Get ready to light up your summer with the perfect Independence Day manicure! Whether you're heading to a backyard BBQ, watching fireworks illuminate the night sky, or just lounging by the pool, 4th of July nails are the ultimate way to show off your festive spirit. From classic red, white, and blue color blocks to dazzling starry designs and glittery explosions, we've rounded up the best patriotic nail art ideas to make your fingertips the star of the show this holiday.
32 Best of All 4th of July Nails
1. Iridescent Galaxy Chrome Ombre
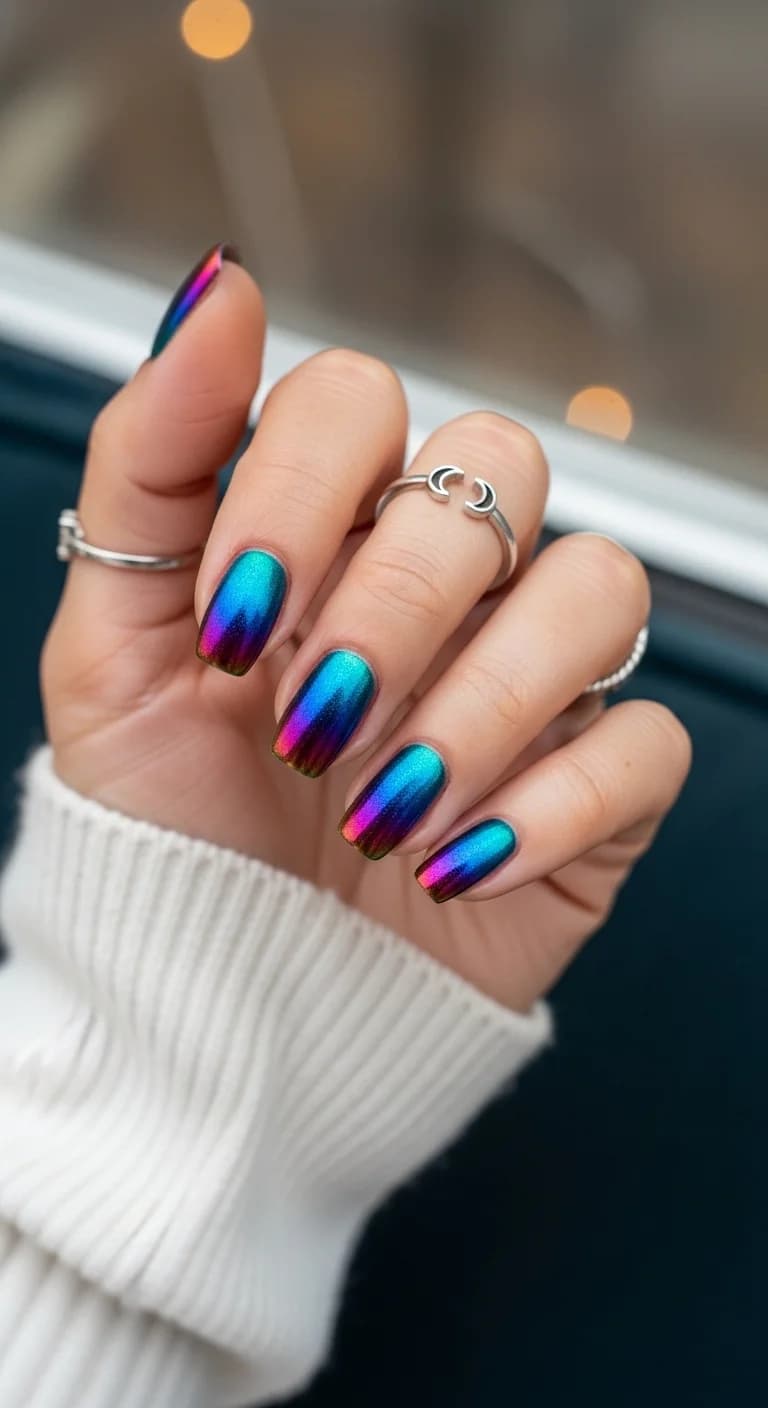
Get ready to mesmerize with this out-of-this-world galaxy chrome ombre! It's like holding a piece of the cosmos right on your fingertips. The colors shift and shimmer with every move, creating a magical, iridescent effect that's totally captivating.
The Design: This design features a stunning chrome finish that blends multiple vibrant colors seamlessly. You'll see a base of deep, inky blue melting into bright, electric teal, then transitioning into a vibrant fuchsia and finishing with a rich, dark reddish-brown at the tips. It's a true chromatic dream!
How to recreate?:
- Start with your favorite nail polish base coat.
- Apply a dark blue or black polish as your base color. This helps the chrome pop!
- Once the base is dry, apply a layer of chrome powder using a sponge or brush. You'll want to buff this all over the nail for that metallic effect.
- Now for the magic: use a makeup sponge or a fine brush to carefully blend the different chrome colors. Start with teal near the cuticle, blend into blue, then pink, and finally the deep red-brown at the tip.
- Seal everything with a good quality gel top coat to lock in that shine and prevent chipping.
Best for: I am absolutely obsessed with this look because it's so unique and eye-catching! It's perfect for anyone who wants to make a statement. Imagine rocking this for a night out, a concert, or even just to add some sparkle to your everyday. It’s like a little bit of magic for your nails that feels so special and fun.


2. Royal Blue & Silver Striped Glam with a Star Accent
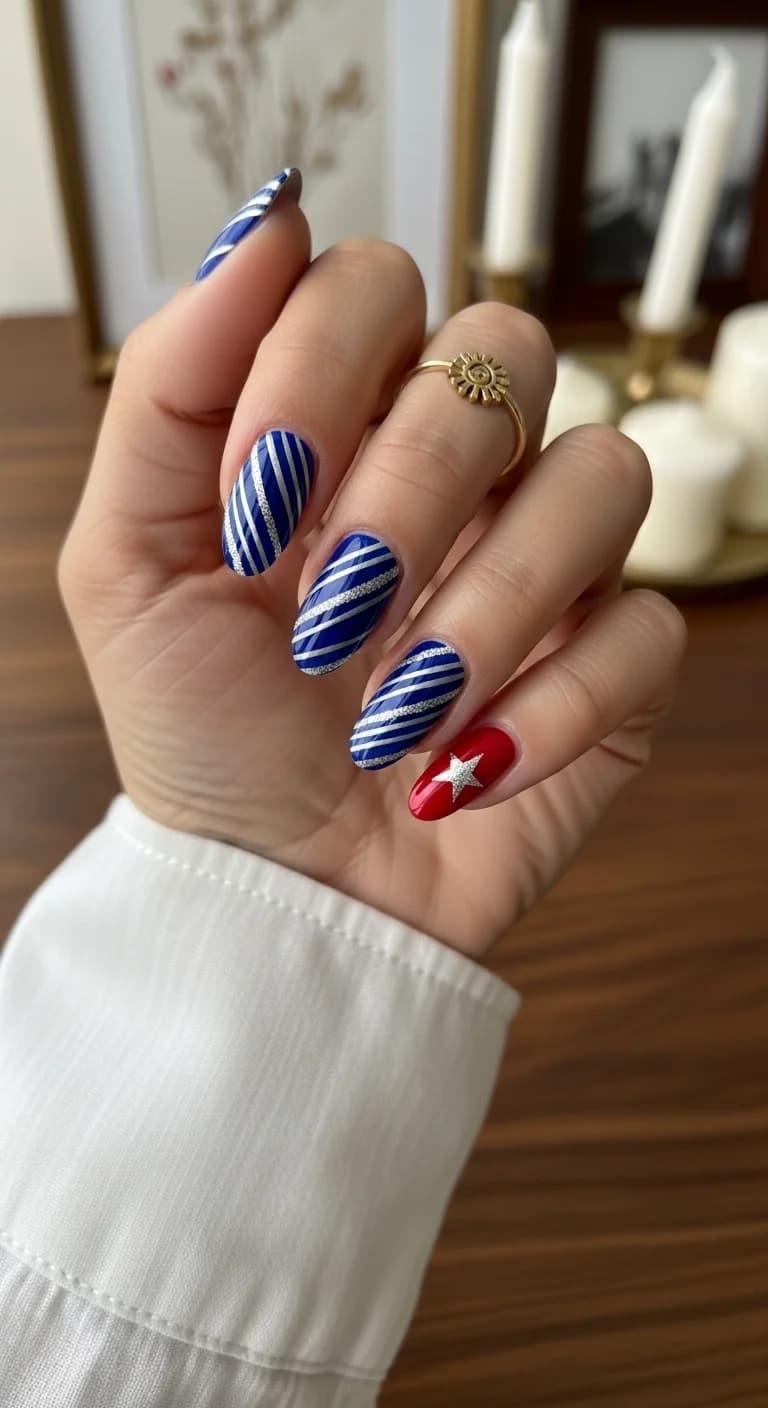
How gorgeous are these nails?! They're like a chic, modern take on a classic patriotic look. The deep royal blue and shiny silver stripes give off such a cool, sophisticated vibe, and that pop of red with the silver star is just perfect.
The Design: We've got a beautiful deep, glossy royal blue as the main color. Then, delicate, shimmering silver lines are painted diagonally across most of the nails, creating a dynamic striped effect. On one nail, it's a bold, glossy red with a sparkling silver star right in the center. It's a mix of glossy finishes that really make the colors and design stand out.
How to recreate?:
- Start with perfectly prepped nails and apply a base coat.
- Paint most of your nails with a rich, glossy royal blue polish.
- On a separate nail, apply a vibrant, glossy red polish.
- Once the blue and red are dry, use a fine-tipped brush or striping tape with a metallic silver polish to create thin, diagonal stripes on the blue nails.
- On the red nail, carefully place or paint a small, detailed silver star.
- Finish everything off with a super shiny top coat to seal the deal and add extra glam!
Best for: Oh my goodness, I am absolutely obsessed with this set! It's perfect for any summer celebration, especially the Fourth of July, but honestly, it's so stylish you could rock it anytime you want a little sparkle. I love how it's festive without being too over-the-top. The diagonal stripes make the nails look so long and elegant, and the contrast between the matte blue and the shiny red with the star is just chef's kiss!
3. Star-Spangled Navy & Silver Swirls

Get ready to shine with this absolutely adorable star-themed manicure! It's got a super fun mix of bold navy blue and shimmery silver, all covered in cute stars. I love how it feels festive and chic at the same time.
The Design: The main color is a deep, glossy navy blue. Scattered across most of the nails are crisp white stars, really making them pop! Then, on some nails, you'll see a fun twist with silver stars on a lighter, almost iridescent blue background. It gives off a cool, shimmery vibe.
How to recreate?:
- Start with a base coat, then apply two coats of a vibrant, glossy navy blue polish to all your nails.
- Once the navy is dry, it's time for the stars! You can use white star nail stickers or a fine white polish with a dotting tool to create the stars on most of your nails.
- For the accent nails, apply a light blue polish with a shimmery or iridescent finish.
- Then, use silver star nail stickers or carefully paint silver stars onto the shimmery blue base.
- Finish everything off with a good top coat to seal in the design and add extra shine!
Best for: This design is just perfect for any patriotic celebration, like the Fourth of July or Memorial Day! But honestly, I think it's so cute you could wear it anytime you want to add a little sparkle and fun to your day. I'm obsessed because it's playful, super easy to recreate, and those stars just make me happy!


4. Blue Gingham & Silver Stripe Summer Vibes
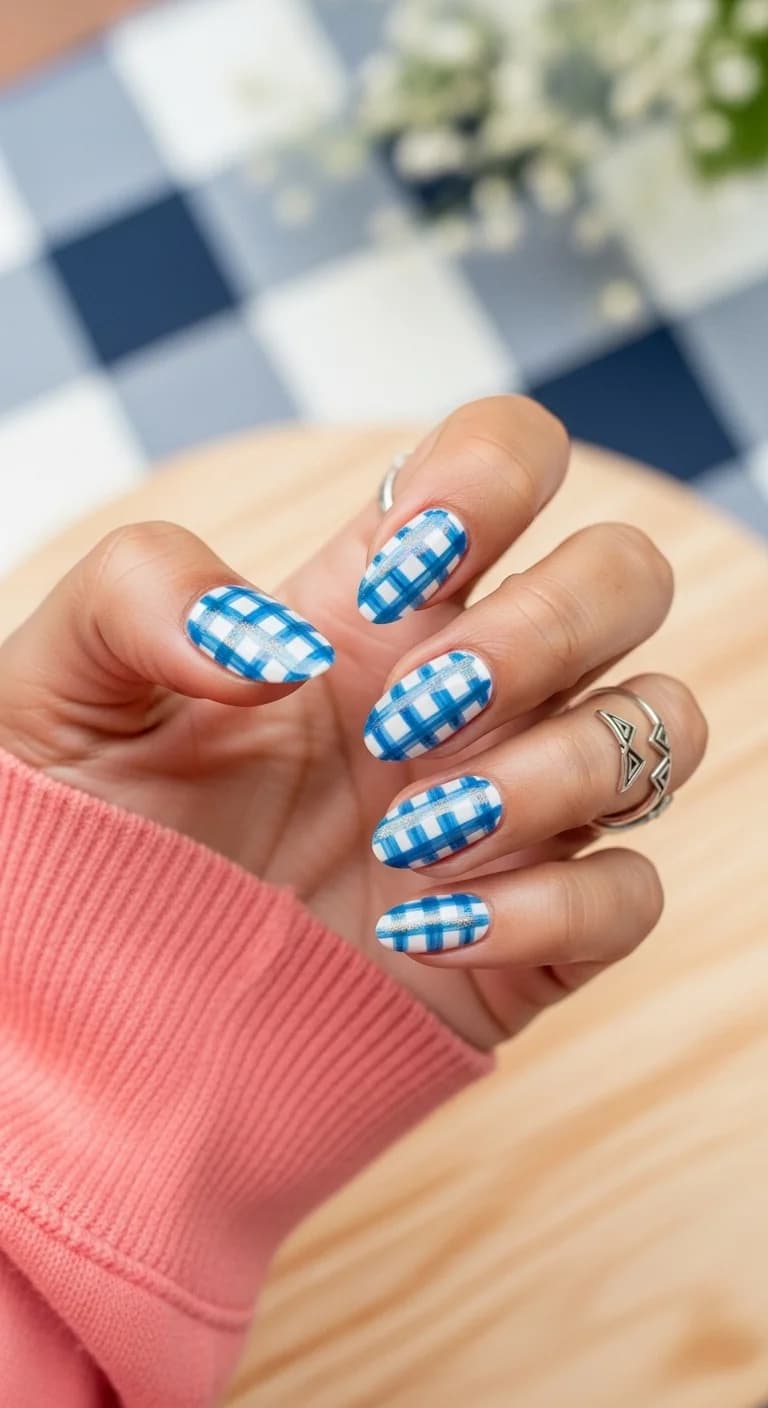
How cute are these nails?! They totally give off picnic-in-the-park vibes with that adorable blue gingham pattern. I love how it feels so fresh and playful, perfect for sunny days.
The Design: The base is a clean, crisp white polish. Then, we have this super cute blue gingham design painted on top. It looks like hand-painted lines, giving it a sweet, slightly imperfect charm. To add a little sparkle, there's a thin, shimmery silver stripe running horizontally across some of the nails. It's just enough to catch the light without being over the top.
How to recreate?:
- Start with a clean white base coat on all your nails.
- Once that's dry, use a thin brush and a bright blue polish to paint thin horizontal lines across your nails.
- Next, paint thin vertical blue lines, crossing over the horizontal ones, to create the gingham pattern. Don't worry about making it perfectly straight; a little handmade look is part of the charm!
- On some nails, carefully add a super thin line of silver glitter polish either horizontally or vertically over the blue lines.
- Finish with a glossy top coat to seal everything in and make it shine.
Best for: I am absolutely obsessed with this look because it's so cheerful and summery! It's the perfect nail art for a picnic, a BBQ, or just any casual outdoor get-together. It also reminds me of cute country vibes and has that perfect pop of blue. Honestly, it's just pure fun for your fingertips!
5. Vibrant Blue French Tips with Sparkling Gems
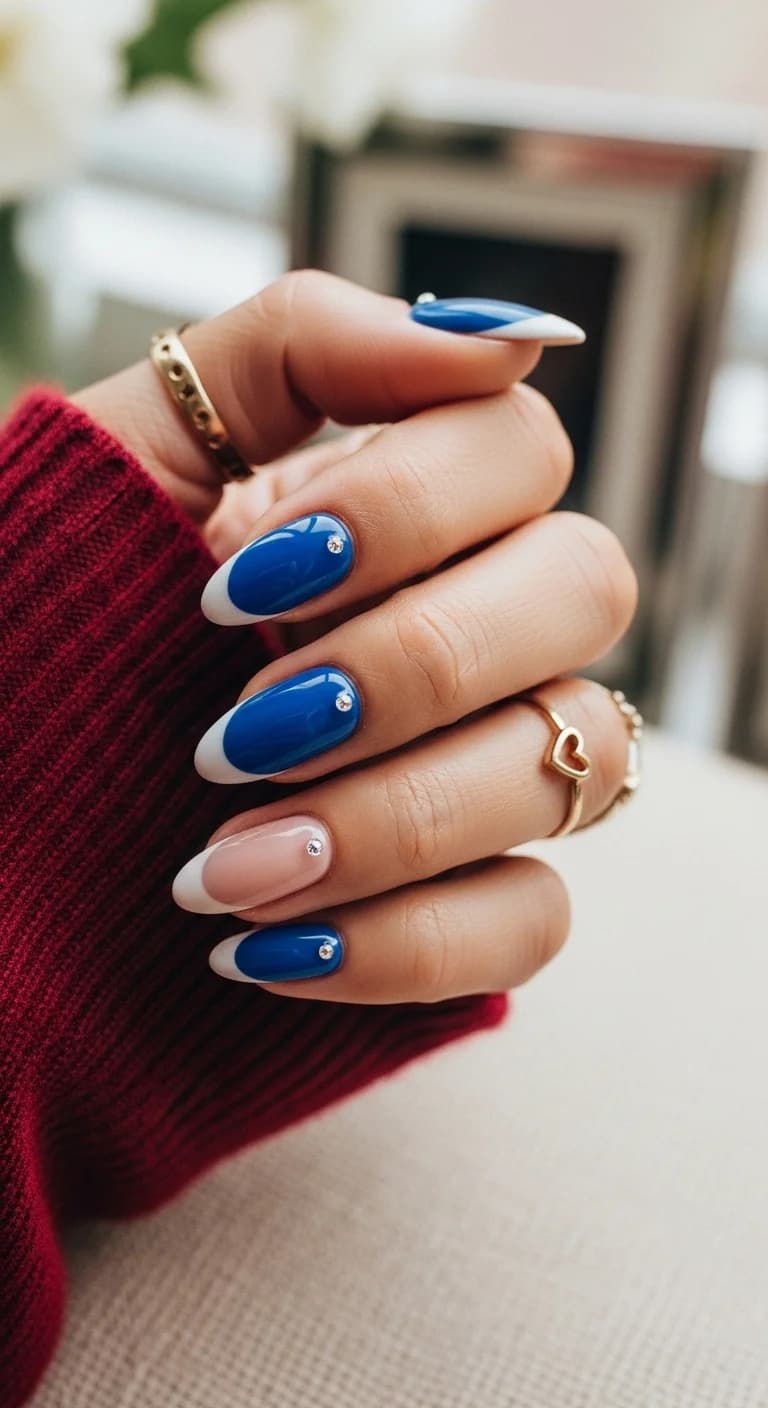
This nail look is a total showstopper! It’s a super fresh take on the classic French manicure, swapping out the usual white for a bold, bright blue. It feels so chic and modern, like a little pop of summer fun on your fingertips.
The Design: We’ve got this amazing, deep cobalt blue color on the tips of the nails. It’s a glossy finish that really makes the color pop. Then, there’s a crisp white line separating the blue from the natural base of the nail, which is a sheer, milky pink. To add some extra sparkle, there are tiny, clear rhinestones placed right in the middle of the blue tips on a few of the nails. It’s just enough bling to catch the light!
How to recreate?:
- Start with your favorite sheer pink or nude base coat and apply it to your entire nail.
- Once that's dry, carefully paint a sharp, defined French tip using a vibrant, glossy blue polish.
- Add a thin, clean white line right where the blue tip meets the pink base.
- On some of your nails, pick up a tiny rhinestone with a wax pencil or detail brush.
- Gently place the rhinestone in the center of the blue tip and secure it with a dot of top coat.
- Finish everything off with a generous layer of glossy top coat to seal the deal and make them shine!
Best for: Honestly, I am obsessed with this design because it’s so unexpected and fun! It’s perfect for anyone who loves a classic French but wants to inject some personality and color. I think these would be amazing for a summer party, a vacation, or even just to brighten up your everyday look. The blue is so vibrant, and the little gems just add that perfect touch of glam. You'll feel so put-together and stylish!


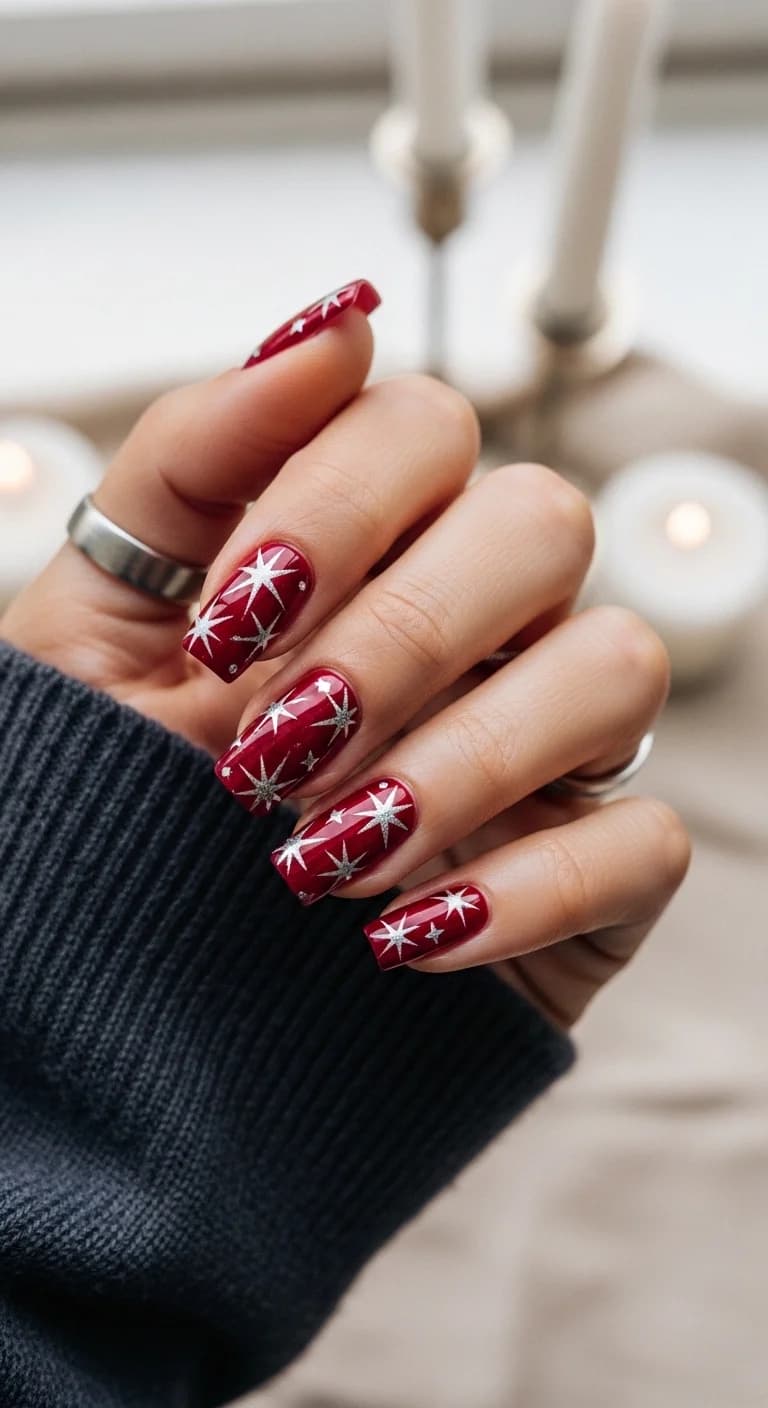
6. Deep Red Constellation Gloss

These nails are like a little piece of the night sky you can wear! I'm obsessed with the deep red base that looks so rich and shiny, almost like a gemstone. Then, you have these delicate silver lines and tiny stars connecting to form constellations. It feels so magical and chic, like you're carrying a secret starry map with you.
The Design: The base color is a stunning, glossy deep red. It has a beautiful shine that makes the nails look super polished. On top of this rich red, there are intricate designs of constellations drawn in a bright, shimmering silver. These aren't just random stars; they're connected with thin silver lines to create actual star patterns. There are also a few scattered tiny silver stars and some subtle silver glitter mixed in, adding even more sparkle and depth.
How to recreate?:
- First, I'd prep my nails and apply a few coats of a gorgeous, glossy deep red nail polish. Let it dry completely!
- Next, I'd grab some silver nail art polish or a fine silver paint. You can also use silver sticker decals if drawing isn't your thing.
- Carefully draw thin silver lines connecting dots to create constellation patterns on each nail. Think about real constellations or just make up your own magical star maps!
- Add tiny silver dots for the stars within your constellations. Some nails might have larger stars or just a few scattered smaller ones.
- For extra twinkle, I'd add a touch of fine silver glitter polish or loose glitter over some of the red areas, especially around the constellations.
- Finally, seal everything with a super shiny top coat to lock in that gloss and sparkle. Let it dry, and you're ready to shine!
Best for: Oh my gosh, these are perfect for literally anytime you want to feel a bit mystical and elegant! I love them for a fancy dinner, a night out with friends, or even just a cozy evening in when you want to feel special. They'd be amazing for a celestial-themed party or any event where you want your nails to be a total conversation starter. I'm personally obsessed because the deep red is so luxurious, and the silver constellations add that perfect touch of magic without being over the top. It's sophisticated and playful all at once!
7. Classic Red Oval with Dazzling Rhinestone Accent Nail

I am absolutely obsessed with this look! It's a super chic and classic manicure that brings all the glamour. You get this stunning, vibrant red on most of your nails, and then one nail is totally covered in sparkly rhinestones for that extra pop. It’s like a party on your fingertip!
The Design: We're working with a beautiful, glossy cherry red polish on oval-shaped nails. It has that perfect shiny finish that just screams luxury. Then, on one accent nail, it looks like a bed of tiny clear rhinestones was applied, and some bigger sparkly gems are scattered over the top. The contrast between the solid red and the blingy accent nail is what makes it so special.
How to recreate?:
- First, get your nails into that perfect oval shape. It's such a flattering shape!
- Apply a base coat to protect your nails, and then paint on two coats of your favorite glossy cherry red polish. Let each coat dry completely.
- For the accent nail, I'd suggest applying a thin layer of nail glue or a clear top coat where you want the rhinestones to stick.
- Now for the fun part! Carefully place tiny clear rhinestones all over the glued area, packing them in nicely.
- Once that's done, strategically add a few larger, sparkly gems on top of the smaller ones. Think of it like creating a little cluster of diamonds!
- Finish everything off with a good quality top coat, making sure to cap the edges to seal in all that sparkle. Be careful not to flood the rhinestones with too much top coat, or you might lose some shine.
Best for: This manicure is perfect for literally any occasion where you want to feel a little extra special! It's amazing for holiday parties, date nights, or even just if you want to add some sparkle to your everyday. I personally love it because it's elegant and eye-catching without being too over-the-top. The classic red is always a winner, and the bling just takes it to the next level!


8. Sparkling Cherry Red Starry Night
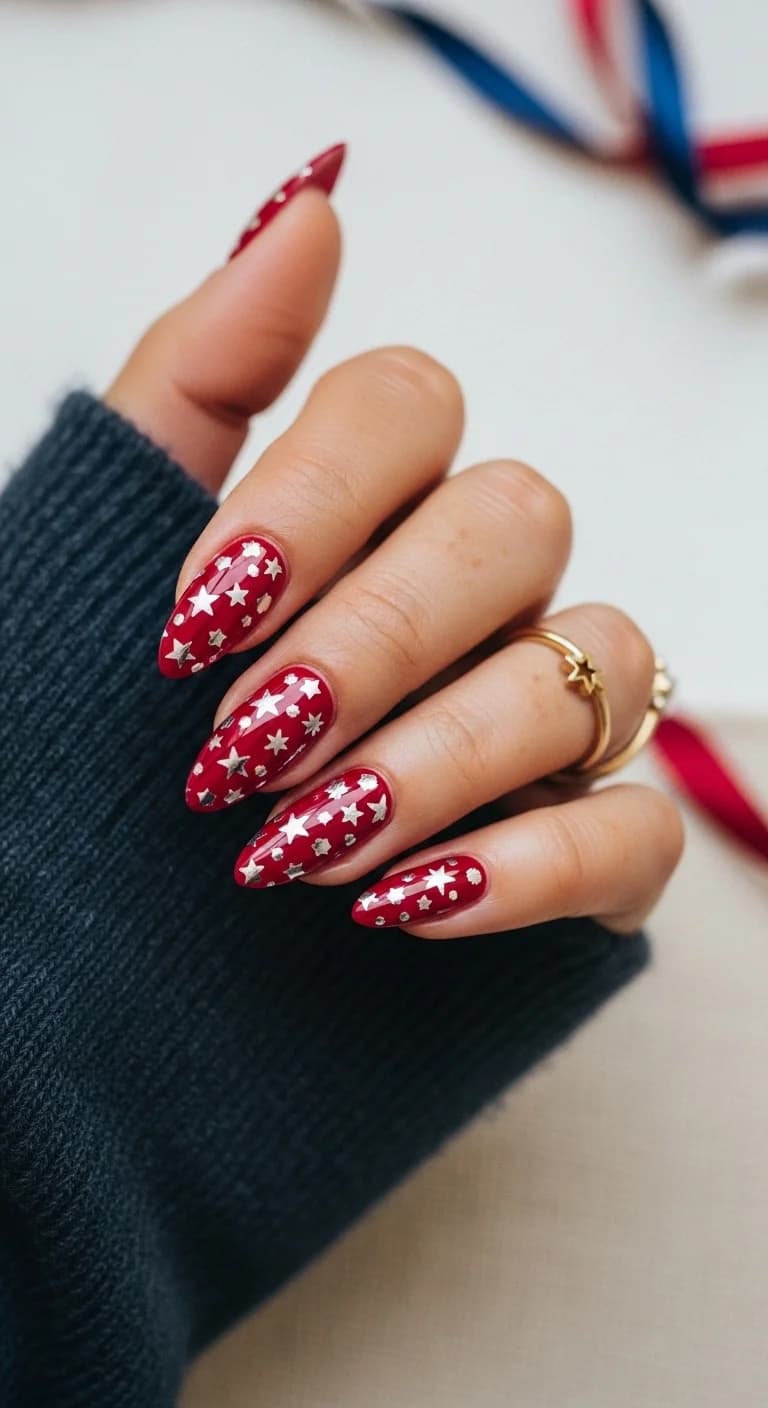
Get ready to shine with this dazzling cherry red nail design, covered in tiny silver stars! It's like a party on your fingertips, super festive and oh-so-fun. I love how the glossy red just makes those little stars pop!
The Design: This look features a vibrant, glossy cherry red polish as the base. All over the nails, you'll find scattered silver star embellishments. Some stars are small and delicate, while others are a bit larger, adding a playful mix. It gives off a super celebratory and sparkly vibe.
How to recreate?:
- Start with clean, prepped nails.
- Apply a glossy cherry red nail polish and let it dry completely. You might need two coats for a solid color.
- Using tweezers, carefully pick up tiny silver star nail studs.
- Apply a tiny dot of nail glue or use a bit of top coat on the nail where you want to place a star.
- Gently press the star onto the nail.
- Repeat this process, scattering stars all over each nail. Mix up the sizes for a dynamic look!
- Once all the stars are in place and the glue is dry, finish with a generous layer of glossy top coat to seal everything and make it super shiny.
Best for: This design is an absolute dream for any Fourth of July celebration, a summer party, or whenever you just want to feel a little extra sparkly! I'm totally obsessed because it’s festive without being too over-the-top, and it brings such a fun, playful energy to any outfit. Plus, who doesn't love a starry night vibe?
9. Classic Red & Silver Glitter Ombre
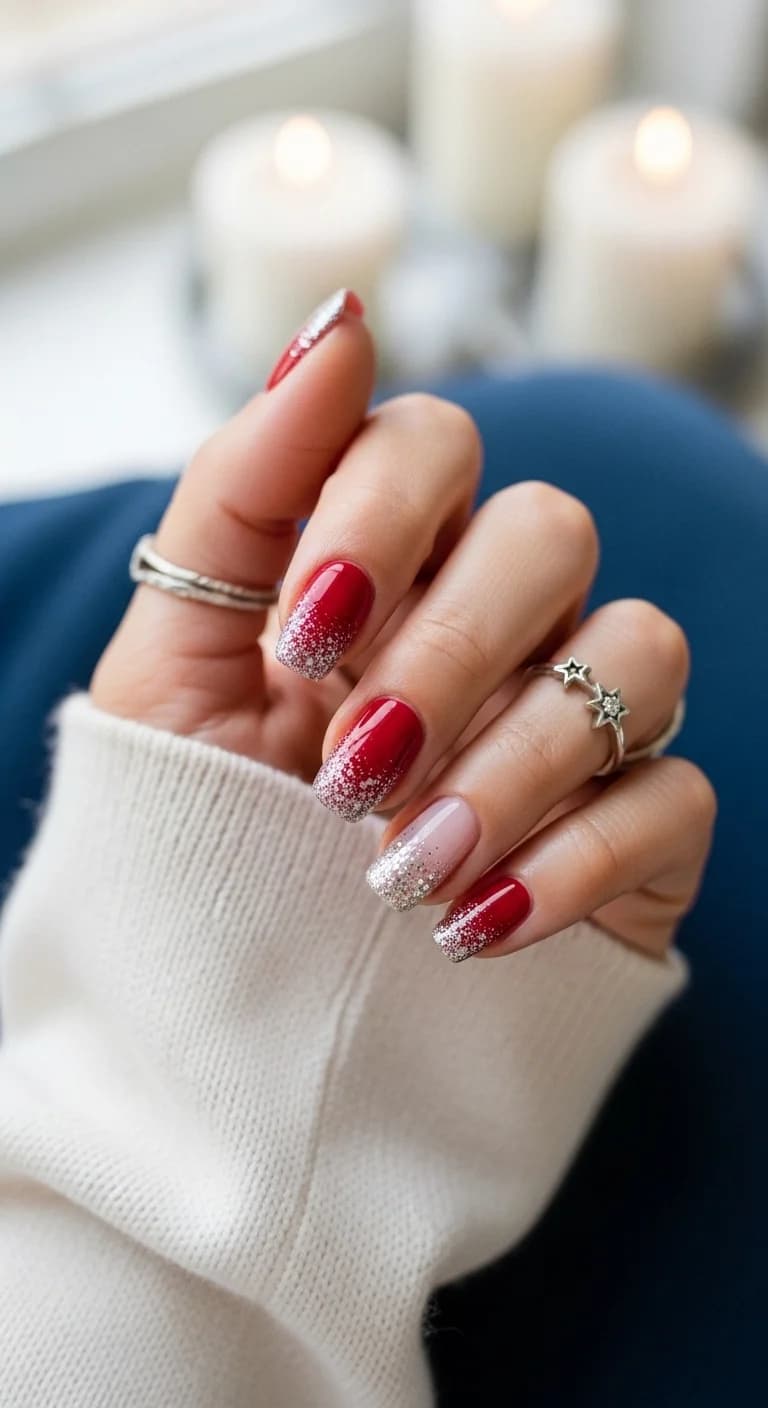
Get ready for some serious sparkle! This design features a gorgeous gradient of shiny red blending into dazzling silver glitter. It's a super festive look that screams celebration and fun.
The Design: The main color is a vibrant, glossy red on most of the nails. The magic happens at the tips where it smoothly transitions into a bed of chunky silver glitter. Some nails have a soft pink base that also fades into the silver glitter, adding a touch of subtlety.
How to recreate?:
- Start with a base coat and let it dry.
- Paint most of your nails with a bright, glossy red polish.
- On the tips, apply a chunky silver glitter polish. You can dab it on with the brush to create a gradient effect, or use a sponge for a softer blend.
- For a more natural look on some nails, start with a sheer pink polish, then apply the silver glitter gradient to the tips.
- Finish with a clear top coat to seal everything in and make it super shiny!
Best for: I am absolutely obsessed with this design because it's so classic yet totally glam! It's perfect for New Year's Eve, a holiday party, or any time you want to feel extra special. The red and silver combo is just timeless and always looks amazing.


10. Sparkling Red, White & Blue Ombre Glitter

Get ready to shine bright with this super fun and festive nail design! It's a gorgeous ombre glitter look that screams celebration, especially for the Fourth of July. I love how the glitter fades from tip to cuticle, giving it that perfect pop.
The Design: This design features a beautiful blend of patriotic colors. On some nails, you'll see a gradient of glitter that goes from a deep red at the tip, fading into a lighter red, and then a sparkly white towards the base. On other nails, the gradient shifts from a vibrant blue at the tip to a sparkly white. The base color on all nails is a sheer, milky white, and the glitter is super fine, giving it a dazzling, almost frosty finish.
How to recreate?:
- Start with a clean base and apply a milky white polish to all your nails.
- For the red ombre nails, take a fine red glitter polish and apply it densely at the tip of your nail. Gently blend it upwards towards the middle of your nail, creating a soft fade.
- For the blue ombre nails, do the same thing but with a fine blue glitter polish at the tip, fading it up towards the middle.
- You can add a touch more fine white glitter all over the nail if you want extra sparkle!
- Once dry, seal the deal with a glossy top coat to lock in all that glittery goodness.
Best for: This design is absolutely perfect for any Fourth of July celebration, summer parties, or any event where you want to show off some patriotic spirit with a touch of glam! I am totally obsessed with how playful and eye-catching it is. It’s festive without being too over-the-top, and the glitter just makes everything feel so special!
11. Chrome French Tips with a Fiery Red Star Accent
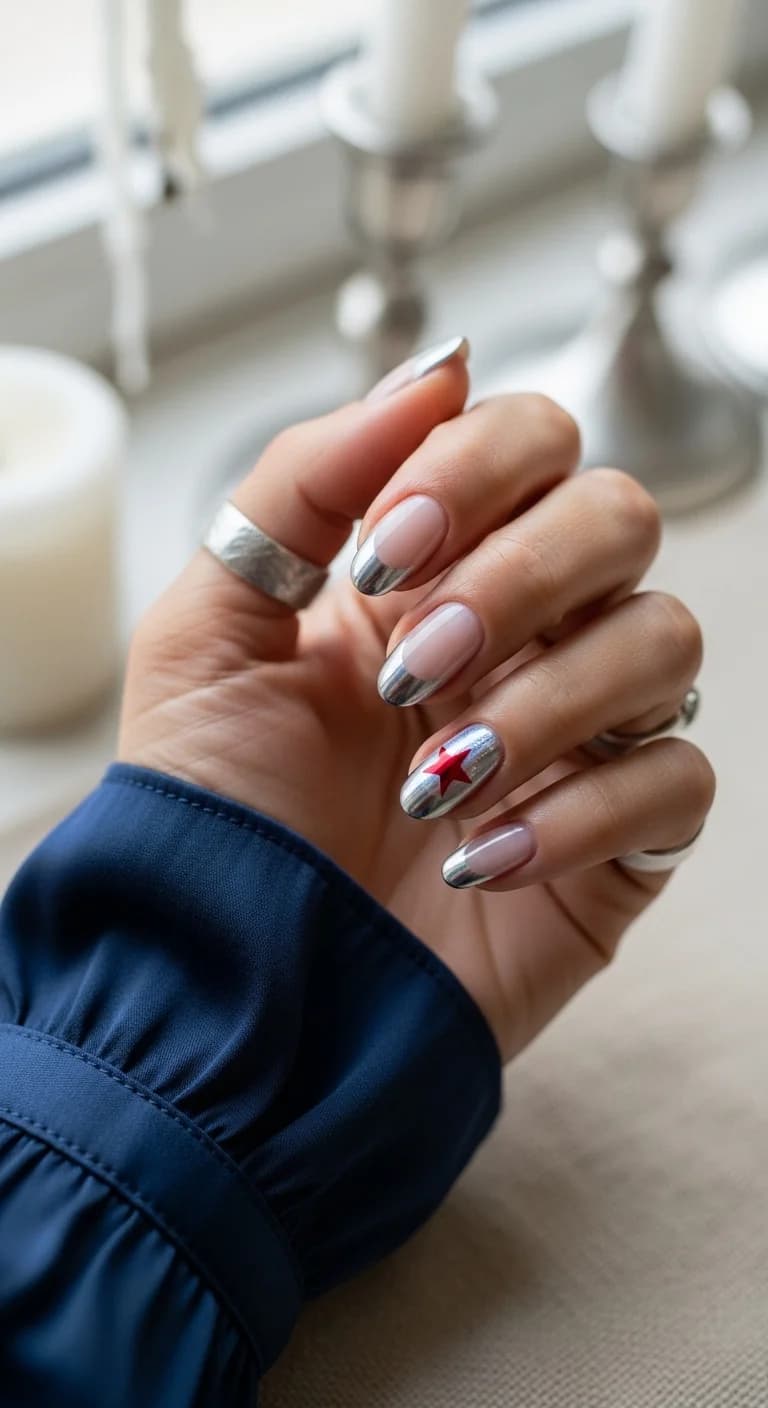
I am absolutely loving this twist on the classic French manicure! It takes the elegant French tip and gives it a seriously cool, futuristic edge with a high-shine chrome finish. Plus, that single red star on one nail adds just the right amount of pop and personality. It feels super chic and a little bit edgy all at once!
The Design: For this look, we're starting with a sheer, nude pink base on all the nails. Then, instead of a white tip, we're using a bright, reflective silver chrome for that stunning French tip effect. The magic really happens on one accent nail, which is fully covered in the same reflective silver chrome. To finish it off, a bold, glossy red star is placed right in the center of that chrome accent nail. It's a mix of sleek metallics and a vibrant focal point.
How to recreate?:
- Start by applying a sheer nude or pink polish to all your nails and let it dry completely.
- Next, you'll want to create those sharp French tips. You can use a fine brush and a silver chrome powder (applied over a sticky top coat or gel) or a metallic silver polish to carefully paint a curve along the free edge of each nail.
- For the accent nail, paint the entire nail with a full coat of the silver chrome polish or powder, making sure it's super reflective.
- Once the chrome is dry, grab a small detail brush or a dotting tool.
- Dip it into a vibrant red polish and carefully paint or stamp a perfect star right in the middle of your chrome accent nail.
- Finish everything off with a good quality top coat to seal in the design and add extra shine!
Best for: Oh, this manicure is perfect for anyone who wants to stand out just a little bit! I adore it because it's a fresh take on a timeless style. It's definitely a showstopper for parties, holidays like the Fourth of July (hello, star!), or even just a night out. The chrome is so eye-catching, and the simple red star gives it just enough playful energy. It’s super versatile and looks amazing when you want something polished but with a fun surprise element.


12. Deep Navy Glossy Nails with Silver Concentric Circles

These nails are a total showstopper with a super glossy, deep navy blue base. They're decorated with a cool, eye-catching design of silver concentric circles that really pop!
The Design: The main color is a rich, glossy navy blue. The art is done in a bright silver, creating a series of perfect circles that get smaller as they go towards the center of the nail. It’s a clean and modern look with a high-shine finish.
How to recreate?:
- Start with perfectly prepped nails and apply a base coat.
- Paint each nail with two coats of your favorite deep navy blue polish. Make sure it's fully dry.
- Using a thin brush or striping tape and a shiny silver polish, carefully create the concentric circle design on each nail. You can freehand them or use guides for super straight lines.
- Add a layer of top coat to seal everything in and give that amazing glossy finish. Let it dry completely!
Best for: I am completely obsessed with this design because it’s so chic and sophisticated! It’s perfect for any occasion where you want to feel a bit fancy, like a dinner date, a party, or even just a day when you want to add some sparkle to your routine. The navy and silver combo is timeless and always looks amazing.
13. Sparkling Star-Spangled American Dream
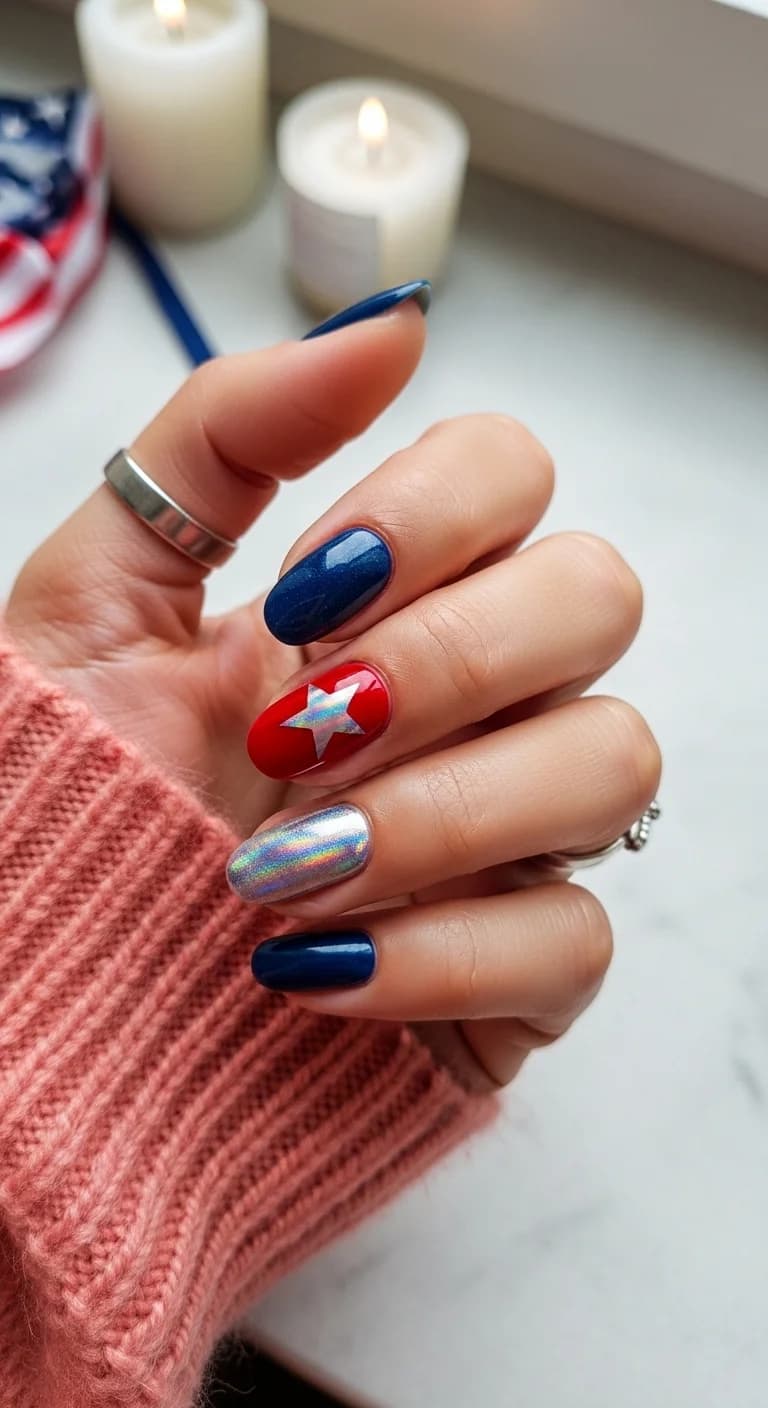
Get ready to celebrate in style with this dazzling Fourth of July-inspired manicure! It’s a playful mix of classic Americana with a modern, sparkly twist. Think bold colors and eye-catching shine that screams festive fun.
The Design: This design features a mix of finishes and bold colors. We have a deep, shimmery navy blue on some nails that catches the light beautifully. Then, there’s a bright, glossy red nail with a holographic silver star right in the center – how cool is that? And to top it off, a totally mesmerizing holographic silver nail that reflects all the colors of the rainbow!
How to recreate?:
- Start with clean, prepped nails.
- Apply two coats of the shimmery navy blue polish to your accent nails and paint your ring finger the glossy red.
- On the ring finger, carefully place or paint a holographic silver star in the middle.
- For the other accent nail, apply two coats of the holographic silver polish, making sure to get full, even coverage.
- Finish all nails with a shiny top coat to seal the deal and add extra sparkle!
Best for: I am absolutely obsessed with this look because it’s the perfect blend of festive and chic! It’s ideal for any Fourth of July celebration, from backyard BBQs to fireworks displays. The holographic elements add such a fun, modern vibe, and I love how it captures the spirit of the holiday with those iconic colors and the star detail. You'll definitely be the star of the party with these on!


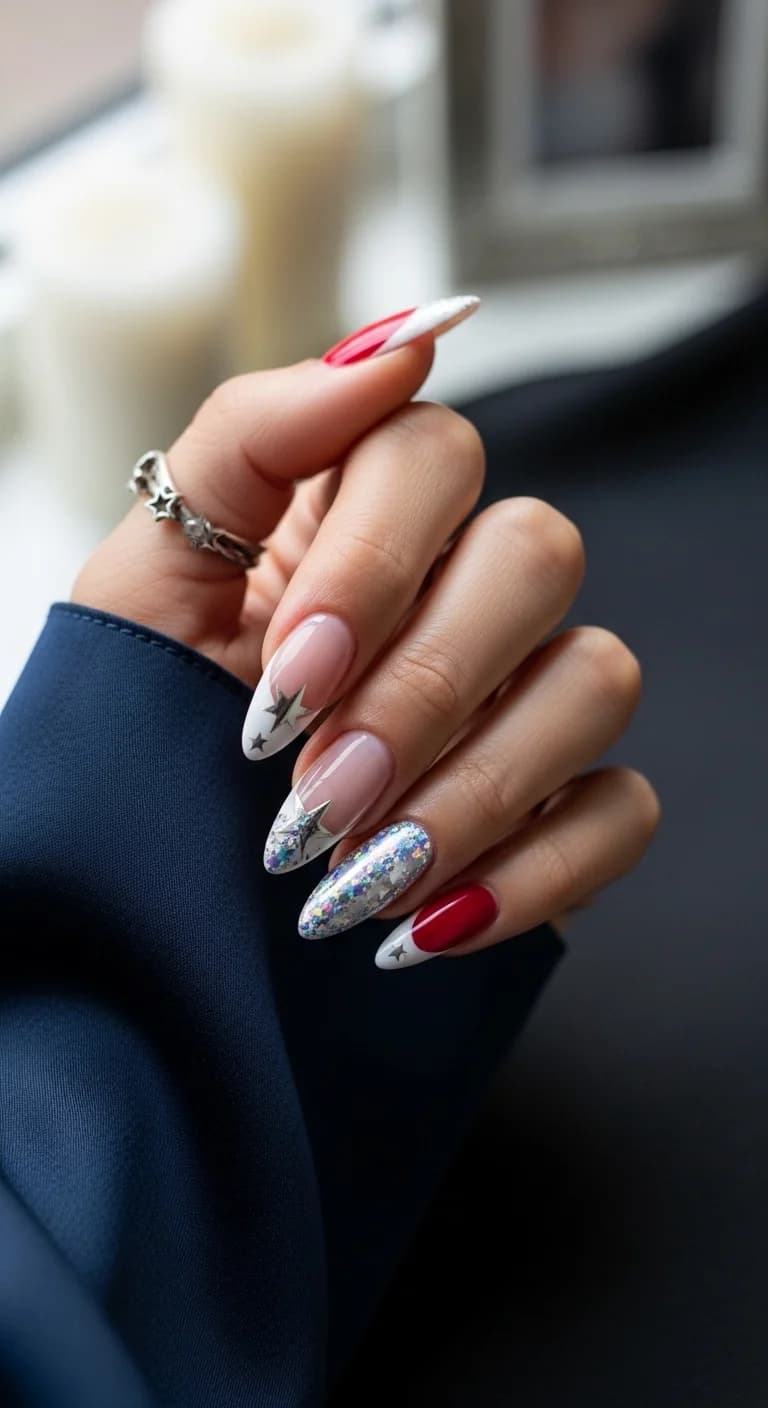
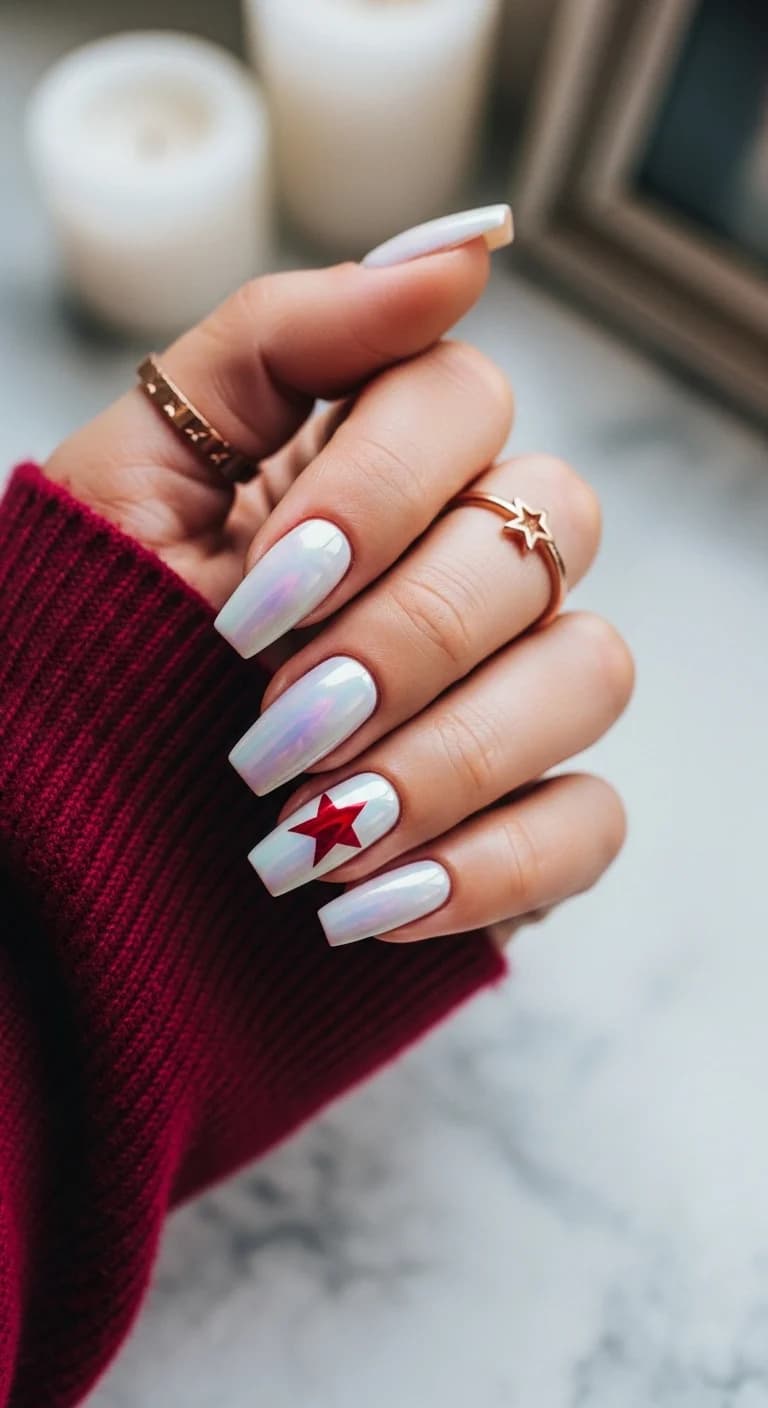
14. Iridescent White Chrome with a Red Star Accent
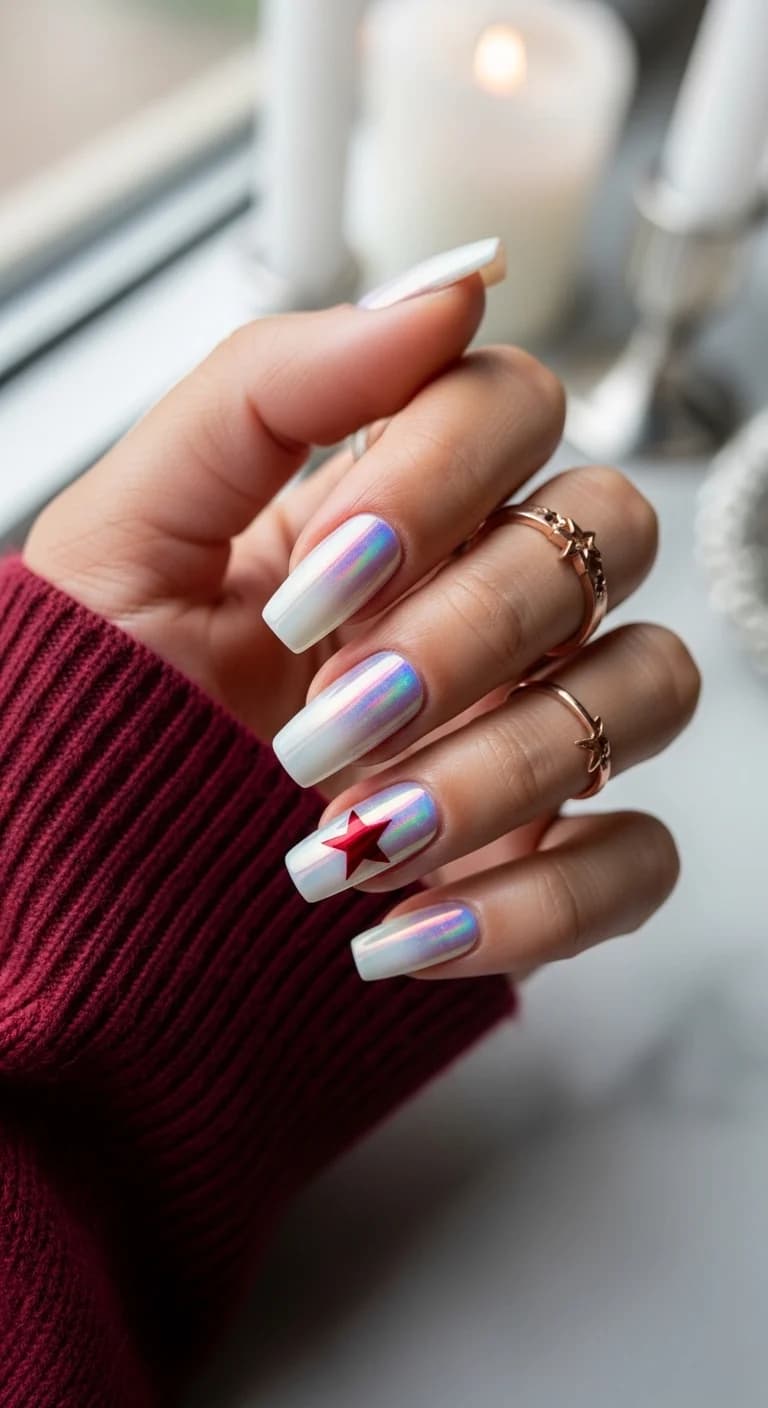
Get ready for nails that shimmer and shine like nothing you've ever seen! This look is all about a dreamy, iridescent white base that catches the light with every color. Then, we add a bold pop of red with a cute star on one nail. It's super fresh and totally eye-catching!
The Design: We're starting with a classic white polish, but here's the magic: we're applying an iridescent chrome powder over the top. This gives each nail this amazing, pearly sheen that shifts between pink, blue, and purple as you move. Then, on one accent nail, we're adding a bright, shiny red star. It's a simple detail, but it makes a huge statement!
How to recreate?:
- First, prep your nails and apply a base coat.
- Paint all your nails with a clean white polish. Make sure it's fully dry.
- Apply a no-wipe top coat over the white polish and cure it under your UV/LED lamp.
- Now for the fun part! Gently rub iridescent chrome powder all over the sticky top coat. Buff it in until you get that beautiful, shimmery effect.
- Wipe away any excess powder.
- On your chosen accent nail, carefully place a red star sticker or apply red polish to freehand a star. Make sure it's centered and looks perfect!
- Apply a top coat over all your nails to seal everything in, making sure to cap the edges.
- Cure one last time and you're done!
Best for: I am totally obsessed with this mani because it's like wearing a rainbow cloud! It's perfect for any time you want to feel a little magical and stand out. Think summer festivals, Fourth of July parties (hello, red star!), or just whenever you need a serious mood boost. It's subtle yet super glam, and I just love how the iridescent finish makes every other color pop!
15. Sparkling Cherry Red Ombre Glitter
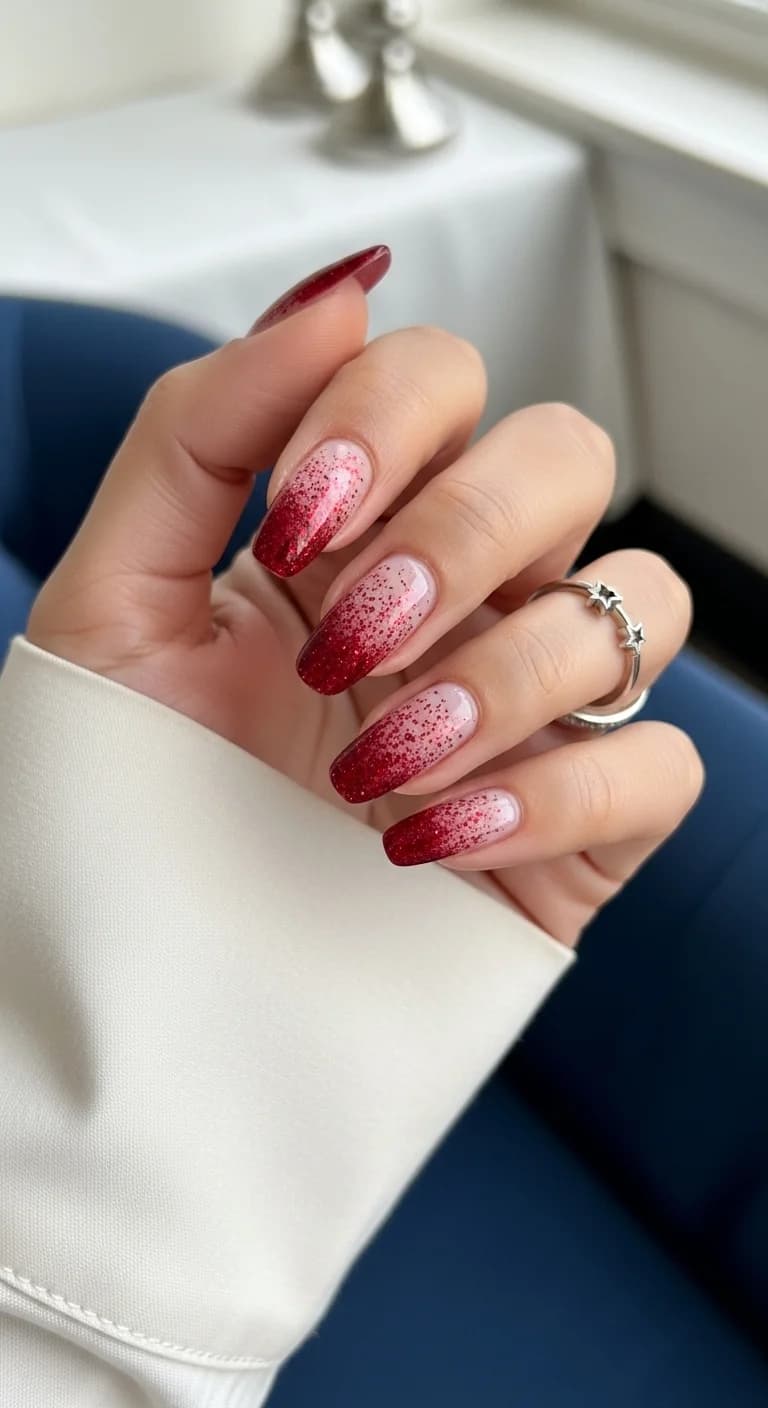
Get ready to shine with this absolutely dazzling cherry red glitter ombre! It's like a party on your fingertips, starting with a soft, natural look at the base and bursting into full-on sparkle towards the tips. This design screams festive and fun, perfect for when you want your nails to be the main event.
The Design: This look features a beautiful gradient, or ombre, effect. The nails start with a sheer, natural pinkish base color that fades seamlessly. As you move towards the free edge of the nail, the color transitions into a vibrant, deep cherry red, packed with fine glitter. The glitter is densest at the tips and gets lighter as it blends into the base, creating a stunning sparkly fade.
How to recreate?:
- Start with a clean, prepped nail and apply a sheer pink or nude base coat. Let it dry completely.
- Next, grab a bright cherry red polish with a good amount of fine glitter. You can use a sponge or a brush to create the ombre effect.
- Gently dab the glitter polish onto the tips of your nails, building up the color and sparkle. Blend downwards towards the cuticle, creating a gradient effect where the glitter becomes less dense.
- You might need a couple of layers to get the intensity you like. Make sure each layer is dry before adding the next.
- Once you're happy with the ombre, seal the whole look with a glossy top coat for extra shine and to smooth out any texture from the glitter.
Best for: I am completely obsessed with this design because it's so glamorous and festive without being over the top! It's the perfect manicure for holidays, parties, or just anytime you want to feel extra special. The cherry red is such a classic color, and adding that glitter ombre just takes it to a whole new level of fabulous. It’s a showstopper that’s surprisingly easy to recreate at home!


16. Red, White, and Blue Watercolor Swirls with Glitter
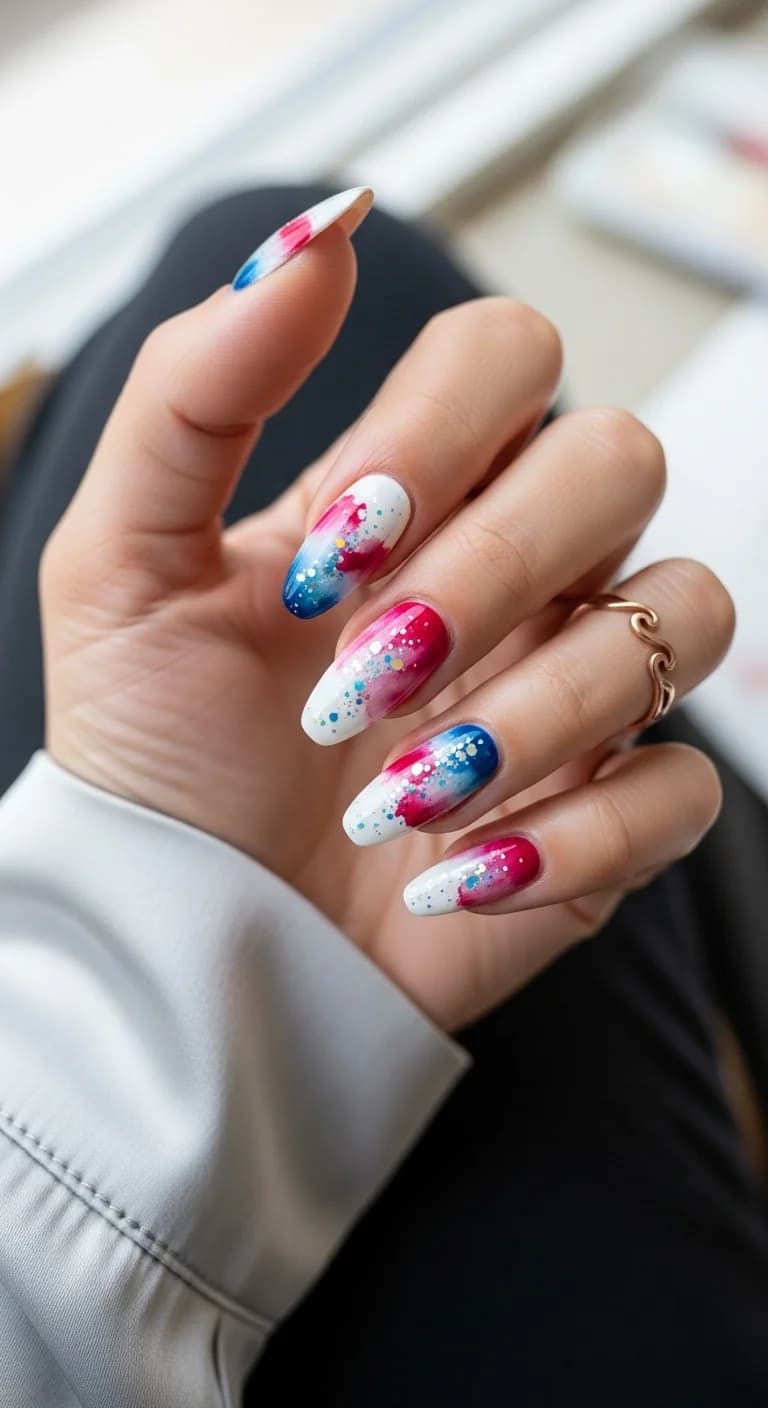
I am absolutely obsessed with this dreamy watercolor design! It captures that free-spirited, celebratory vibe with its blend of bold colors and sparkling glitter. It feels like a perfect mix of artistic flair and festive fun, and I can't get enough of how soft and blended the colors look together.
The Design: This design features a white base on most of the nails. Then, vibrant streaks of bright red and deep blue are painted on, creating a watercolor effect that blends softly into the white. Some nails also have a splash of pinkish-red for extra dimension. To make it pop, a generous amount of fine, iridescent glitter is sprinkled over the colored areas, adding a lovely shimmer. The finish is glossy and smooth, letting the artwork shine.
How to recreate?:
- Start with a clean, white base coat on all your nails. This will make the colors really stand out!
- Next, grab your red and blue polishes. I like to use a thin brush or even a makeup sponge to dab and blend the colors onto the white base. Think soft, swooshy strokes, letting the colors bleed into each other like a watercolor painting.
- Don't be afraid to add a little pinkish-red in there too, just to give it some extra depth and interest, like I did on some of the nails.
- While the color is still a little wet, gently sprinkle on some fine glitter. You want to catch those colorful areas to really make them sparkle!
- Once everything is dry, seal it all in with a super glossy top coat. This makes the colors look even more vibrant and keeps your masterpiece looking fresh!
Best for: Oh my goodness, this is the ultimate Fourth of July manicure, don't you think? It's perfect for any summer celebration, especially barbecues, fireworks displays, or any time you want to feel a little extra festive and fun. I personally love it because it’s artistic without being too complicated to recreate, and that watercolor effect just makes my heart sing! It’s so unique and playful.
17. Sparkling Midnight Firework Tips
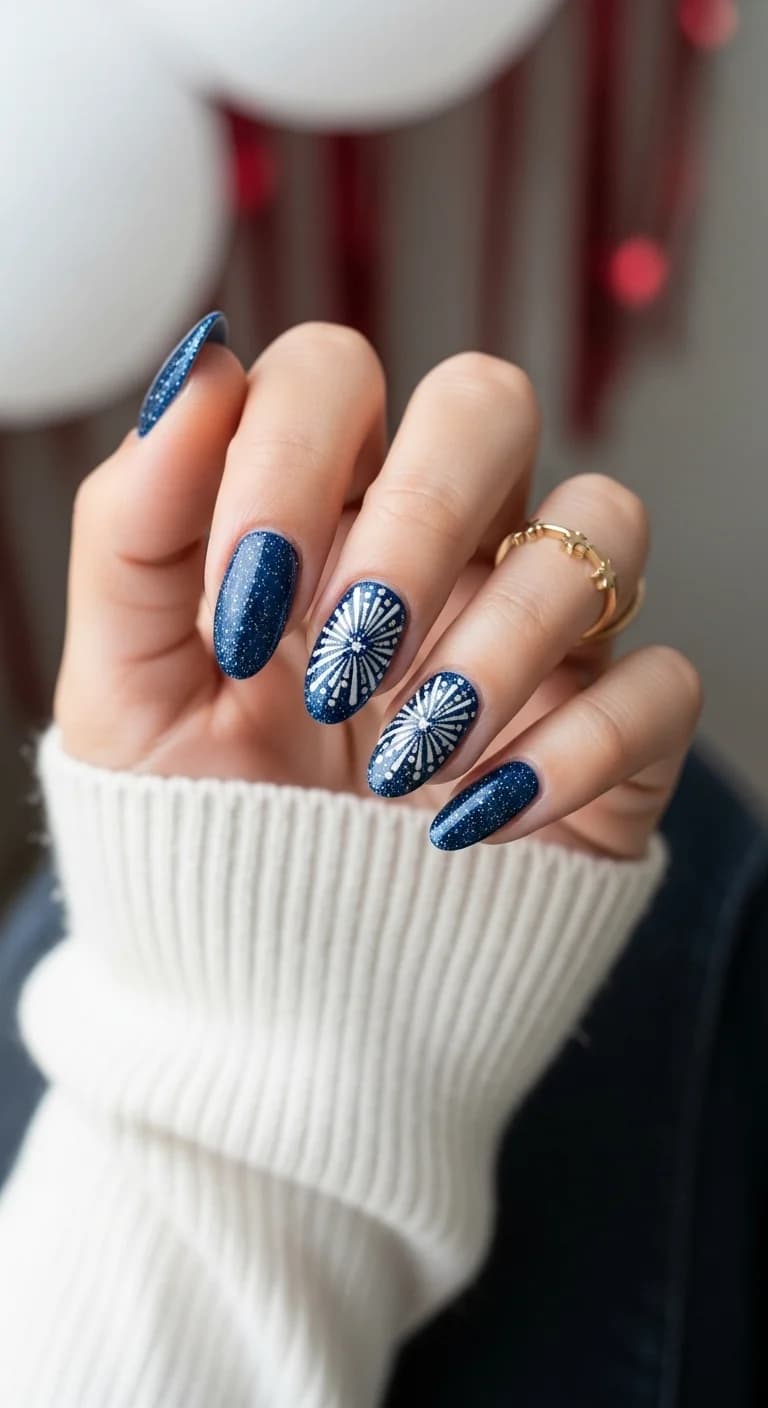
These nails are like a mini fireworks show on your fingertips! The deep sparkly blue base is so rich and reminds me of a clear night sky, perfect for setting the stage. Then, BAM! White firework bursts explode from the tips, creating such a fun and festive look.
The Design: The main color is a gorgeous, deep navy blue with a super fine glitter that catches the light beautifully, giving it a starry, cosmic feel. On accent nails, there's a bright white design that looks just like a bursting firework. It has thin lines radiating out from a central point, with little white dots scattered around, adding to the explosive effect. The finish is glossy and smooth, making everything pop.
How to recreate?:
- First, I’d paint all your nails with two coats of that amazing deep sparkly navy blue polish. Make sure it's fully dry!
- Now for the fun part! On your accent nails, use a fine brush or a dotting tool with bright white polish.
- Start by making a tiny dot in the center of the nail, towards the tip.
- Then, draw thin, straight lines radiating outwards from that center dot, like spokes on a wheel, to create the firework shape.
- Add small white dots around the lines to make it look like the firework is really bursting!
- Finally, seal everything with a super glossy top coat to lock in the sparkle and the design. You're ready to shine!
Best for: Oh my gosh, I am obsessed with this design because it's so festive and eye-catching! It's absolutely perfect for the Fourth of July, obviously, but I think it would be amazing for New Year's Eve too, or any celebration where you want to feel a little bit magical. The contrast between the dark, sparkly blue and the bright white fireworks is just chef's kiss!


18. Sparkling Star-Spangled French Tips
This manicure is all about festive vibes with a touch of glam! It's a super fun take on classic French tips, blending bold colors with dazzling glitter and cute star accents. It feels playful yet chic, perfect for making a statement.
The Design: We've got a mix of looks here! Some nails are a classic French tip style, but with a twist: the tips are painted in a crisp white with a bright red accent color following the curve. Then, there are nails with a beautiful nude base and a white French tip, adorned with little silver star charms. Another nail is covered in chunky silver glitter, giving us all the sparkle! Finally, one nail features a red half-moon shape at the base, with a tiny white star on a nude base for a subtle pop.
How to recreate?:
- Start with a clean base of nude polish on all your nails.
- For the French tips, paint a crisp white curve at the tip of some nails. Then, add a matching red line just below the white curve for that extra flair.
- On nails with a nude base, carefully place small silver star charms along the white French tip line.
- For the glitter nail, apply a clear top coat and generously cover the nail with chunky silver glitter. Seal it with another top coat.
- For the accent nail, create a red half-moon shape at the base of the nail and add a tiny white star on the nude part.
- Finish all nails with a shiny top coat to seal everything and add extra gloss.
Best for: I am absolutely obsessed with this design because it's so versatile and screams celebration! It's perfect for Fourth of July, of course, but also for any summer party, a concert, or just whenever you want to add some sparkle and fun to your look. I love how it combines the elegance of French tips with the playful energy of glitter and stars. It’s just a really eye-catching and happy design!
19. Sparkling French Tips in Fuchsia & Electric Blue

Get ready to shine with this playful twist on a classic French manicure! It's a super fun and vibrant look that adds a pop of color and sparkle to your fingertips. The shiny tips feel so glamorous and totally catch the light.
The Design: This design starts with a sheer, milky pink base for a clean and natural look. The magic happens at the tips, where we have a bold, glittery French tip. On some nails, the tip is a dazzling, bright fuchsia pink. On others, it's a vibrant, electric blue. Both tips have a super sparkly, almost metallic finish that really makes them stand out.
How to recreate?:
- Start with your favorite sheer pink or milky nude polish and apply one or two coats for a smooth base.
- Once the base is dry, carefully paint the tips of your nails with a fine brush. You'll want to use a super glittery polish in a bright fuchsia for some nails.
- On other nails, repeat the tip application with an equally glittery electric blue polish.
- Make sure to get a clean line between the base color and the glitter tip for that classic French look.
- Finish with a good top coat to seal in all that sparkle and give your nails a glossy shine.
Best for: I am absolutely obsessed with this design because it takes a simple French manicure and makes it feel so exciting and modern! It's perfect for any time you want to feel a little extra, like a fun party, a night out, or even just to brighten up your everyday look. The glitter tips just scream celebration and confidence. Plus, you get two gorgeous colors in one manicure – how can you not love that?


20. Ruby Red Sparkle Starburst Nails
Get ready to shine with these dazzling ruby red nails featuring a mix of bold starburst designs and a touch of silver sparkle! It's a look that's both festive and super chic, perfect for making a statement.
The Design: The main color is a stunning, glossy ruby red that just screams glamour. Some nails have these awesome, graphic starburst designs painted in a bright, metallic silver. Others feature a cool silver base with a matching red and silver starburst. The silver has a subtle shimmer, almost like a glitter finish, that catches the light beautifully. It's a fantastic contrast between the deep red and the sparkly silver elements.
How to recreate?:
- Start with your favorite glossy ruby red polish and paint most of your nails with it. Make sure you get a smooth, even coat!
- For the accent nails, start with a shimmery silver polish. I think a fine glitter or a metallic finish would look amazing.
- Now for the fun part: the starbursts! Using a fine brush and metallic silver polish, carefully paint starburst shapes radiating from a central point on the red nails.
- On the silver accent nails, use a fine brush to paint a starburst design using both the ruby red and silver polish. Try to make them pop!
- Once everything is dry, add a super shiny top coat to seal the deal and give your nails that extra glossy, polished look.
Best for: I am totally obsessed with this design because it's so festive and eye-catching! It would be absolutely perfect for holiday parties, New Year's Eve, or any event where you want your nails to be the star of the show. The rich red and sparkling silver combo just feels so celebratory and luxurious. I also love how it mixes a solid color with detailed art – it's super balanced and exciting!
21. Red, White, and Blue Swirl with Glitter Accents
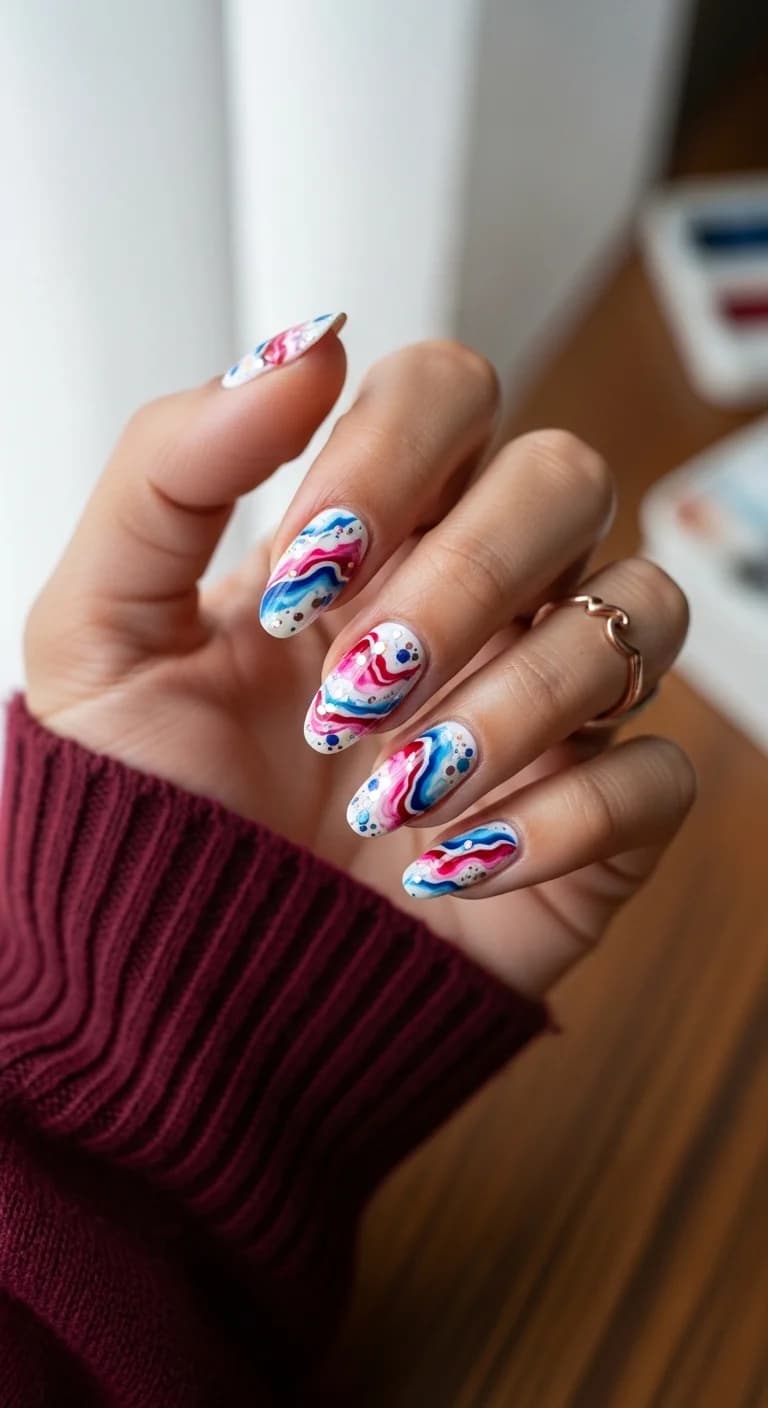
I am absolutely loving this fun and festive nail design! It's got this cool, almost marbled look with vibrant pops of red, white, and blue, plus some sparkle. It feels so energetic and perfect for a celebration.
The Design: The base is a clean white. Then, wavy lines of bright red, a deep royal blue, and a lighter sky blue are swirled together to create a really dynamic pattern. On some nails, I see tiny blue dots and scattered silver glitter, adding just the right amount of shimmer and texture. The finish looks like a classic glossy top coat, making all the colors really pop.
How to recreate?:
- Start with a clean white base coat on all your nails.
- While the white is still wet, carefully drop small amounts of red, royal blue, and sky blue polish next to each other.
- Use a toothpick or a fine brush to gently swirl the colors together, creating that marbled effect. Don't over-swirl, you want distinct lines!
- On some nails, use a dotting tool to add small blue dots. Sprinkle a bit of silver glitter over the wet polish for that extra sparkle.
- Let the design dry completely.
- Finish with a glossy top coat to seal everything in and give it that beautiful shine.
Best for: This design is a total winner for any summer holiday, especially the Fourth of July! It’s so festive without being too over-the-top. I'm obsessed because it's a creative way to wear patriotic colors and the swirl technique always looks so chic and eye-catching. Plus, who doesn't love a little glitter?


22. Sparkling Firework Burst

Get ready to celebrate with these dazzling nails that look like tiny fireworks bursting right on your fingertips! I love how the classic white base makes the red, white, and blue sparkle really pop. It's such a fun and festive look that's sure to turn heads.
The Design: This design features a clean, glossy white base on all nails. The star of the show is the intricate firework design, created using fine lines and dots in patriotic red, white, and blue. Some of the red and blue lines have a subtle shimmer, adding an extra touch of sparkle. The design is concentrated towards the center of each nail, bursting outwards like a miniature firework.
How to recreate?:
- Start with a fresh coat of glossy white polish and let it dry completely.
- Using a very fine nail art brush or a dotting tool, create a small cluster of dots in the center of your nail using red and blue polish.
- Now, carefully draw thin lines radiating outwards from the center cluster. Use red, blue, and a shimmery silver or iridescent polish for that extra twinkle.
- Add smaller dots along these lines and around the center to give it that exploding firework effect.
- Seal your masterpiece with a good top coat to keep those fireworks bright and bold!
Best for: These nails are absolutely perfect for any Fourth of July celebration, backyard BBQ, or summer party! I am obsessed with how they capture the excitement and energy of fireworks. They're festive without being overwhelming, and the sparkle just makes them feel extra special. You'll feel ready to party the moment you put them on!
23. Iridescent Cloud Nine + Bold Red Star Accent
I am absolutely obsessed with this dreamy, ethereal vibe! It's like having little pieces of the sky on your fingertips. The pearly, almost holographic sheen is so captivating, and then BAM! That bright red star just pops and adds such a fun, unexpected twist. It feels super chic but also playful and a little bit magical.
The Design: The base color is this stunning iridescent shade. It shifts with the light, giving off hints of pink, blue, and purple, kind of like a soap bubble or mother-of-pearl. It's got a super smooth, glossy finish that just makes it look so luxurious. Then, on one accent nail, there's a perfectly shaped, bold red star. It's super clean and solid, really standing out against the shimmery background. The shape is that classic five-pointed star, and the color is a vibrant, true red.
How to recreate?:
- Start with your favorite nail shape – these look amazing on coffin or almond nails!
- Apply a pearly or iridescent white polish. You might need a couple of coats to get that full, shifting color effect. A top coat will really seal in that glow!
- On your chosen accent nail, carefully paint or apply a sticker of a bright red star. Make sure the edges are super crisp so it looks sharp!
- Add a glossy top coat over all your nails to make everything super shiny and protect your awesome new design.
Best for: This manicure is perfect for anyone who wants a bit of everyday magic! I love it because it's so versatile. It’s dreamy enough for a special occasion but has that cool factor that makes it totally wearable for everyday. Imagine wearing this to a summer party or even just for a little confidence boost! I'm just in love with how the iridescent shimmer plays with the bold, graphic star – it's the perfect balance of soft and strong.


24. Deep Navy Geometric Mosaic

Get ready for a nail look that's totally eye-catching and super chic! I'm obsessed with this deep navy base paired with a scattered, almost mosaic-like pattern that catches the light. It's like having tiny stained-glass windows on your fingertips, but make it fashion!
The Design: We're starting with a rich, glossy deep navy blue polish as our base. Then, the magic happens with an overlay of geometric shapes in iridescent white and light blue. These pieces look like shattered glass or tiny, colorful tiles, and they have this amazing holographic shimmer that reflects different colors as you move. It's all about that glossy finish and the cool, fragmented design.
How to recreate?:
- First, make sure your nails are prepped and clean. Apply a base coat to protect your nails.
- Paint all your nails with two smooth coats of a deep, glossy navy blue polish. Let it dry completely.
- Now for the fun part! You'll need some small, irregular-shaped iridescent or holographic stickers or decals. Think shattered glass or mosaic tile shapes.
- Carefully place these pieces randomly all over your nails. I like to vary the size and placement for a more natural look.
- Once all the pieces are in place, apply a generous layer of glossy top coat over everything. This will seal the design and make those iridescent pieces POP!
- Let your top coat dry fully, and you're done!
Best for: Honestly, this design is a total showstopper! I love it because it's unique and feels so sophisticated. It's perfect for a night out, a special event, or anytime you want your nails to be the main event. Plus, that deep navy is so universally flattering. It’s my go-to when I want something a little extra without being over the top.
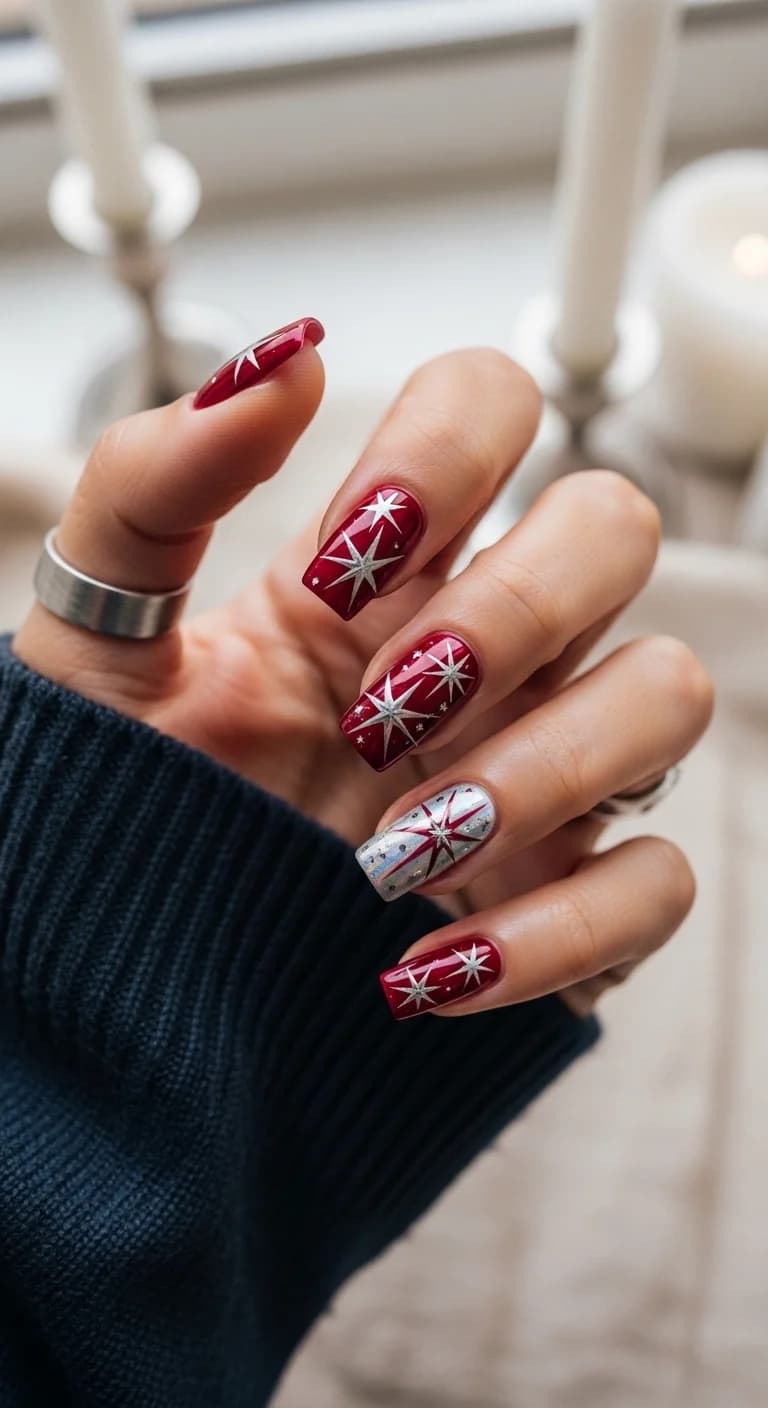
25. Deep Cherry Red with Sparkly Silver Starbursts
These nails are giving me major festive vibes! I love how the deep, rich cherry red polish looks with the delicate, sparkly silver starburst designs all over. It feels so glamorous and celebratory, like a magical night sky right on your fingertips.
The Design: The base color is a stunning, glossy deep cherry red that is super vibrant. Over this gorgeous red, there are these amazing silver starbursts. They look like they're made with a fine glitter or metallic polish, giving them a really bright sparkle. Some nails also have tiny, sparkly silver dots scattered around, adding an extra little twinkle.
How to recreate?:
- First, make sure your nails are prepped and shaped. I love a coffin or square shape for this design!
- Apply a good base coat to protect your nails.
- Paint on two coats of your favorite deep cherry red polish. Make sure each coat is completely dry before applying the next.
- Now for the fun part! Using a fine silver glitter polish or a silver metallic polish with a very thin brush, carefully paint on the starburst designs. You can freehand them or use stencils if that's easier for you.
- On some nails, add a few tiny silver dots near the starbursts for that extra pop of sparkle.
- Once all the art is dry, finish with a high-shine top coat to seal everything in and make those stars really pop!
Best for: Oh my gosh, I am obsessed with this look because it's just so chic and festive! It's absolutely perfect for any holiday party, New Year's Eve, or even just a special night out when you want your nails to feel extra dazzling. The deep red is so classic, and the silver stars add just the right amount of sparkle to make them stand out. It's sophisticated but also really fun!


26. Oceanic Swirls with Starry Accents
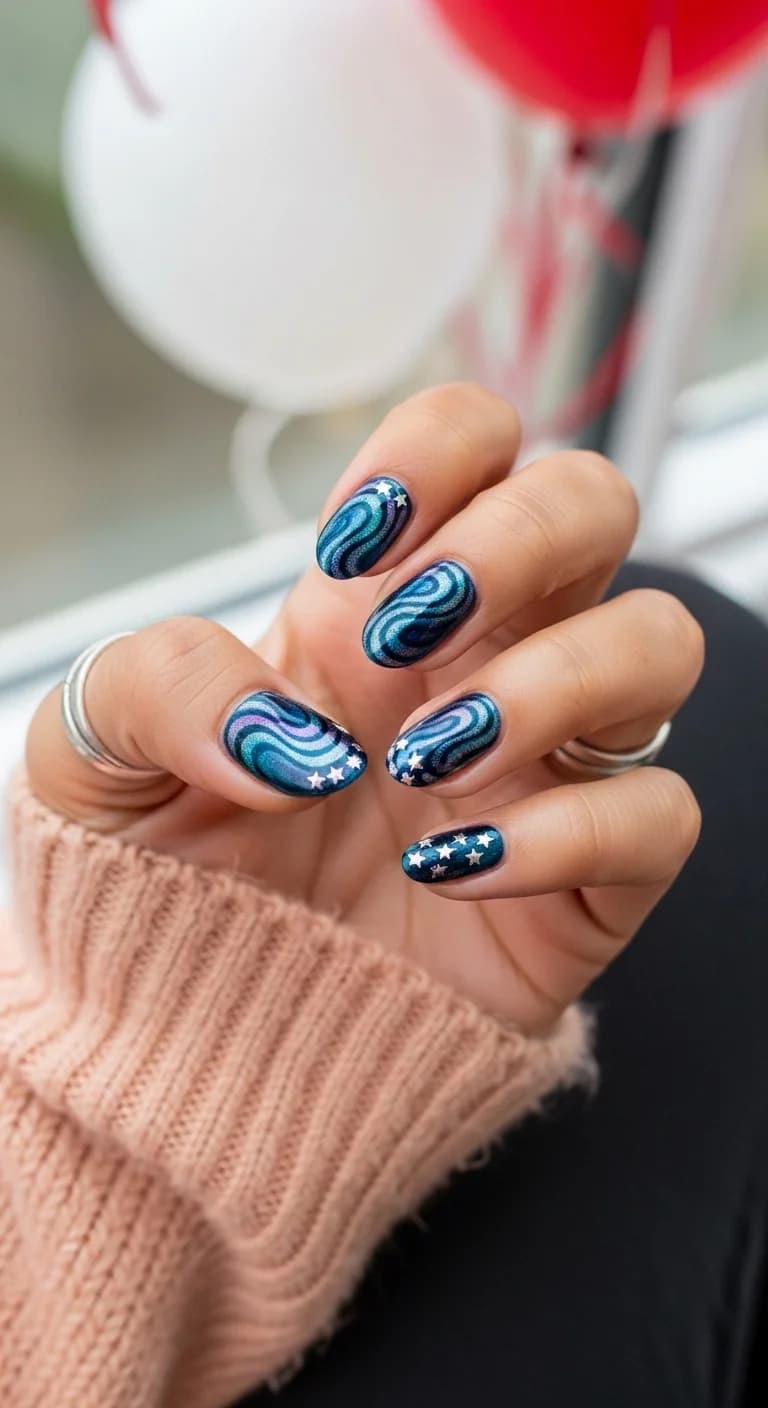
These nails give me major 'deep sea magic' vibes! Imagine the most beautiful ocean waves shimmering under the moonlight, with little twinkling stars scattered all over. It's a dreamy, cool-toned look that's totally mesmerizing.
The Design: The base color is this amazing deep, shimmery teal that looks like it has a hint of blue and purple in it. Then, there are these gorgeous, glossy swirls in lighter blues, teals, and even some soft pinkish-purple hues. It gives a really dynamic, watery effect. On some nails, I added super cute, tiny white stars, especially near the tips, which totally amp up the celestial and festive feel.
How to recreate?:
- Start with a good base coat, always!
- Apply a couple of coats of your favorite deep teal shimmer polish. Make sure it's fully dry before you move on.
- Now for the fun part! Using a fine brush, freehand those wavy swirls. I like to mix a few shades of blue and teal, plus a touch of purple, to get that multi-dimensional look. Think of ocean currents!
- For the starry nails, paint a layer of deep teal shimmer, and then carefully place small white star decals or use a tiny dotting tool and white polish to create little stars.
- Once everything is dry, seal it all in with a glossy top coat. This really makes those swirls pop and gives it that super polished finish!
Best for: Honestly, I am obsessed with this look because it feels so unique and ethereal. It's perfect for summer evenings, a vacation by the sea, or honestly, anytime you want your nails to feel like a little piece of art. I especially love it for the Fourth of July because the stars and the blue tones totally fit the vibe without being overtly patriotic. It's chic and playful all at once!
27. Sparkling Red and Silver Ombre French Tips
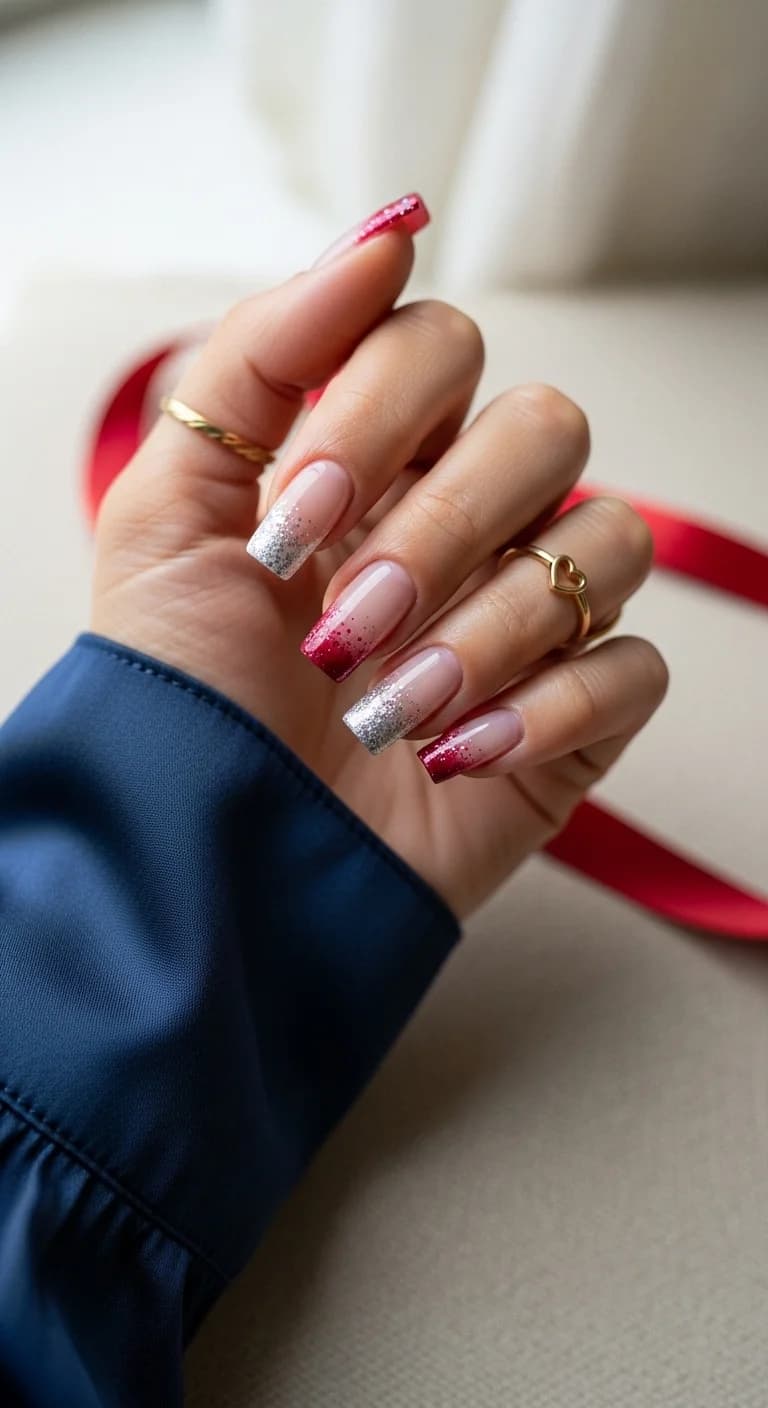
Get ready to dazzle with these super chic ombre French tips! This design mixes a classic French manicure vibe with a fun, glittery twist, perfect for making a statement.
The Design: We're seeing a beautiful gradient effect here! The nails have a natural-looking sheer pink base. Then, the tips are a playful blend of a bold, shimmery red and a bright, sparkly silver glitter. It looks like the glitter starts strong at the very edge and fades softly into the pink, creating a lovely ombré look.
How to recreate?:
- Start with a clean, natural nail or apply a sheer pink nail polish as your base.
- For the ombre effect, you'll want to use a sponge or a makeup brush. Dip it lightly into a shimmery red polish and dab it onto the tips of your nails.
- Next, use the same sponge or brush, or a clean one, with a sparkly silver glitter polish. Apply this right next to the red, blending slightly into it to create that smooth transition.
- You can build up the intensity of the glitter and color by dabbing on more layers as needed.
- Once everything is dry, seal the deal with a good top coat to make sure all that sparkle stays put and looks super glossy!
Best for: I am absolutely obsessed with this look because it's festive and elegant all at once! It's perfect for any celebration where you want to feel extra special, like parties, holidays, or even just a fun night out. The mix of red and silver glitter is just so eye-catching and makes your nails pop in the best way possible!


28. Sparkling Navy Firework & Star Manicure
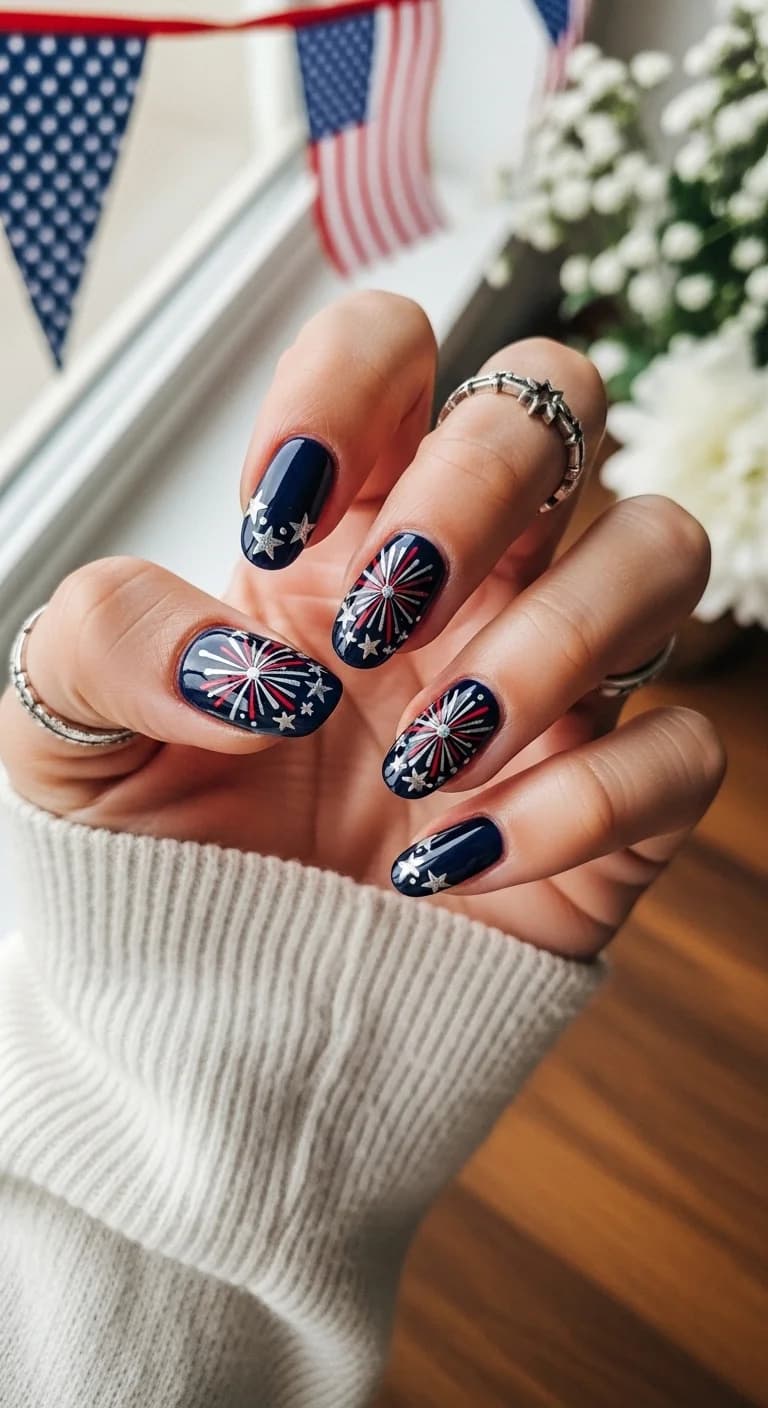
Get ready to light up the night with this stunning Fourth of July-inspired nail design! It's a playful yet chic look that brings the magic of fireworks right to your fingertips. The deep navy base makes the vibrant red and white bursts pop, while scattered stars add that extra twinkle. It’s the perfect way to show your festive spirit in style!
The Design: This manicure features a glossy, deep navy blue polish as the base color for all nails. The accent nails showcase intricate firework designs with bursts of bright red and crisp white lines radiating from a central point. Tiny, scattered silver star accents are dotted across the navy background on other nails, and also appear as part of the firework designs. The overall finish is high-glossy and dazzling.
How to recreate?:
- Start with a clean canvas and apply a good base coat.
- Paint all your nails with a rich, glossy navy blue polish. Let it dry completely, and maybe add a second coat for full opacity.
- For the firework nails, use a fine brush or nail art pen to carefully draw radiating lines in red and white from a central point on a few nails. Think of a starburst!
- On the other nails, or to fill in spaces on the firework nails, use a tiny dotting tool or a fine brush to place small silver star shapes. You can also use tiny silver star stickers or decals.
- Seal the entire design with a high-shine top coat to lock in the sparkle and make those fireworks really gleam!
Best for: I am absolutely obsessed with this design because it’s so festive and fun without being over the top! It’s perfect for any Fourth of July celebration, backyard BBQ, or even just to add a pop of patriotic flair to your everyday look. The navy base keeps it sophisticated, while the fireworks and stars make it undeniably celebratory. It’s a showstopper!
29. White Starry Night Coffin Nails
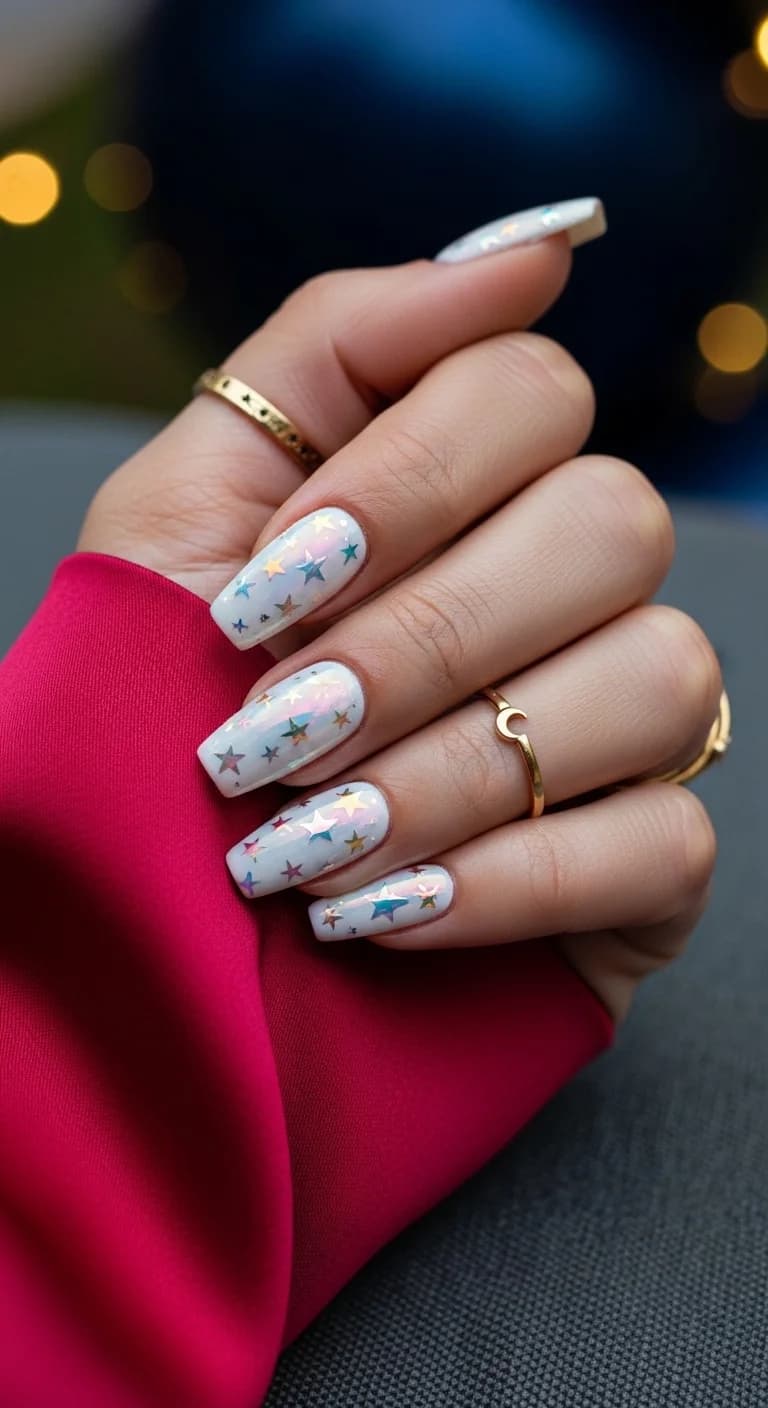
Get ready for a magical night with these dreamy coffin nails! I'm obsessed with how the pearly white base makes all the holographic stars pop. It's like carrying a little piece of the night sky with you, but way more sparkly and fun!
The Design: The base color is a gorgeous, shimmery pearly white that has this iridescent, almost milky finish. It's super smooth and gives off a subtle glow. Then, scattered all over each nail are these tiny, super shiny holographic stars! They catch the light beautifully and flash with different colors like pink, blue, and gold. It's a simple but totally dazzling effect.
How to recreate?:
- Start with clean, prepped nails and apply your favorite white pearly polish. I love a polish that has that subtle shimmer!
- Once the white polish is completely dry, it's time for the magic! You can use holographic star nail stickers or decals.
- Carefully place the holographic stars all over your nail. You can go for a dense pattern like in the picture, or spread them out for a more minimalist look.
- Make sure the stars are lying flat against the nail. Press them down gently.
- Finish with a good quality top coat. This will seal everything in, give you that super glossy shine, and make those stars really sparkle!
Best for: These nails are perfect for literally any occasion where you want to feel a little bit magical! Think summer parties, festivals, or even just a night out with friends. I personally love them because they are so easy to recreate but look like you spent hours at the salon. Plus, who doesn't love stars? They bring such a fun, playful vibe!


Conclusion
No matter how you choose to celebrate Independence Day, having a fresh, festive manicure is the perfect finishing touch to your holiday look. Whether you opt for subtle stars, bold Americana stripes, or a full explosion of glitter, these 4th of July nail ideas are sure to make a statement. Don't be afraid to mix and match styles or try a new technique to create a custom design that matches your personal summer vibe. Grab your favorite red, white, and blue polishes, and have a safe, stylish, and happy 4th of July!
Loving This Guide? Get More Like This! 💌
Want to impress with clothes? Want to look good? Subscribe to Whatsmyshape Newsletter and get weekly fashion guides, exclusive outfit ideas, and beauty tips delivered directly to your inbox. No spam, just pure style inspiration! ✨