
September is the month where your nails have to do double duty. It is still warm enough for open-toed shoes and short sleeves, but the color palette in your closet is already shifting toward brown, burgundy, and olive. Your manicure should bridge that gap without committing fully to either season.
This guide covers 27 designs that navigate that transition. There are botanical leaf art and earthy sage greens for anyone holding onto the last traces of warmth. There are plaid patterns, tortoiseshell French tips, and deep cat-eyes for those ready to lean into fall. And there are plenty of abstract and geometric options in between, because September is when experimentation feels the most natural.
27 September Nail Designs
1. Green French Tips with Leaf Art
OVERVIEW:
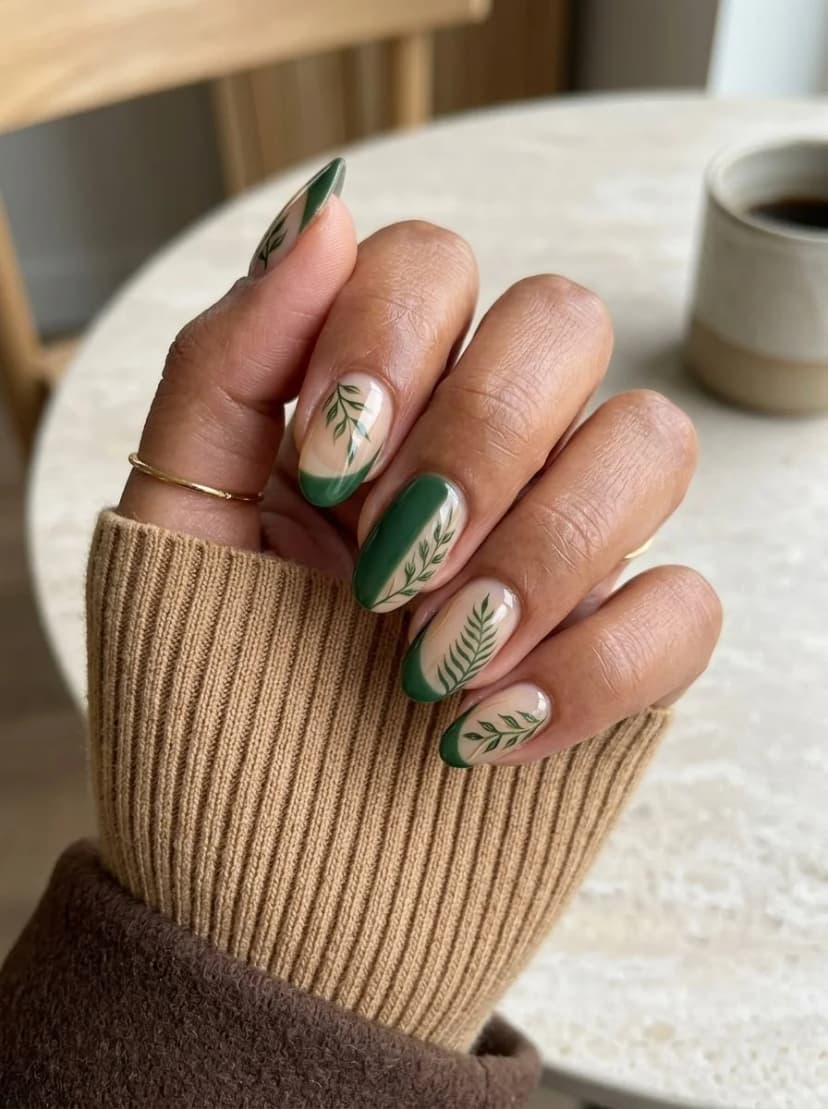
Dark green French tips on a nude base are a subtle way to signal that your nails have entered their fall chapter without going full autumn. The leaf and vine line art painted across a few of the nails adds an organic, botanical quality that makes the whole set feel grounded and natural rather than trend-chasing.
The almond shape works well here because the tapered tip gives the vine art room to curve naturally. On shorter nails, the delicate leaf details would get compressed and lose their elegance. The glossy top coat over everything seals the design and gives the green tips a polished, lacquered look.
One thing to consider: the vine line art requires a very thin brush and a steady hand. If freehand work is not your strength, you can achieve a similar effect with thin green striping tape laid in curved lines. It will not have the same organic, hand-drawn quality, but it will be faster and more forgiving.
DESIGN BREAKDOWN:
Classic French structure with botanical detail. The dark green does the heavy lifting against the nude base.
- Nail Color Used: Sheer nude or milky pink base, deep forest green for the tips and leaf art.
- Suitable Nail Shape: Medium to long almond. The curved shape complements the botanical theme.
- Design Element: Dark green French tips on all nails, with hand-painted vine and leaf line art on two to three accent nails.
- Finish: High-gloss top coat for a clean, polished look.
- Tools Used: Fine detail brush for leaf art, French tip guides or liner brush for tips.
GET THE LOOK AT HOME:
Start with the French tips first, then add the botanical details as a second pass.
- Base: Apply two coats of sheer nude to all nails. Let dry.
- Green tips: Use French tip guides or a liner brush to paint thin dark green tips on each nail.
- Vine art: Using a fine detail brush and the same green, paint thin curved stems extending from the tips downward. Add small leaf shapes along the stems.
- Seal: Apply a glossy top coat to finish. Be gentle over the leaf art to avoid smearing.
Pro Tip: Practice the leaf shapes on paper first. Simple curved lines with small oval shapes at the ends read as leaves without requiring advanced painting skill.


2. Purple and Lime Swirl Nails
OVERVIEW:
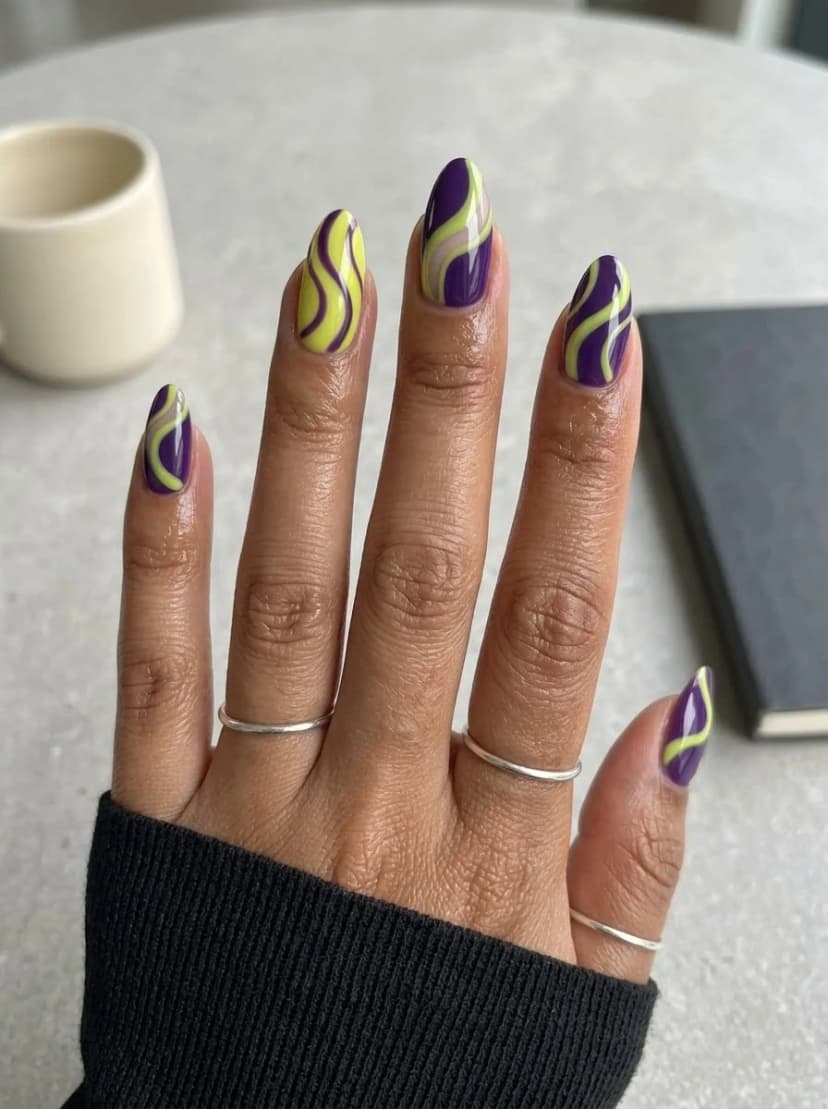
This is not a design for anyone who plays it safe with their nails. Deep purple and bright lime green swirl together in thick, flowing lines across every nail. The two colors sit opposite each other on the color wheel, which creates a visual tension that is impossible to ignore.
The swirl pattern varies on each nail, which is part of what makes it work. Some nails lean more purple, others more green, and the way the colors twist around each other creates a sense of movement. Under different lighting, the purple shifts between a warm grape and a cooler plum, while the lime stays consistently electric.
The practical challenge here is that two highly pigmented colors side by side will bleed into each other if you do not let each layer dry fully. Patience between coats is non-negotiable with this design. Budget at least an hour for the full set.
DESIGN BREAKDOWN:
High-contrast color pairing with organic swirl movement. The purple and lime fight for attention, and that is the point.
- Nail Color Used: Deep purple and bright lime green.
- Suitable Nail Shape: Medium to long almond. The elongated shape gives the swirls room to develop.
- Design Element: Thick, flowing swirl lines of purple and lime across all nails.
- Finish: High-gloss top coat to seal the design and enhance the color saturation.
- Tools Used: Thin striping brush or detail brush for the swirl lines.
GET THE LOOK AT HOME:
Work one color at a time and let each swirl dry before adding the second color.
- Base: Apply one coat of purple to all nails. Let dry completely.
- Swirl lines: Load a striping brush with lime green and paint thick, wavy lines across each nail. Vary the direction and thickness on each nail.
- Fill gaps: Go back with purple to fill any gaps between the green swirls where the base coat shows through.
- Seal: Apply a generous glossy top coat to smooth out any texture from the layered polish.
Pro Tip: If the lime green looks sheer over the purple, add a second coat of green to the swirl lines only. The purple base should still show between the swirls to maintain the two-tone effect.
3. Burgundy Petal Accent Nails
OVERVIEW:
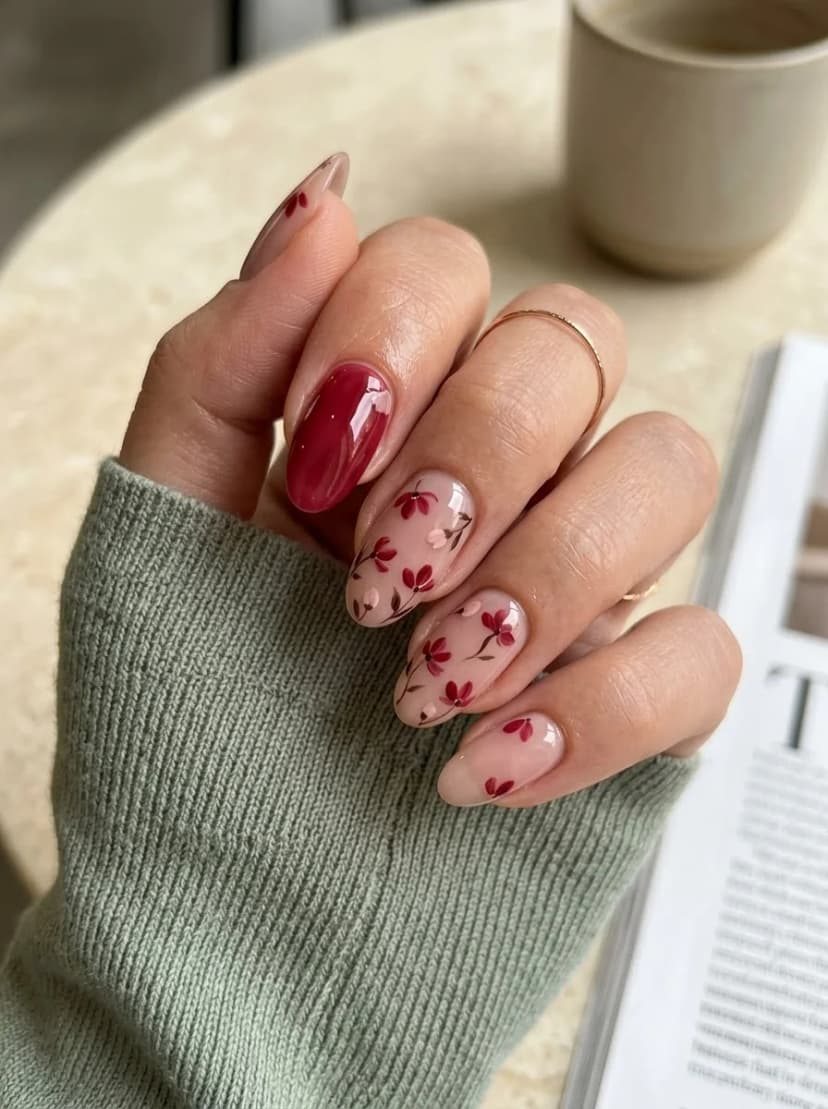
Small burgundy petals scattered across a nude base create a floral design that feels autumnal rather than spring-like. The deep red petals are simple, almost abstract, and they are paired with tiny dot accents that add texture without cluttering the nail. One nail is painted solid burgundy, which anchors the set and prevents the scattered petals from looking random.
What separates this from typical floral nail art is the restraint. Each nail only has two or three petal clusters, and they are placed asymmetrically. That spacing gives the design room to breathe. The petals look like they drifted onto the nail rather than being arranged there.
The almond shape complements the organic quality of the petals. The curved surface adds dimension to the simple shapes, making them look more like actual botanical illustrations than flat stickers.
DESIGN BREAKDOWN:
Minimal floral on a clean canvas. The burgundy solid nail ties everything together.
- Nail Color Used: Sheer nude base, deep burgundy for the petals and solid accent nail.
- Suitable Nail Shape: Almond or oval. The soft curves match the botanical feel.
- Design Element: Scattered burgundy petal clusters with dot accents on nude nails, one solid burgundy accent nail.
- Finish: Glossy top coat for a fresh, natural look.
- Tools Used: Small brush or dotting tool for petals, fine detail brush for stems.
GET THE LOOK AT HOME:
The petal shapes are forgiving because they are meant to look hand-painted and organic.
- Nude base: Apply two coats of sheer nude to all nails. Let dry.
- Solid accent: Paint the index finger with two coats of burgundy.
- Petals: On the remaining nails, use a small brush dipped in burgundy to paint two or three small petal clusters. Each petal is a simple teardrop shape.
- Details: Add tiny dots near the petals using a dotting tool. These act as filler and add texture.
- Seal: Apply a glossy top coat to lock everything in.
Pro Tip: Vary the petal placement on each nail. Cluster them near the cuticle on one nail, near the tip on another, and off-center on the third. This prevents the pattern from looking uniform.

4. Burgundy Geometric Starburst Nails
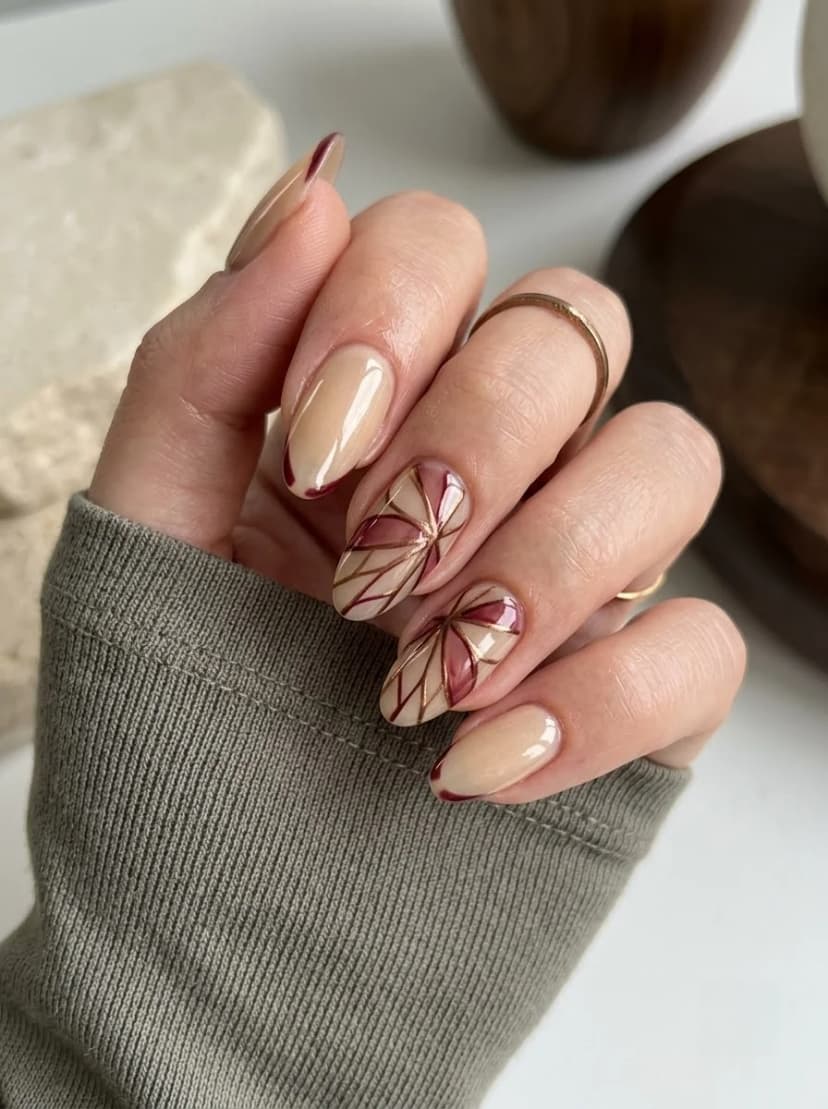
OVERVIEW:
Geometric line work in burgundy and gold over a nude base creates a starburst pattern that looks architectural. The lines radiate outward from a central point, dividing the nail into triangular sections. Some sections are filled with burgundy, others stay nude, and the gold metallic lines between them catch light at different angles.
The alternating pattern across the hand keeps the design from feeling too rigid. Some nails have the full starburst, others have just a few radiating lines, and one nail stays solid nude with a burgundy French tip. That variation prevents the geometric precision from becoming monotonous.
The gold metallic lines are the hardest part. They need to be genuinely thin and evenly spaced to read as intentional geometry rather than random scratches. If you do not trust your freehand line work, gold striping tape cut into short lengths can approximate the look.
DESIGN BREAKDOWN:
Geometric precision with warm metallic accents. The gold lines define the structure.
- Nail Color Used: Sheer nude base, deep burgundy, and gold metallic polish for the line work.
- Suitable Nail Shape: Medium to long almond. The elongated surface gives the geometry room to develop.
- Design Element: Starburst line pattern with burgundy-filled sections and gold metallic dividers on select nails.
- Finish: High-gloss top coat to seal the gold lines and enhance the burgundy depth.
- Tools Used: Fine detail brush or striping brush for lines, gold striping tape as an alternative.
GET THE LOOK AT HOME:
Paint the burgundy sections first, then add the gold lines on top to cover the edges.
- Base: Apply two coats of sheer nude to all nails. Let dry.
- Burgundy sections: Using a detail brush, paint triangular sections radiating from a center point. Fill alternating sections with burgundy.
- Gold lines: Load a striping brush with gold metallic polish and trace along the edges of each triangle. Keep the lines thin and consistent.
- French tip variation: On the accent nail, paint a thin burgundy French tip and add two or three short gold lines near the cuticle.
- Seal: Apply a glossy top coat to protect the gold lines and add depth to the burgundy.
Pro Tip: Start with the gold lines on one nail to practice your spacing before committing to the full set. Getting the line thickness consistent is what makes or breaks the geometric effect.
5. Brown and Mustard Houndstooth Nails
OVERVIEW:
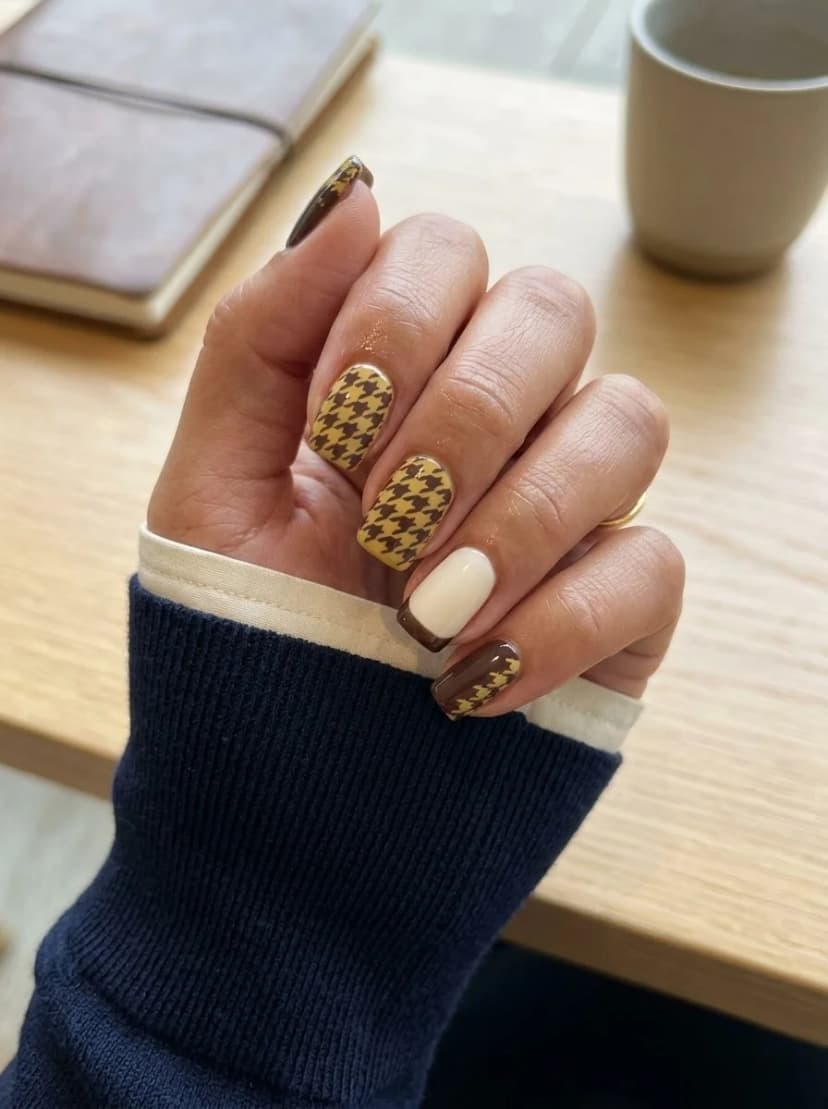
Houndstooth is a pattern that reads as distinctly fall without trying too hard. This version uses a mustard yellow base with brown houndstooth spots on two nails, balanced by a solid cream nail, a solid dark brown nail, and one nail with a houndstooth accent at the tip. The mix of patterned and solid nails prevents the set from feeling overwhelming.
The color combination is warm and grounded. The mustard yellow has enough depth to avoid looking neon or summery, and the brown spots keep everything anchored in an autumn palette. The cream nail acts as a palate cleanser between the busier patterned nails.
Short square nails work well for this design because houndstooth is a dense pattern that benefits from a compact canvas. On longer nails, the spots would spread out and lose the tight, woven quality that makes houndstooth look like fabric rather than random dots.
DESIGN BREAKDOWN:
Classic textile pattern in warm autumn tones. The mix of solid and patterned nails keeps it balanced.
- Nail Color Used: Mustard yellow, dark brown, and cream/off-white.
- Suitable Nail Shape: Short to medium square or squoval. The flat surface suits the geometric pattern.
- Design Element: Houndstooth pattern on two nails, solid cream and solid brown accent nails, houndstooth tip on one nail.
- Finish: High-gloss top coat for a polished, fabric-like quality.
- Tools Used: Fine detail brush for houndstooth spots, cleanup brush.
GET THE LOOK AT HOME:
Houndstooth spots are small and repetitive. Work slowly and keep your brush loaded with polish.
- Base: Apply two coats of mustard yellow to the pattern nails. Apply cream to one accent nail and dark brown to another. Let all dry.
- Houndstooth spots: Using a fine detail brush and brown polish, paint small, irregular four-pointed shapes across the yellow nails. Work in rows, alternating the orientation of each spot.
- Tip variation: On the fifth nail, paint a thin cream French tip, then add a few houndstooth spots along the tip area.
- Seal: Apply a thick top coat to smooth out the texture from the small spots.
Pro Tip: If painting individual houndstooth spots feels tedious, use a dotting tool to create the basic shape and then refine the edges with a detail brush. The spots do not need to be perfectly uniform.
6. Orange Gingham Checkerboard Nails
OVERVIEW:
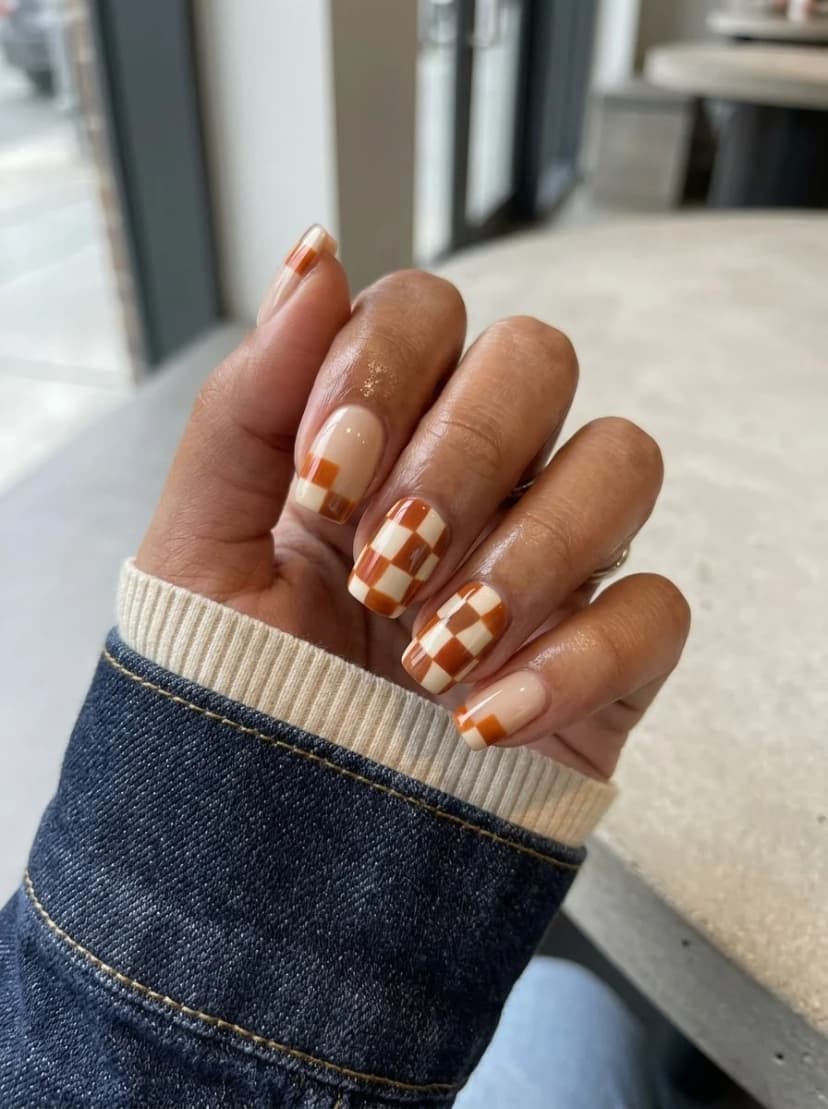
Orange and white in a gingham checkerboard pattern creates a warm, picnic-blanket quality that fits September perfectly. This design uses the pattern on two nails as full coverage, while the remaining nails feature orange and white accents at the tips or along the edges. The nude base keeps everything from feeling too busy.
The checkerboard is not perfectly uniform, which is part of its charm. Some squares are slightly larger, some lines are not perfectly straight, and that hand-painted quality gives the design character. A machine-perfect checkerboard would look colder and less inviting.
Square nails are the right call here. The flat, angular surface makes grid work easier and the geometric pattern reads more clearly on a squared-off shape than on a rounded one.
DESIGN BREAKDOWN:
Warm-toned grid pattern with strategic placement. The nude nails prevent visual overload.
- Nail Color Used: Warm orange, opaque white, and sheer nude.
- Suitable Nail Shape: Short to medium square. The flat surface makes the grid easier to execute.
- Design Element: Orange and white gingham checkerboard on two nails, orange accent tips on others.
- Finish: High-gloss top coat for a clean, polished look.
- Tools Used: Striping tape or thin brush for grid lines, cleanup brush.
GET THE LOOK AT HOME:
Grid work is methodical. Set up good lighting and work slowly.
- White base: Apply two coats of opaque white to the pattern nails. Let dry completely.
- Grid lines: Use thin striping tape or a detail brush to create horizontal and vertical lines in orange, forming a grid of small squares.
- Fill alternating squares: Using a small brush, fill in every other square with orange polish. Work slowly to stay within the lines.
- Accent nails: On the remaining nails, paint orange French tips or add a small checkerboard section near the tip.
- Top coat: Apply a thick, self-leveling top coat to smooth out any texture from the paint layers.
Pro Tip: Use a sheer nude or milky base on the non-pattern nails instead of bare nail. It creates a more finished look and gives the orange something to play against.
7. Black and Burgundy Rose Nails
OVERVIEW:
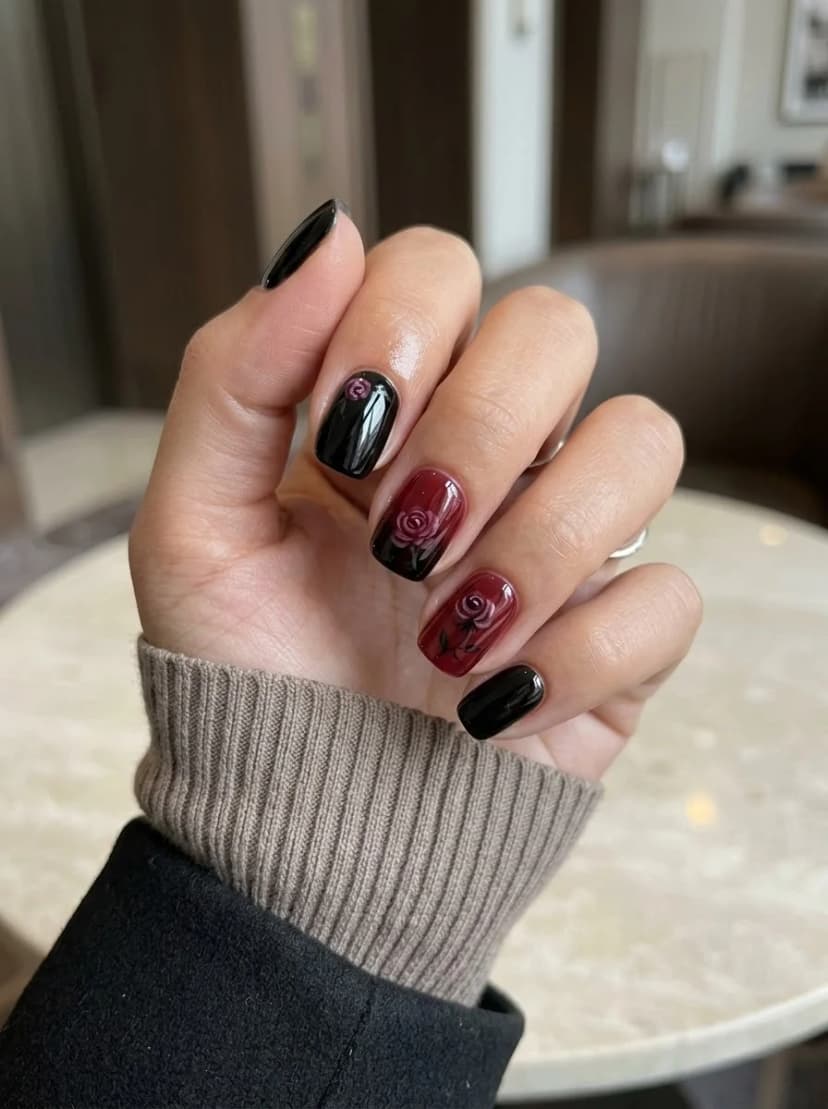
This is a dark, moody design that leans into the heavier side of September. Two nails are painted solid black, two nails are a deep burgundy with hand-painted black rose details, and one nail is solid black with a tiny rosebud near the cuticle. The roses are not detailed botanical illustrations; they are loose, almost abstract shapes that read as roses from a distance.
The black base on the solid nails is what gives this design its edge. Without it, the burgundy roses would feel more romantic and less gothic. The black grounds the set and pushes the overall mood toward something darker and more dramatic.
One practical note: black polish shows every fingerprint and scratch. If you work with your hands, the solid black nails will start looking worn by day three. Consider keeping this design for a weekend event or pairing it with a matte top coat on the black nails to hide wear marks.
DESIGN BREAKDOWN:
Dark, romantic floral with a gothic undertone. The black nails are the anchor.
- Nail Color Used: Opaque black and deep burgundy/oxblood.
- Suitable Nail Shape: Short to medium square or almond. Both suit the moody aesthetic.
- Design Element: Solid black on three nails, burgundy with black rose art on two nails.
- Finish: High-gloss top coat to enhance the depth of both colors.
- Tools Used: Fine detail brush for rose art, dotting tool for rosebud details.
GET THE LOOK AT HOME:
The roses are painted in layers. Build the shape gradually rather than trying to get it right in one stroke.
- Black nails: Apply two coats of opaque black to three nails. Let dry.
- Burgundy base: Apply two coats of burgundy to the remaining two nails. Let dry.
- Rose shapes: Using a detail brush and black polish, paint loose, swirling rose shapes on the burgundy nails. Start with a small spiral in the center and build outward with curved strokes.
- Details: Add thin black stems extending from the roses. Keep them short and slightly curved.
- Seal: Apply a glossy top coat to all nails.
Pro Tip: If the roses look too messy, that is actually the point. Loose, painterly roses look more natural than tightly controlled ones. Resist the urge to fix every imperfection.


8. Blue and Grey Abstract Line Nails
OVERVIEW:
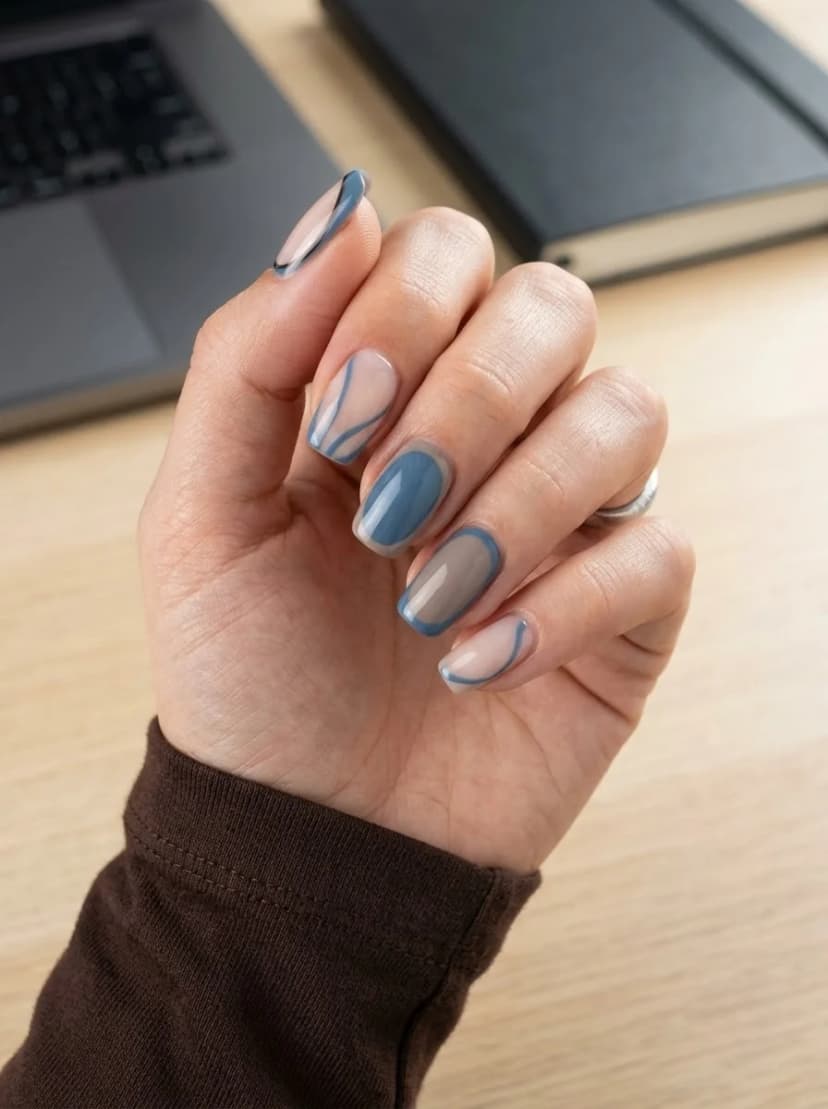
Abstract curved lines in muted blue and grey over a nude base create a design that feels calm and considered. The lines sweep across each nail in different directions, some curving from cuticle to tip, others looping across the middle. One nail is painted solid dusty blue, which gives the eye a resting place between the more active patterned nails.
The muted color palette is what makes this design work for September. Bright cobalt or electric blue would skew summery, but these dusty, grey-leaning blues feel cooler and more transitional. The grey acts as a neutral bridge between the blue and the nude base.
The lines do not need to be precise. In fact, the slightly wobbly, hand-drawn quality is what gives the design its appeal. Perfectly smooth curves would look mechanical. A little shake in the line reads as intentional and artistic.
DESIGN BREAKDOWN:
Organic lines on a clean canvas. The muted palette keeps it sophisticated.
- Nail Color Used: Sheer nude base, dusty blue, and soft grey.
- Suitable Nail Shape: Medium square or almond. Both suit the flowing line work.
- Design Element: Abstract curved lines in blue and grey across nude nails, one solid blue accent nail.
- Finish: Glossy top coat for a clean, modern look.
- Tools Used: Thin detail brush or striping brush for the lines.
GET THE LOOK AT HOME:
This is a quick design once the base is dry. Work confidently and do not go back over lines that are already down.
- Base: Apply two coats of sheer nude to all nails. Let dry.
- Solid accent: Paint one nail with two coats of dusty blue.
- Blue lines: Using a detail brush, paint one or two thick, curved lines in blue across each nude nail. Vary the direction on each nail.
- Grey lines: Add thinner grey lines that cross or follow alongside the blue lines. Keep them lighter and more delicate.
- Seal: Apply a glossy top coat to finish.
Pro Tip: Keep the brush fully loaded for smooth, continuous lines. A dry brush creates scratchy, broken lines that look hesitant rather than artistic.
9. Sage Green with Abstract Brown Spots
OVERVIEW:
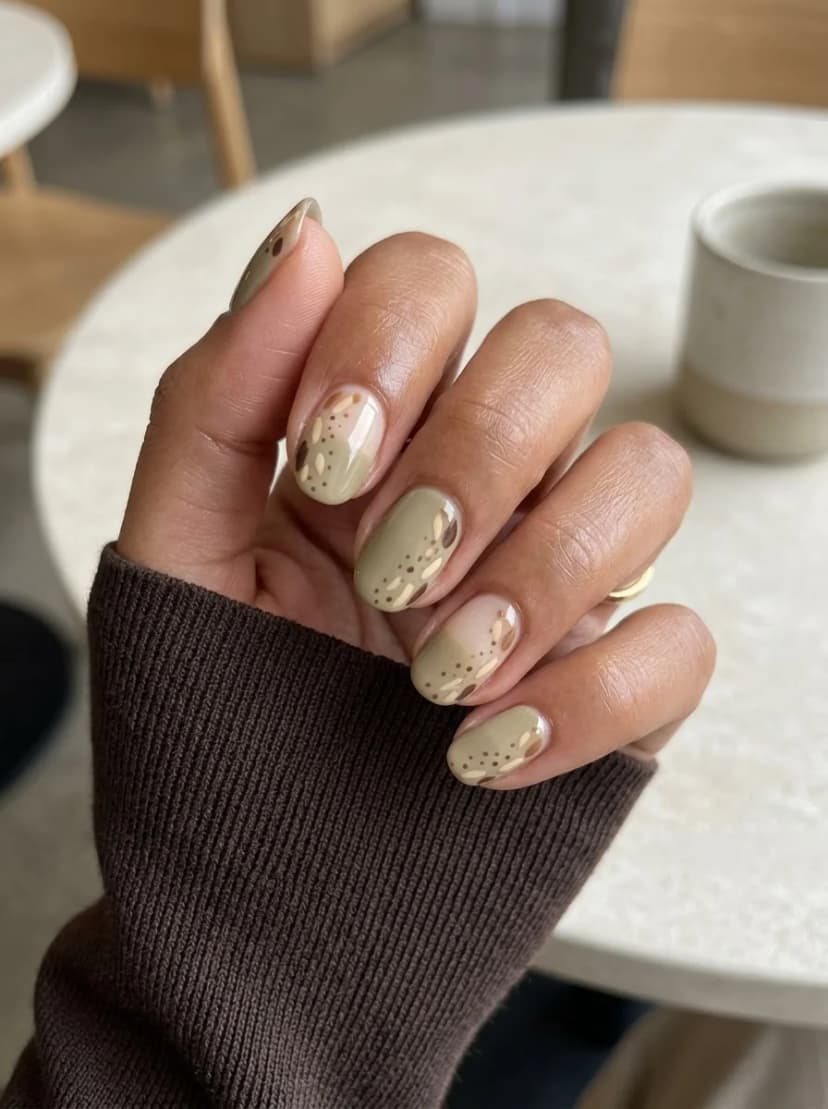
Sage green is one of those colors that straddles seasons without committing to either one. This design pairs it with abstract brown spots and cream dot clusters that give the nails an organic, almost stone-like quality. The spots are irregular and scattered, some overlapping, some standing alone, and they are concentrated more heavily on some nails than others.
The sage green itself is muted and earthy, not bright or pastel. It reads as grounded and natural, which is exactly the mood for September. The brown spots add warmth without introducing a second bold color, and the cream dots act as highlights that break up the density.
This design is forgiving for beginners. The spots are meant to look random and organic, so there is no precision required. Imperfection actually makes the design look more authentic, like the patterns you see on river stones or pottery glaze.
DESIGN BREAKDOWN:
Organic spots on an earthy base. The randomness is intentional.
- Nail Color Used: Muted sage green, warm brown, and cream/off-white.
- Suitable Nail Shape: Short round or squoval. The softened shape matches the organic nature of the spots.
- Design Element: Abstract brown spots and cream dot clusters scattered over sage green nails.
- Finish: Glossy top coat for a smooth, polished surface.
- Tools Used: Dotting tool or the end of a bobby pin, fine detail brush.
GET THE LOOK AT HOME:
Work quickly and do not overthink the placement. This is a five-minute design once the base is dry.
- Green base: Apply two coats of sage green to all nails. Let dry completely.
- Brown spots: Dip a dotting tool into brown polish and press irregular spots onto the nail. Vary the sizes and spacing.
- Cream dots: Using a smaller dotting tool, add cream dots near and around the brown spots. Cluster some together, leave others isolated.
- Seal: Apply a thick glossy top coat to level out any texture from the dots.
Pro Tip: Concentrate the spots more heavily on two or three nails and leave the others with just a few dots. This creates visual variety across the hand.


10. Rust Plaid and French Tip Mix
OVERVIEW:
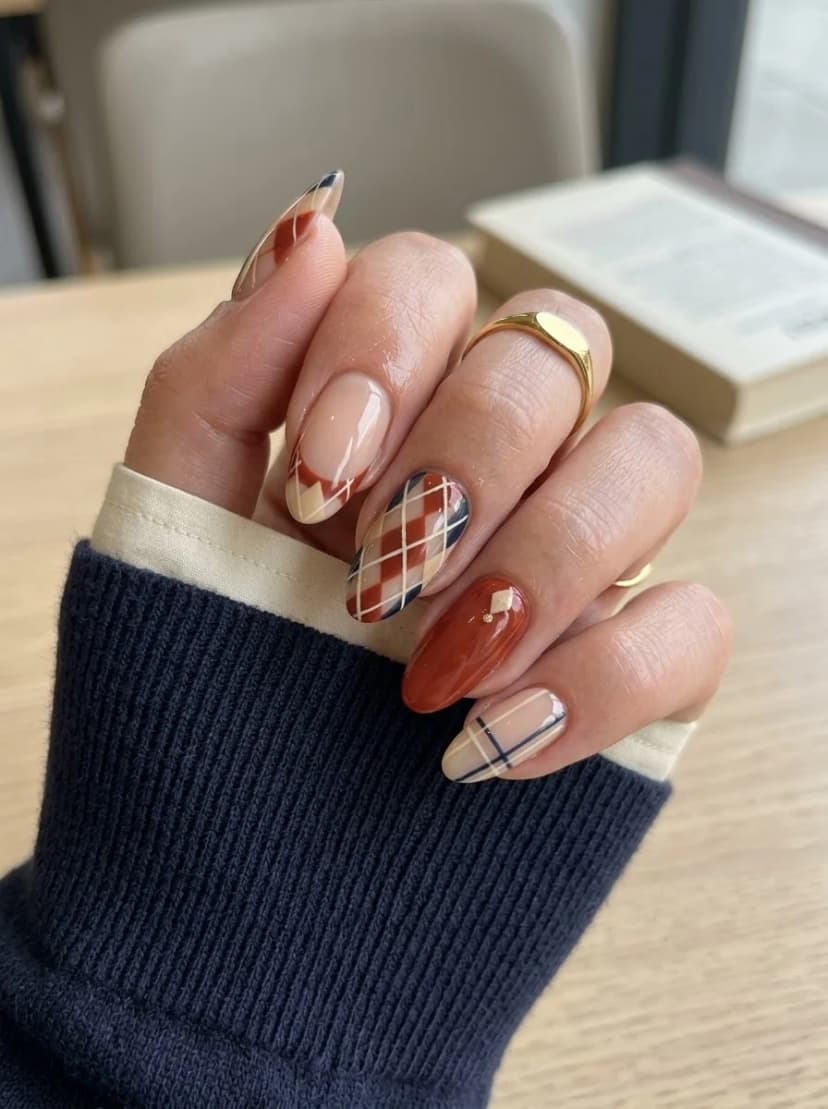
Mixing plaid, solid rust, and French tip variations across five nails creates a set that looks curated rather than random. One nail features a full plaid pattern in rust, navy, and cream. Another is solid rust with a small gold accent near the cuticle. The remaining nails use nude bases with geometric French tip details and subtle plaid accents.
The rust color is the thread that ties everything together. It appears in the plaid, as the solid accent, and in the French tip details. That repetition creates cohesion across what could otherwise feel like five separate designs.
The almond shape suits this mixed approach because the elongated surface gives each variation enough room to read clearly. The plaid nail needs space for its intersecting lines, and the French tip nails need length for the curved detail work.
DESIGN BREAKDOWN:
Multiple patterns united by a single color family. The rust is the glue.
- Nail Color Used: Rust/burnt orange, navy, cream, and sheer nude.
- Suitable Nail Shape: Medium to long almond. The elongated shape suits the varied patterns.
- Design Element: Plaid pattern on one nail, solid rust with gold accent, and French tip variations on the remaining nails.
- Finish: High-gloss top coat for a unified, polished look.
- Tools Used: Thin striping brush for plaid lines, detail brush for French tips.
GET THE LOOK AT HOME:
Plan which nail gets which design before you start. Work through each pattern type across all nails rather than completing one nail at a time.
- Base: Apply nude to the French tip nails and rust to the solid accent nail. Let dry.
- Plaid nail: On the designated nail, paint a cream base. Add horizontal and vertical lines in rust and navy to create the plaid grid.
- French tips: On the nude nails, paint geometric French tip details using rust and navy. Keep the lines thin and angular.
- Gold accent: Add a small gold metallic dot or line near the cuticle of the solid rust nail.
- Seal: Apply a thick top coat to smooth out the texture from the layered plaid lines.
Pro Tip: Use striping tape for the plaid lines. It creates cleaner, straighter lines than freehand and saves significant time.
11. Teal Double French Tip Nails
OVERVIEW:
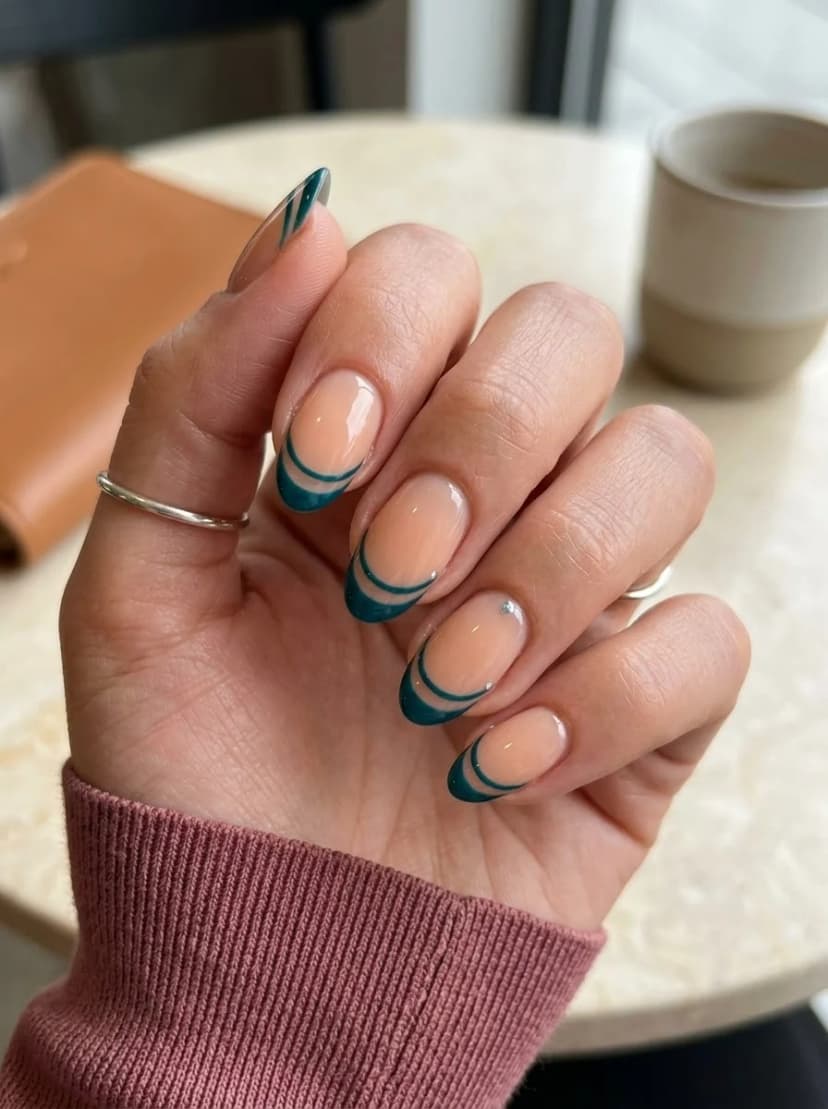
A double French tip means two thin lines at the tip instead of one. This version uses a deep teal for both lines, with a narrow gap of nude between them. The effect is a layered, dimensional French that looks more considered than a single-color tip.
The teal is dark enough to read as sophisticated rather than playful, which makes this design work in professional settings. The double line adds visual interest without adding complexity. It is a small variation on a classic format that makes the whole manicure feel updated.
The almond shape is ideal for double French tips because the curved tip creates a natural, flowing smile line. On square nails, the double line would look more angular and less organic. The gap between the two lines needs to be consistent across all nails, which requires a steady hand or French tip guides.
DESIGN BREAKDOWN:
Classic French structure, doubled. The teal does all the work.
- Nail Color Used: Sheer nude base and deep teal.
- Suitable Nail Shape: Medium almond. The curved tip creates the best smile line.
- Design Element: Two parallel teal French tip lines on each nail with nude space between them.
- Finish: High-gloss top coat for a clean, modern finish.
- Tools Used: Thin liner brush or French tip guides, steady hand.
GET THE LOOK AT HOME:
The gap between the two lines is what makes this design. Keep it narrow and consistent.
- Base: Apply two coats of sheer nude to all nails. Let dry.
- First line: Using a thin liner brush, paint a teal line at the very tip of each nail. Keep it narrow.
- Second line: Paint a second teal line just below the first, leaving a thin strip of nude between them.
- Consistency: Check each nail from a distance to make sure the gap width is uniform.
- Seal: Apply a glossy top coat to finish.
Pro Tip: If freehanding both lines feels daunting, paint the first line, let it dry, then use French tip guides to mask off the gap area before painting the second line. It adds time but guarantees clean separation.


12. Burgundy Plaid Accent Nails
OVERVIEW:
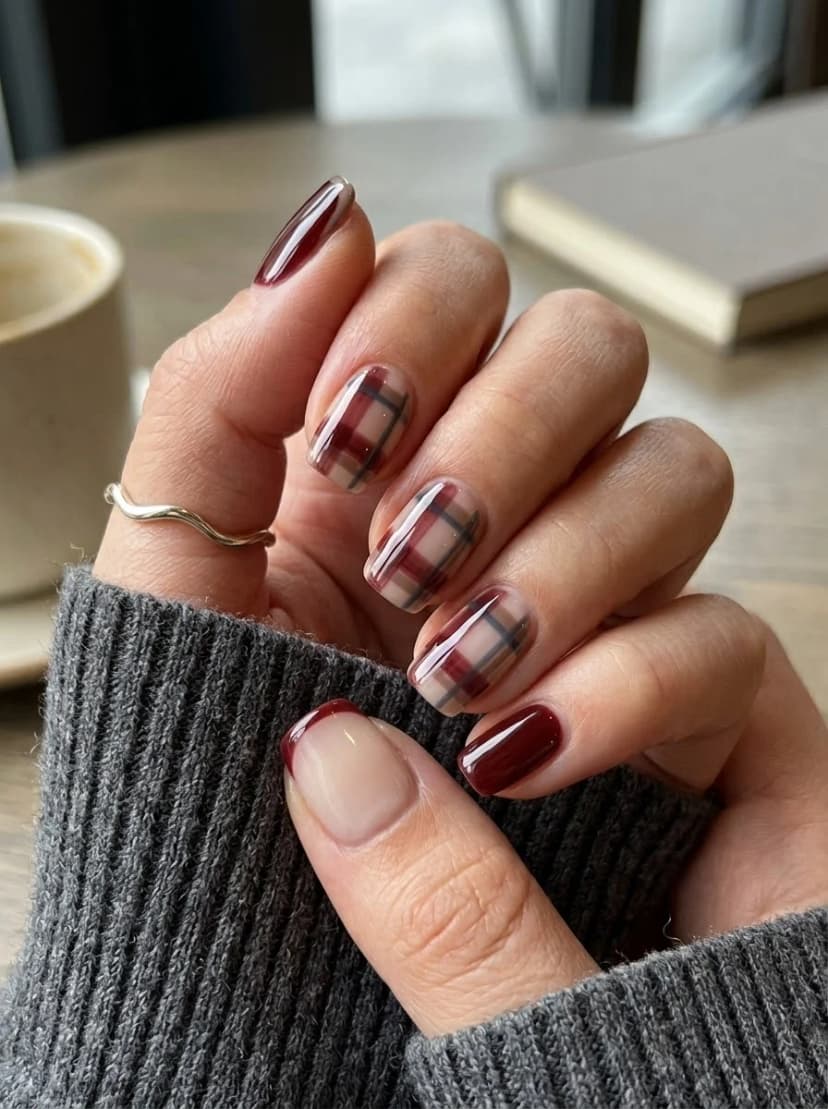
This design uses burgundy as the dominant color across a mix of solid nails and plaid-patterned nails. Three nails feature a translucent plaid in burgundy, grey, and green over a sheer base, while the remaining nails alternate between solid burgundy and a burgundy French tip. The overall effect is warm and layered.
The plaid here is more transparent than the typical opaque version. The sheer base shows through the intersecting lines, which gives the pattern a lighter, more modern quality. It reads as fabric draped over the nail rather than painted on top.
Short nails work well for this design because the plaid pattern is small-scale and the solid nails are straightforward. The compact format keeps everything tight and cohesive. Longer nails would require more lines in the plaid to fill the surface, which could make it look busy.
DESIGN BREAKDOWN:
Warm plaid paired with solid burgundy. The sheer base modernizes the pattern.
- Nail Color Used: Deep burgundy, black, grey, and sheer nude.
- Suitable Nail Shape: Short square or almond. The compact shape keeps the plaid tight.
- Design Element: Sheer plaid pattern on three nails, solid burgundy or burgundy French tips on both.
- Finish: High-gloss top coat for a polished, fabric-like quality.
- Tools Used: Thin striping brush for plaid lines.
GET THE LOOK AT HOME:
The plaid lines should be thin and evenly spaced. Work one direction at a time.
- Base: Apply sheer nude to all nails. Let dry.
- Solid nails: Paint two nails with two coats of burgundy. Let dry.
- Plaid lines: On the designated nails, paint thin horizontal lines in burgundy, then crossing vertical lines in green and grey.
- French tip: If you want something different designs on remaining nails, you can paint a thin burgundy French tip.
- Seal: Apply a thick top coat to smooth out the line texture.
Pro Tip: Use sheer or jelly burgundy for the plaid lines instead of opaque. It creates the translucent, fabric-like quality that separates this from a standard plaid design.
13. Brown and Blue Abstract Block Nails
OVERVIEW:
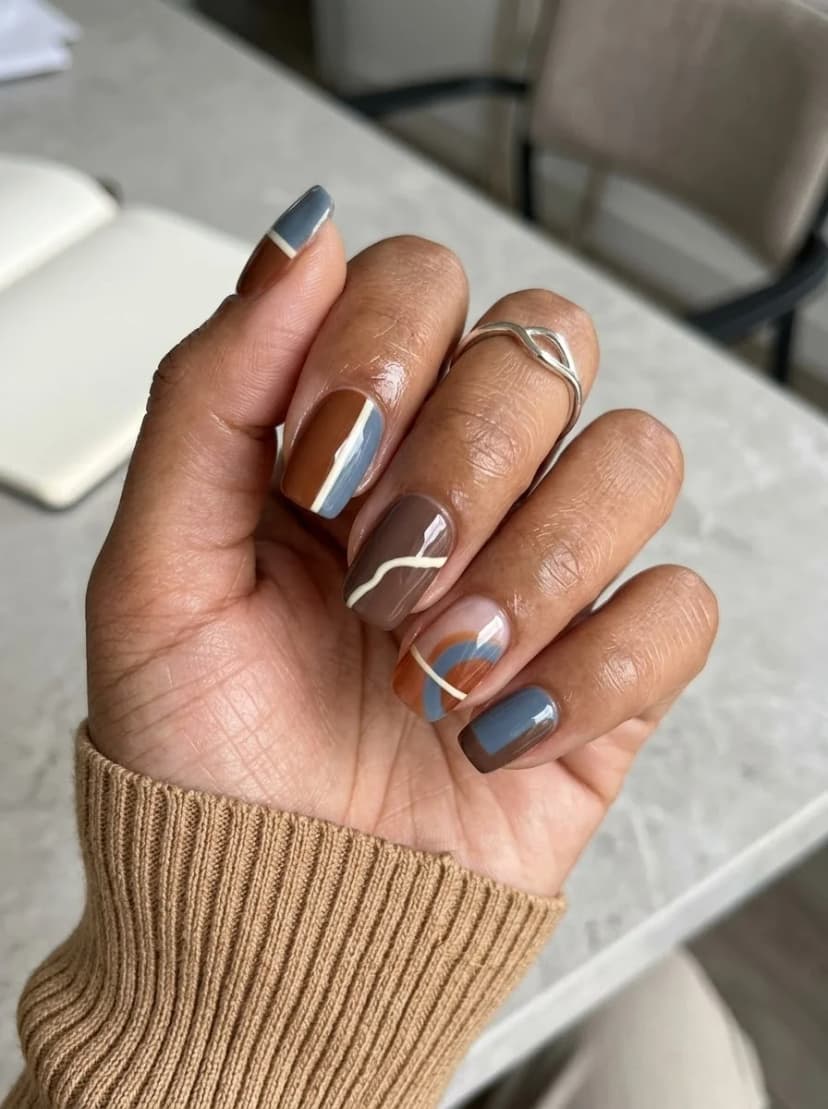
Abstract color blocking in warm brown, dusty blue, and cream creates a design that looks like a modern art painting. Each nail features different shapes and sections of color separated by thin white or cream lines. Some nails are mostly brown, others lean blue, and one nail combines both colors with curved, organic shapes.
The brown and blue combination is unexpected but grounded. The brown keeps things warm and autumnal, while the blue adds a cool counterpoint that prevents the design from feeling too monochromatic. The cream lines between the color blocks act as borders that define each section.
This design rewards patience. Each color block needs to dry before you add the next section, or the colors will bleed at the boundaries. The thin white lines between blocks are the hardest part because they need to be clean and continuous.
DESIGN BREAKDOWN:
Color-blocked sections with defined borders. The cream lines hold the composition together.
- Nail Color Used: Warm brown, dusty blue, cream, and white.
- Suitable Nail Shape: Medium square. The flat surface suits the geometric blocking.
- Design Element: Abstract color blocks in brown, blue, and cream separated by thin white lines.
- Finish: High-gloss top coat to seal the design and add depth.
- Tools Used: Detail brush for color blocks, fine striping brush for border lines.
GET THE LOOK AT HOME:
Work one color at a time and let each block dry fully before adding the next.
- Base: Apply two coats of cream to all nails. Let dry.
- Brown blocks: Using a detail brush, paint large brown shapes on two or three nails. Keep the edges rough and organic.
- Blue blocks: Add blue sections to the remaining nails and partially overlapping the brown on others.
- Border lines: Using a thin striping brush and white polish, paint thin lines along the edges where colors meet.
- Seal: Apply a glossy top coat to finish.
Pro Tip: Keep the color blocks large and bold. Tiny sections will make the design look cluttered instead of artistic. Two or three blocks per nail is enough.


14. Mauve Polka Dot Nails
OVERVIEW:
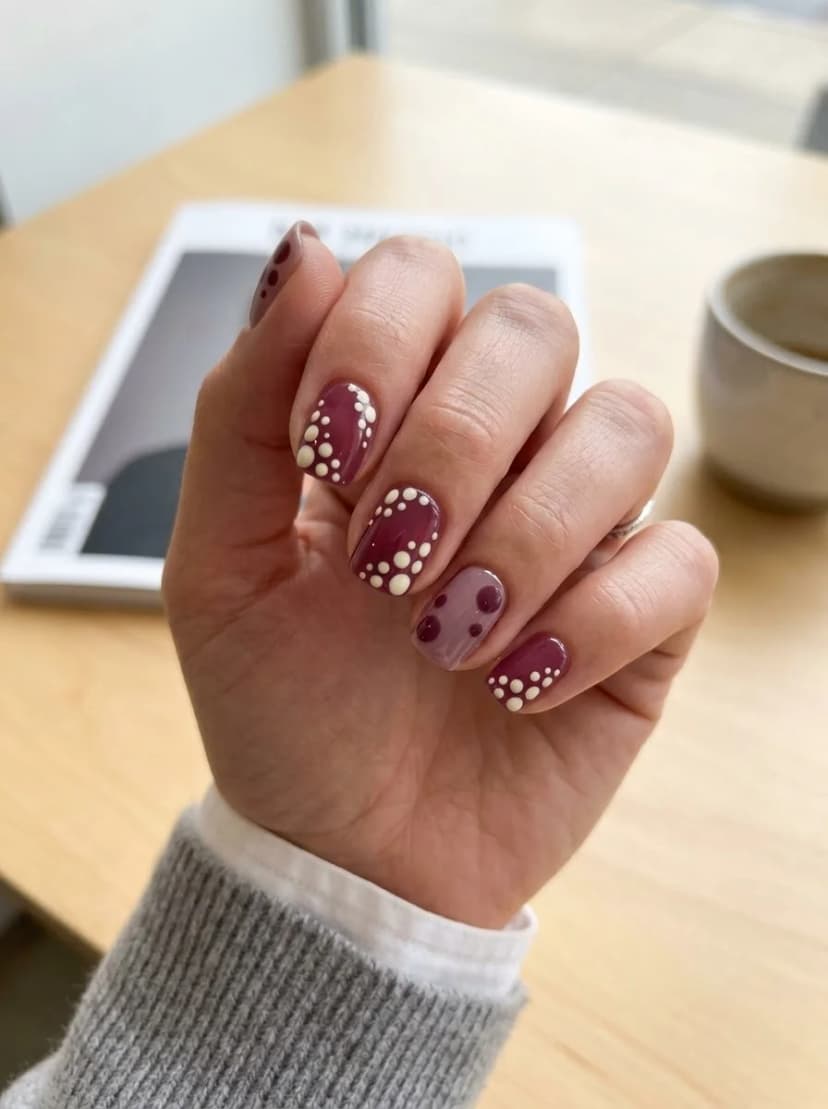
Dusty mauve with cream polka dots is a combination that feels vintage without being costume-y. The dots are clustered in groups rather than spread evenly across the nail, which gives the design a more organic, less uniform quality. One nail features larger dots in a different shade, which breaks up the pattern and adds visual variety.
The mauve is the right shade for September. It is muted enough to work in professional settings, warm enough to feel seasonal, and dark enough to hide minor chips better than a pastel would. The cream dots contrast against the mauve without the harshness that white dots would create.
Polka dots are one of the most forgiving designs for beginners. The dotting tool does most of the work, and the clustered placement means precision is less important than you would think. Slightly uneven spacing actually looks better than perfect grid-like uniformity.
DESIGN BREAKDOWN:
Clustered dots on a muted base. The cream softens the contrast.
- Nail Color Used: Dusty mauve/burgundy and cream/off-white.
- Suitable Nail Shape: Short square or round. The compact shape suits the small-scale pattern.
- Design Element: Clustered cream polka dots on mauve nails, one accent nail with larger dots.
- Finish: Glossy top coat for a smooth, polished surface.
- Tools Used: Dotting tool in two sizes, cleanup brush.
GET THE LOOK AT HOME:
Cluster the dots rather than spreading them evenly. It creates a more natural, less mechanical pattern.
- Base: Apply two coats of dusty mauve to all nails. Let dry.
- Dot clusters: Using a medium dotting tool dipped in cream, press groups of three to five dots onto each nail. Cluster them near the center or off to one side.
- Accent nail: On one nail, use a larger dotting tool to create bigger dots in a darker shade of mauve or burgundy.
- Seal: Apply a glossy top coat to smooth out the dot texture.
Pro Tip: If the dots look too sparse, add a few smaller dots between the larger ones. This fills the gaps without making the pattern feel dense.
15. Olive Green with Gold Shell Accent
OVERVIEW:
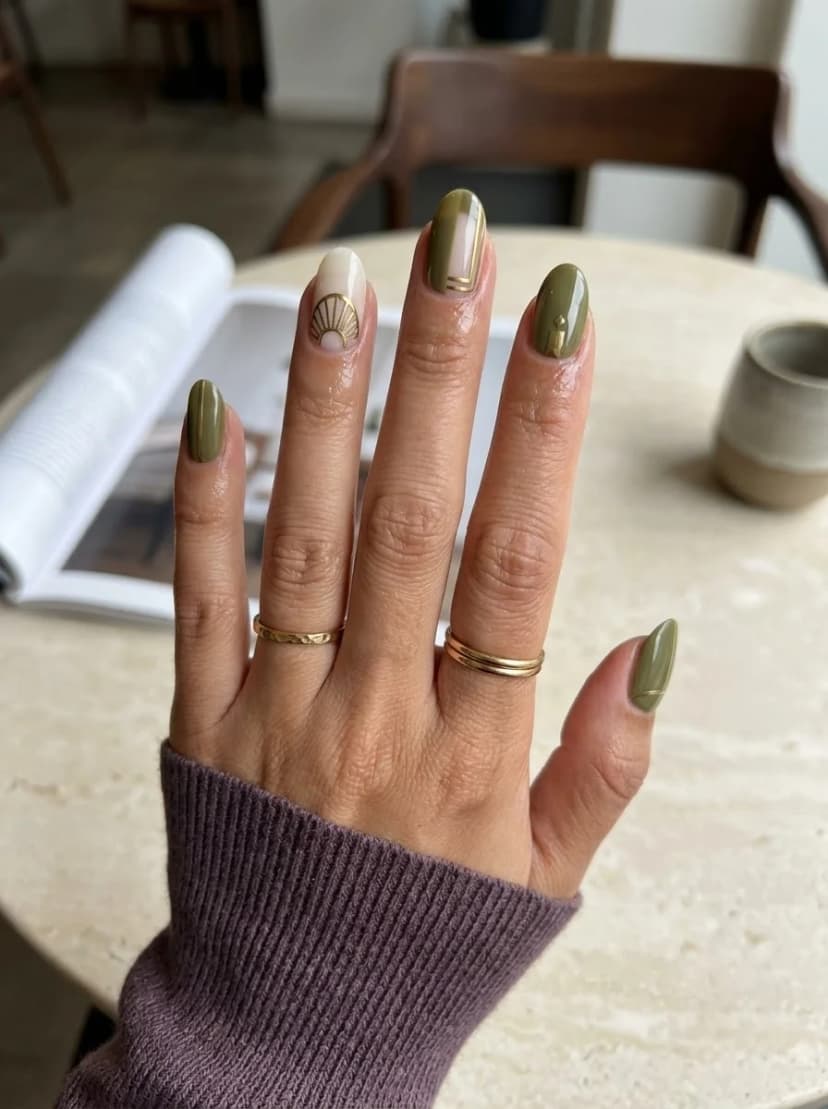
Olive green as a solid color on four nails, with one cream accent nail featuring a gold fan or shell motif. Small gold metallic accents appear on the green nails as well, creating a subtle thread of metallic warmth that ties the set together. The gold is used sparingly, which makes it feel like jewelry rather than decoration.
The olive green itself is deep and earthy without veering into neon or pastel territory. It sits comfortably in the fall palette while still feeling fresh enough for early September. The cream accent nail with the gold shell detail adds a point of visual interest that elevates the entire set from a simple solid-color manicure.
The shell or fan motif is hand-painted, which means each one will look slightly different. That variation is part of the charm. The gold accents on the green nails are small enough that they catch light without dominating the design.
DESIGN BREAKDOWN:
Earthy solid with a single metallic art accent. The gold shell is the focal point.
- Nail Color Used: Olive green, cream, and gold metallic polish.
- Suitable Nail Shape: Almond. The curved shape complements the organic shell motif.
- Design Element: Solid olive green on four nails, cream accent with gold shell art, small gold accents on green nails.
- Finish: High-gloss top coat to enhance the gold shimmer and green depth.
- Tools Used: Fine detail brush for shell art and gold accents.
GET THE LOOK AT HOME:
Paint the solid green nails first. They are quick and build confidence before the detail work.
- Green nails: Apply two coats of olive green to four nails. Let dry.
- Cream accent: Apply two coats of cream to one nail. Let dry.
- Shell art: Using a fine detail brush and gold metallic polish, paint a fan or shell shape on the cream nail. Start with a small semi-circle at the base and radiate lines outward.
- Gold accents: Add small gold dots or thin lines to two or three of the green nails. Keep them minimal.
- Seal: Apply a glossy top coat to all nails.
Pro Tip: If the shell motif feels too complex, simplify it to a gold semi-circle with three to four radiating lines. The basic shape reads as a shell or fan without requiring precise detail work.
16. Brown, Yellow and Purple Abstract Watercolor Dot Nails
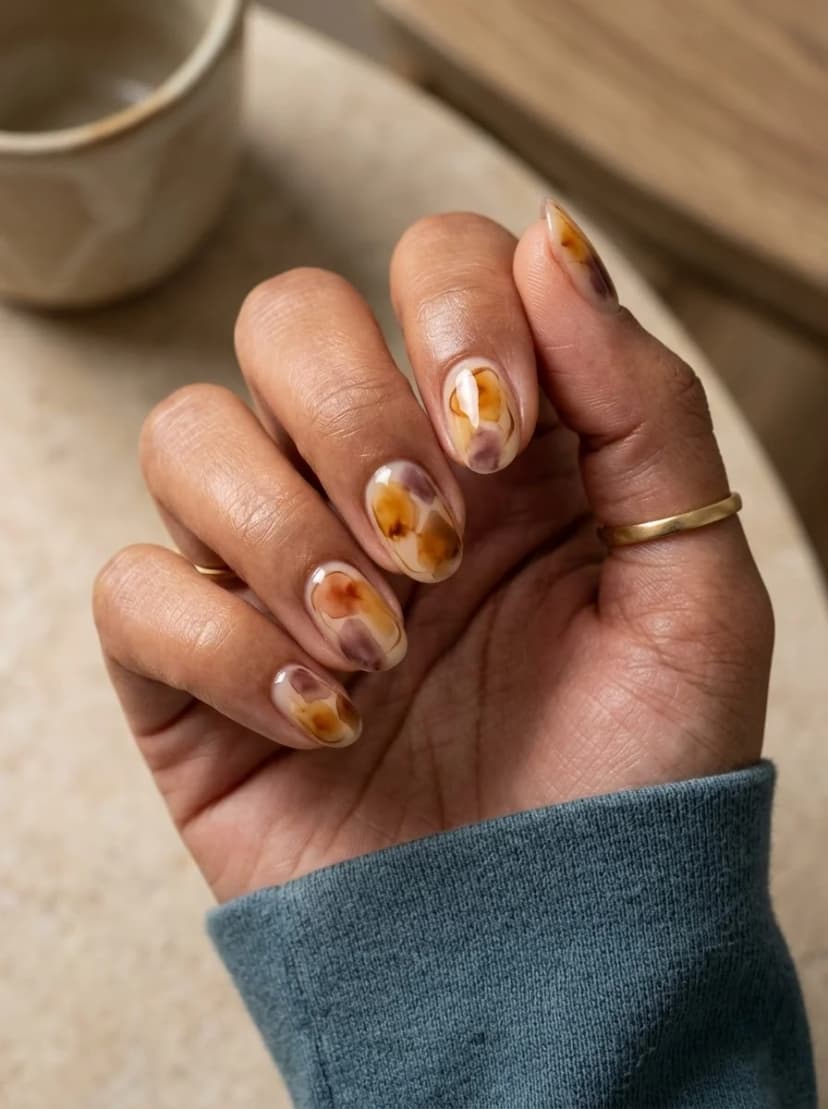
OVERVIEW:
Soft watercolor-style dots in brown, purple, and yellow create a design that looks like pigment droplets diffusing on paper. The colors bloom outward with soft, blurred edges, while the sheer nude base shows through, adding depth and transparency. Each nail features unique organic spots, giving the manicure an artistic, painterly finish.
The brown, yellow, and purple combination is unusual but grounded. The brown keeps things warm and autumnal, while the purple adds a cool, moody undertone and the yellow gives it subtle brightness. Where the colors overlap and bleed at the edges, they create soft translucent transitions that look like watercolor pigment settling on wet paper.
This effect relies on a blooming gel or wet-on-wet technique, allowing drops of color to spread naturally into soft dots. Letting the polish bloom on its own without dragging or forcing swirl patterns is key to keeping the watercolor effect soft and fluid.
DESIGN BREAKDOWN:
Wet-on-wet watercolor dot technique. The soft-focus blooming edges are the point.
- Nail Color Used: Sheer nude base, warm brown, yellow, and muted purple.
- Suitable Nail Shape: Medium to long almond. The elongated surface lets the watercolor dots expand naturally.
- Design Element: Soft watercolor-style dots and blotches of brown, yellow, and purple over a sheer nude base.
- Finish: Glossy top coat to seal the design and enhance the translucent quality.
- Tools Used: Dotting tool or fine detail brush, blooming gel or alcohol ink/gel polish, foil palette.
GET THE LOOK AT HOME:
Work one nail at a time so the watercolor dots bleed and bloom evenly before setting.
- Base: Apply one coat of sheer nude to all nails. Let dry or cure.
- Blooming layer: Apply a thin coat of blooming gel or wet clear polish. Do not cure or let dry yet.
- Drop colors: While the wet layer is active, dab small dots of brown, yellow, and purple onto the nail using a dotting tool. Allow 10–15 seconds for the dots to bleed outwards into soft watercolor spots.
- Seal: Cure under UV/LED lamp (or let dry), then apply a thick glossy top coat to smooth out texture and lock in the look.
Pro Tip: If the dots spread too quickly or bleed together, flash-cure for a few seconds between adding each color to keep individual watercolor spots distinct.
17. Green, Purple, and Yellow Aura Nails
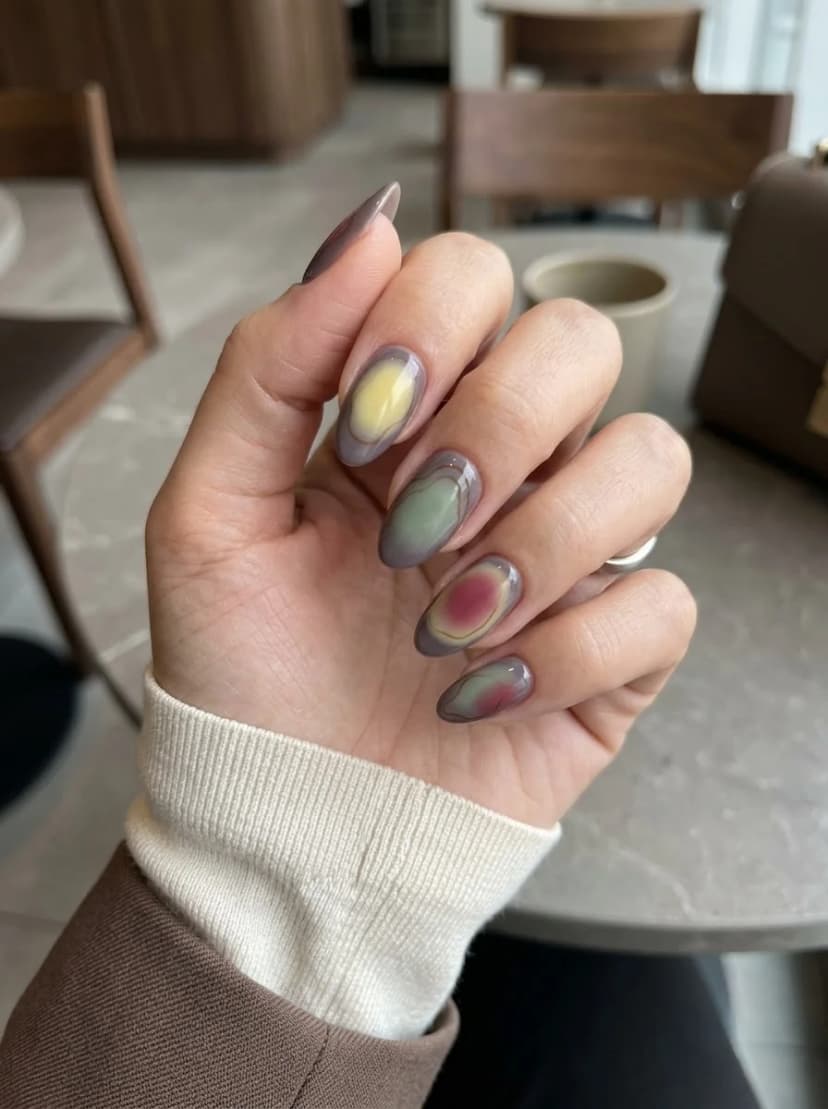
OVERVIEW:
Aura nails use a gradient technique where color radiates outward from the center of the nail, creating a soft, glowing effect. This version uses different color combinations on each nail: yellow surrounded by grey, green surrounded by grey, and purple with yellow and grey edges. The result is a set that looks like a collection of polished gemstones.
The muted, grey-toned versions of these colors keep the design from looking neon or costume-like. The yellow is closer to primrose than highlighter, the green is sage rather than lime, and the purple is dusty rather than electric. That tonal restraint is what makes three bold colors work together without clashing.
Creating the aura effect requires blending two colors while they are still wet, which means working quickly and accepting some inconsistency between nails. The gradient will not be perfectly smooth on every nail, and that is fine. The soft, diffused quality is what makes aura nails distinctive.
DESIGN BREAKDOWN:
Radial gradient technique with multiple color pairs. Each nail is its own combination.
- Nail Color Used: Muted yellow, sage green, dusty purple, and grey.
- Suitable Nail Shape: Medium to long almond. The curved surface maximizes the glow effect.
- Design Element: Aura-style radial gradients with different color centers on each nail.
- Finish: High-gloss top coat to seal the gradient and add depth.
- Tools Used: Makeup sponge or small brush for blending.
GET THE LOOK AT HOME:
Work one nail at a time. The blending needs to happen while the polish is still wet.
- Base: Apply one coat of grey to all nails. Let dry.
- Wet layer: Apply a second coat of grey. Do not let it dry.
- Color center: While the grey is wet, place a dot of yellow, green, or purple in the center of each nail.
- Blend: Use a small brush or sponge to gently blur the edges of the color outward into the grey. Work in circular motions.
- Seal: Wait five minutes, then apply a thick top coat to smooth out the gradient.
Pro Tip: If the gradient looks patchy, do not add more polish. Just blend what is there. Adding more product creates a thick, lumpy layer that takes forever to dry.
18. Nude Marble with Gold Flakes
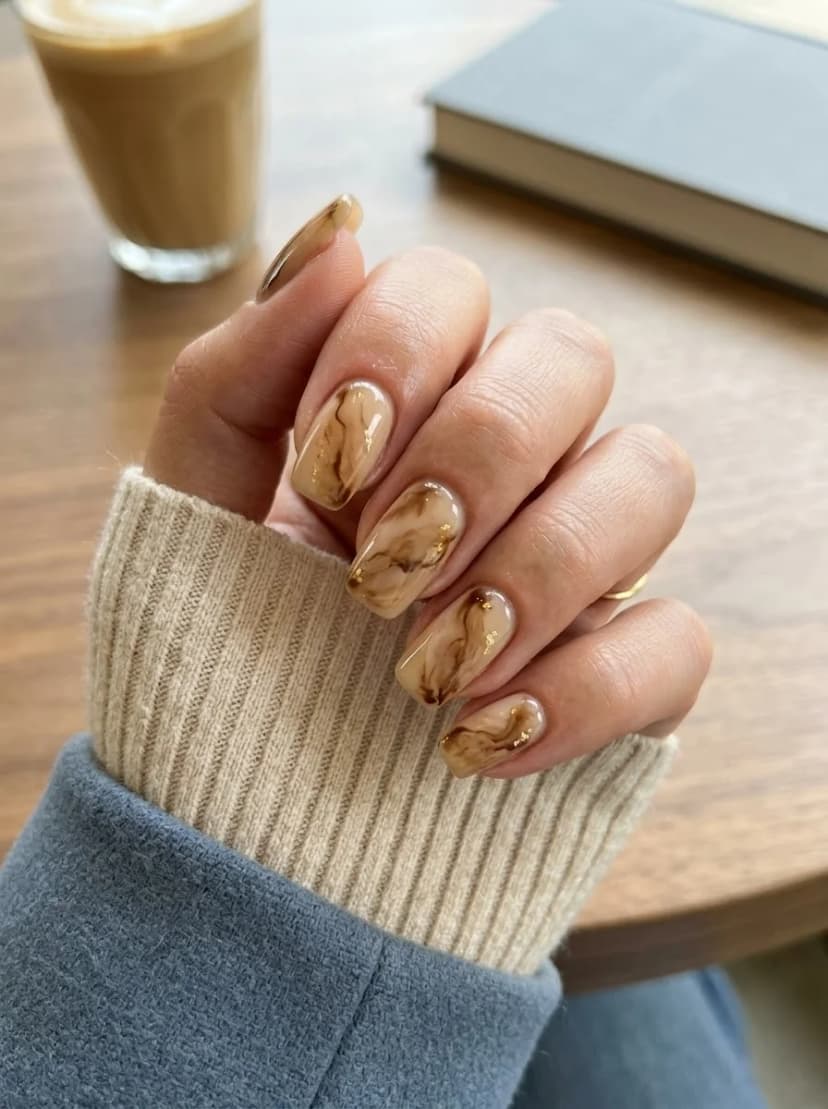
OVERVIEW:
Brown marble over a warm nude base with gold leaf flakes scattered across each nail. The marble effect is achieved with a wet-on-wet technique that creates organic, flowing veins of darker brown through the lighter base. The gold flakes add a metallic flash that breaks up the organic pattern.
This is one of those designs that looks expensive even though it is achievable at home. The marble technique produces a different pattern on every nail, which gives the set a natural, stone-like quality. No two pieces of marble are identical, and the same principle applies here.
The gold flakes are optional but worth the extra effort. Without them, the marble is still attractive, but the metallic interruption adds a layer of luxury that takes the design from nice to noticeable. Working with gold leaf requires tweezers and a light touch. The flakes are fragile and will crumble if handled roughly.
DESIGN BREAKDOWN:
Organic marble with metallic accents. Every nail is unique.
- Nail Color Used: Warm nude base, chocolate brown, and gold leaf flakes.
- Suitable Nail Shape: Almond or coffin. The elongated shape gives the marble room to breathe.
- Design Element: Brown marble swirls with scattered gold leaf flakes over a warm nude base.
- Finish: High-gloss top coat to seal the gold leaf and create a polished stone effect.
- Tools Used: Toothpick or fine brush, tweezers for gold leaf, foil palette.
GET THE LOOK AT HOME:
Work one nail at a time. The wet-on-wet technique requires quick, confident moves.
- Base: Apply one coat of warm nude to all nails. Let dry.
- Wet layer: Apply a second thin coat of nude. Do not let it dry.
- Drop colors: While the base is wet, place small dots of brown onto the nail. Use a toothpick to drag through them in flowing lines. Three or four drags per nail maximum.
- Gold leaf: While the marble is still tacky, use tweezers to press small gold leaf flakes onto the surface.
- Seal: Wait five minutes, then apply a thick top coat to smooth out texture and encapsulate the gold leaf.
Pro Tip: If the marble looks muddy, you are over-mixing. Use fewer drops of brown and limit yourself to three drags per nail.
19. Sage Green Leopard Print Nails
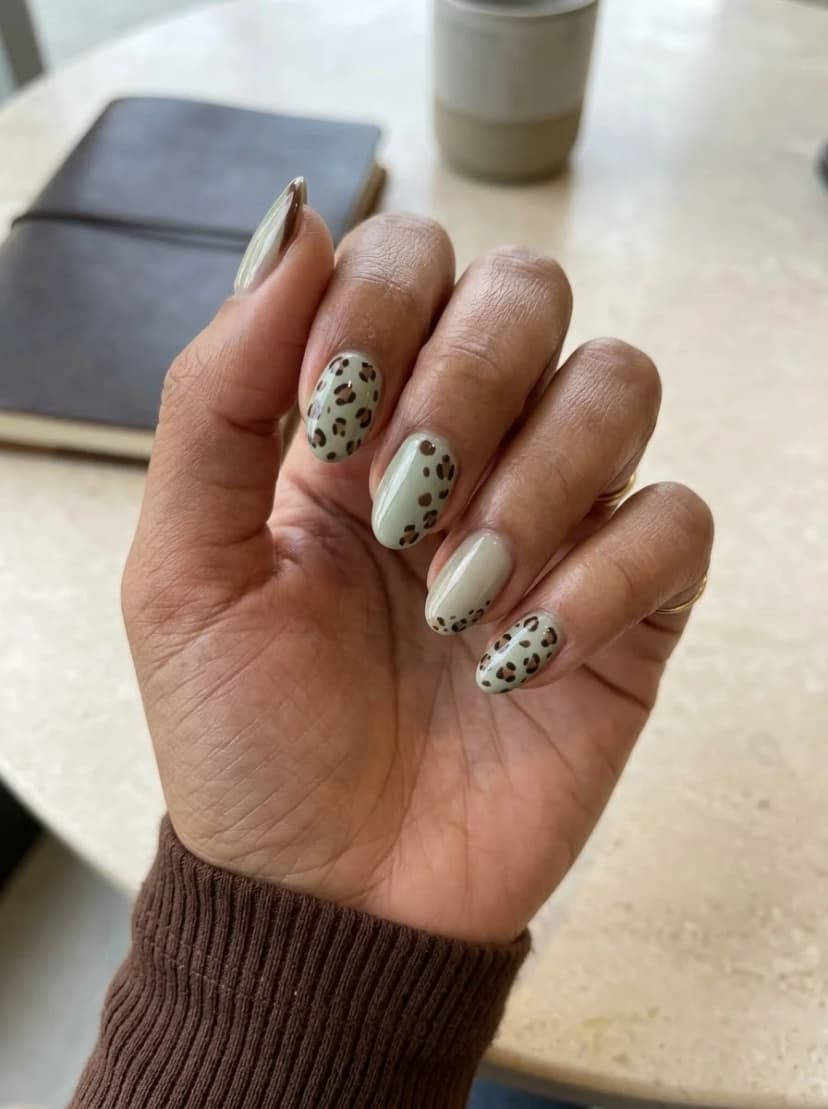
OVERVIEW:
Sage green as a base with brown leopard spots on three nails. The leopard print is done in a tonal brown that sits close to the sage in warmth, which makes the pattern feel organic rather than costume-like. Two nails stay solid sage, giving the set a balanced rhythm between patterned and plain.
What separates this from typical leopard print is the color pairing. Brown spots on a nude or tan base is the standard approach. Putting them on sage green pushes the design into territory that feels more autumnal and less like a fashion-week trend. The muted green acts as a neutral, which is why the brown spots look at home rather than forced.
Leopard spots are forgiving because they are not meant to be uniform. Each spot should look slightly different in shape and size. If you try to make them identical, the pattern will look mechanical and lose the quality that makes animal print work.
DESIGN BREAKDOWN:
Animal print on an earthy base. The sage green makes it feel grounded.
- Nail Color Used: Muted sage green and warm brown.
- Suitable Nail Shape: Short round or almond. Both suit the organic nature of the print.
- Design Element: Brown leopard spots on three sage green nails, two solid sage accent nails.
- Finish: Glossy top coat for a polished, unified look.
- Tools Used: Dotting tool or small brush for leopard spots.
GET THE LOOK AT HOME:
Paint the solid nails first to establish the base color, then add spots to the remaining nails.
- Green base: Apply two coats of sage green to all nails. Let dry.
- Leopard spots: Using a dotting tool or small brush dipped in brown, paint irregular C-shaped and O-shaped spots across three nails. Vary the sizes and spacing.
- Fill gaps: If the spots feel too sparse, add a few smaller solid brown dots between the larger spots.
- Seal: Apply a glossy top coat to finish.
Pro Tip: Real leopard spots are not round. Use the tip of your brush to drag the edges of each spot into irregular shapes. Two or three spots per nail is enough.


20. Tortoiseshell French Tip Nails
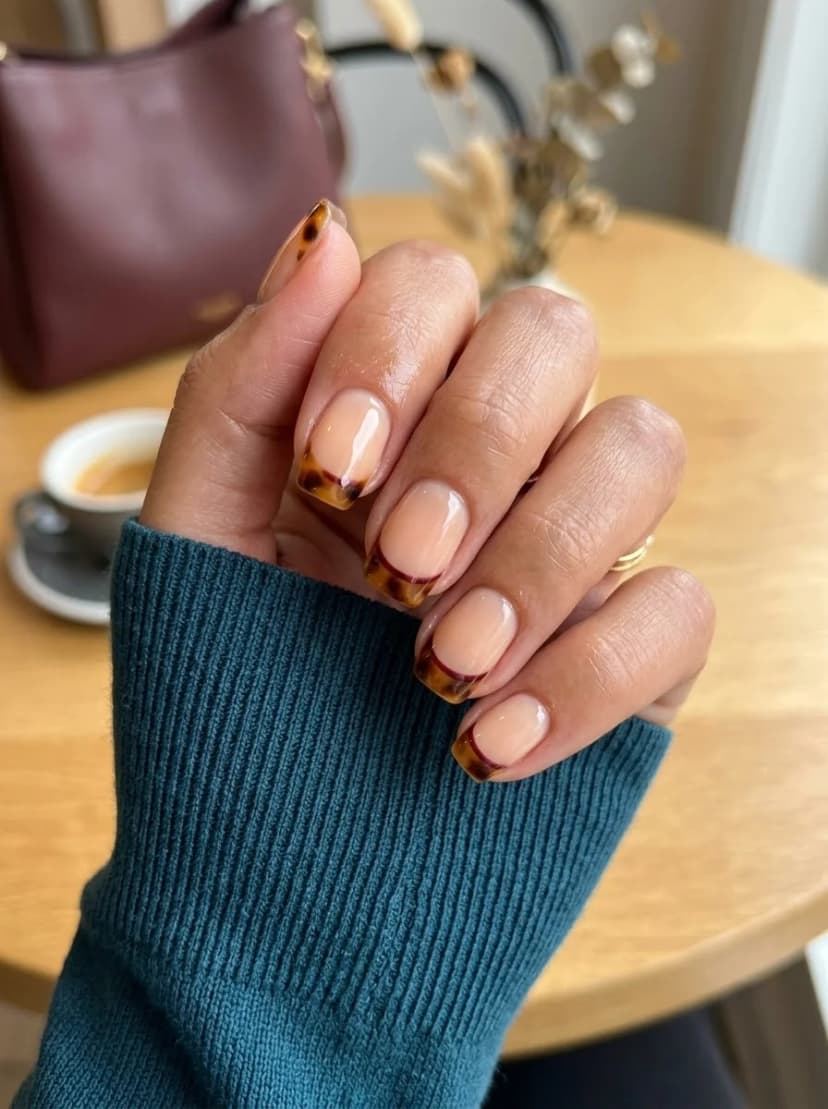
OVERVIEW:
The classic French tip gets a fall upgrade with tortoiseshell replacing the traditional white. The tips feature a mix of amber, brown, and dark spots that mimic the pattern of polished tortoiseshell. The nude base stays clean and natural, which lets the patterned tips be the focal point.
Tortoiseshell works particularly well as a French tip because the pattern is contained to a small area. When tortoiseshell covers the entire nail, it can feel heavy or busy. As a tip, it becomes a subtle accent that adds warmth and texture without overwhelming the hand.
The challenge is creating the tortoiseshell effect in a narrow tip area. The spots need to be smaller and more tightly packed than they would be on a full nail, which requires a steady hand and a very small brush. If freehand work feels daunting, you can apply the tortoiseshell pattern to a thin strip of nail wrap or decal and trim it to fit the tip.
DESIGN BREAKDOWN:
Classic French structure with a patterned twist. The tortoiseshell tips are the whole point.
- Nail Color Used: Sheer nude base, amber, dark brown, and black for the tortoiseshell tips.
- Suitable Nail Shape: Short to medium square. The flat tip makes the pattern easier to execute.
- Design Element: Tortoiseshell-patterned French tips over a sheer nude base.
- Finish: High-gloss top coat to seal the pattern and add depth.
- Tools Used: Fine detail brush for spots, French tip guides.
GET THE LOOK AT HOME:
Build the tortoiseshell pattern in layers. Start with the lighter amber, then add darker spots on top.
- Base: Apply two coats of sheer nude to all nails. Let dry.
- Amber tip: Using a detail brush, paint the French tip area with amber polish. Keep the line clean.
- Dark spots: While the amber is still slightly wet, add small spots of dark brown and black to the tip area. The colors will blend slightly at the edges.
- Seal: Apply a thick top coat to smooth out the spot texture and add depth.
Pro Tip: Keep the spots small and tightly packed. Large spots in a narrow tip area will look cluttered rather than like tortoiseshell.
21. Multicolor Star Art Nails
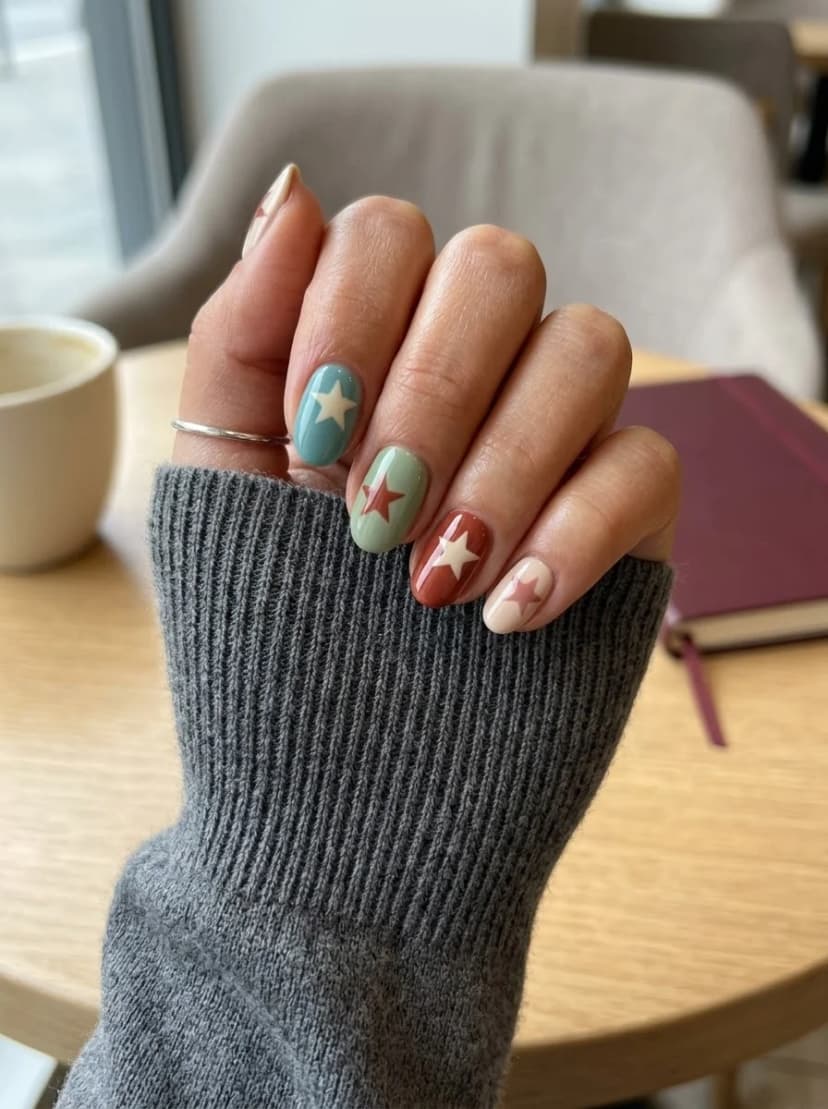
OVERVIEW:
Each nail gets a different base color, teal, sage green, rust, and cream, with a contrasting star painted in the center. The stars are simple, five-pointed shapes done in white or a lighter shade of the base color. The result is playful without being juvenile, and the varied color palette keeps the set feeling curated rather than random.
The color choices are what ground this design in September. Teal and rust are warm-cool complements that feel autumnal, while the sage green and cream keep things muted and earthy. A bright pink or electric blue star would push this into summer territory. The muted palette keeps it seasonal.
Stars are one of the simpler shapes to paint, but getting clean points requires a steady hand. The five-pointed star is basically five triangles meeting at a center point. If freehand painting feels risky, star stickers or decals can achieve the same effect in a fraction of the time.
DESIGN BREAKDOWN:
Muted multi-color base with simple star art. The variety is the appeal.
- Nail Color Used: Teal, sage green, rust/burnt orange, and cream.
- Suitable Nail Shape: Short round. The compact shape suits the simple star motif.
- Design Element: Different base colors on each nail with contrasting star art in the center.
- Finish: Glossy top coat for a clean, modern look.
- Tools Used: Fine detail brush for stars, or star stickers.
GET THE LOOK AT HOME:
Paint all the base colors first, then add the stars in one pass.
- Base colors: Apply two coats of each color to designated nails. Let dry completely.
- Star shapes: Using a fine detail brush and white polish, paint a small five-pointed star in the center of each nail. Start with five short lines radiating from a center point, then connect the tips.
- Seal: Apply a glossy top coat to finish.
Pro Tip: Keep the stars small, roughly the width of your brush tip. Large stars on short nails can look crowded and lose their shape.


22. Bronze and Brown Chrome Swirl Nails
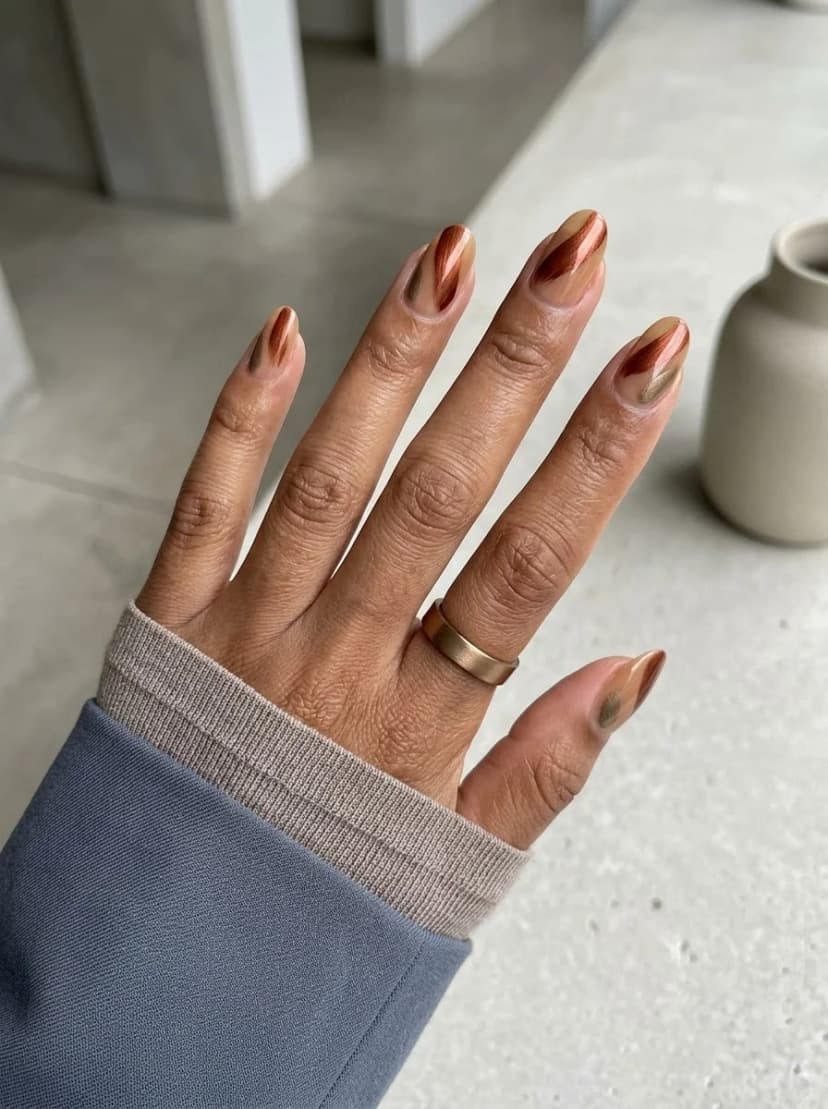
OVERVIEW:
Metallic bronze and warm brown swirl together in flowing lines across each nail. The bronze has a chrome-like finish that catches light and creates a sense of movement. The brown provides a matte counterpoint that grounds the metallic shimmer. The two colors twist around each other like cream stirred into coffee.
Chrome and metallic polishes show brush strokes more than cream finishes. The swirl technique actually works in your favor here because the lines and variations in the metallic look intentional rather than like application mistakes. The movement of the swirl disguises any imperfections in the chrome finish.
The almond shape is the ideal match for this design. The tapered tip elongates the fingers, and the curved surface lets the chrome shift between brighter and darker tones as your hand moves. It is the kind of manicure that catches light from across a room.
DESIGN BREAKDOWN:
Two metallic-adjacent tones in organic swirls. The bronze does the heavy lifting.
- Nail Color Used: Metallic bronze/chrome and warm brown.
- Suitable Nail Shape: Almond. The curved surface maximizes the chrome light effect.
- Design Element: Swirling lines of bronze and brown across all nails.
- Finish: High-gloss top coat to enhance the chrome depth.
- Tools Used: Thin striping brush for the swirl lines.
GET THE LOOK AT HOME:
Keep your brush fully loaded for smooth, continuous swirls. A dry brush creates scratchy, broken lines.
- Base: Apply two coats of warm brown to all nails. Let dry.
- Bronze swirls: Load a striping brush with metallic bronze and paint one or two flowing, curved lines across each nail. Vary the direction on each nail.
- Seal: Apply a glossy top coat to lock in the design. Use a light hand over the bronze to avoid smearing.
Pro Tip: If the bronze looks too thin, go over the line once more without letting it dry between strokes. The second pass deepens the metallic without adding texture.
23. Navy Blue Geometric Section Nails
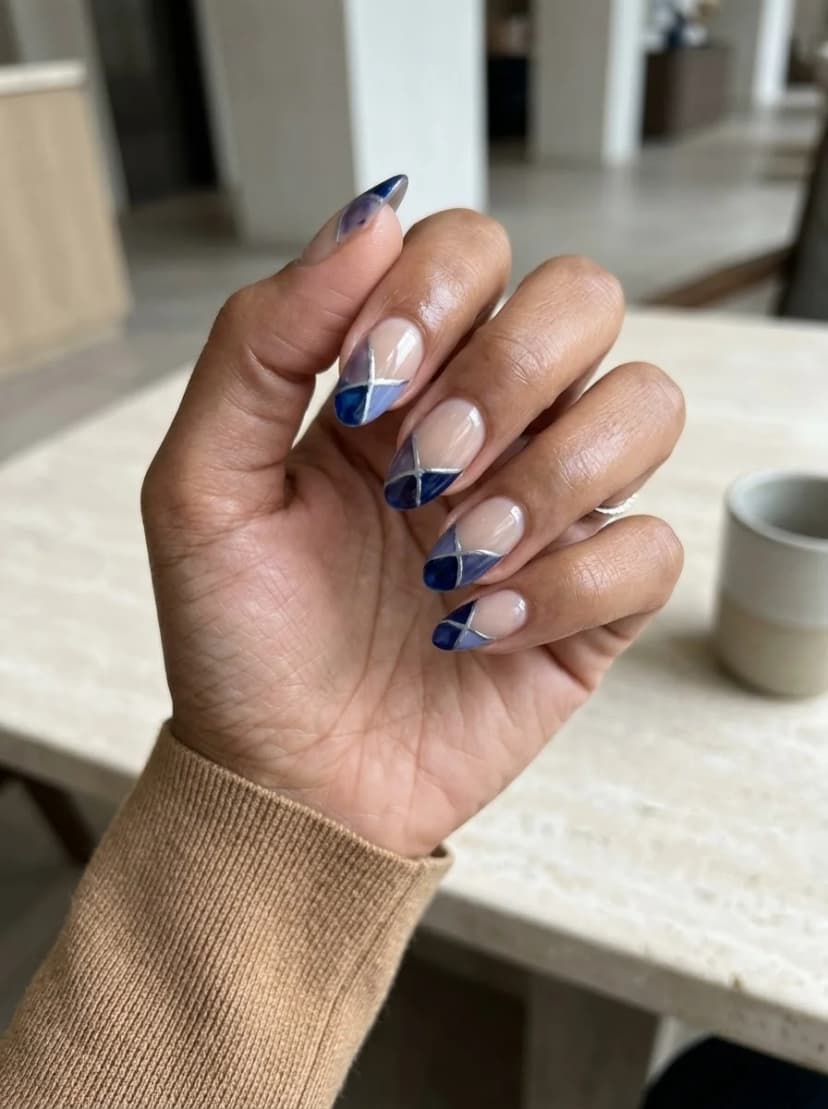
OVERVIEW:
Nude nails divided into geometric sections by thin gold lines, with some sections filled in navy blue and others left nude. The effect is architectural, like looking at a blueprint or a stained-glass window. The gold lines define the boundaries between colored and bare sections, creating sharp, angular shapes across each nail.
The navy blue is deep enough to provide strong contrast against the nude base, but not so dark that it reads as black. The gold lines catch light and add a metallic thread that elevates the design from simple color blocking to something more refined. The combination of navy and gold is classic, which is why this geometric approach feels timeless rather than trendy.
The gold lines are the hardest part. They need to be thin, straight, and evenly spaced to maintain the geometric quality. If freehand line work feels risky, gold striping tape cut into short lengths can approximate the effect. The tape will not have the same hand-painted quality, but it will be faster and more precise.
DESIGN BREAKDOWN:
Geometric sections with metallic borders. The gold lines define the structure.
- Nail Color Used: Sheer nude base, deep navy blue, and gold metallic polish.
- Suitable Nail Shape: Medium to long almond. The elongated surface gives the geometry room to develop.
- Design Element: Geometric sections divided by gold lines, with navy filling some sections and nude showing in others.
- Finish: High-gloss top coat to seal the gold lines and enhance the navy depth.
- Tools Used: Fine detail brush or gold striping tape.
GET THE LOOK AT HOME:
Paint the navy sections first, then add the gold lines on top to cover the edges.
- Base: Apply two coats of sheer nude to all nails. Let dry.
- Navy sections: Using a detail brush, paint angular sections in navy. Vary the shapes on each nail.
- Gold lines: Load a striping brush with gold metallic polish and trace along the edges of each navy section. Keep the lines thin and consistent.
- Seal: Apply a glossy top coat to protect the gold lines.
Pro Tip: Start with simple shapes, triangles and rectangles, before attempting more complex geometric patterns. The basic shapes already create a strong visual effect.


24. Camel Tweed French Tip Nails
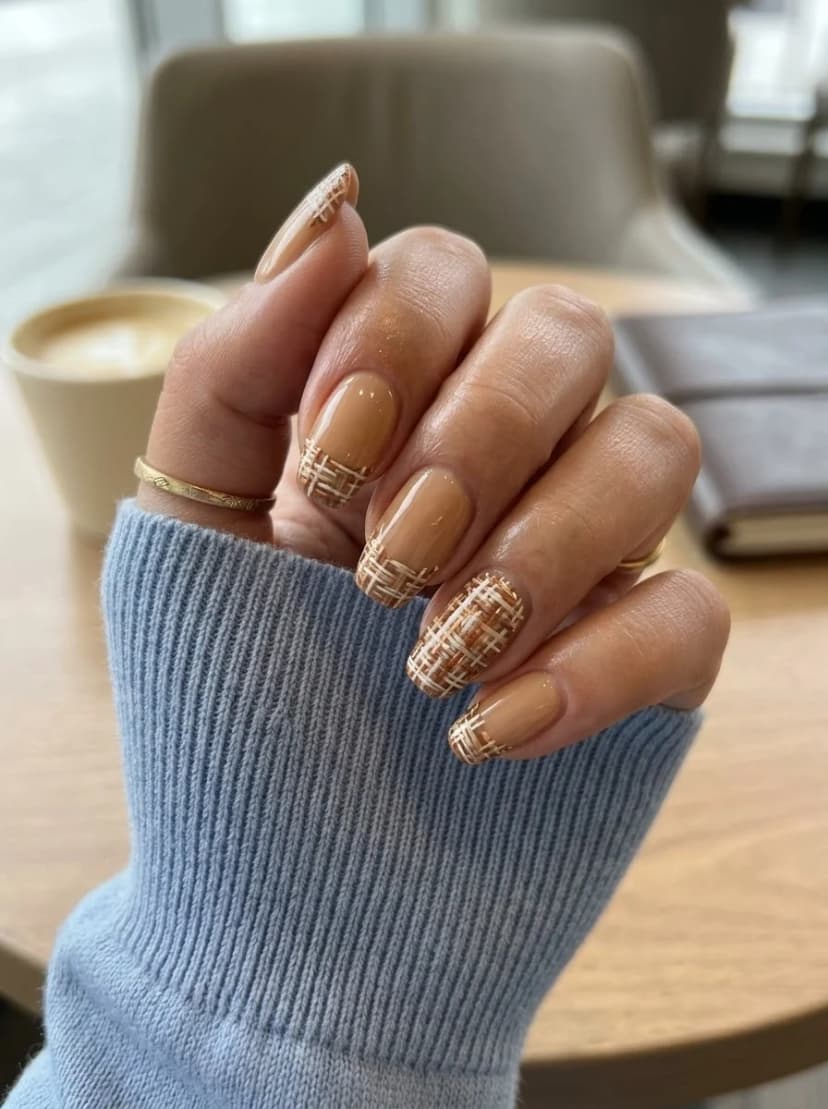
OVERVIEW:
A tweed or woven texture pattern applied to French tips and full nails in warm camel, cream, and brown. The pattern mimics the look of boucle or tweed fabric, with intersecting horizontal and vertical lines in varying thicknesses. Some nails feature the full tweed pattern, while others use it only on the tip area.
The camel color is the anchor of this design. It reads as warm and luxurious, like a well-made coat or a quality leather bag. The cream and brown lines create the woven texture that makes the pattern read as fabric rather than just a grid.
Tweed nail art is time-consuming because the pattern requires many small, intersecting lines. Each line needs to dry before you add the crossing line, or the colors will bleed. Budget at least an hour for the full set, and accept that the pattern will look slightly different on each nail.
DESIGN BREAKDOWN:
Textile-inspired pattern in warm neutrals. The woven texture is the focal point.
- Nail Color Used: Camel/tan, cream, and medium brown.
- Suitable Nail Shape: Medium almond. The elongated surface gives the weave pattern room.
- Design Element: Tweed/woven pattern on select nails, tweed French tips on others.
- Finish: High-gloss top coat to smooth out the texture and add a polished finish.
- Tools Used: Thin striping brush for weave lines, cleanup brush.
GET THE LOOK AT HOME:
Work in layers. Each set of lines needs to dry before you add the crossing lines.
- Base: Apply two coats of camel to all nails. Let dry completely.
- Horizontal lines: Use a striping brush to paint thin horizontal lines in cream and brown across each nail. Space them evenly.
- Vertical lines: Once the horizontal lines are dry, add crossing vertical lines in the same colors.
- French tip variation: On select nails, apply the tweed pattern only to the tip area, leaving the base nude.
- Seal: Apply a thick top coat to smooth out the texture from the layered lines.
Pro Tip: Use slightly different line thicknesses for the horizontal and vertical lines. This creates the woven quality that makes tweed look like fabric rather than a flat grid.
25. Brown Cat-Eye Chrome Nails
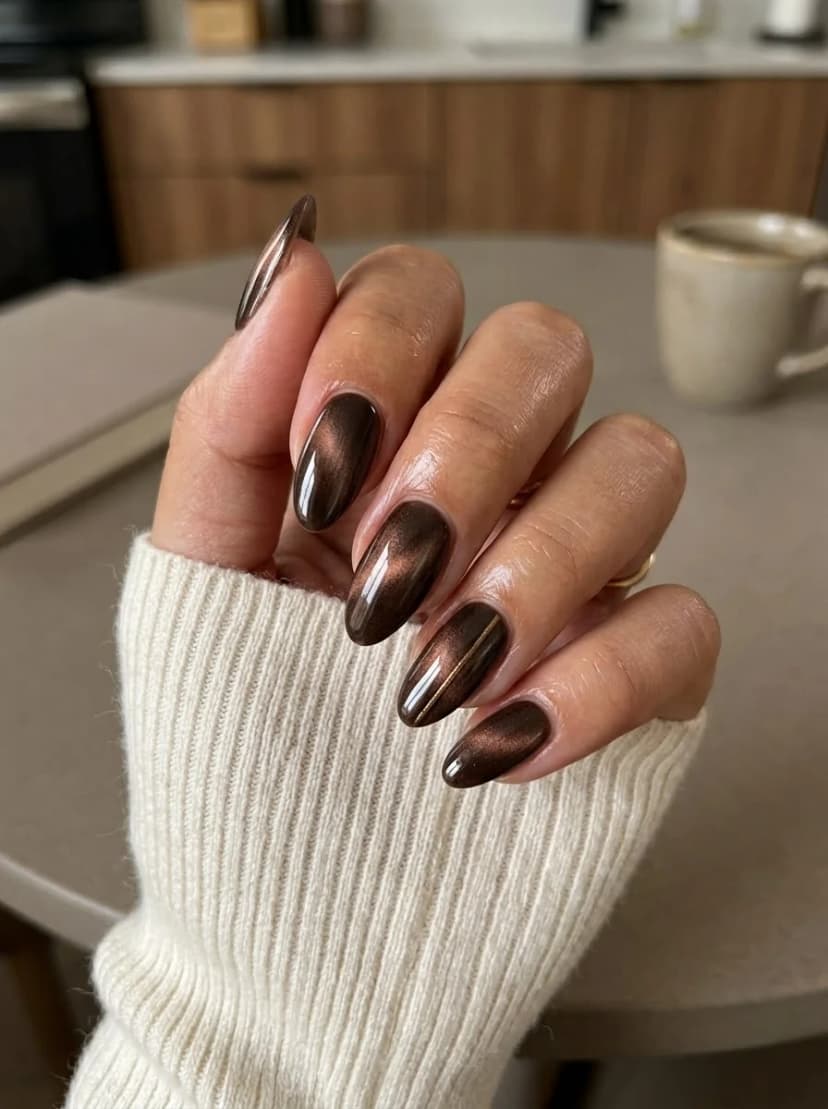
OVERVIEW:
Cat-eye polish uses magnetic particles suspended in the formula to create a dimensional, shifting effect. This deep brown version produces a streak of light that moves across the nail as you tilt your hand. The result looks like polished mahogany or a gemstone caught in lamplight.
Brown cat-eye is one of those designs that looks like it required far more effort than it actually did. The magnetic particles do the work. You just need to hold a magnet near the wet polish and let the physics handle the rest. The depth and dimension that appear in the finish are created by the particles aligning along the magnetic field.
Cat-eye polish requires gel products and a UV or LED lamp for best results. Regular polish versions exist, but the magnetic effect is less pronounced and does not last as long. If you are investing the time in this design, gel is worth the setup.
DESIGN BREAKDOWN:
Magnetic polish creates a three-dimensional light effect. The magnet is the tool that makes or breaks the design.
- Nail Color Used: Deep brown cat-eye gel polish.
- Suitable Nail Shape: Almond. The curved surface maximizes the light-shifting effect.
- Design Element: Brown cat-eye magnetic effect on all nails.
- Finish: High-gloss top coat to seal the magnetic particles and add depth.
- Tools Used: Cat-eye magnet, UV/LED lamp.
GET THE LOOK AT HOME:
The key is holding the magnet steady and close enough to the wet polish without touching it.
- Prep: Push back cuticles and buff the nail surface. Cat-eye polish magnifies every ridge.
- Base coat: Apply one coat of gel base coat and cure under the lamp.
- Cat-eye layer: Apply one coat of brown cat-eye gel polish. Do not cure yet.
- Magnet: Hold the cat-eye magnet about 5mm above the wet polish. Hold it steady for 10 to 15 seconds. The magnetic particles will shift and create the characteristic light streak.
- Cure: Once the light streak appears, cure under the lamp immediately to lock it in place.
- Top coat: Apply a no-wipe gel top coat and cure.
Pro Tip: The distance between the magnet and the polish determines the sharpness of the light streak. Hold it closer for a tight, defined line, or farther away for a wider, more diffused effect.


26. Purple Cat-Eye with Swirl Accent
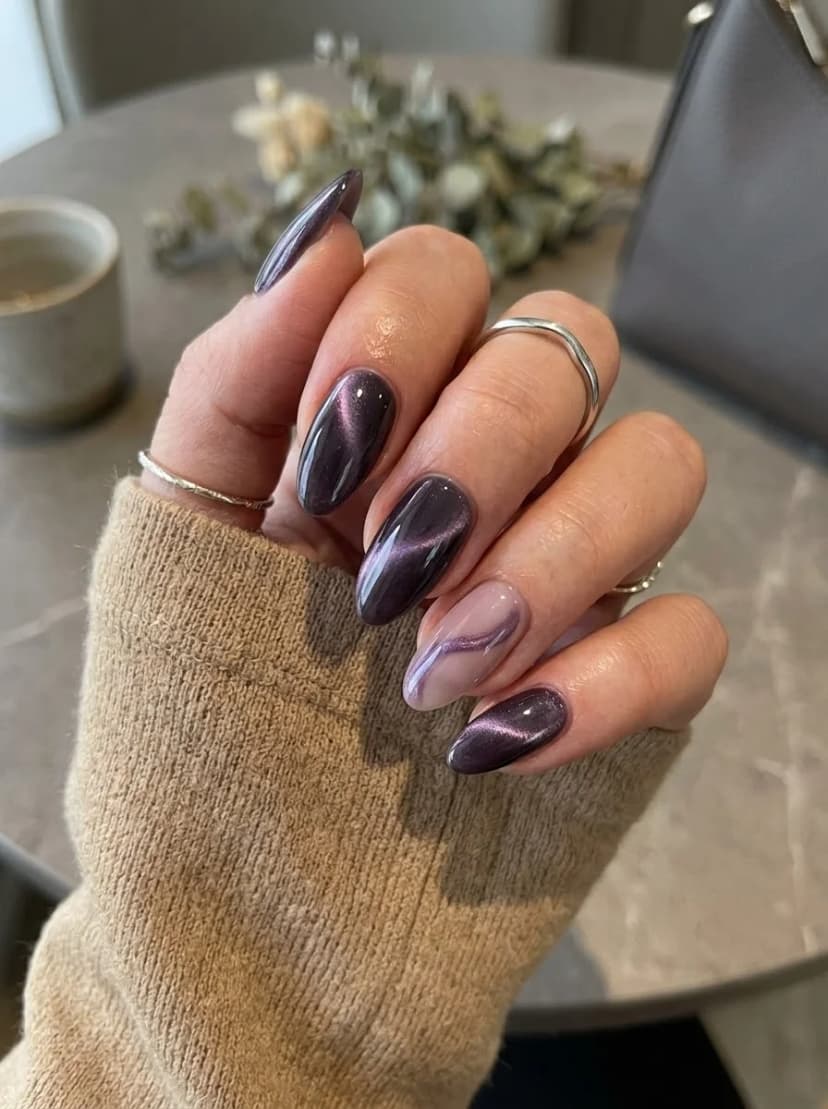
OVERVIEW:
Four nails in deep purple cat-eye, one accent nail in sheer nude with a purple swirl line. The cat-eye effect creates a dimensional, shifting quality that makes the purple look like polished amethyst. The accent nail breaks up the density of four dark nails and adds a lighter, more playful element.
Purple cat-eye is moodier than the brown version. The magnetic particles create a pinkish-purple light streak that shifts between warm and cool depending on the angle. Under warm indoor lighting, the effect leans more berry. In cool daylight, it skews toward violet.
The swirl accent nail is the detail that makes this design feel considered rather than just a solid-color manicure. The thin purple swirl on nude creates a visual bridge between the dark cat-eye nails and the bare skin, which helps the whole set feel cohesive.
DESIGN BREAKDOWN:
Dark magnetic polish with a single lighter accent. The contrast is what makes it work.
- Nail Color Used: Deep purple cat-eye gel polish and sheer nude.
- Suitable Nail Shape: Almond. The curved surface maximizes the cat-eye light effect.
- Design Element: Purple cat-eye on four nails, sheer nude with purple swirl line on one accent nail.
- Finish: High-gloss gel top coat for maximum depth.
- Tools Used: Cat-eye magnet, UV/LED lamp, fine detail brush for swirl accent.
GET THE LOOK AT HOME:
Do the cat-eye nails first, then add the accent nail as a finishing touch.
- Accent nail base: Apply two coats of sheer nude to one nail. Let dry.
- Cat-eye nails: Apply one coat of purple cat-eye gel to the remaining four nails. Hold the magnet above each nail for 10 to 15 seconds. Cure under the lamp.
- Swirl accent: Using a detail brush and the purple cat-eye polish, paint a single flowing swirl line across the nude accent nail. Hold the magnet above it briefly to activate the particles.
- Top coat: Apply a no-wipe gel top coat to all nails and cure.
Pro Tip: If you do not have a second magnet, you can skip the magnetic effect on the swirl accent. A simple purple swirl on nude still creates a nice visual break between the cat-eye nails.
27. Abstract Brush Stroke Nails
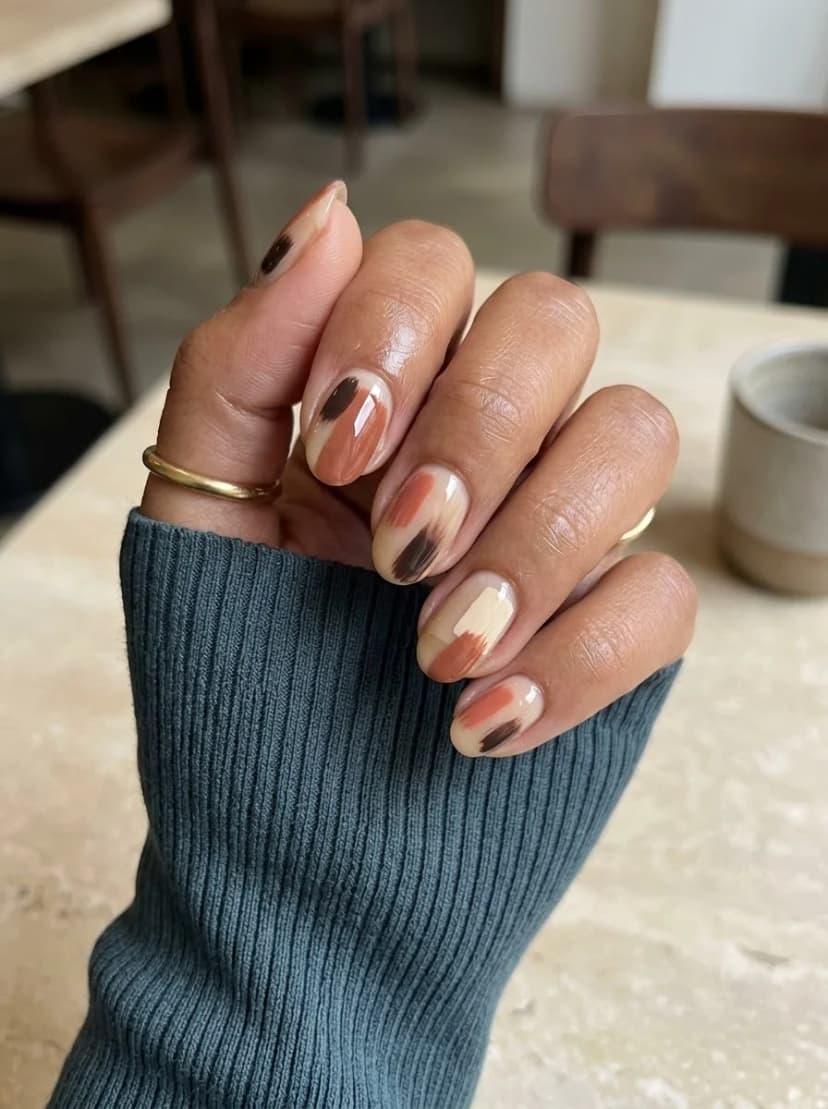
OVERVIEW:
Thick, painterly brush strokes in terracotta, peach, brown, and cream over a sheer nude base. Each nail gets a different combination of colors, laid down in broad, visible strokes that look like they came off a loaded paintbrush. The strokes overlap and blend at the edges, creating an abstract, Impressionist quality.
This design works because the color palette is warm and cohesive. Terracotta and peach are neighbors on the color wheel, and brown and cream provide neutral anchors. The result is a set that feels like a small painting on each nail. The visible brush texture is part of the appeal. It reads as handmade and artistic rather than manufactured.
The technique is forgiving because there is no wrong way to lay down a brush stroke. Thicker strokes, thinner strokes, angled strokes, overlapping strokes, they all work. The key is to keep the brush loaded and move confidently. Hesitant, thin strokes will look scratchy rather than painterly.
DESIGN BREAKDOWN:
Visible brush strokes in a warm palette. The texture is the point.
- Nail Color Used: Terracotta, peach, warm brown, and cream.
- Suitable Nail Shape: Short round. The compact shape suits the bold strokes.
- Design Element: Abstract brush strokes in varying colors over a nude base.
- Finish: Glossy top coat to seal the texture and add depth.
- Tools Used: Flat brush or the brush from the polish bottle.
GET THE LOOK AT HOME:
Keep the brush loaded and move confidently. Hesitation creates thin, scratchy strokes.
- Base: Apply two coats of sheer nude to all nails. Let dry.
- First strokes: Dip a flat brush into terracotta polish and lay down one or two broad strokes across each nail. Vary the direction and length on each nail.
- Second strokes: Add peach strokes that partially overlap the terracotta. Let the colors blend at the edges.
- Details: Add thinner strokes of brown and cream to fill gaps and add variety.
- Seal: Apply a glossy top coat to smooth out the brush texture.
Pro Tip: If the strokes look too uniform, go back with a nearly dry brush and add one or two strokes in a contrasting direction. The variation in stroke angle is what makes the design look dynamic rather than patterned.


Tips to Make Your September Manicure Last Longer
September is transitional in every way, including how your nails hold up. The weather is shifting, your hands are probably still dry from summer, and the darker polish colors that dominate this month show chips more visibly than pastels. A few small changes to your routine can extend the life of your manicure by several days.
- Cap the free edge: When applying top coat, swipe across the very tip of each nail. This seals the polish at the point where it makes the most contact with surfaces and is the first place chips appear.
- Use gloves for dishes and cleaning: Hot water and cleaning chemicals break down polish faster than anything else. Rubber gloves are a small investment that pays off in manicure longevity.
- Apply cuticle oil daily: Dry, cracked cuticles pull polish away from the nail bed. A few drops of cuticle oil rubbed into the base of each nail keeps the surrounding skin flexible and prevents lifting.
- Avoid quick-dry drops on nail art: If your design includes hand-painted details or layered patterns, quick-dry drops can cause the top layer to shrink and pull, distorting the art underneath. Let it air dry instead.
- Reapply top coat every two to three days: A fresh layer of top coat every few days fills in minor scratches and restores the shine that everyday wear dulls.
Conclusion
September nails are about meeting the moment halfway. You do have to pick a side between summer and fall. The designs in this guide work because they exist in the space between, using warm earth tones alongside cooler transitional shades, mixing organic botanicals with structured geometry.
Whether you lean toward the moody cat-eyes and dark roses or the abstract brush strokes and sage green botanicals, the goal is the same: a manicure that feels intentional without feeling forced. The best September nails are the ones that match the rhythm of the month itself, shifting and settling into something warmer.
Loving This Guide? Get More Like This! 💌
Want to impress with clothes? Want to look good? Subscribe to Whatsmyshape Newsletter and get weekly fashion guides, exclusive outfit ideas, and beauty tips delivered directly to your inbox. No spam, just pure style inspiration! ✨