
August sits in that strange spot where summer is winding down but you are not quite ready to let go. Your nails should reflect that energy. Maybe you want one more burst of playful fruit art and bright color before fall arrives. Maybe you are already gravitating toward richer tones and darker finishes. Either way, this list covers it.
This guide pulls together 31 designs that run the full spectrum. There are ladybugs and cherries for anyone who wants to hold onto summer as long as possible. There are chocolate browns and emerald greens for those ready to transition early. And there are plenty of French tip variations in between, because August is when that classic format starts showing up in every imaginable color and texture.
31 August Nail Designs
1. Mixed Animal Print Nails
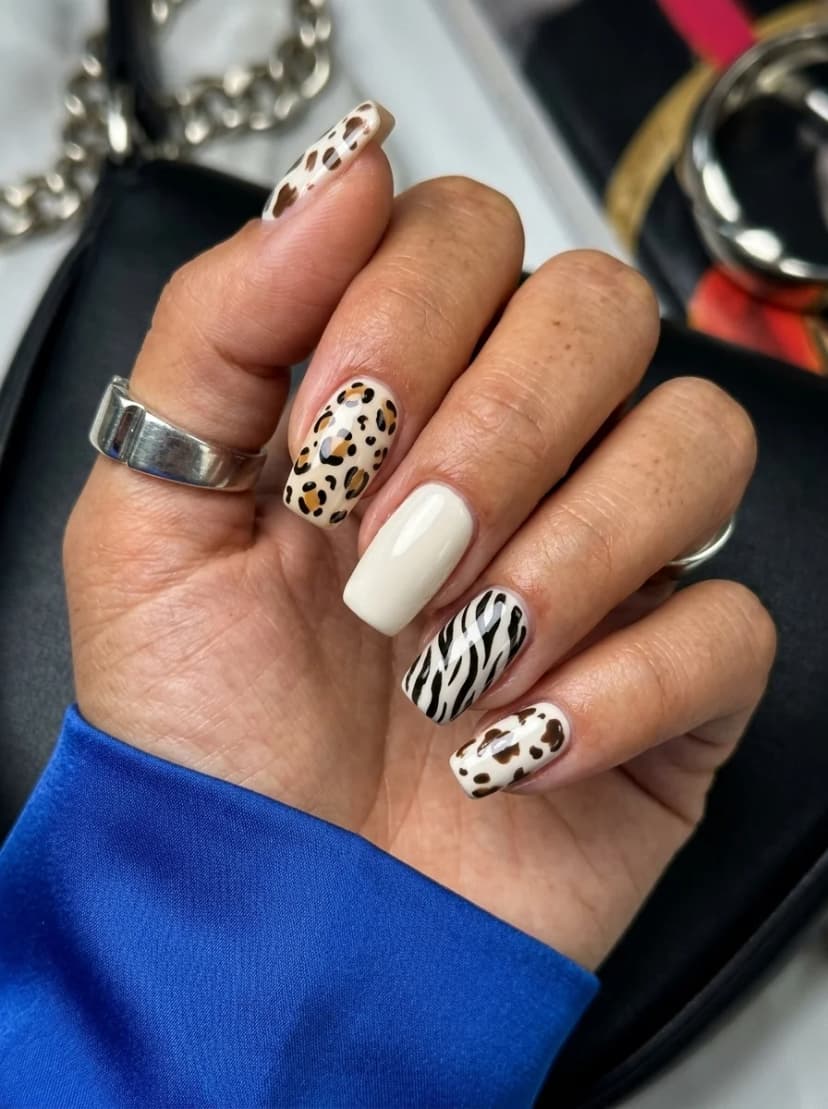
OVERVIEW:
Mixing multiple animal prints on one hand sounds chaotic on paper, but this design makes it work by keeping everything anchored to the same white and cream base. You get leopard spots on one nail, zebra stripes on another, and cow-print splotches on the pinky. The ring finger stays solid white, giving your eye a place to rest.
The trick here is that all the prints share a similar tonal range. Nothing is neon or hyper-saturated. The leopard uses warm browns and tans, the zebra uses black on white, and the cow print stays in the brown family. That cohesion is what keeps it from looking like three separate manicures smashed together.
One thing to know: this design works best on medium-length nails. Short nails cuts the patterns and make them harder to read. Long coffin or almond shapes give each print enough surface area to look intentional.
DESIGN BREAKDOWN:
Three different prints, one unified palette. The white base is the glue.
- Nail Color Used: Opaque white (like OPI "Alpine Snow"), warm cream, black, and various brown tones for the prints.
- Suitable Nail Shape: Medium to long almond or coffin. Short nails compress the patterns too much.
- Design Element: Three different animal prints (leopard, zebra, cow) on separate nails, with one solid white accent.
- Finish: High-gloss top coat. The shine unifies the different prints.
- Tools Used: Fine detail brush, dotting tool, striping brush for zebra lines.
GET THE LOOK AT HOME:
Start with the simplest print first and build up complexity. Zebra is the most forgiving.
- Base coat: Apply two coats of opaque white to all nails. Let each coat dry fully.
- Zebra nail: Use a thin striping brush and black polish to paint irregular, wavy lines across the white base. They should vary in thickness and spacing.
- Leopard nail: Paint irregular brown spots on the cream base. Add darker brown or black outlines to some spots, but not all. Leave some spots without outlines for a more natural look.
- Cow print nail: Paint large, irregular brown splotches on white. Real cow spots are not round, so keep the edges uneven.
- Seal: Apply a generous glossy top coat to everything. This evens out the texture differences between the prints.
Pro Tip: Keep the solid white nail as your accent nail on your middle finger. It creates visual balance and prevents the overall look from feeling overwhelming.


2. Matte Black with Glossy French Tips
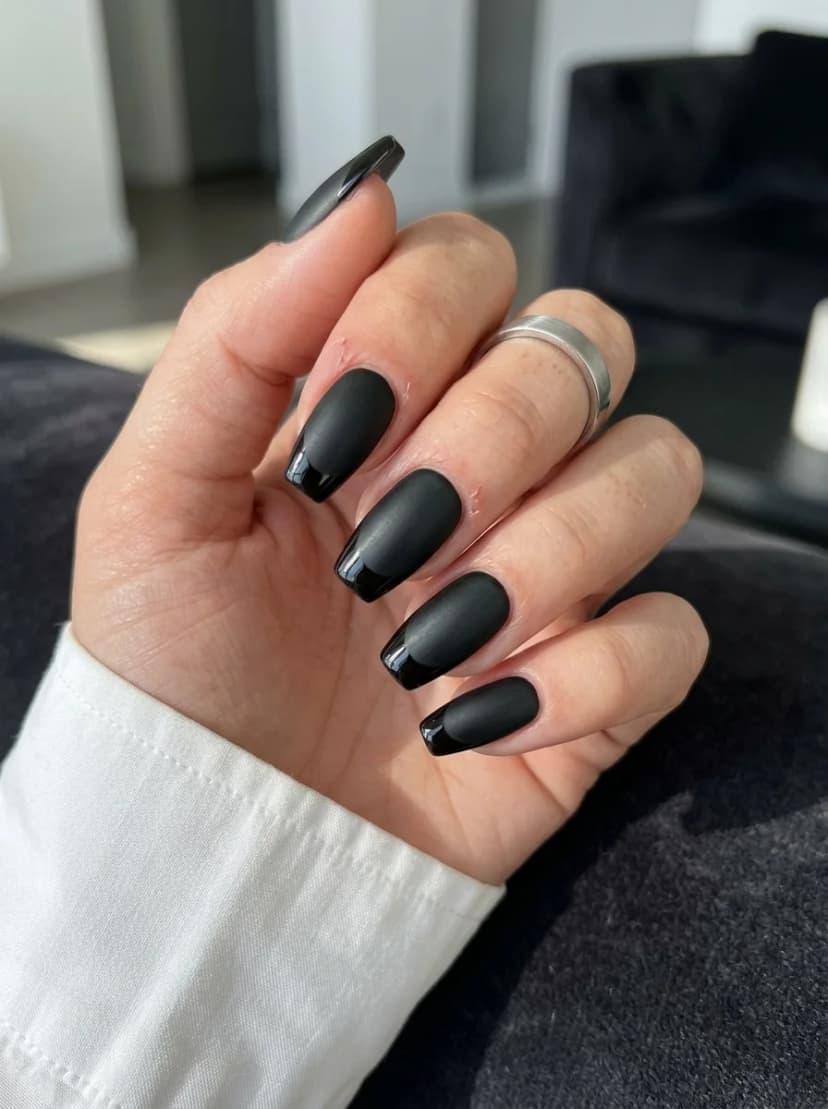
OVERVIEW:
All-black nails can feel one-note after a while, but adding glossy tips to a matte base creates a texture contrast that is subtle in photos and striking in person. Your eye catches the shine on the tips first, then registers the velvety matte body. It is a push-pull that keeps the design interesting without adding any color.
The coffin shape matters here. The angular tip provides a clear boundary between matte and gloss, which is what makes the French tip readable. On rounder shapes, the transition zone gets blurry and the effect loses its edge.
Practical warning: matte top coats show every fingerprint and scratch. If you work with your hands a lot, this design will start looking worn by day three. Consider keeping it for a weekend event rather than a full two-week wear cycle.
DESIGN BREAKDOWN:
Texture does all the heavy lifting. Same color, two finishes.
- Nail Color Used: Pure black polish for both the base and tips.
- Suitable Nail Shape: Coffin or ballerina. The flat tip defines the French line.
- Design Element: Matte black body with glossy black French tips.
- Finish: Matte top coat over the base, glossy top coat selectively on the tips.
- Tools Used: French tip guides or a steady hand, two different top coats.
GET THE LOOK AT HOME:
The order of operations is critical. Apply matte first, then add gloss on top.
- Black base: Apply two thin coats of black polish. Let each coat dry completely.
- Matte coat: Apply a matte top coat over the entire nail. Wait for it to fully set and lose all shine.
- Define the tip: Place French tip guides across each nail, or freehand if you are confident. Paint the exposed tip with glossy black polish in two thin coats.
- Seal the tip: Apply a glossy top coat only over the tip area. Use a thin brush to keep the boundary clean.
Pro Tip: If you want the glossy tips to pop even more, use a high-shine top coat like Seche Vite. It creates a mirror-like finish that contrasts dramatically with the matte base.
3. Black and White Checkerboard Nails
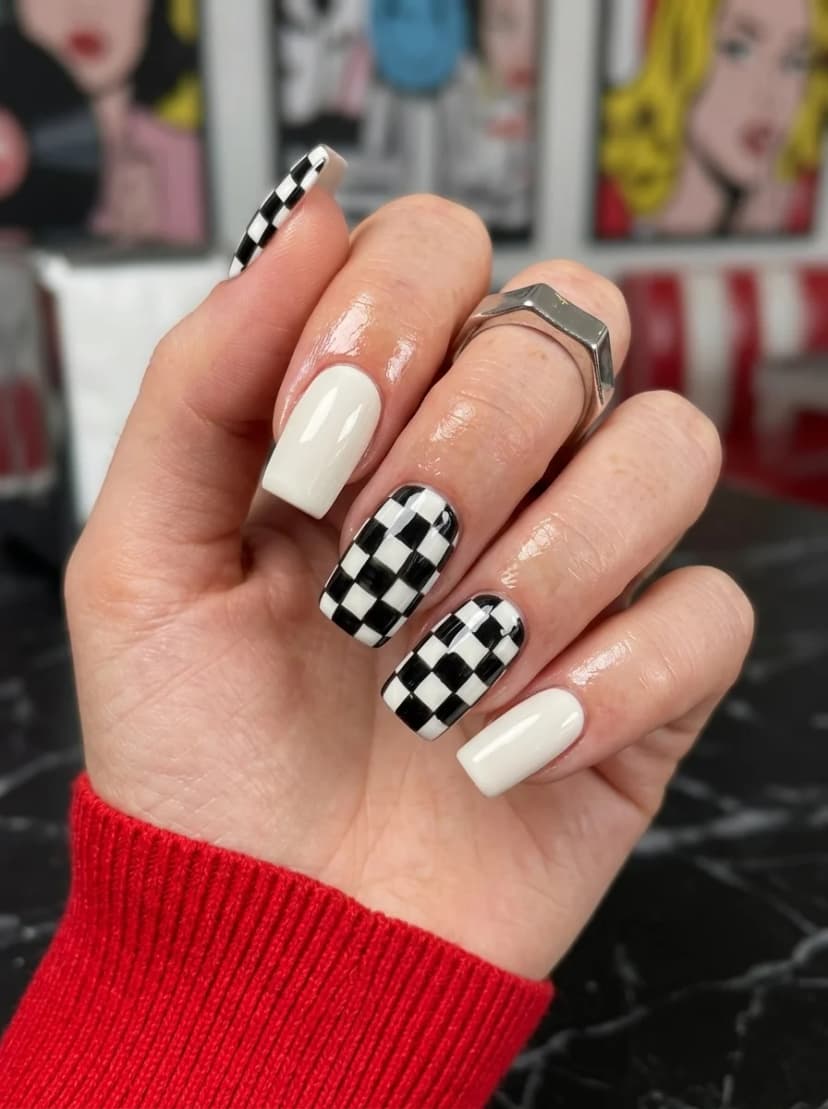
OVERVIEW:
Checkerboard nails have a retro, almost ska-punk energy that works surprisingly well in late summer. The design is bold enough to make a statement but graphic enough to feel clean rather than cluttered. This version keeps things balanced by using solid white on two nails and the checker pattern on the other three.
The black-and-white palette is part of what makes this design so versatile. It pairs with virtually anything in your closet, from a white sundress to black jeans. The pattern reads as intentional and styled rather than random or childish.
Fair warning: achieving clean, straight lines on a curved nail surface is harder than it looks. The squares near the edges will distort slightly, and that is fine. Perfectly uniform checkerboards actually look worse because they appear machine-made rather than hand-painted.
DESIGN BREAKDOWN:
Graphic, high-contrast, and deceptively simple. The challenge is in the line work.
- Nail Color Used: Opaque white and opaque black.
- Suitable Nail Shape: Medium to long square or coffin. The flat surface makes grid lines easier.
- Design Element: Alternating black and white squares in a checkerboard pattern on select nails.
- Finish: High-gloss top coat for a polished look.
- Tools Used: Striping tape or thin brush, cleanup brush with acetone.
GET THE LOOK AT HOME:
Grid work is tedious but methodical. Set up good lighting and take your time.
- White base: Apply two coats of opaque white to all nails. Let dry completely.
- Grid lines: Use thin striping tape or a detail brush to create horizontal and vertical lines, forming a grid of small squares.
- Fill alternating squares: Using a small brush or dotting tool, fill in every other square with black polish. Work slowly to stay within the lines.
- Fix mistakes: Dip a cleanup brush in acetone and sharpen any edges that bled outside the lines.
- Top coat: Apply a thick, self-leveling top coat to smooth out any texture from the paint layers.
Pro Tip: Start with the center column of squares and work outward. This keeps the pattern centered on the nail even if your edges are not perfectly symmetrical.


4. Ladybug Nail Art
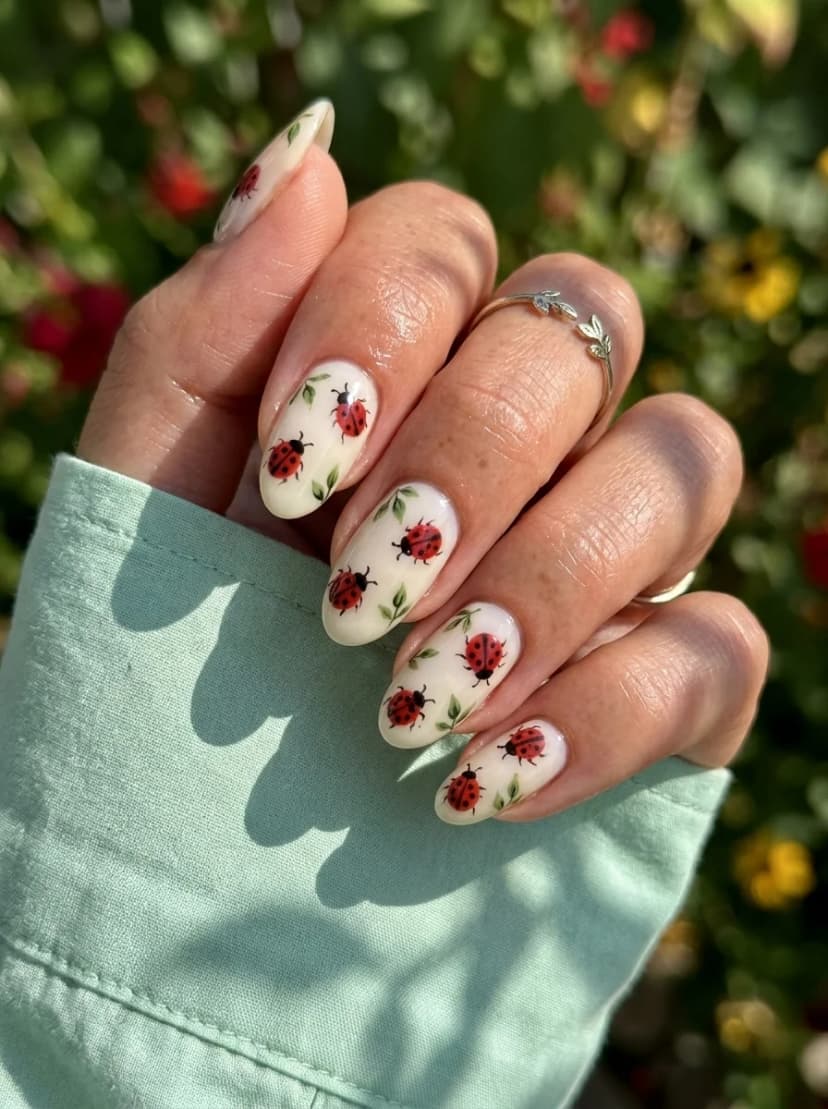
OVERVIEW:
Ladybug nails are the kind of design that makes people smile when they notice them. The white base keeps everything clean and lets the tiny red-and-black bugs stand out without competing for attention. Small green leaf details add a natural, garden-fresh quality that grounds the whole look.
This is a design that rewards patience. Each ladybug is hand-painted, which means they will all look slightly different. That variation is part of the charm. If you try to make every bug identical, you will overwork them and lose the whimsical quality that makes this design work.
The almond shape in the photo is ideal. The tapered tip gives each bug a natural resting place, and the curved surface adds dimension to the painting. On short square nails, the bugs would feel cramped.
DESIGN BREAKDOWN:
Delicate hand-painted art on a clean canvas. Simplicity is the goal.
- Nail Color Used: Creamy white base, bright red, black, and green for the details.
- Suitable Nail Shape: Almond or oval. The curves complement the organic nature of the design.
- Design Element: Hand-painted ladybugs with green leaf accents scattered across the nails.
- Finish: Glossy top coat to seal the artwork and add depth.
- Tools Used: Fine detail brush, dotting tool for ladybug spots.
GET THE LOOK AT HOME:
Paint the ladybugs in stages. Let each layer dry before adding details.
- Base: Apply two coats of creamy white polish. Let dry fully.
- Ladybug bodies: Use a dotting tool or small brush to paint red oval shapes on each nail. Space them randomly, two to four per nail.
- Details: Once the red is dry, add a tiny black head to each bug with a fine brush. Then dot black spots onto the red bodies.
- Leaves: Paint small green leaf shapes near the ladybugs. Keep them simple, just a few curved strokes.
- Seal: Apply a glossy top coat in one smooth layer. Going back over the artwork while wet can smear the details.
Pro Tip: If your hand shakes during the detail work, rest your painting hand on a stable surface and brace your pinky against your other hand. It steadies the brush significantly.
5. Abstract Colorful Confetti Nails
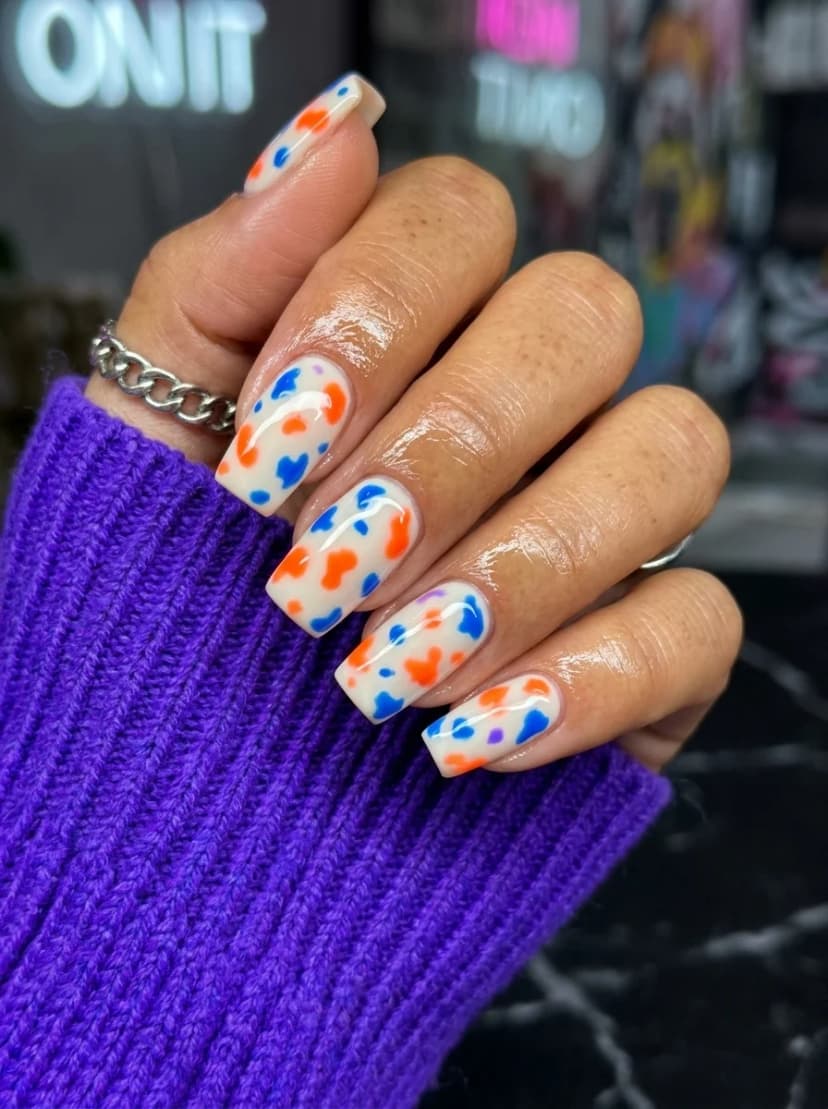
OVERVIEW:
What you actually get is a white base covered in abstract confetti-like spots of orange, blue, and purple. The shapes are irregular, almost like paint splatters, and they are distributed randomly across each nail.
The color combination is unexpected but works. The warm orange and cool blue create visual tension, while the purple bridges the gap between them. On a white base, these colors pop without feeling chaotic.
This design is forgiving for beginners. Because the spots are meant to look random and abstract, there is no precision required. Imperfection actually makes it look more authentic, like actual confetti scattered across the nail.
DESIGN BREAKDOWN:
Controlled chaos on a clean white canvas. Random is the point.
- Nail Color Used: Opaque white base, with bright orange, cobalt blue, and purple for the confetti spots.
- Suitable Nail Shape: Medium to long coffin or almond. The elongated shape gives the spots room to breathe.
- Design Element: Abstract, irregular spots of color scattered across a white base.
- Finish: Glossy top coat to smooth out the spots and add shine.
- Tools Used: Dotting tool or the end of a bobby pin, cleanup brush.
GET THE LOOK AT HOME:
Work quickly and do not overthink the placement. This is a five-minute design once the base is dry.
- White base: Apply two coats of opaque white. Let dry completely.
- Color spots: Dip a dotting tool into orange polish and press random spots onto the nail. Repeat with blue and purple, overlapping slightly in places.
- Vary the sizes: Use different pressure or different sized tools to create spots of varying sizes. This prevents the pattern from looking uniform.
- Seal: Apply a thick glossy top coat to level out any texture from the dots.
Pro Tip: If the spots feel too sparse, add a few more. If they feel too dense, leave the next nail with fewer. Variation between nails is what makes the overall set look interesting.


6. Tortoiseshell and Gold Chrome Nails
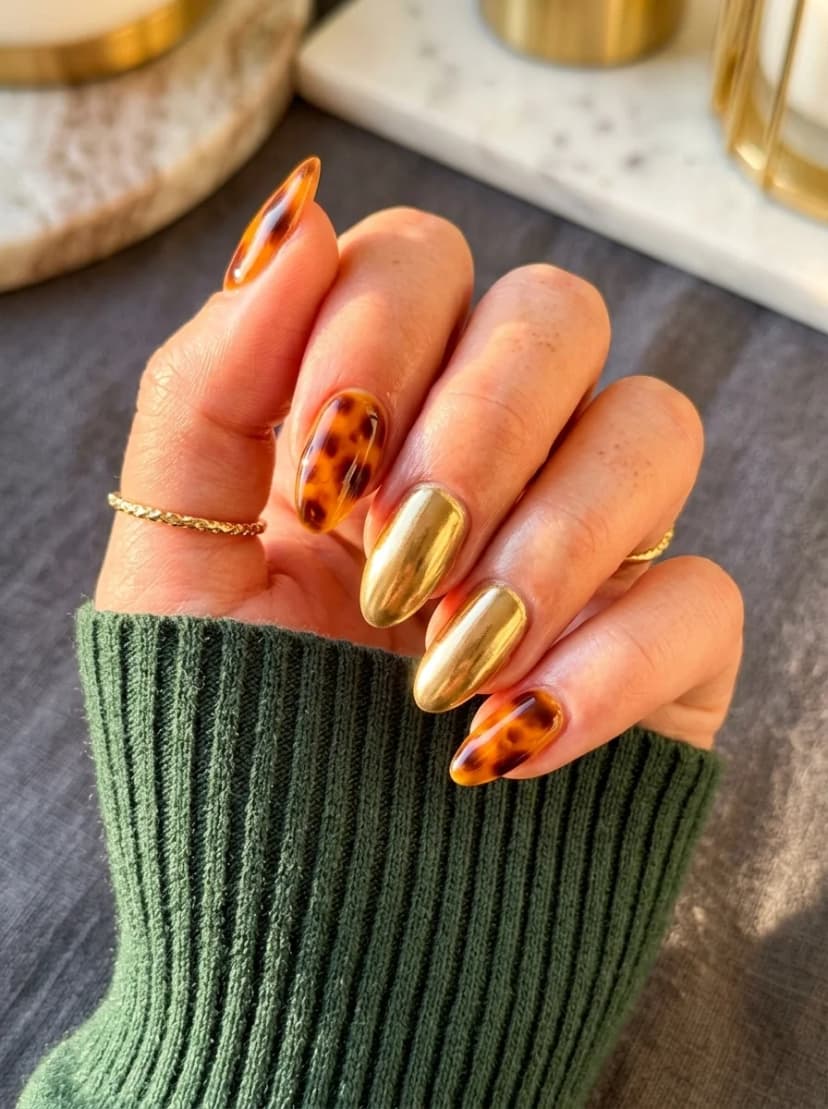
OVERVIEW:
Tortoiseshell is one of those patterns that consistently looks more expensive than it is to create. The mix of amber, brown, and dark spots creates depth that reads as rich and layered. Pairing it with solid gold chrome nails elevates the whole set from casual to luxe.
The alternating pattern works because the gold chrome acts as a palette cleanser between the busy tortoiseshell nails. If every nail had the pattern, it would feel overwhelming. The gold breaks it up and adds a metallic flash that catches light differently than the glossy tortoiseshell.
Chrome powder can be tricky to work with at home. It requires a no-wipe gel top coat as a base, and the powder needs to be burnished in firmly to achieve that mirror finish. If you skip the burnishing step, you get glitter rather than chrome.
DESIGN BREAKDOWN:
Warm tones, mixed textures, and strategic alternation.
- Nail Color Used: Amber/tortoiseshell gel or polish (brown, dark brown, amber), gold chrome powder.
- Suitable Nail Shape: Almond or coffin. The elongated shape suits the richness of the colors.
- Design Element: Alternating tortoiseshell and solid gold chrome nails.
- Finish: High-gloss on the tortoiseshell, mirror chrome on the gold.
- Tools Used: Chrome powder, sponge applicator, no-wipe gel top coat, detail brush for tortoiseshell.
GET THE LOOK AT HOME:
The chrome nails require gel products. If you only have regular polish, use a metallic gold polish instead.
- Tortoiseshell nails: Apply a sheer amber base. While wet, drop small spots of dark brown and black. Use a toothpick to drag and blend the spots slightly. Cure or dry.
- Gold chrome nails: Apply gold polish or gel and cure. Apply a no-wipe top coat and cure. Burnish gold chrome powder into the surface with a sponge applicator. Dust off excess.
- Alternation: Assign tortoiseshell to the thumb, index, and pinky. Gold chrome goes on the middle and ring fingers.
- Seal everything: Apply a final top coat to all nails. For chrome, use a no-wipe top coat to preserve the mirror finish.
Pro Tip: If you do not have gel products, you can simulate the tortoiseshell effect with regular polish by layering translucent brown over spots of darker brown. It takes longer to dry but achieves a similar depth.
7. Yellow Nails with Butterfly Wing Accents
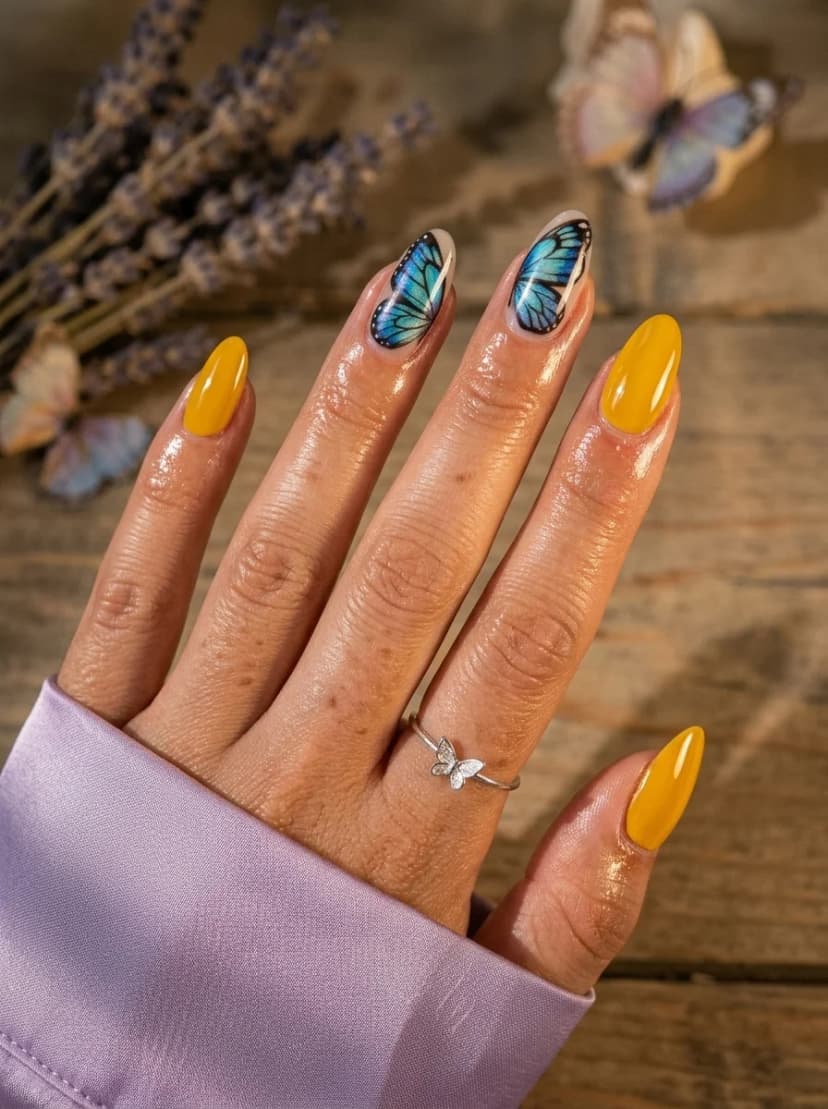
OVERVIEW:
Mustard yellow is a surprisingly versatile nail color. It reads warm without being garish, and it flatters a wide range of skin tones. This design uses it as the primary color on most nails, then breaks it up with two accent nails featuring blue butterfly wing art on a sheer base.
The butterfly wings are the focal point, and they are done with enough detail to look realistic without being hyper-detailed. The blue iridescent quality of the wings against the warm yellow creates a complementary color contrast that draws the eye directly to the accent nails.
Yellow polish is notoriously streaky. You will need three thin coats rather than two to get even coverage. Use a ridge-filling base coat to give the polish a smooth surface to adhere to.
DESIGN BREAKDOWN:
Warm primary color with detailed accent art. The contrast is what makes it work.
- Nail Color Used: Warm mustard yellow, sheer nude for accent nails, blue, black, and white for butterfly wings.
- Suitable Nail Shape: Almond. The tapered shape mimics the natural curve of a butterfly wing.
- Design Element: Solid yellow on most nails, with two accent nails featuring detailed butterfly wing art.
- Finish: High-gloss top coat over everything.
- Tools Used: Fine detail brush, thin striping brush for wing veins.
GET THE LOOK AT HOME:
The butterfly wings take the most time. Block out fifteen minutes for the detail work.
- Yellow nails: Apply a ridge-filling base coat. Follow with three thin coats of mustard yellow, letting each dry fully.
- Accent nail base: Apply two coats of sheer nude to the accent nails.
- Butterfly wings: Using a detail brush, paint the outline of a butterfly wing shape in blue. Fill it in, then use black to paint the wing veins. Add white highlights along the edges.
- Seal: Apply a glossy top coat to all nails. Cap the free edge to prevent chipping on the yellow nails.
Pro Tip: If painting both accent nails feels daunting, do just one. A single butterfly wing accent nail next to solid yellow still looks intentional and saves you twenty minutes.


8. Cherry Nail Art
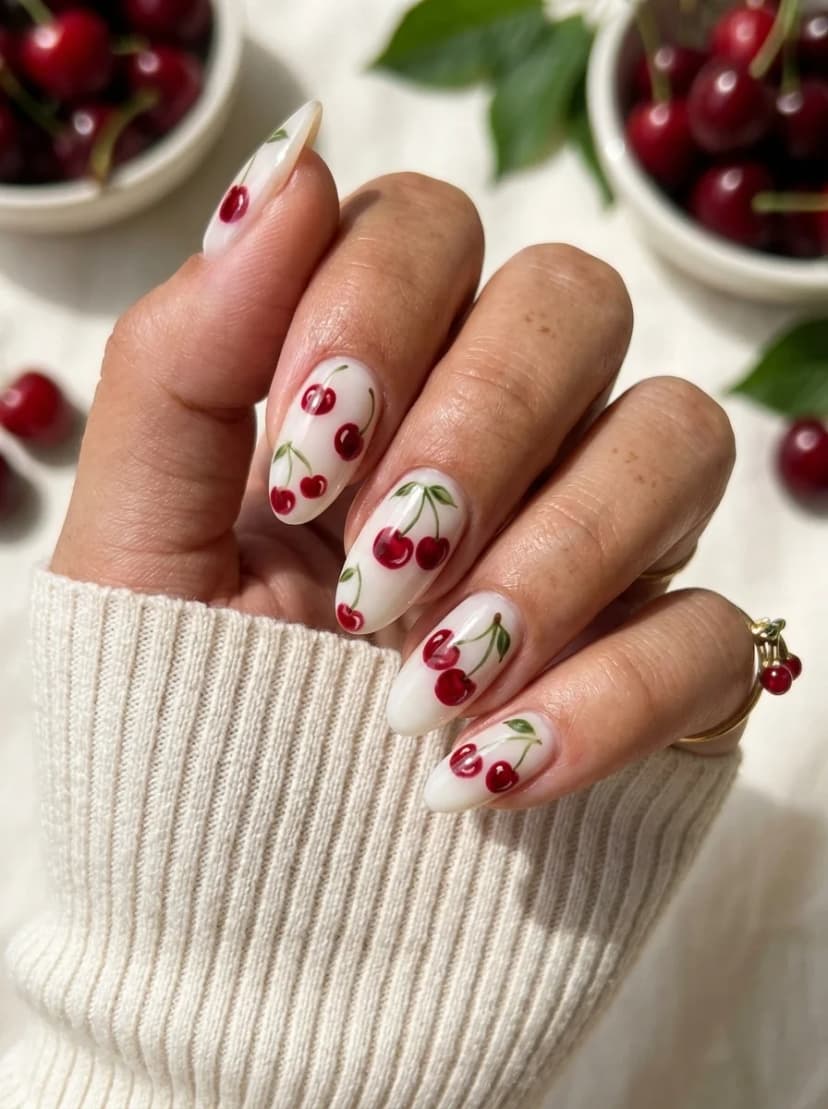
OVERVIEW:
Cherry nails are a summer staple that somehow never gets old. The combination of bright red fruit against a creamy white base feels fresh and nostalgic at the same time. The green stems add just enough contrast to keep the design from looking flat.
What makes this version work is the placement. The cherries are scattered randomly, some clustered in pairs and others standing alone. That irregularity makes them look hand-painted rather than like stickers, which is what gives the design its charm.
The almond shape is perfect for this. The tapered tip gives each cherry a natural place to sit, and the curved surface adds dimension to the fruit. This would look fine on other shapes, but almond is the sweet spot.
DESIGN BREAKDOWN:
Simple fruit art on a clean canvas. The red-on-white contrast does the work.
- Nail Color Used: Creamy white base, bright cherry red, and green for stems.
- Suitable Nail Shape: Almond or oval. The curves complement the rounded fruit shapes.
- Design Element: Hand-painted cherries with stems, scattered across a white base.
- Finish: Glossy top coat for a juicy, fresh look.
- Tools Used: Dotting tool for cherry bodies, fine brush for stems.
GET THE LOOK AT HOME:
The dotting tool does most of the work here. This is a beginner-friendly design.
- White base: Apply two coats of creamy white. Let dry.
- Cherry bodies: Use a dotting tool dipped in red polish to create pairs of round dots on each nail. Place them randomly.
- Stems: Use a fine brush to paint thin green stems connecting each pair of cherries. Add a small leaf if you want extra detail.
- Highlights: Optionally, add a tiny white dot to each cherry to create a light reflection effect.
- Seal: Apply a glossy top coat to lock everything in.
Pro Tip: For a more realistic look, use two shades of red. Paint the base of each cherry in a darker red and add a lighter red highlight on top before the polish dries.
9. Rainbow Swirl and Dot Nails
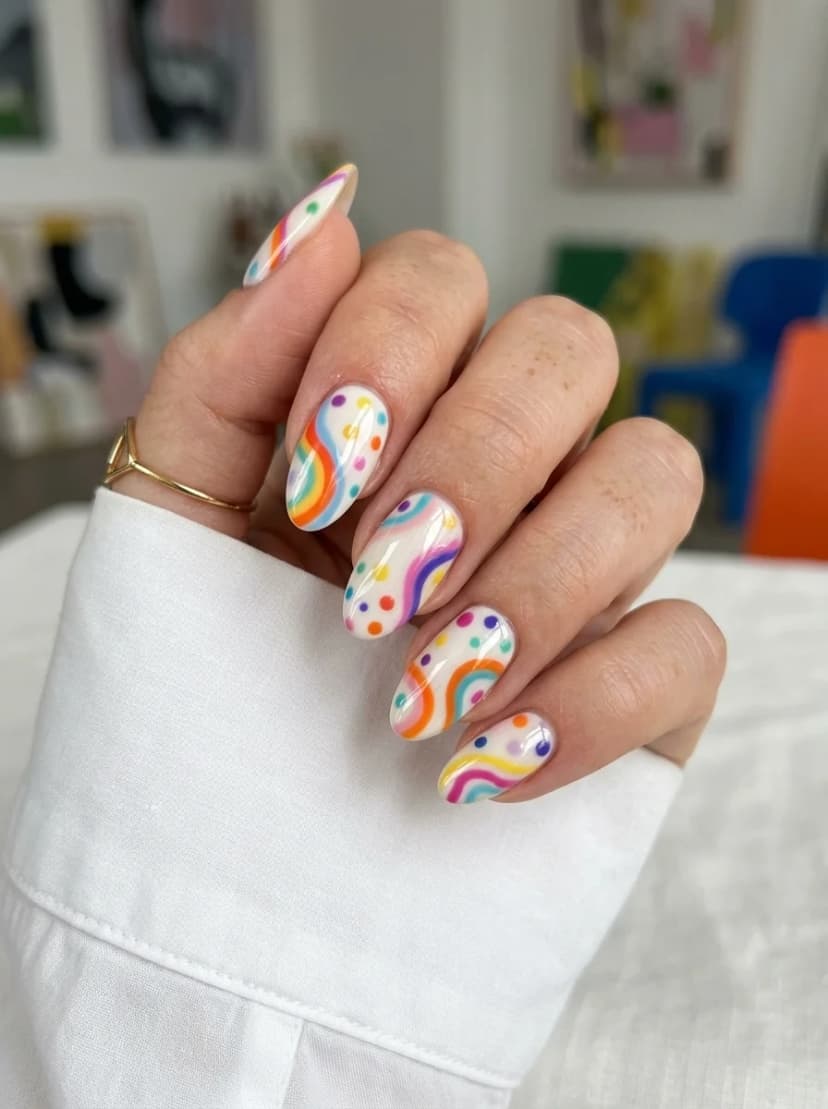
OVERVIEW:
This design combines two classic nail art elements: rainbow swirls and confetti dots. The white base keeps things clean, while the wavy lines in orange, pink, purple, blue, and yellow create movement across each nail. Small colorful dots fill the gaps between the swirls, adding texture without clutter.
The retro quality of this design is part of its appeal. The swirls feel like something from a 1970s poster, but the color palette and dot accents keep it modern. It is playful without being juvenile.
One consideration: this design takes time. Each swirl needs to dry before you add the next color, or the lines bleed into each other. Budget at least an hour for the full set.
DESIGN BREAKDOWN:
Layered rainbow elements on white. Patience with drying time is essential.
- Nail Color Used: White base, with rainbow colors: orange, pink, purple, blue, yellow, and green.
- Suitable Nail Shape: Almond or coffin. The elongated shape gives the swirls room to flow.
- Design Element: Wavy rainbow lines and scattered colorful dots on a white base.
- Finish: Glossy top coat for a smooth, unified surface.
- Tools Used: Thin striping brush, dotting tool.
GET THE LOOK AT HOME:
Work one color at a time. Let each swirl dry before adding the next.
- White base: Apply two coats of opaque white to all nails. Let dry completely.
- Swirls: Starting with one color, use a striping brush to paint a wavy line across each nail. Repeat with each rainbow color, spacing the swirls evenly.
- Dots: Use a dotting tool to add small colorful dots in the spaces between swirls.
- Seal: Apply a thick, self-leveling top coat to smooth out any texture from the layered polish.
Pro Tip: If you find the swirls are bleeding into each other, your polish is too wet. Wait an extra minute between colors, or use a quick-dry drops on each layer before proceeding.


10. Dark Chocolate with Tortoiseshell Accent
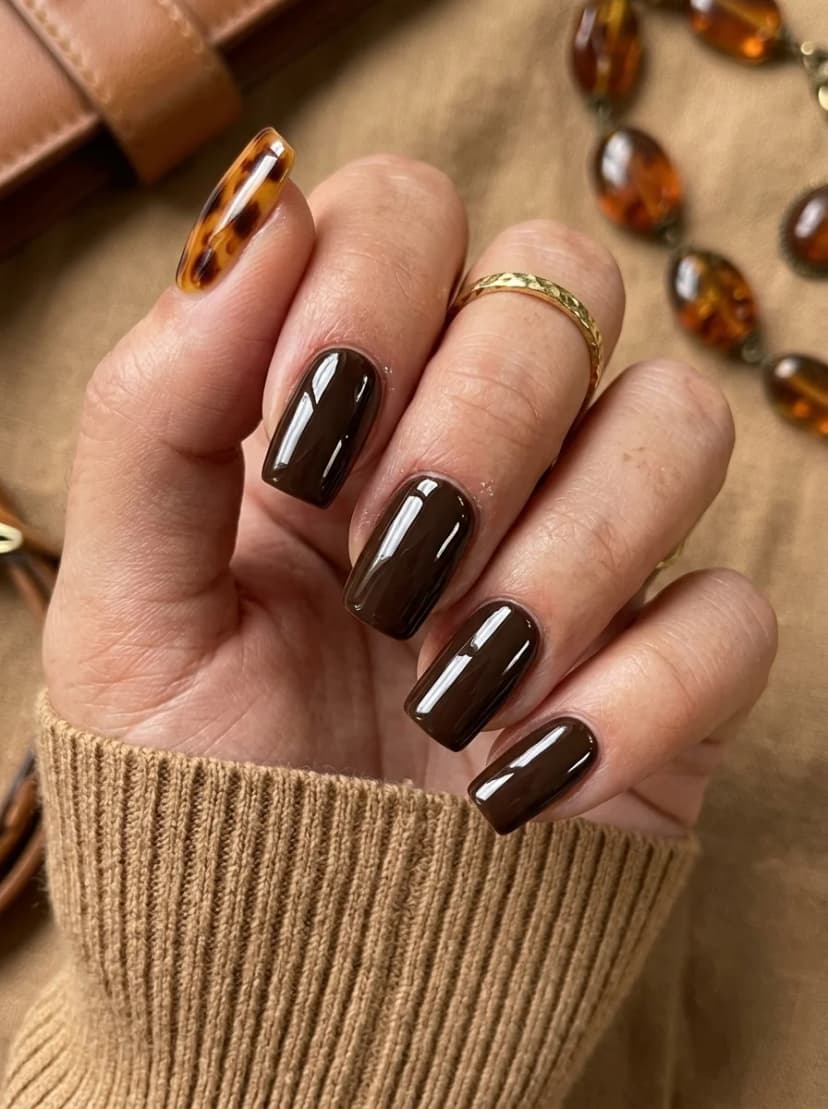
OVERVIEW:
Dark chocolate brown is one of those colors that signals the shift from summer to fall without fully committing to it. It is warm, sophisticated, and pairs well with practically everything in your wardrobe. Adding a single tortoiseshell accent nail gives the set visual interest without making it busy.
The glossy finish on the chocolate nails makes the color look deeper and richer than it would with a matte coat. It almost looks like melted dark chocolate, which is exactly the effect you want.
This is a good transitional design for anyone who wants to start moving toward fall colors but is not ready to give up the shine and gloss of summer finishes. It bridges both seasons cleanly.
DESIGN BREAKDOWN:
Solid dark base with one detailed accent. Minimal and polished.
- Nail Color Used: Deep chocolate brown, with amber, dark brown, and black for the tortoiseshell accent.
- Suitable Nail Shape: Coffin or almond. Both complement the richness of the brown.
- Design Element: Solid chocolate brown on four nails, tortoiseshell pattern on the accent nail.
- Finish: High-gloss top coat over everything.
- Tools Used: Detail brush for tortoiseshell, dotting tool.
GET THE LOOK AT HOME:
The chocolate nails are straightforward. The accent nail takes the most care.
- Chocolate base: Apply two coats of deep chocolate brown to four nails. Let dry.
- Tortoiseshell accent: On the accent nail, apply a sheer amber base. While wet, add small spots of dark brown and black. Drag a toothpick through them to create the marbled tortoiseshell effect.
- Seal: Apply a glossy top coat to all nails. The high-shine finish is what makes the chocolate look luxurious.
Pro Tip: Choose which finger gets the accent based on your hand proportions. The ring finger is traditional, but the middle finger often shows the design more prominently.
11. Sunflower and French Tip Mix
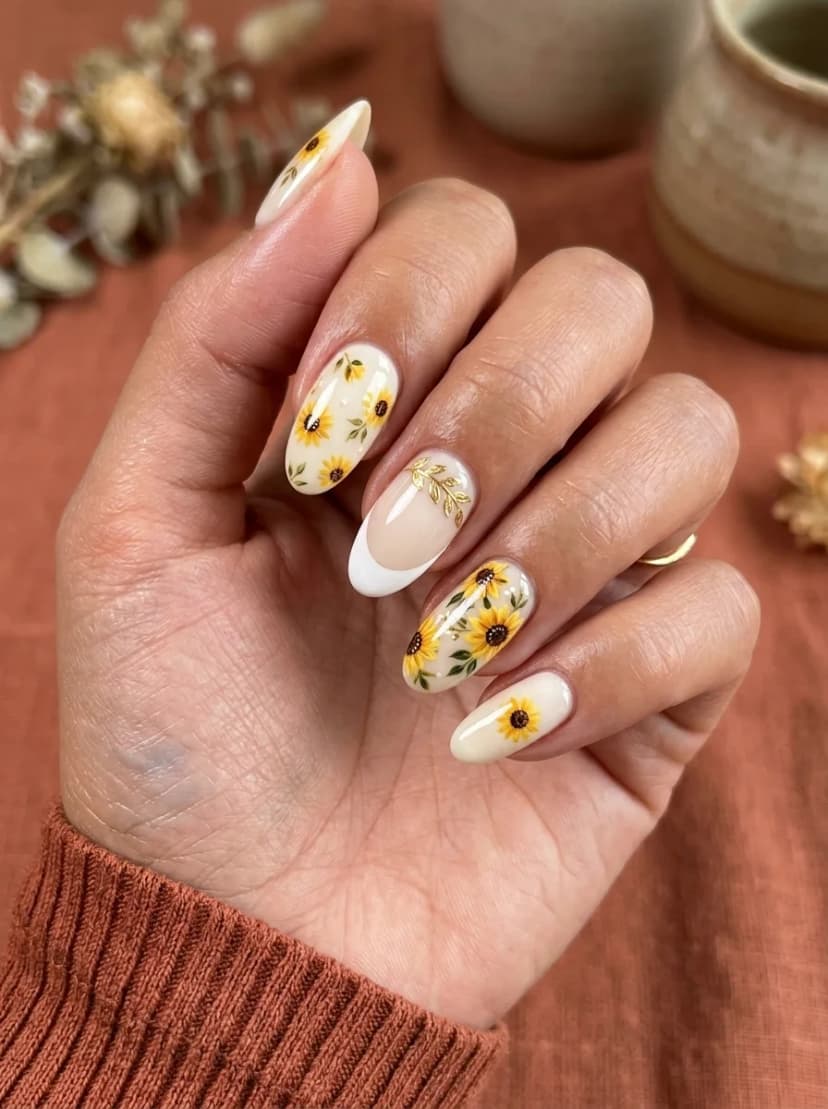
OVERVIEW:
Combining hand-painted sunflowers with a classic French tip and a gold leaf accent creates a set that feels curated rather than random. Each nail has its own personality, but the warm color palette ties everything together. The sunflowers are detailed enough to look intentional but loose enough to avoid feeling stiff.
The French tip nail acts as a palate cleanser between the busier sunflower nails. It gives your eye a resting place and prevents the overall design from feeling overloaded. The gold leaf accent adds a metallic flash that elevates the whole set.
One thing to keep in mind: sunflower petals require a steady hand and a thin brush. If you are new to nail art, start with fewer petals per flower. A simplified version with five or six petals still reads as a sunflower and is much easier to execute.
DESIGN BREAKDOWN:
Three distinct nail styles unified by warm tones and gold accents.
- Nail Color Used: Creamy white base, golden yellow, brown, green, and gold leaf flakes.
- Suitable Nail Shape: Almond. The tapered shape suits the floral theme.
- Design Element: Hand-painted sunflowers on select nails, a classic French tip, and a gold leaf accent.
- Finish: Glossy top coat to seal the artwork and gold leaf.
- Tools Used: Fine detail brush, gold leaf flakes, tweezers.
GET THE LOOK AT HOME:
Paint the sunflowers first, then add the French tip and gold leaf last.
- Base: Apply two coats of creamy white to all nails. Let dry.
- Sunflowers: Use a detail brush to paint yellow petals radiating from a brown center. Add green leaves around the flowers.
- French tip: On the designated nail, paint a clean white tip over the nude base.
- Gold leaf: On the accent nail, press small gold leaf flakes onto a tacky base coat. Arrange them randomly for an organic look.
- Seal: Apply a thick top coat to all nails, paying extra attention to the gold leaf to prevent lifting.
Pro Tip: Gold leaf adheres best to a slightly tacky surface. Apply your top coat, wait thirty seconds, then press the flakes on. They will stick without sliding around.


12. Forest Green with Rose Art
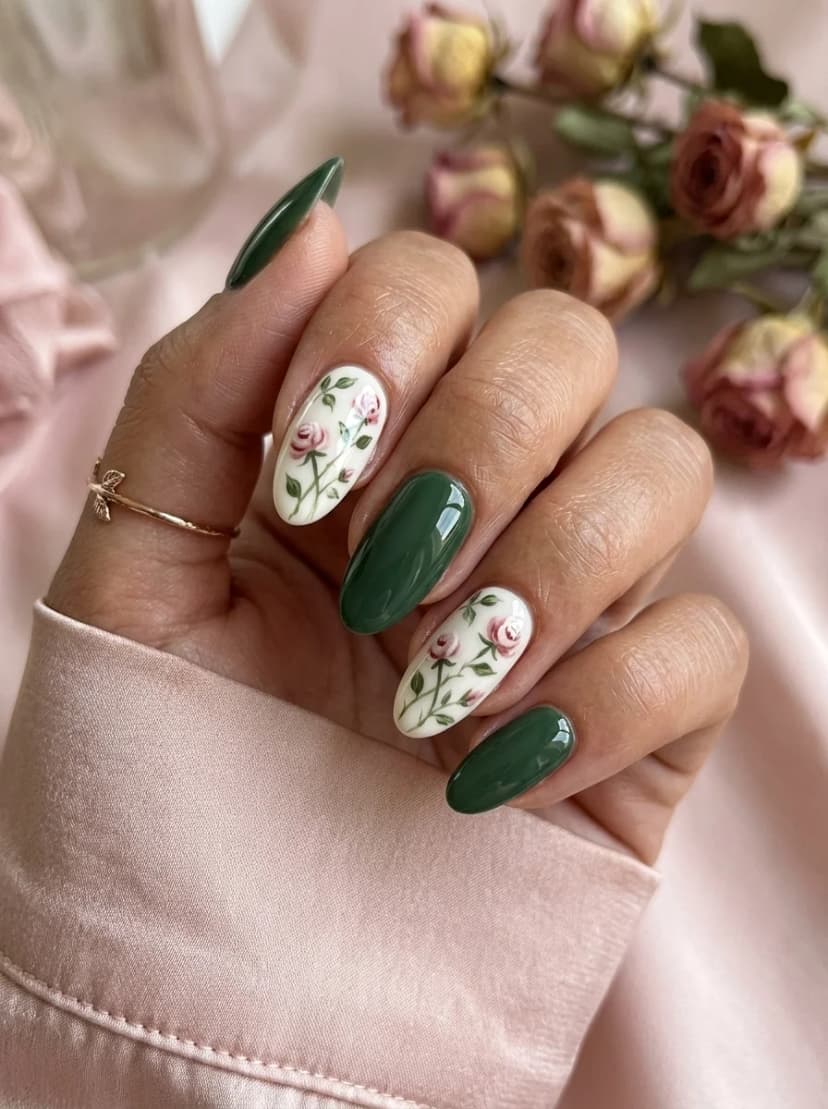
OVERVIEW:
Forest green is having a moment, and this design shows why. The deep, saturated green on most nails feels grounded and sophisticated, while the accent nails with white base and delicate pink roses add softness and femininity. The contrast between the bold green and the gentle florals creates a set that feels balanced.
The rose paintings are done in a watercolor style, which gives them a dreamy, impressionistic quality. They are not hyper-realistic, and that is intentional. The soft edges and blended colors feel more organic and less like stickers.
This design works particularly well for late August when you want to start thinking about fall without going full autumn palette. The green reads as seasonal without being specifically summer or fall.
DESIGN BREAKDOWN:
Rich solid color paired with delicate floral accent art.
- Nail Color Used: Deep forest green, white base for accent nails, pink and green for the roses.
- Suitable Nail Shape: Almond. The soft taper complements the romantic floral theme.
- Design Element: Solid green on most nails, with two accent nails featuring watercolor-style pink roses on white.
- Finish: Glossy top coat for a lush, saturated look.
- Tools Used: Fine detail brush, small flat brush for watercolor effect.
GET THE LOOK AT HOME:
The watercolor technique requires thin, watery polish. Dilute your pink slightly with top coat.
- Green nails: Apply two coats of forest green to the designated nails. Let dry.
- Accent base: Apply two coats of white to the accent nails.
- Roses: Using a diluted pink polish, paint loose petal shapes in a circular pattern. Add darker pink for depth in the center. Paint small green leaves around the flowers.
- Seal: Apply a glossy top coat to all nails. The shine makes the green look deeper and the roses look fresher.
Pro Tip: If your roses look muddy, you are using too much polish on the brush. Wipe most of it off and use light, feathery strokes instead.
13. French Tip and Floral Mix
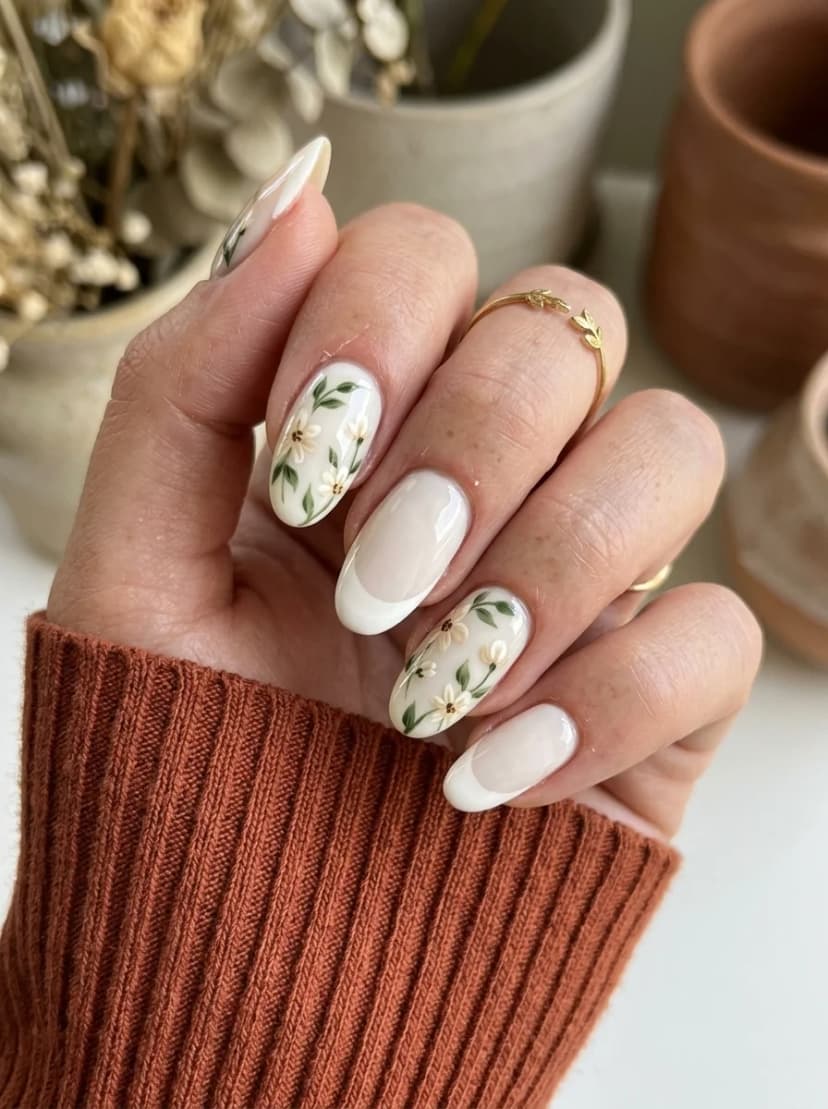
OVERVIEW:
This design splits the difference between classic and decorative. Some nails get a clean French tip while others feature delicate white flowers with green leaves on a milky base. The result is a set that feels polished and romantic without being overly busy.
The floral nails use a muted palette. The flowers are white with subtle shading, and the leaves are a soft sage green rather than a bright Kelly green. That restraint keeps the design looking elegant rather than crafty.
The almond shape is ideal here. It gives the French tips a clean line to follow and provides enough surface area for the floral art to breathe.
DESIGN BREAKDOWN:
Classic meets botanical in a balanced split.
- Nail Color Used: Sheer nude or milky white base, opaque white for French tips and flowers, sage green for leaves.
- Suitable Nail Shape: Almond or oval.
- Design Element: Alternating French tips and floral accent nails.
- Finish: Glossy top coat for a cohesive, polished look.
- Tools Used: French tip guides, fine detail brush for florals.
GET THE LOOK AT HOME:
Do all the French tips first, then tackle the floral work.
- Base: Apply two coats of sheer nude or milky white to all nails.
- French tips: Use guides or a liner brush to paint white tips on the designated nails.
- Florals: On the accent nails, use a detail brush to paint small white flowers with five petals each. Add green leaves around them.
- Seal: Apply a glossy top coat to everything.
Pro Tip: Keep the flowers small. Tiny, delicate blossoms look more refined than large, overly detailed ones on a nail surface.


14. Yellow and Daisy Field Nails
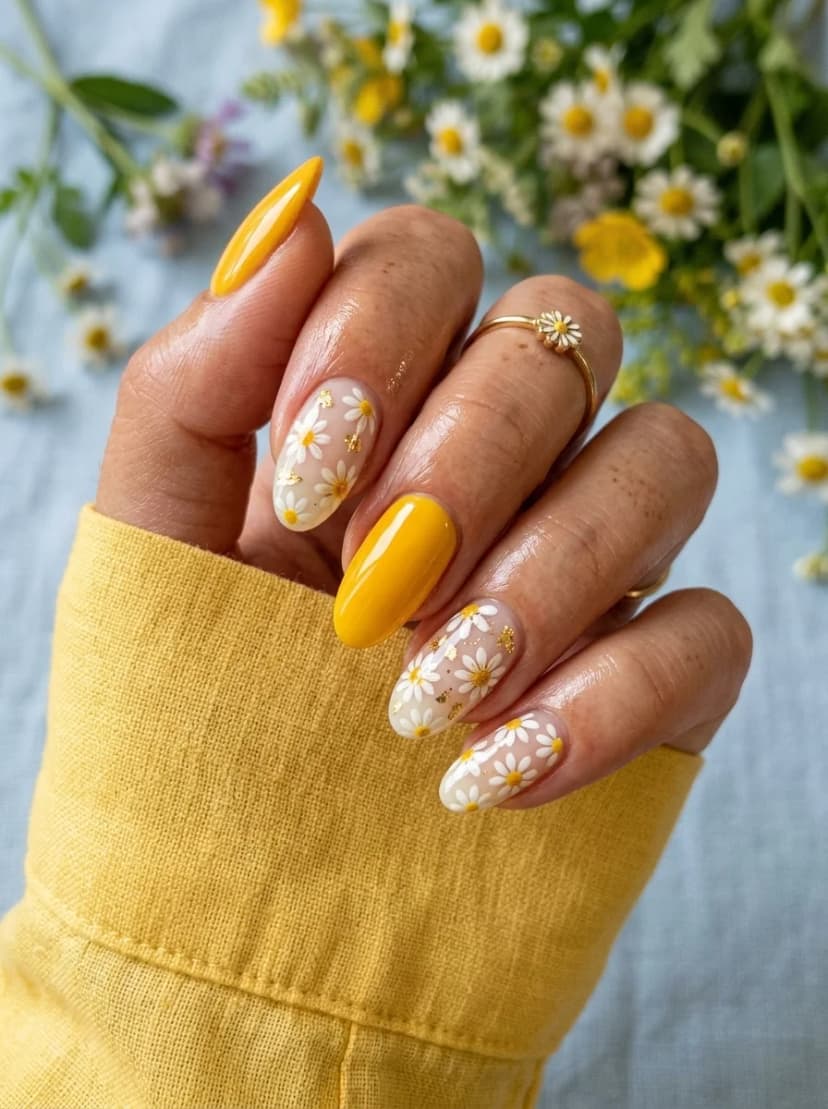
OVERVIEW:
This design captures the feeling of a late summer meadow. Solid yellow nails bring the sunshine, while the accent nails with daisies on a nude base add a wildflower quality. Small gold foil flakes scattered among the flowers catch light and add a touch of luxury without overpowering the natural theme.
The yellow used here is warm and saturated, closer to marigold than pastel. It is a confident color that pairs well with the delicate daisy art because both elements share that same sunny, optimistic energy.
The gold foil is optional but worth the extra step. It adds a dimension that the flat daisy painting alone does not have. The mix of matte flower petals and reflective gold creates visual texture.
DESIGN BREAKDOWN:
Sunshine meets wildflowers with a metallic accent.
- Nail Color Used: Warm marigold yellow, nude base for accent nails, white and yellow for daisies, gold foil flakes.
- Suitable Nail Shape: Almond. The natural curve suits the floral theme.
- Design Element: Solid yellow nails alternating with daisy-patterned accent nails featuring gold foil.
- Finish: Glossy top coat for a fresh, dewy look.
- Tools Used: Dotting tool for daisy centers, fine brush for petals, tweezers for gold foil.
GET THE LOOK AT HOME:
Paint the daisies before applying the gold foil. The foil goes on last.
- Yellow nails: Apply three thin coats of marigold yellow. Let dry.
- Daisy base: Apply two coats of nude to the accent nails.
- Daisies: Use a dotting tool for the yellow centers, then paint white petals around them with a detail brush.
- Gold foil: Press small gold flakes onto the tacky surface of the accent nails. Arrange them randomly.
- Seal: Apply a thick top coat to lock everything in and smooth out the foil texture.
Pro Tip: If you cannot find gold foil, gold nail stickers cut into small pieces work as a substitute. They are easier to handle and stay in place better.
15. Strawberry, Cherry, and Lemon Nails
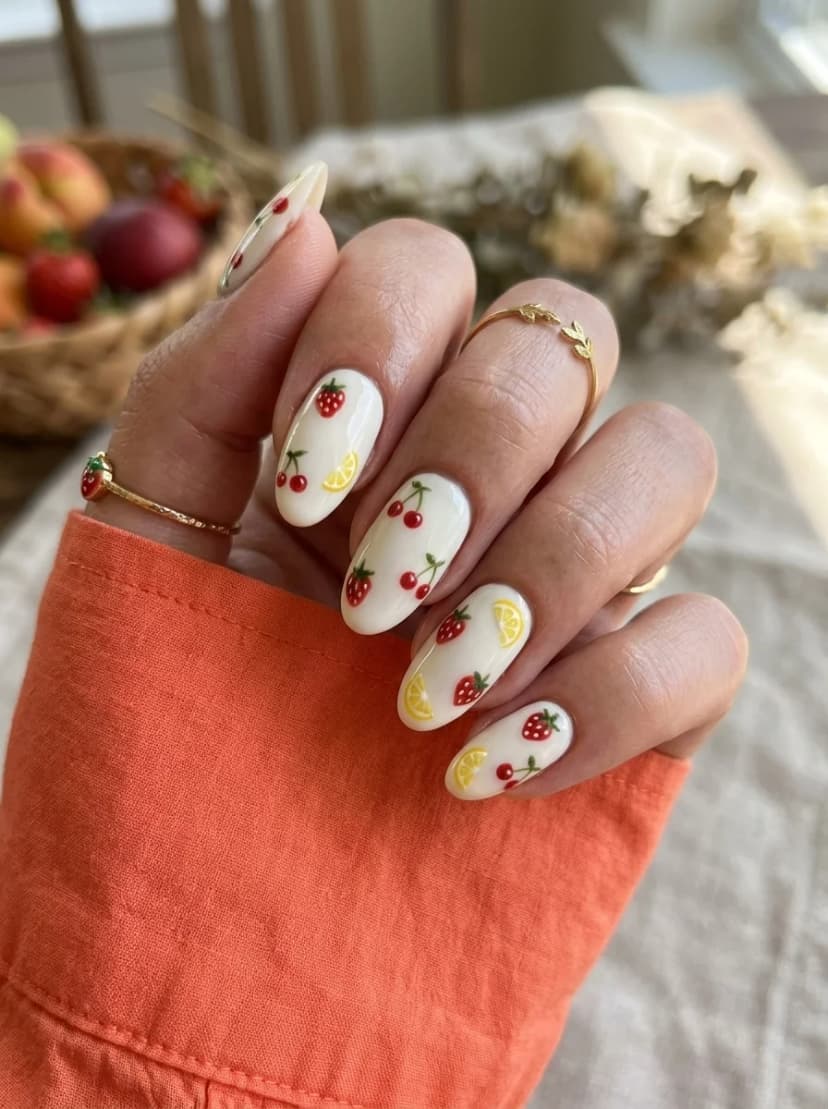
OVERVIEW:
This design actually features three fruits: strawberries, cherries, and lemon slices. All three are painted on a creamy white base, creating a fruit salad effect that feels celebratory and fun.
What makes this work is the consistent scale. Each fruit is small and roughly the same size, so no single element dominates. The red strawberries and cherries share a color family, while the yellow lemon slices add a bright counterpoint.
This is a great design for the first half of August when summer is still in full swing. It loses relevance once September rolls around, so wear it while you can.
DESIGN BREAKDOWN:
Three fruits, one cohesive theme. Scale and spacing matter.
- Nail Color Used: Creamy white base, red for strawberries and cherries, yellow for lemons, green for stems and leaves.
- Suitable Nail Shape: Almond or oval. The soft shapes complement the organic fruit forms.
- Design Element: Hand-painted strawberries, cherries, and lemon slices scattered across all nails.
- Finish: Glossy top coat for a fresh, juicy appearance.
- Tools Used: Fine detail brush, dotting tool.
GET THE LOOK AT HOME:
Work fruit by fruit. Paint all strawberries first, then cherries, then lemons.
- Base: Apply two coats of creamy white. Let dry.
- Strawberries: Paint small red triangular shapes. Add tiny yellow dots for seeds and green tops.
- Cherries: Paint pairs of round red dots with green stems connecting them.
- Lemons: Paint small yellow circles, then add thin lines inside to create the citrus segment pattern.
- Seal: Apply a glossy top coat to finish.
Pro Tip: Keep each fruit to about the size of a pencil eraser. Going larger makes them look cartoonish rather than delicate.


16. Abstract Line Art Nails
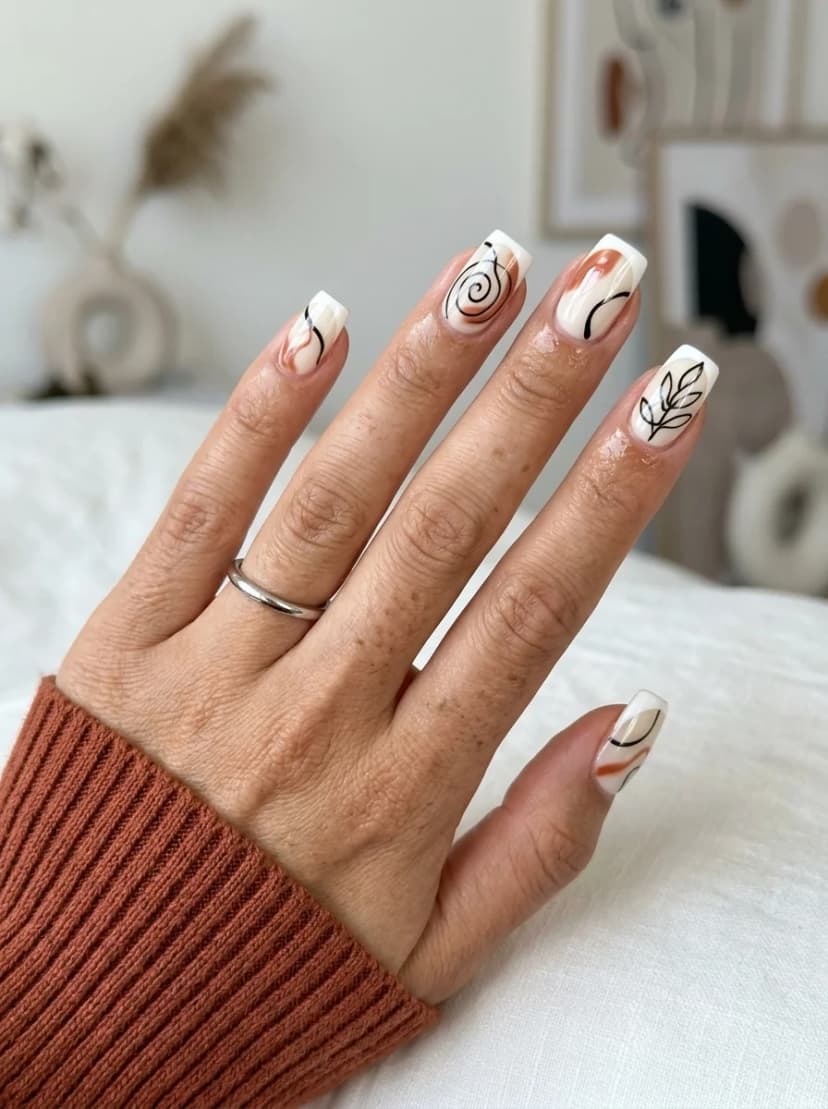
OVERVIEW:
This design looks like it belongs in a modern art gallery. The white base serves as a canvas for black line art including swirls, botanical leaf motifs, and abstract curves. Touches of terracotta add warmth to the otherwise monochrome palette.
Each nail features a different element of the design, which keeps the set visually interesting. One nail has a spiral, another has a leaf, and others have flowing organic lines. The variety is what makes it feel curated rather than random.
The abstract nature of this design makes it forgiving. There is no "correct" way for the lines to flow, so imperfections read as intentional artistic choices.
DESIGN BREAKDOWN:
Artistic line work with earthy accents. Every nail is different.
- Nail Color Used: White base, black for line art, terracotta/brown for accent strokes.
- Suitable Nail Shape: Medium to long square or coffin. The flat surface showcases the line work.
- Design Element: Abstract swirls, botanical motifs, and organic lines in black and terracotta on white.
- Finish: Glossy or satin top coat, depending on preference.
- Tools Used: Thin striping brush, detail brush.
GET THE LOOK AT HOME:
Plan your design loosely before painting. Sketch on paper first if it helps.
- Base: Apply two coats of opaque white. Let dry.
- Line art: Using a thin striping brush and black polish, paint your chosen motifs on each nail. Work slowly and let the brush follow natural curves.
- Accent color: Add small terracotta strokes or fills in select areas. Do not overdo it; a little goes a long way.
- Seal: Apply a top coat to protect the line work.
Pro Tip: If your lines are shaky, try rotating the nail instead of your brush. It is easier to paint smooth curves when the brush stays relatively still.
17. Silver Glitter French Tips
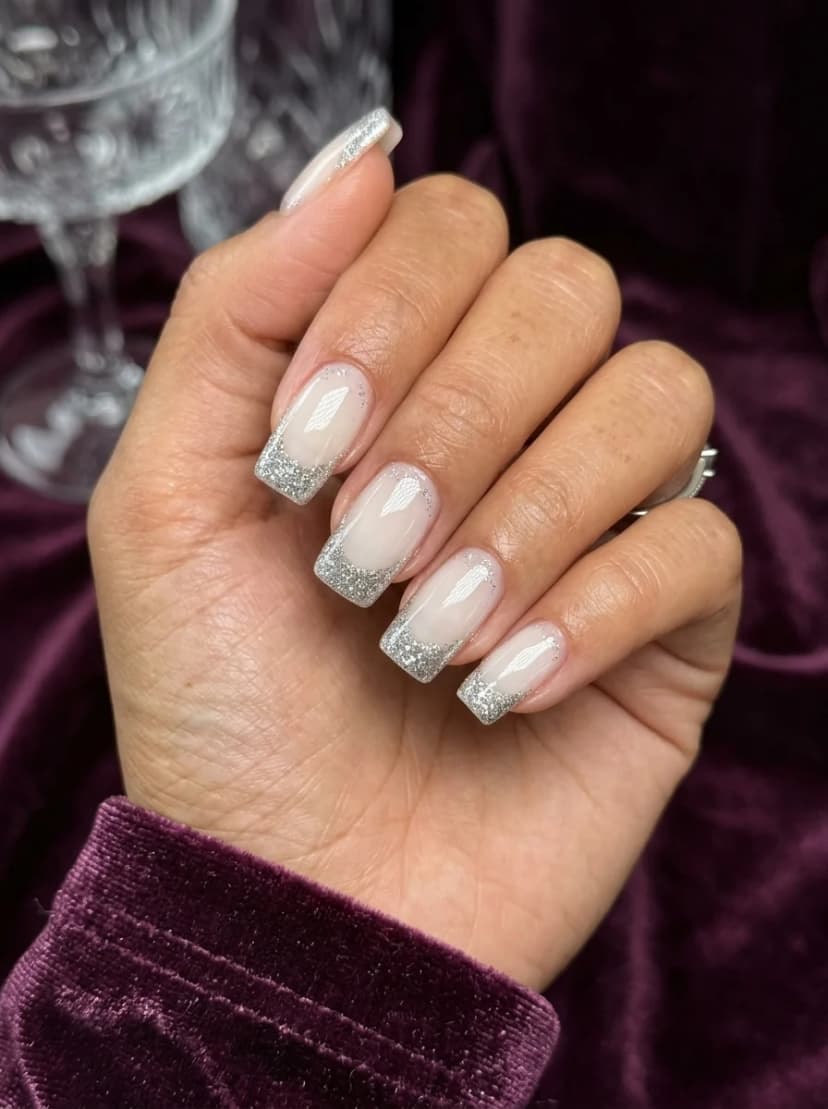
OVERVIEW:
A French tip done in silver glitter rather than white is a simple upgrade that changes the entire mood of the manicure. The sheer nude base keeps things natural and understated, while the glitter tips add sparkle that catches light from every angle. It is the kind of design that looks appropriate at a formal event and casual enough for everyday wear.
The square shape works well here because the flat tip provides a clean, defined line for the glitter to follow. The glitter itself is fine rather than chunky, which keeps the finish smooth rather than textured.
DESIGN BREAKDOWN:
Classic French structure with a metallic twist.
- Nail Color Used: Sheer nude or pink base, fine silver glitter polish for the tips.
- Suitable Nail Shape: Square or coffin. The flat tip defines the glitter line.
- Design Element: Sheer base with silver glitter French tips.
- Finish: Glossy top coat to seal the glitter and add shine.
- Tools Used: French tip guides, glitter polish.
GET THE LOOK AT HOME:
Apply the glitter in thin layers. Thick glitter coats chip quickly.
- Base: Apply two coats of sheer nude. Let dry.
- Glitter tips: Place French tip guides across each nail. Paint the exposed tip with silver glitter polish in two thin coats.
- Remove guides: Peel off the guides while the glitter is still slightly wet for a cleaner line.
- Seal: Apply a thick top coat to smooth out the glitter texture and prevent snagging.
Pro Tip: If the glitter looks patchy after two coats, dab on a third thin layer rather than pressing harder. Pressing displaces the glitter and creates bare spots.


18. Rose Gold Chrome French Tips
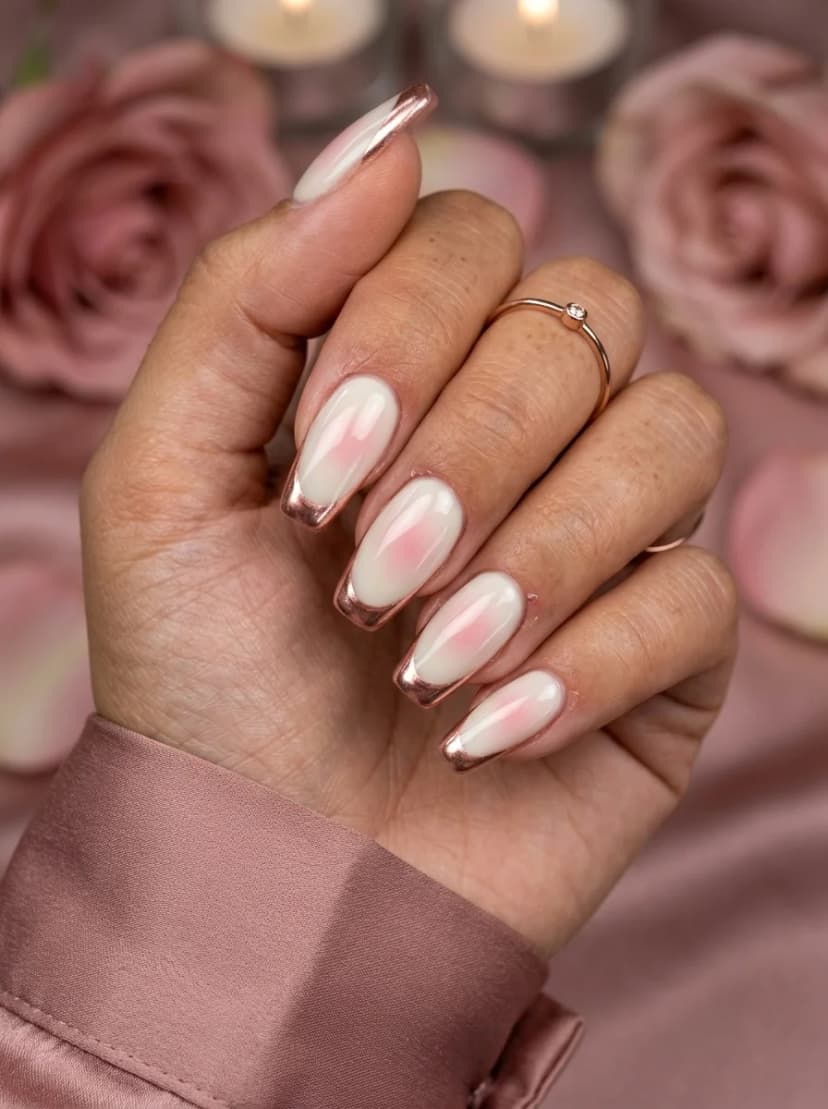
OVERVIEW:
Rose gold chrome on a milky white base creates a French tip that looks like liquid metal. The chrome finish has a mirror-like quality that regular metallic polish cannot replicate. The warm rose tone flatters virtually every skin tone, which is part of why this color combination has stayed popular.
The almond shape is the ideal canvas. The tapered tip gives the chrome a clean line to follow, and the curved surface makes the metallic finish catch light in a way that flat nails do not.
Chrome powder requires gel products for best results. If you only have regular polish, a rose gold metallic polish will give you a similar effect, though the mirror finish will be less pronounced.
DESIGN BREAKDOWN:
Milky base, metallic tip. Simple concept, striking result.
- Nail Color Used: Milky white or sheer pink base, rose gold chrome powder.
- Suitable Nail Shape: Almond. The taper suits the elegance of the design.
- Design Element: Milky base with rose gold chrome French tips.
- Finish: Mirror chrome on the tips, glossy on the base.
- Tools Used: Chrome powder, sponge applicator, no-wipe top coat, French tip guides.
GET THE LOOK AT HOME:
The chrome application is the critical step. Take your time with the burnishing.
- Base: Apply two coats of milky white. Let cure or dry.
- Chrome tips: Apply French tip guides. Paint the tips with a no-wipe top coat and cure. Burnish rose gold chrome powder into the cured tips with a sponge applicator.
- Dust off: Use a fluffy brush to remove excess chrome powder from the nails and surrounding skin.
- Seal: Apply a no-wipe top coat over everything to protect the chrome finish.
Pro Tip: If the chrome does not stick, your top coat may not be fully cured. Try curing for an additional thirty seconds before burnishing.
19. Lavender French Tip Nails
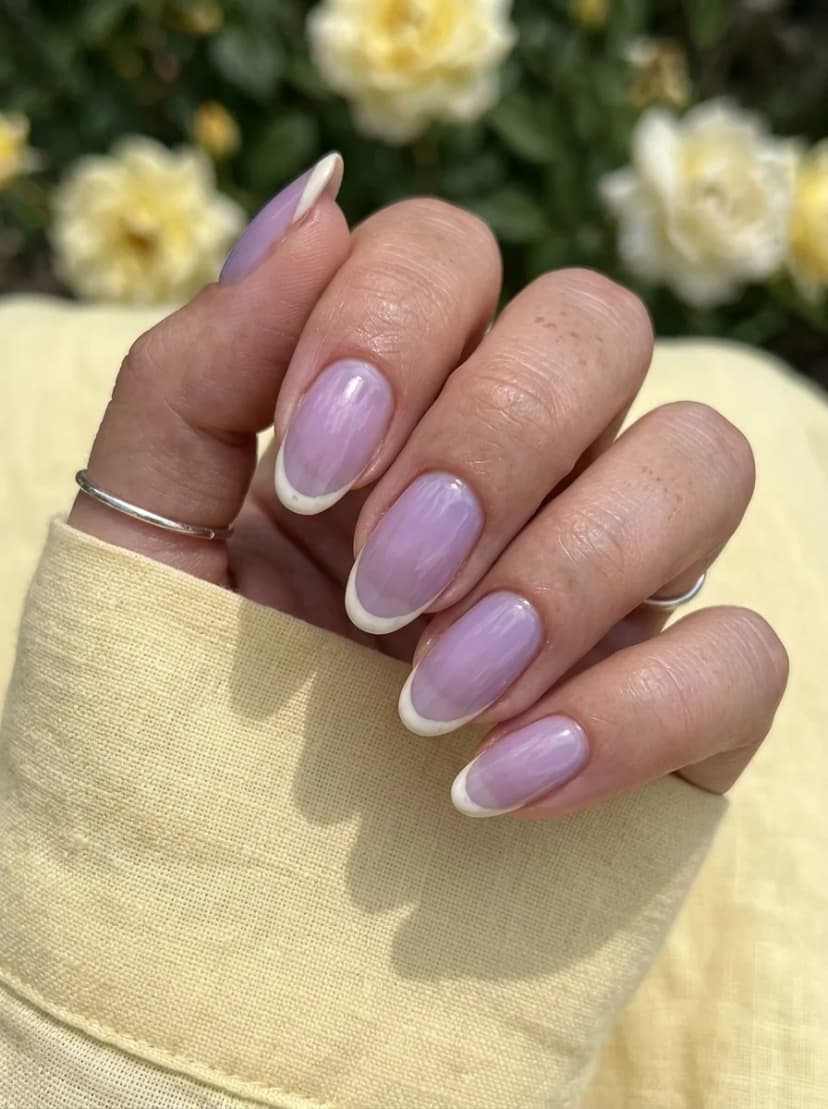
OVERVIEW:
Lavender is a color that works year-round, but it feels especially appropriate in late summer when you want something soft and cool-toned before the warm autumn palette takes over. This design uses a sheer lavender base with thin white French tips, creating a look that is delicate and refined.
The thinness of the white tips is what makes this design work. A thick French tip on a pastel base can look heavy-handed. The delicate line here feels intentional and modern.
This is a low-maintenance design. The sheer base means grow-out is less noticeable, and the simple French tip is easy to touch up if it chips.
DESIGN BREAKDOWN:
Sheer color, thin tip, maximum elegance.
- Nail Color Used: Sheer lavender or lilac, opaque white for the tips.
- Suitable Nail Shape: Oval or almond. The soft curves suit the pastel palette.
- Design Element: Sheer lavender base with thin white French tips.
- Finish: Glossy top coat for a dewy, fresh appearance.
- Tools Used: French tip guides or liner brush.
GET THE LOOK AT HOME:
The key is keeping the tips thin. Less is more here.
- Base: Apply two coats of sheer lavender. Let dry.
- Tips: Place French tip guides high on the nail to create a thin tip line. Paint with opaque white.
- Remove guides: Peel off while the white is wet for a crisp line.
- Seal: Apply a glossy top coat to finish.
Pro Tip: If you want even more subtlety, use a sheer white for the tips instead of opaque white. It creates a "your nails but better" effect.


20. Tortoiseshell French Tips
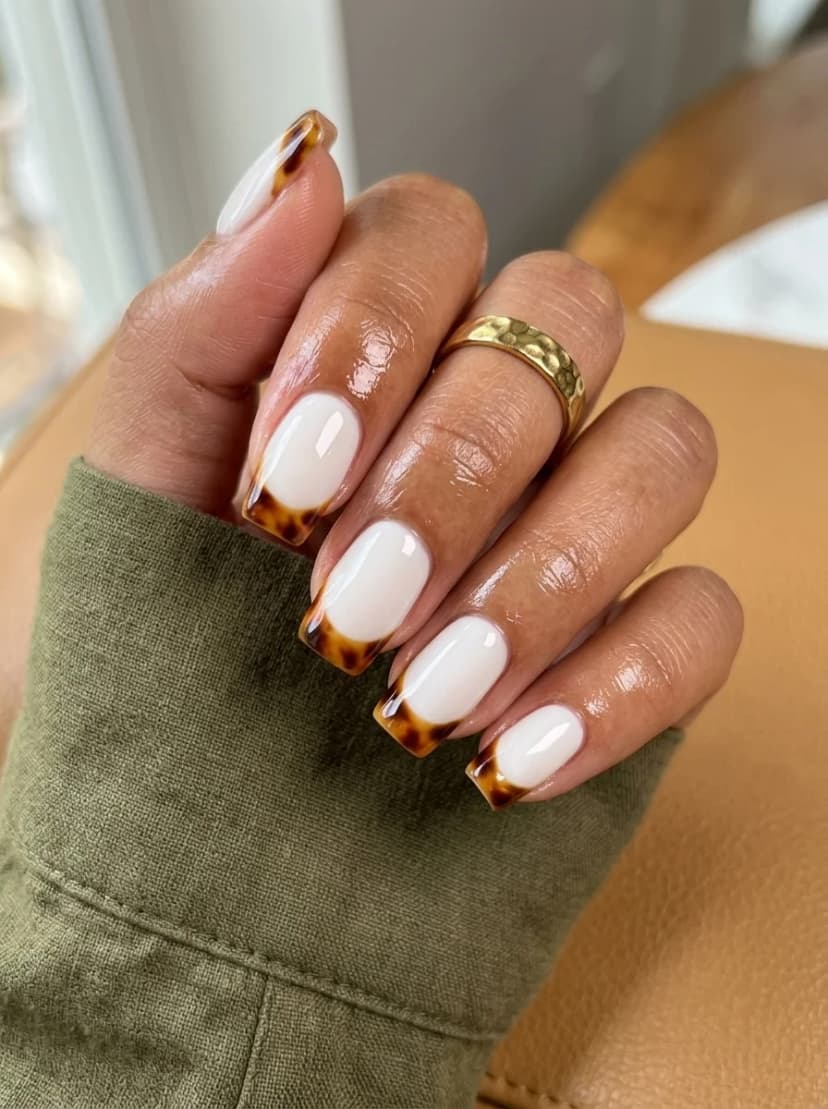
OVERVIEW:
Taking the classic French tip and replacing the white with a tortoiseshell pattern is a clever way to add visual interest without adding color. The milky white base keeps things clean, while the amber-and-brown patterned tips create a warm, organic contrast.
The tortoiseshell effect on the tips is created by layering translucent amber with darker brown spots. The result looks like polished resin or vintage eyeglass frames, which gives the design a sophisticated, almost architectural quality.
This design works best on longer nails. The tips need enough surface area for the tortoiseshell pattern to read clearly. On short nails, the pattern gets compressed and loses its depth.
DESIGN BREAKDOWN:
Classic structure, organic pattern. Warm and modern.
- Nail Color Used: Milky white base, translucent amber, dark brown, and black for the tips.
- Suitable Nail Shape: Coffin or long almond. Length matters for the pattern.
- Design Element: Milky base with tortoiseshell patterned French tips.
- Finish: High-gloss top coat to enhance the depth of the tortoiseshell.
- Tools Used: Detail brush, toothpick for dragging the pattern.
GET THE LOOK AT HOME:
Work the tortoiseshell pattern on the tip while the polish is still wet.
- Base: Apply two coats of milky white to all nails. Let dry.
- Tip outline: Use a liner brush to define the French tip boundary with a thin line.
- Tortoiseshell fill: Apply translucent amber to the tip area. While wet, drop small spots of dark brown and black. Use a toothpick to drag through the spots to create the marbled effect.
- Seal: Apply a thick top coat to smooth out the texture and add depth.
Pro Tip: If the tortoiseshell looks muddy, you are over-mixing the colors. Two or three drags with the toothpick are enough. Let the colors blend naturally.
21. Leopard Print and French Tip Mix
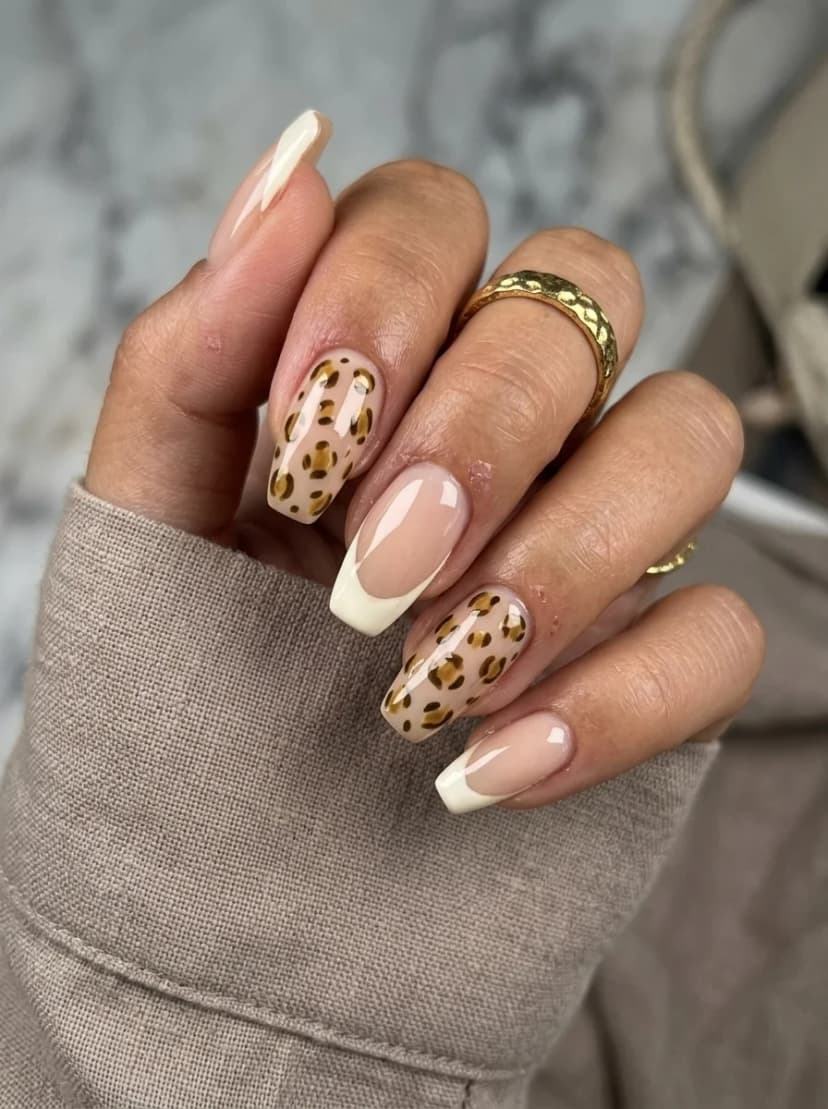
OVERVIEW:
Mixing leopard print with classic French tips is a smart way to wear a bold pattern without committing to it on every nail. The French tips act as a neutral, grounding the busier leopard print and keeping the overall set feeling balanced.
The leopard spots here use a golden-olive tone rather than the typical warm brown. That color choice gives the print a slightly more modern, earthy quality that pairs well with the nude base.
This design is versatile enough for both casual and professional settings. The French tips keep it conservative enough for an office, while the leopard print adds personality.
DESIGN BREAKDOWN:
Bold print balanced by classic technique.
- Nail Color Used: Nude base, white for French tips, olive-gold and dark brown for leopard spots.
- Suitable Nail Shape: Almond or coffin.
- Design Element: Alternating French tips and leopard print nails.
- Finish: Glossy top coat for a polished look.
- Tools Used: Dotting tool or detail brush for leopard spots, French tip guides.
GET THE LOOK AT HOME:
Do the French tips first, then add the leopard print.
- Base: Apply two coats of nude to all nails.
- French tips: Paint white tips on the designated nails.
- Leopard spots: On the accent nails, paint irregular olive-gold spots. Outline some of them with dark brown, but not all. Leave some spots open for a more natural look.
- Seal: Apply a glossy top coat to everything.
Pro Tip: Real leopard spots are not perfect circles. Keep the shapes irregular and vary the sizes for authenticity.


22. Pink Nails with Silver Hearts
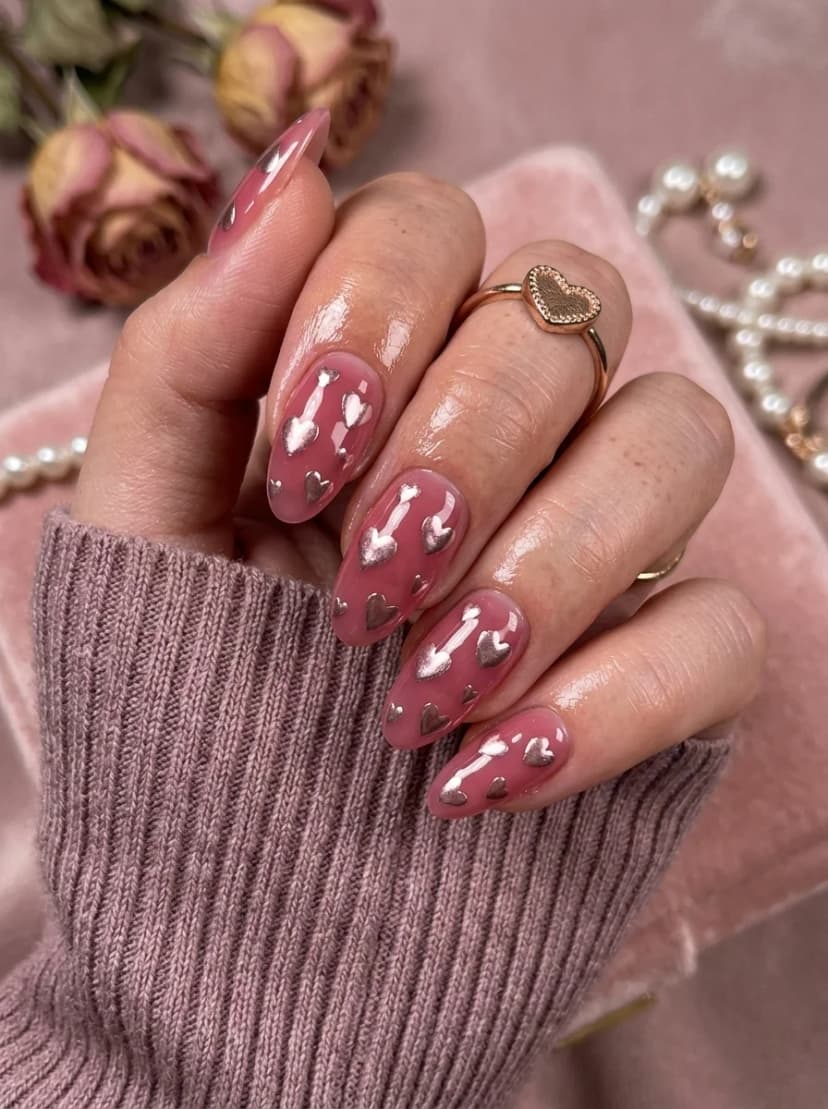
OVERVIEW:
A rosy pink base with scattered silver hearts is a design that leans into femininity without being saccharine. The silver hearts have a chrome-like quality that catches light, creating a metallic flash against the soft pink. It is romantic without being overly sweet.
The heart shapes vary in size and orientation, which keeps the design from looking like a Valentine's Day repeat. Some hearts are tilted, some are upright, and they are scattered randomly across each nail.
This design photographs exceptionally well. The chrome hearts catch light in a way that creates depth in photos, making the nails look more three-dimensional than they actually are.
DESIGN BREAKDOWN:
Soft base, metallic accents. Feminine but not childish.
- Nail Color Used: Rosy pink base, silver chrome or metallic polish for hearts.
- Suitable Nail Shape: Almond or oval. The soft shapes complement the romantic theme.
- Design Element: Solid pink base with scattered silver chrome hearts.
- Finish: Glossy top coat for a dewy, romantic look.
- Tools Used: Heart-shaped nail stamps, detail brush, or vinyl stencils.
GET THE LOOK AT HOME:
Stamps or stencils make the hearts much easier than freehand.
- Base: Apply two coats of rosy pink. Let dry.
- Hearts: Use a stamping plate with heart designs and silver polish, or apply heart-shaped vinyl stencils and paint over them with silver.
- Placement: Scatter two to four hearts per nail at random angles.
- Seal: Apply a glossy top coat to protect the hearts and add shine.
Pro Tip: If you are freehanding the hearts, paint them as two dots side by side and drag them down to meet at a point. It is the simplest way to get a clean heart shape.
23. Nautical Stripes and Polka Dots
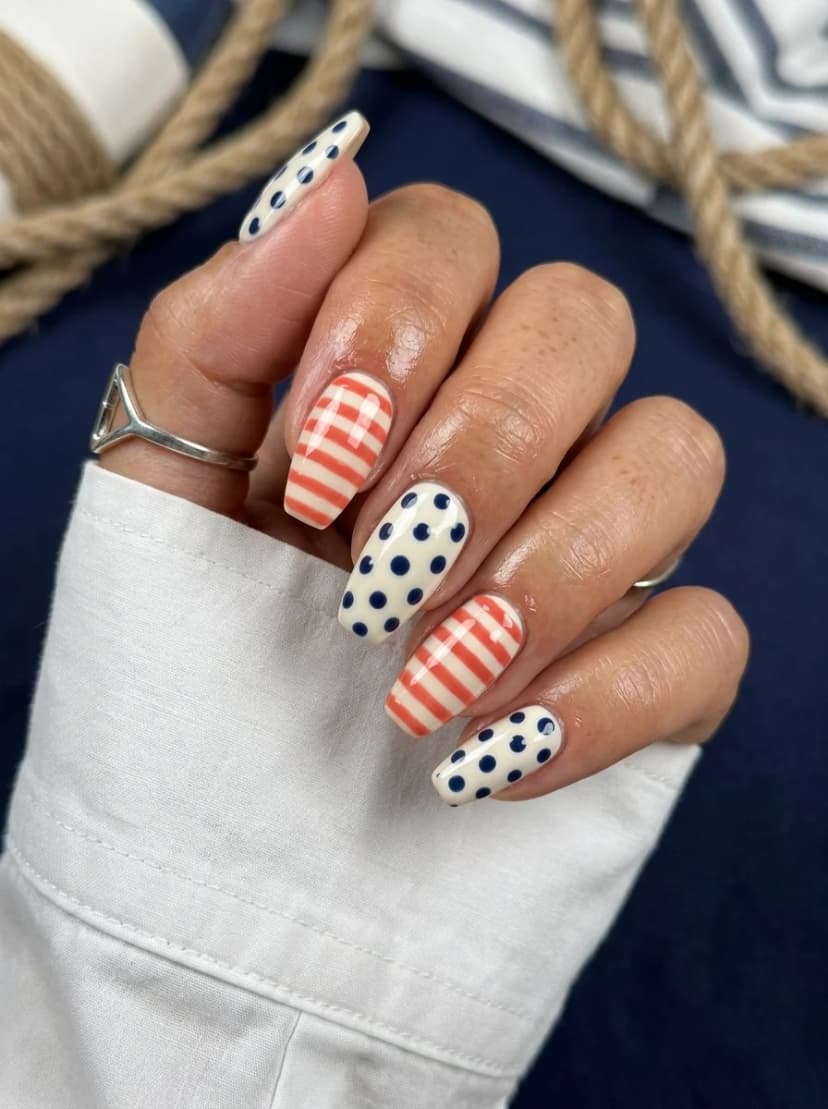
OVERVIEW:
This nautical-inspired design alternates between red and white stripes and navy blue polka dots on a white base. The color palette is patriotic without being explicitly flag-themed, which gives it more versatility throughout the month.
The stripes are horizontal, which creates a widening effect on the nail. On almond-shaped nails like these, that horizontal emphasis balances the natural elongation of the shape. The polka dots provide a round counterpoint to the straight lines.
This design is clean and graphic. It reads as intentional and styled, which is what makes it work for both casual summer outings and more polished occasions.
DESIGN BREAKDOWN:
Two patterns, one color story. Red, white, and navy.
- Nail Color Used: White base, red for stripes, navy blue for polka dots.
- Suitable Nail Shape: Almond or coffin.
- Design Element: Alternating red-and-white horizontal stripes and navy polka dots on white.
- Finish: Glossy top coat for a clean, polished look.
- Tools Used: Striping brush or tape for stripes, dotting tool for polka dots.
GET THE LOOK AT HOME:
Use striping tape for the cleanest stripe lines.
- Base: Apply two coats of white to all nails.
- Stripes: Apply thin horizontal strips of tape across the nail, leaving gaps. Paint red over the exposed areas. Remove tape while wet.
- Polka dots: Use a dotting tool dipped in navy blue to create evenly spaced dots on the white accent nails.
- Seal: Apply a glossy top coat to finish.
Pro Tip: For evenly spaced polka dots, start with a center dot, then place four dots around it in a cross pattern. Fill in the gaps after.

24. Silver Swirl Nails
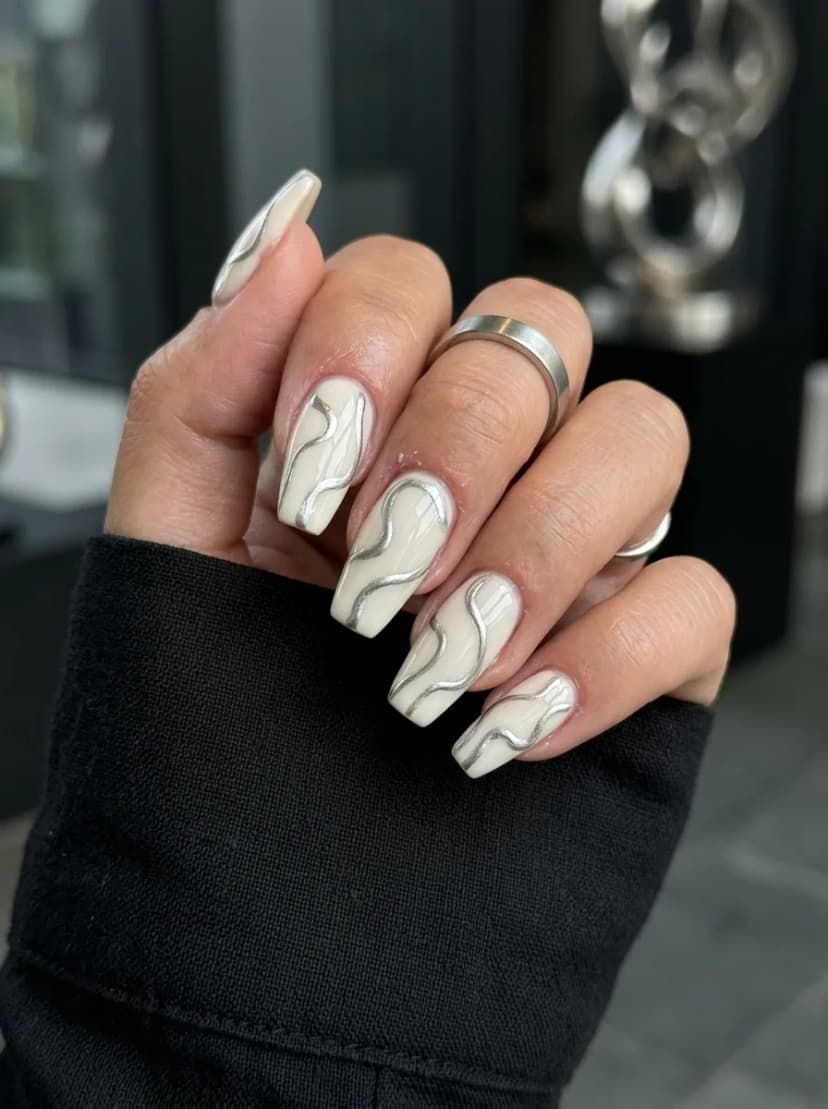
OVERVIEW:
Metallic silver swirls on a white base create a design that feels futuristic and clean. The swirls are organic and flowing, which contrasts nicely with the cool, industrial quality of the silver. It is a combination that feels both natural and high-tech at the same time.
The silver polish used here has a chrome-like quality that catches light and creates a sense of movement on the nail. As your hand moves, the swirls seem to shift and shimmer.
This design is minimalist in concept but high-impact in execution. Two colors, one pattern, and a lot of visual interest.
DESIGN BREAKDOWN:
Two colors, maximum impact. The swirl direction matters.
- Nail Color Used: Opaque white base, metallic silver polish.
- Suitable Nail Shape: Coffin or square. The flat surface showcases the swirl patterns.
- Design Element: Flowing silver swirl lines on a white base.
- Finish: Glossy top coat to enhance the metallic shine.
- Tools Used: Thin striping brush.
GET THE LOOK AT HOME:
Load your brush with enough polish to create smooth, continuous lines.
- Base: Apply two coats of opaque white. Let dry.
- Swirls: Using a striping brush loaded with silver polish, paint flowing, curved lines across each nail. Vary the thickness and direction on each nail.
- Seal: Apply a glossy top coat to lock in the design and add depth to the silver.
Pro Tip: Keep the brush fully loaded but not dripping. A dry brush creates scratchy, broken lines. A wet brush creates smooth, flowing curves.
25. Gold Leaf Flake Nails
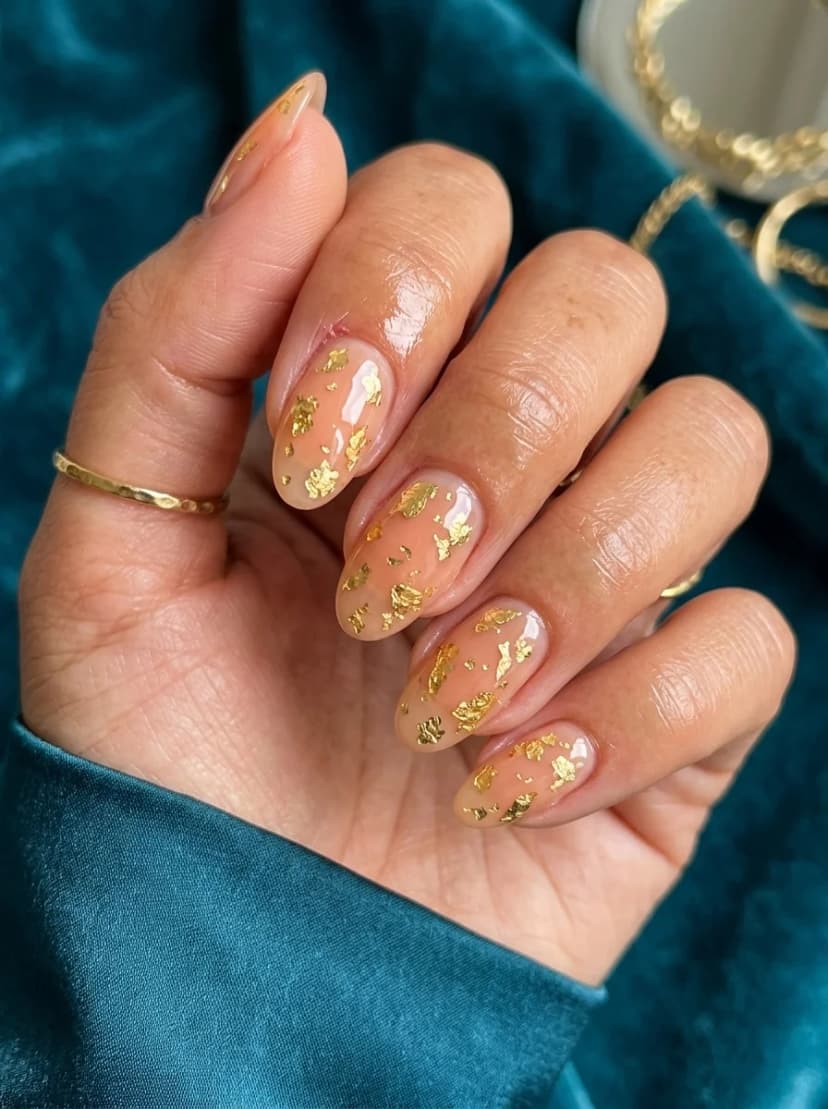
OVERVIEW:
Gold leaf on a sheer nude base is one of the simplest ways to make your nails look expensive. The flakes catch light at different angles, creating a scattered, organic shimmer that looks more like jewelry than nail art. The sheer base keeps everything understated.
The beauty of gold leaf is its randomness. No two nails will look the same, and the irregular shapes of the flakes add a natural, imperfect quality that feels luxurious rather than manufactured.
Gold leaf is delicate. It tears easily and can blow away with a light breath. Work in a still environment and handle the flakes with tweezers.
DESIGN BREAKDOWN:
Sheer base, metallic accent. Less is more.
- Nail Color Used: Sheer nude or clear base, gold leaf flakes.
- Suitable Nail Shape: Almond or any shape. This design is shape-agnostic.
- Design Element: Scattered gold leaf flakes on a sheer base.
- Finish: Glossy top coat to seal the flakes and add shine.
- Tools Used: Tweezers, clear base coat or nail glue.
GET THE LOOK AT HOME:
Apply the flakes to a tacky surface so they adhere without sliding.
- Base: Apply two coats of sheer nude. Let dry partially so the surface is still slightly tacky.
- Gold leaf: Using tweezers, pick up small flakes of gold leaf and press them onto the nail. Arrange them randomly, leaving some areas bare.
- Press down: Gently press the flakes flat with a soft brush or your fingertip.
- Seal: Apply a thick top coat to encapsulate the gold leaf and prevent lifting.
Pro Tip: If you do not have gold leaf, gold foil nail stickers cut into irregular pieces work as an easier alternative. They are thicker and easier to handle.


26. Stars and Stripes Nails
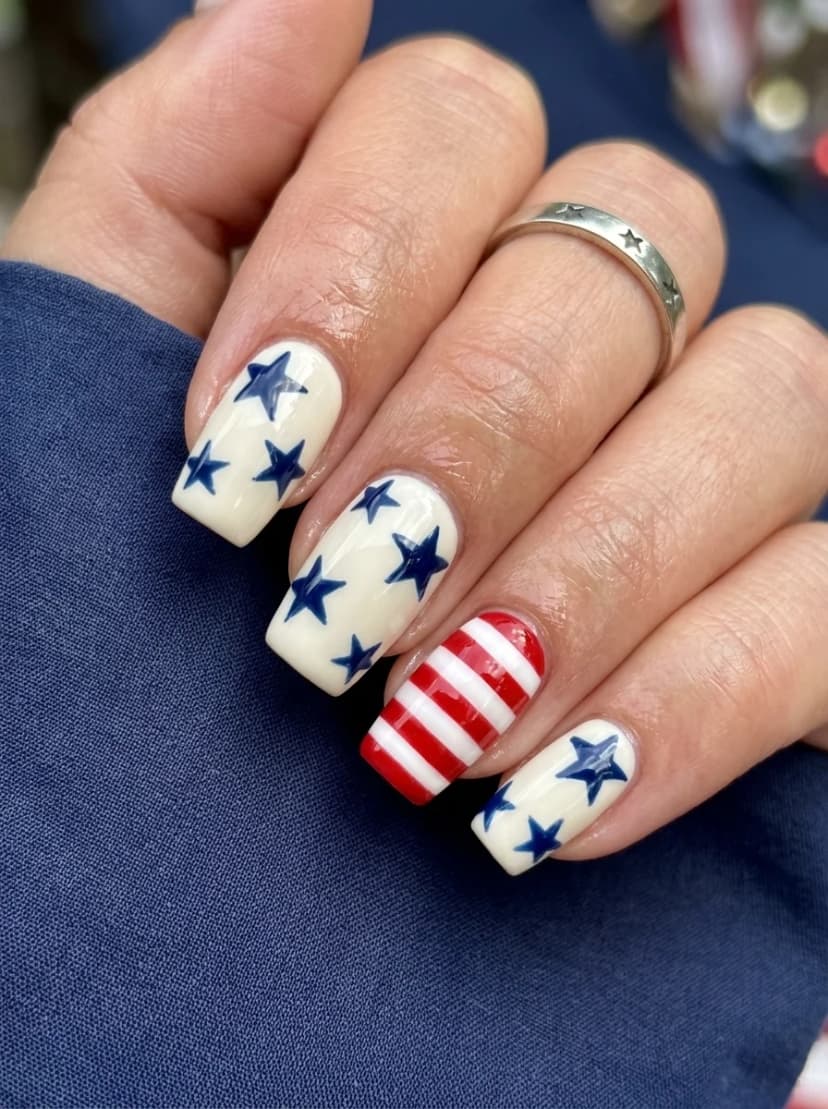
OVERVIEW:
This patriotic design features navy blue stars on a white base alongside red and white horizontal stripes. It is clearly American-flag-inspired, but the hand-painted quality keeps it from looking like a costume. The stars are slightly irregular, which adds charm.
The color palette is classic and strong. Navy, red, and white create high contrast that reads well from a distance. It is a bold design that does not need additional embellishment.
While this design is most associated with early July, it works through August as well, especially for anyone extending their summer patriotic spirit.
DESIGN BREAKDOWN:
Stars on some nails, stripes on others. High contrast, clear theme.
- Nail Color Used: White base, navy blue for stars, red for stripes.
- Suitable Nail Shape: Square or coffin. The flat surface suits the graphic patterns.
- Design Element: Hand-painted navy stars on white, red and white horizontal stripes on accent nails.
- Finish: Glossy top coat for a clean, polished look.
- Tools Used: Star stencil or detail brush, striping brush for stripes.
GET THE LOOK AT HOME:
Stars are easier with a stencil. Freehand stars require a steady hand.
- Base: Apply two coats of white to all nails.
- Stars: Use a star-shaped stencil or stamp to apply navy stars to the designated nails. If freehanding, paint a small plus sign and fill in the points.
- Stripes: Use striping tape to mask off horizontal lines on the accent nails. Paint red over the exposed areas. Remove tape while wet.
- Seal: Apply a glossy top coat to finish.
Pro Tip: For the most realistic stars, vary the size. Paint two or three different sizes on each nail rather than making them all identical.
27. Brown Marble Nails
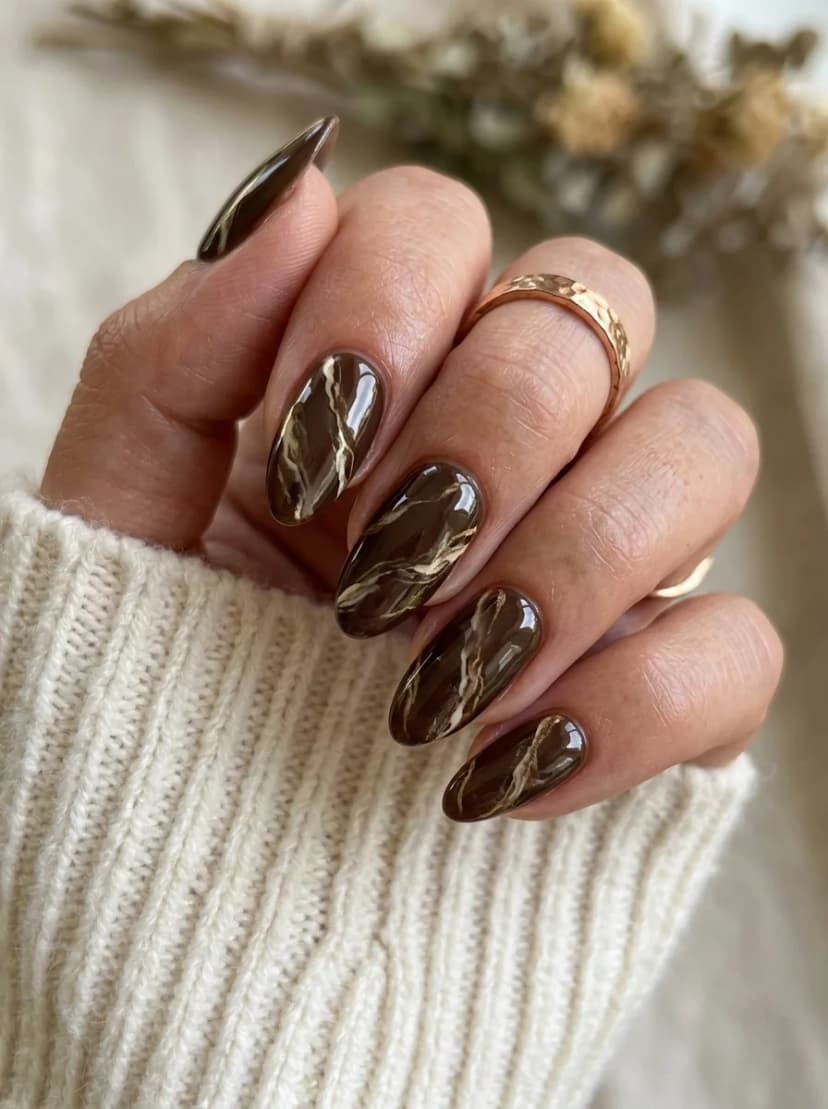
OVERVIEW:
Dark brown marble with gold veining looks like polished stone. The deep chocolate base with lighter brown and gold swirls creates a geological effect that feels rich and grounded. This is the kind of design that makes people ask if your nails are actually made of stone.
The marble effect is achieved through a wet-on-wet technique. You drop different colors of polish onto a wet base and drag them through each other. The result is organic and impossible to replicate exactly from nail to nail, which is part of the appeal.
This design transitions well from late summer into fall. The warm brown tones feel seasonal without being specifically tied to any one time of year.
DESIGN BREAKDOWN:
Wet-on-wet marble technique. Every nail will be unique.
- Nail Color Used: Dark chocolate brown base, lighter brown, gold, and cream for the marble veins.
- Suitable Nail Shape: Almond or coffin. The elongated shape gives the marble room to develop.
- Design Element: Dark brown marble with gold veining across all nails.
- Finish: High-gloss top coat to enhance the stone-like depth.
- Tools Used: Toothpick or fine brush, foil palette for mixing.
GET THE LOOK AT HOME:
Work one nail at a time. The wet-on-wet technique requires speed.
- Base: Apply a thick coat of dark brown polish. Do not let it dry.
- Drop colors: While the base is still wet, drop small amounts of lighter brown, gold, and cream onto the nail.
- Drag: Use a toothpick to drag through the colors in flowing, organic lines. Three or four drags per nail maximum.
- Seal: Wait five minutes for the polish to settle, then apply a thick top coat to smooth out any texture.
Pro Tip: If the marble looks muddy, you are using too many drags. Limit yourself to three or four pulls per nail and let the colors blend naturally.


28. Strawberry Nail Art
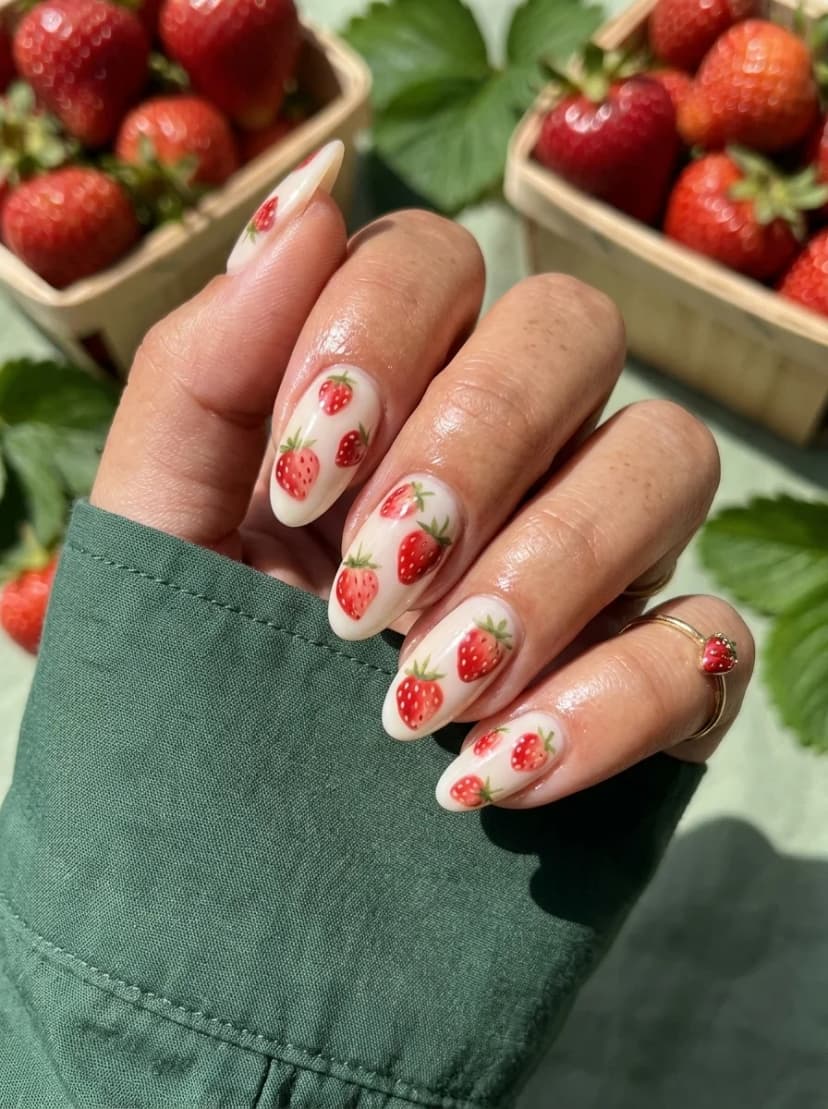
OVERVIEW:
Dedicated strawberry nails, without the supporting cast of other fruits, create a more focused and cohesive design. The red berries with green tops against a creamy white base feel fresh and summery. The strawberries are painted with enough detail to be recognizable but without hyper-realistic shading.
The placement is scattered and organic. Some strawberries sit upright, others tilt at angles. That variation keeps the design feeling playful rather than stiff.
This is a good beginner nail art project. Strawberries are simple shapes to paint, and the color palette is limited to red, green, and white.
DESIGN BREAKDOWN:
Single fruit theme, clean execution.
- Nail Color Used: Creamy white base, bright red, and green for the strawberries.
- Suitable Nail Shape: Almond or oval.
- Design Element: Hand-painted strawberries scattered across a white base.
- Finish: Glossy top coat for a juicy, fresh look.
- Tools Used: Dotting tool or small brush, detail brush for stems.
GET THE LOOK AT HOME:
The strawberry shape is simple: a triangle with a green top.
- Base: Apply two coats of creamy white. Let dry.
- Berry body: Paint small red triangles or heart shapes on each nail. Three to five per nail.
- Green tops: Add small green strokes at the top of each berry to represent the leafy cap.
- Seeds: Optionally, add tiny yellow or white dots on the red bodies for seeds.
- Seal: Apply a glossy top coat to finish.
Pro Tip: For more realistic strawberries, use two shades of red. Paint the base in a darker red and add a lighter red highlight on one side.
29. Silver Chrome French Tips
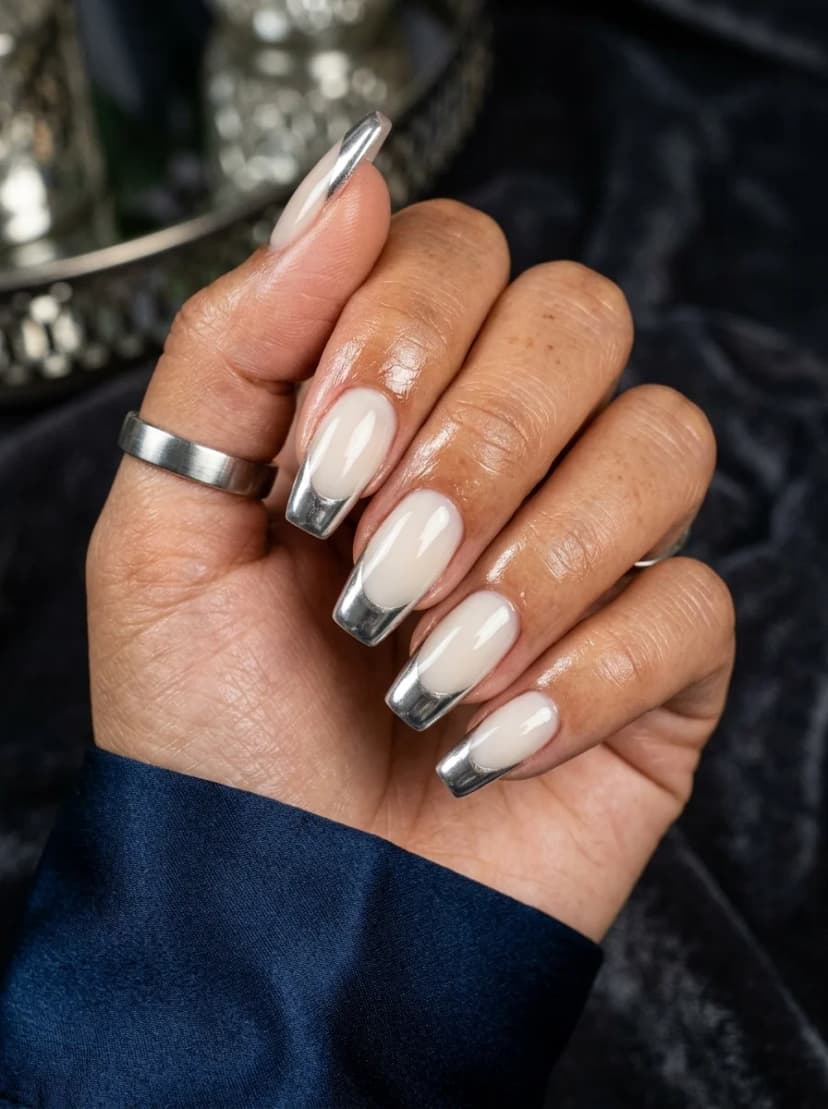
OVERVIEW:
Silver chrome on a milky white base creates a French tip that looks like liquid mercury. The mirror-like finish of the chrome is what sets this apart from a regular silver glitter tip. It reflects light in a way that looks metallic and three-dimensional.
The coffin shape gives the chrome tips a wide, flat surface to showcase the mirror effect. The milky base keeps the overall look soft and approachable, while the chrome tips add edge.
Chrome powder requires burnishing to achieve the mirror finish. If you just sprinkle it on, you get a glitter effect rather than chrome. The burnishing step is non-negotiable.
DESIGN BREAKDOWN:
Milky base, mirror tip. The finish is everything.
- Nail Color Used: Milky white or sheer pink base, silver chrome powder.
- Suitable Nail Shape: Coffin or square. The flat tip maximizes the chrome effect.
- Design Element: Milky base with silver chrome French tips.
- Finish: Mirror chrome on tips, glossy on base.
- Tools Used: Chrome powder, sponge applicator, no-wipe top coat.
GET THE LOOK AT HOME:
The chrome application is the most technical step. Take your time.
- Base: Apply two coats of milky white. Cure or dry.
- Chrome tips: Apply French tip guides. Paint the tips with no-wipe top coat and cure. Burnish silver chrome powder into the cured tips with a sponge applicator.
- Clean up: Dust off excess powder with a fluffy brush.
- Seal: Apply a no-wipe top coat over everything to protect the chrome.
Pro Tip: If the chrome looks patchy, apply another layer of no-wipe top coat, cure, and burnish again. The powder adheres better to a freshly cured surface.


30. Watercolor Rose Nails
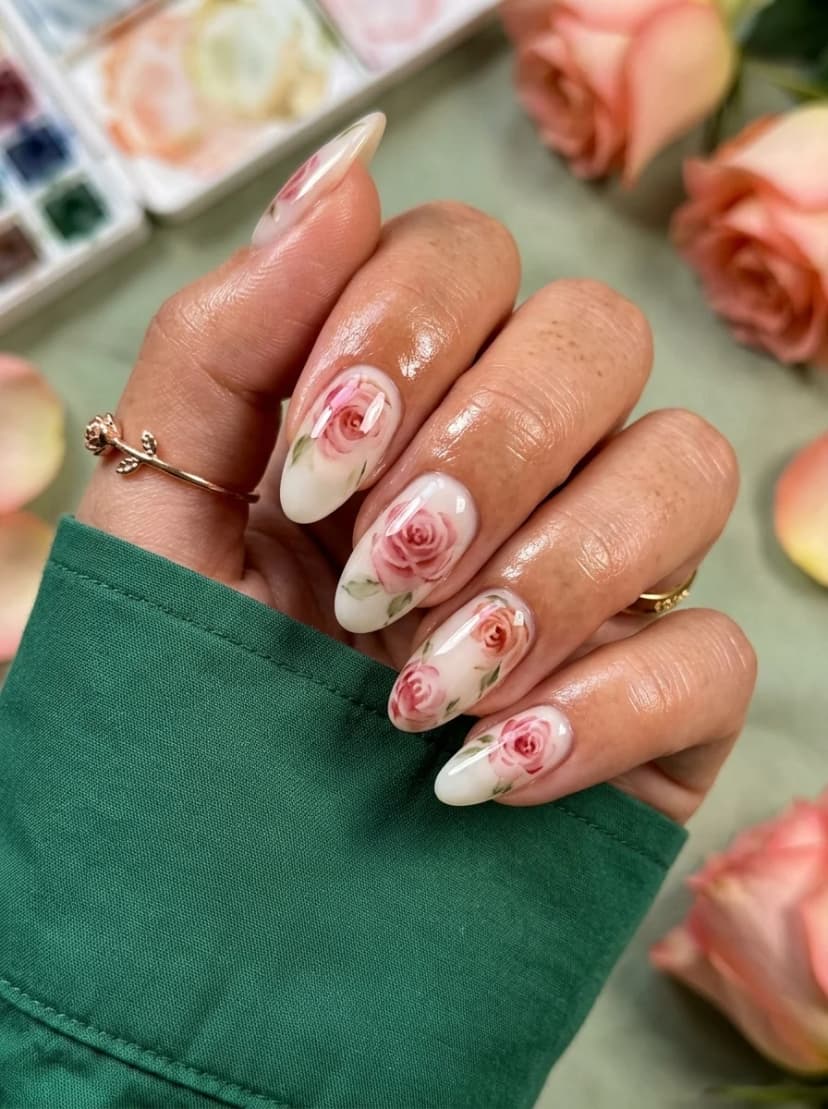
OVERVIEW:
These roses are painted in a watercolor style that gives them a soft, dreamy quality. The petals blend into each other with feathered edges rather than hard outlines, which makes them look like they were painted with actual watercolors rather than nail polish.
The pink tones range from pale blush to deeper rose, creating depth within each flower. The white base keeps everything bright and lets the soft pinks read clearly.
This is a design that looks more complicated than it is. The watercolor technique actually rewards looseness and imperfection. Trying to paint precise, detailed roses would make them look stiff.
DESIGN BREAKDOWN:
Soft, blended florals. The technique is more about touch than precision.
- Nail Color Used: White base, various pink tones (blush, rose, mauve), green for leaves.
- Suitable Nail Shape: Almond. The soft taper suits the romantic floral style.
- Design Element: Watercolor-style pink roses with green leaves on a white base.
- Finish: Glossy top coat for a fresh, dewy look.
- Tools Used: Small flat brush or detail brush, top coat for diluting.
GET THE LOOK AT HOME:
Dilute your pink polish with a drop of top coat to create a watercolor consistency.
- Base: Apply two coats of white. Let dry.
- First layer: Using diluted pale pink, paint loose, petal-like shapes in a circular arrangement. Let dry.
- Second layer: Add deeper pink to the center of each rose for depth. Blend the edges outward.
- Leaves: Paint small green leaves around the roses with a detail brush.
- Seal: Apply a glossy top coat to finish.
Pro Tip: If your roses look flat, add a tiny dot of white to the center of each flower as a highlight. It creates the illusion of dimension.
31. Emerald Green French Tips
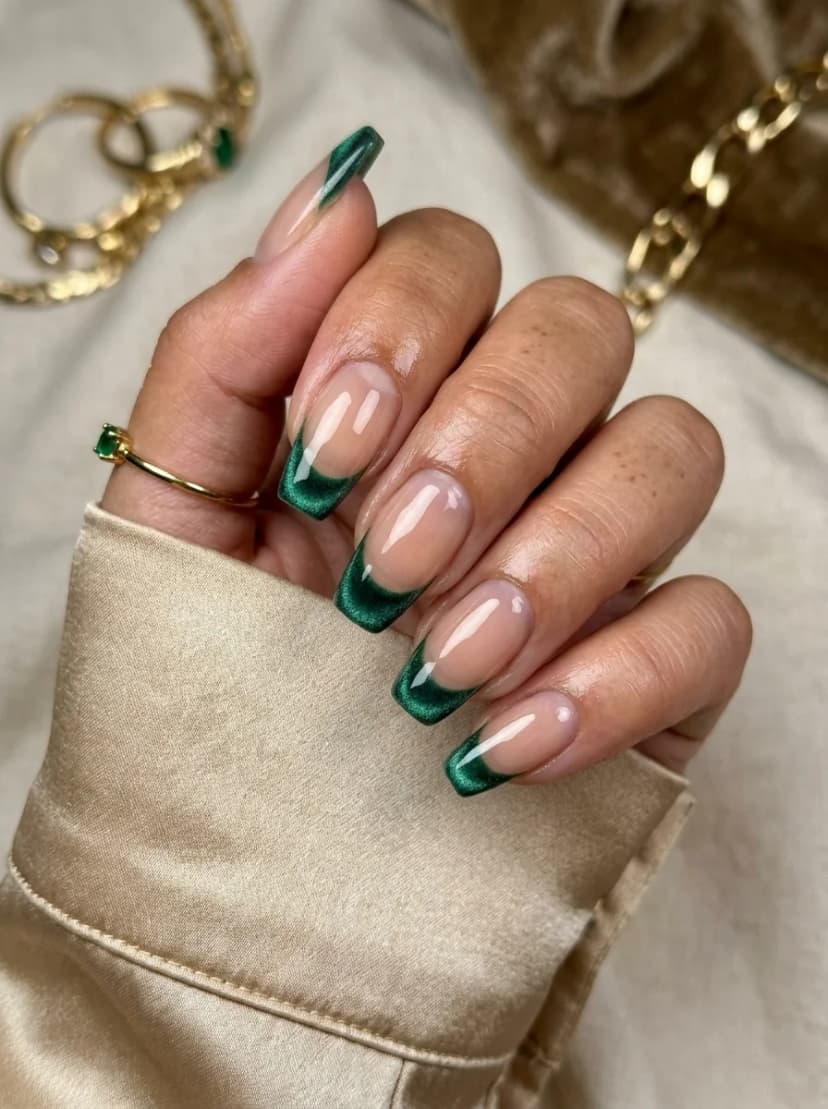
OVERVIEW:
Emerald green chrome on a nude base is a French tip that commands attention. The metallic finish of the green has a depth that flat polish cannot achieve. It shifts between deep forest green and brighter emerald depending on the light.
The nude base keeps the design grounded and lets the green tips be the focal point. This is a strong color choice that signals confidence without being loud.
This design bridges late summer and early fall perfectly. The green is rich enough for autumn but the French tip format keeps it feeling light enough for summer. It is a transitional design that works across seasons.
DESIGN BREAKDOWN:
Nude base, jewel-toned tip. Bold and sophisticated.
- Nail Color Used: Nude or sheer pink base, emerald green metallic or chrome polish.
- Suitable Nail Shape: Almond or coffin. Both complement the richness of the green.
- Design Element: Nude base with emerald green metallic French tips.
- Finish: High-gloss top coat to enhance the metallic depth.
- Tools Used: French tip guides or liner brush.
GET THE LOOK AT HOME:
Metallic polish shows brush strokes. Apply in thin, confident strokes and do not go back over them.
- Base: Apply two coats of nude or sheer pink. Let dry.
- Green tips: Apply French tip guides. Paint the tips with emerald green metallic polish in two thin coats.
- Remove guides: Peel off while the polish is slightly wet.
- Seal: Apply a glossy top coat to protect the metallic finish and add shine.
Pro Tip: If you see brush strokes in the metallic polish, do not try to fix them by going over the area again. Let it dry and apply a second coat in smooth, single strokes. The self-leveling properties of most metallic polishes will minimize visible strokes.


Tips to Make Your August Manicure Last Longer
August heat and humidity can be tough on nail polish. Here are practical steps to extend the life of your manicure:
- Always use a base coat. It creates a bonding layer between your natural nail and the polish, which prevents premature chipping.
- Cap the free edge. Run your brush along the tip of each nail after applying color and top coat. This seals the edge and prevents tip wear.
- Reapply top coat every two days. A fresh layer of top coat refreshes the shine and adds an extra protective layer.
- Wear gloves when cleaning. Household cleaners and dish soap are harsh on polish. Rubber gloves protect your manicure.
- Avoid hot water on your hands immediately after painting. Hot water can cause polish to lift and peel. Use lukewarm water instead.
- Moisturize your cuticles daily. Hydrated cuticles prevent the skin around your nails from drying out and pulling at the polish edge.
Conclusion
August is a month of transition, and your nails can reflect that. Whether you go for the playful fruit art of early summer or the deeper tones that hint at fall, the 31 designs here give you options for every mood and skill level.
The French tip variations in this list are particularly worth noting. From silver glitter to tortoiseshell to emerald chrome, the classic French format has never been more versatile. If you have been sticking to solid colors, a colored French tip is an easy entry point into nail art.
Whatever you choose, remember that the best manicure is the one that makes you feel good when you look at your hands. Pick a design that excites you, take your time with the application, and enjoy the result.
Loving This Guide? Get More Like This! 💌
Want to impress with clothes? Want to look good? Subscribe to Whatsmyshape Newsletter and get weekly fashion guides, exclusive outfit ideas, and beauty tips delivered directly to your inbox. No spam, just pure style inspiration! ✨