July is the peak of summer, and there is no better way to celebrate the sunny weather, beach trips, and outdoor gatherings than with a stunning new manicure! Whether you're lounging by the pool or dressing up for a summer party, your nails are the perfect canvas to showcase your style.
To help you find your next look, we've gathered 24 gorgeous July nail designs that blend vibrant colors, playful patterns, and sophisticated textures. From bold neon pops to timeless neutrals and creative nail art, these ideas will make your summer style feel complete and polished. Get ready to find your new favorite July manicure!
24 July Nails Designs
1. White Base with Pink and Purple Floral Swirls
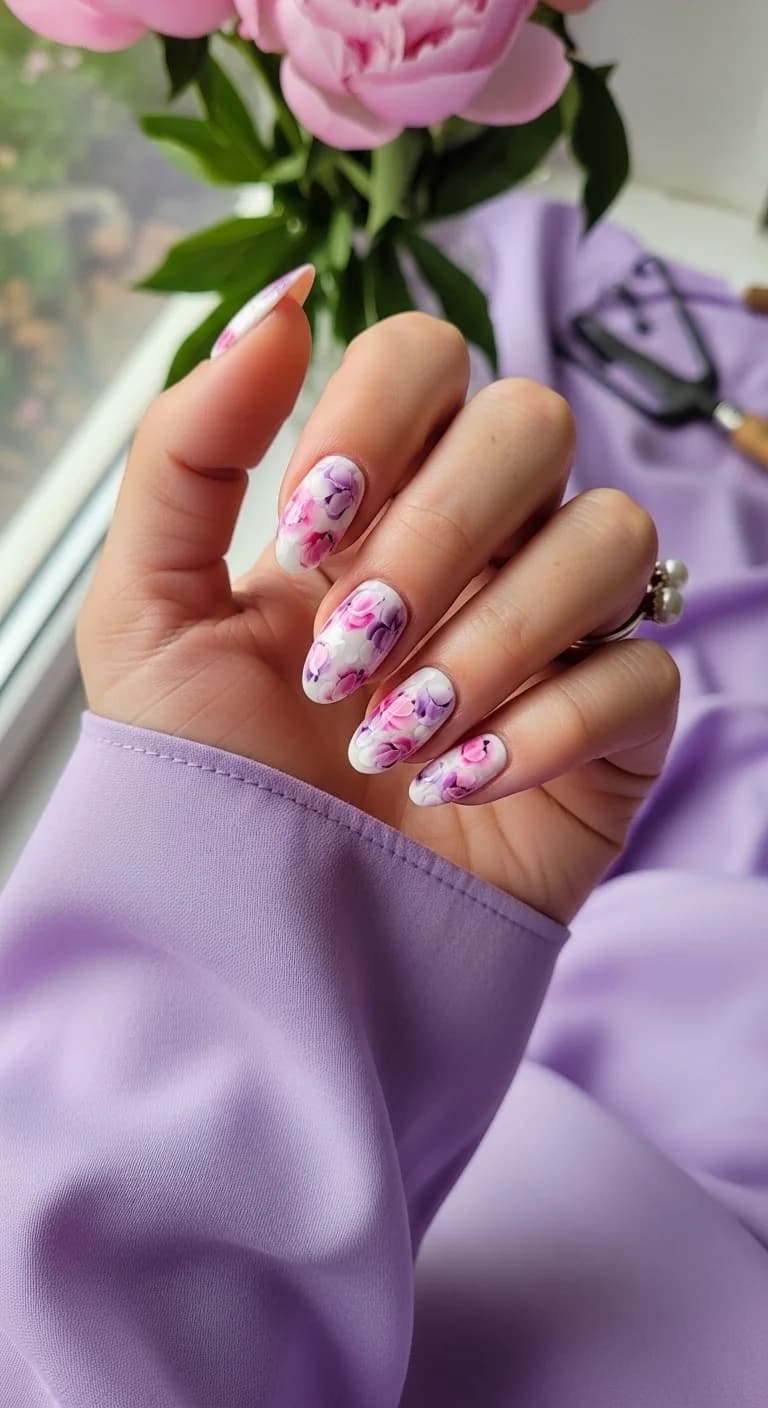
These nails are giving me major springtime vibes, like a fresh bouquet just bloomed! The design is super dreamy with a soft white base that makes the pretty pink and purple floral swirls just pop. It feels so romantic and delicate, perfect for when you want your nails to feel like a little work of art. I absolutely love how the colors blend together like a watercolor painting, making each nail unique and so eye-catching. They really bring a touch of gentle elegance to any look.
The Design: The base color is a clean, crisp white, which acts as the perfect canvas for the artwork. Over this white base, there are beautiful, flowing swirls and abstract shapes created with soft pinks and vibrant purples. The colors aren't sharply defined; instead, they blend into each other in a way that mimics watercolor paints or the soft petals of flowers. Some areas have a deeper, more saturated pink or purple, while others are lighter and more translucent, giving a lovely depth to the design. The finish is a glossy top coat that makes everything look super shiny and polished, really bringing out the richness of the colors. It’s not a typical solid floral print; it's more of an artistic interpretation, with loose brush strokes creating a really organic and artistic feel.
How to recreate?:
- Start with clean, prepped nails. Apply a smooth, opaque white nail polish as your base coat and let it dry completely. This is super important for the colors to show up brightly.
- Now for the fun part! Grab your pink and purple polishes. I like to use a gel polish for this because it allows you to work with the colors a bit before they set. You can also use regular polish, but you’ll need to work a bit faster.
- Using a fine nail art brush, or even the tip of a toothpick, start creating loose swirls and abstract shapes on top of the white base. Dip your brush into the pink, then gently touch it with a bit of purple, or vice versa, to create a blended effect. Don't aim for perfection here; think soft, organic strokes.
- Layer the colors and blend them slightly. You want it to look like they’re melting into each other, not like separate painted blobs. Add more pink or purple where you want more depth, or use a lighter touch for softer areas.
- Once you're happy with the flow and placement of your floral-inspired swirls on each nail, let them dry completely if using regular polish. If using gel, cure it under your UV/LED lamp.
- Apply a generous layer of glossy top coat to seal everything in and give it that beautiful, glass-like shine. Make sure to cap the free edge of the nail too. Let it cure if using gel or dry completely if using regular polish.
Best for: Oh my goodness, these nails are just perfect for spring and summer events! Think garden parties, Easter brunch, or even a casual wedding. I wore these to a friend's baby shower last month, and they got so many compliments! They're also amazing if you just want to add a touch of feminine charm to your everyday look. I'm personally obsessed with them because they feel so light and airy, like wearing a beautiful watercolor painting on your fingertips. They're whimsical without being too over-the-top, and they just make me feel happy and refreshed.


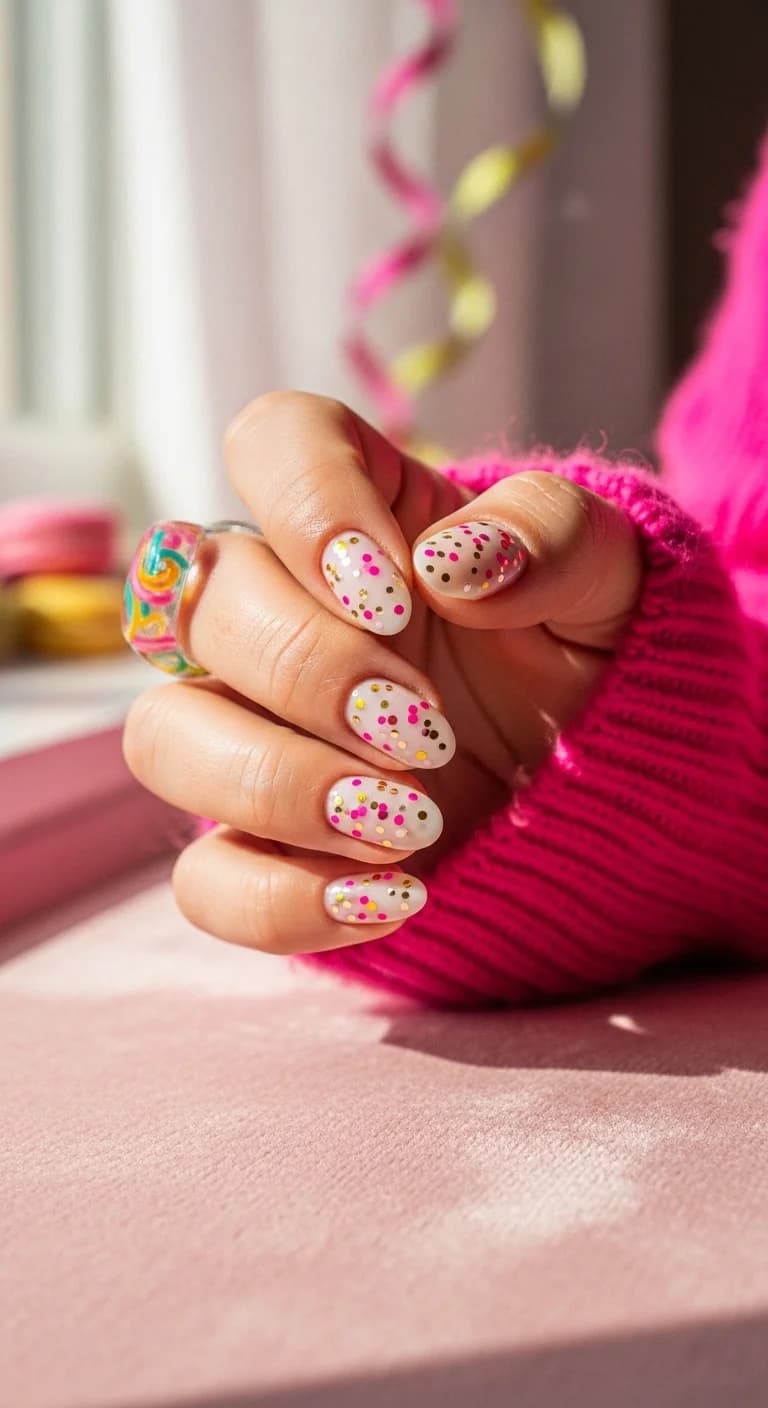
2. White Base with Colorful Confetti Glitter
Get ready to party with these super fun and festive nails! They're like a little celebration on each nail, with a clean white background that lets the confetti glitter really shine. Believe it or not, this design is surprisingly easy to pull off but looks so high-end and playful. I wore these for New Year's Eve, and they were the perfect touch of sparkle and fun. They just scream 'good times' and make me feel like I'm always ready for a celebration, no matter the occasion.
The Design: The foundation of this design is a smooth, opaque white nail polish. It's a perfect neutral base that makes the colorful elements truly stand out. Scattered all over each nail are tiny pieces of glitter in a variety of shapes and sizes – think small circles, squares, and maybe even some tiny hex shapes. The colors of the glitter are super cheerful: bright pinks, sunny yellows, pops of turquoise, and little flecks of gold or rose gold. They're not densely packed, giving that 'confetti' effect where you see a lovely mix of color and sparkle without it being overwhelming. The finish is a glossy top coat that smooths out the glitter and gives a super shiny, glass-like finish, making the confetti appear embedded and protected.
How to recreate?:
- Start by applying a clean, opaque white polish to your nails. Make sure it's fully dry before moving to the next step. A good quality white polish is key for a bright base.
- Next, grab your confetti glitter polish or loose glitter. If you're using a glitter polish, apply it strategically. You can dab it on with the brush in random spots, or apply a sheer layer over the entire nail and then add more glitter in key areas.
- If you're using loose glitter, apply a thin layer of clear top coat or nail glue where you want the glitter to stick. Then, carefully sprinkle or place the confetti glitter onto the wet polish. Tap off any excess.
- You want a good distribution of the glitter pieces, like actual confetti scattered randomly. Focus on getting a nice mix of colors and sizes on each nail.
- Once the glitter is placed and looks balanced, let it dry completely. You might need a couple of coats of clear polish to make sure all the glitter pieces are covered and not sticking up.
- Apply a generous, smoothing top coat to encapsulate all the glitter and create a super sleek, shiny surface. Cure this under a UV/LED lamp if you're using gel polish, or let it air dry thoroughly for regular polish.
Best for: These nails are an absolute dream for any celebration! I think they'd be amazing for birthday parties, New Year's Eve, festivals, or just any day you want to feel extra cheerful. Honestly, I love them for casual Fridays or weekend getaways because they add such a fun, playful vibe. They're also super versatile and would look great with a simple outfit to let the nails be the star. I'm obsessed because they capture that feeling of pure joy and excitement, like being at a fun fair or a surprise party!
3. White Base with Turquoise and White Cow Print
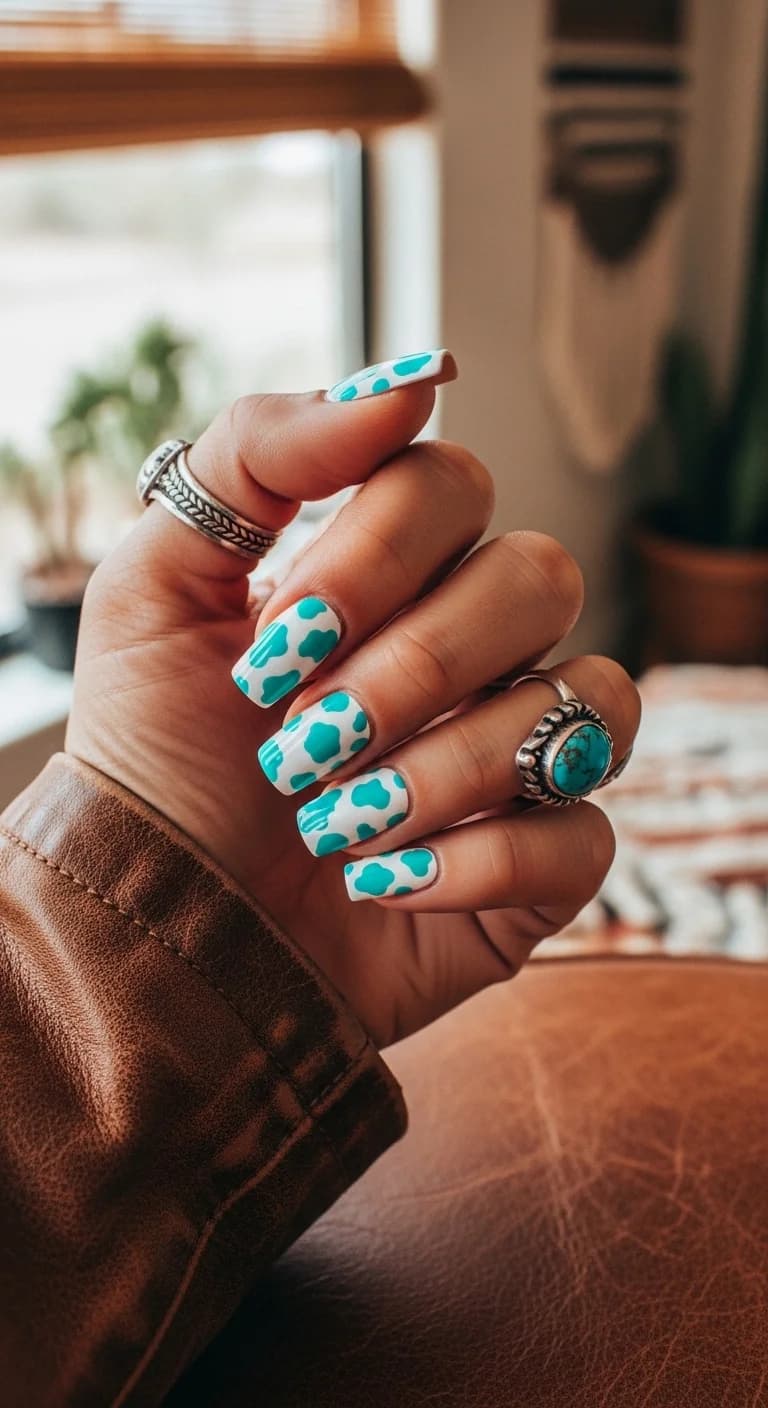
How adorable are these cow print nails?! They're such a fun and quirky design that brings a touch of playful country charm to your look. The contrast between the bright turquoise and crisp white is just perfection, making the pattern super clear and totally eye-catching. I feel like these nails are just begging for a road trip or a fun day out! They have this cool, retro vibe that I'm totally here for, and they always make me smile whenever I catch a glimpse of them.
The Design: This design features a clean, opaque white base on all the nails, providing a bright and fresh canvas. Over this white background, a classic cow print pattern is applied, but with a fun twist! Instead of the traditional black and white, the spots are done in a striking, vibrant turquoise color. The spots are irregular in shape and size, just like real cow spots, and they're placed randomly across each nail. The edges of the turquoise spots are a bit soft, giving them a painted-on look rather than being super sharp. The finish is a glossy top coat that gives a beautiful shine and makes the colors look even more vivid. It's a super clean and fun take on a popular print.
How to recreate?:
- Start by painting all your nails with a nice, opaque white nail polish. Make sure it's completely dry before you start painting the spots, as this will prevent smudging.
- Now, grab your vibrant turquoise nail polish. You'll want a fine nail art brush or a dotting tool for this part.
- Begin creating the cow spots. Don't make them perfectly round! Real cow spots are irregular. Vary the size and shape of your turquoise spots across each nail. Think blobs and splotches rather than neat circles.
- Place the spots randomly, leaving some white space visible, just like on a cow. You can make some spots larger and some smaller to create a more natural look. Don't worry about making them perfectly symmetrical.
- Once you've applied the turquoise spots to all your nails, let the polish dry completely. This is really important to avoid any smearing when you add the top coat.
- Apply a good quality glossy top coat over the entire nail to seal the design and give it a beautiful, smooth shine. This will also help the colors pop and make the print look super clean.
Best for: These nails are just begging for a fun, casual outing! I think they're absolutely perfect for a trip to the country, a music festival, or just a weekend vibe when you want to add some personality. They'd also be super cute for a themed party or even just a day when you're feeling a bit sassy and bold. I personally adore them because they're a playful twist on a classic pattern, and the turquoise color is just so refreshing. They always make me feel a little bit adventurous and fun!


4. Green Marble Swirls with a Glossy Finish
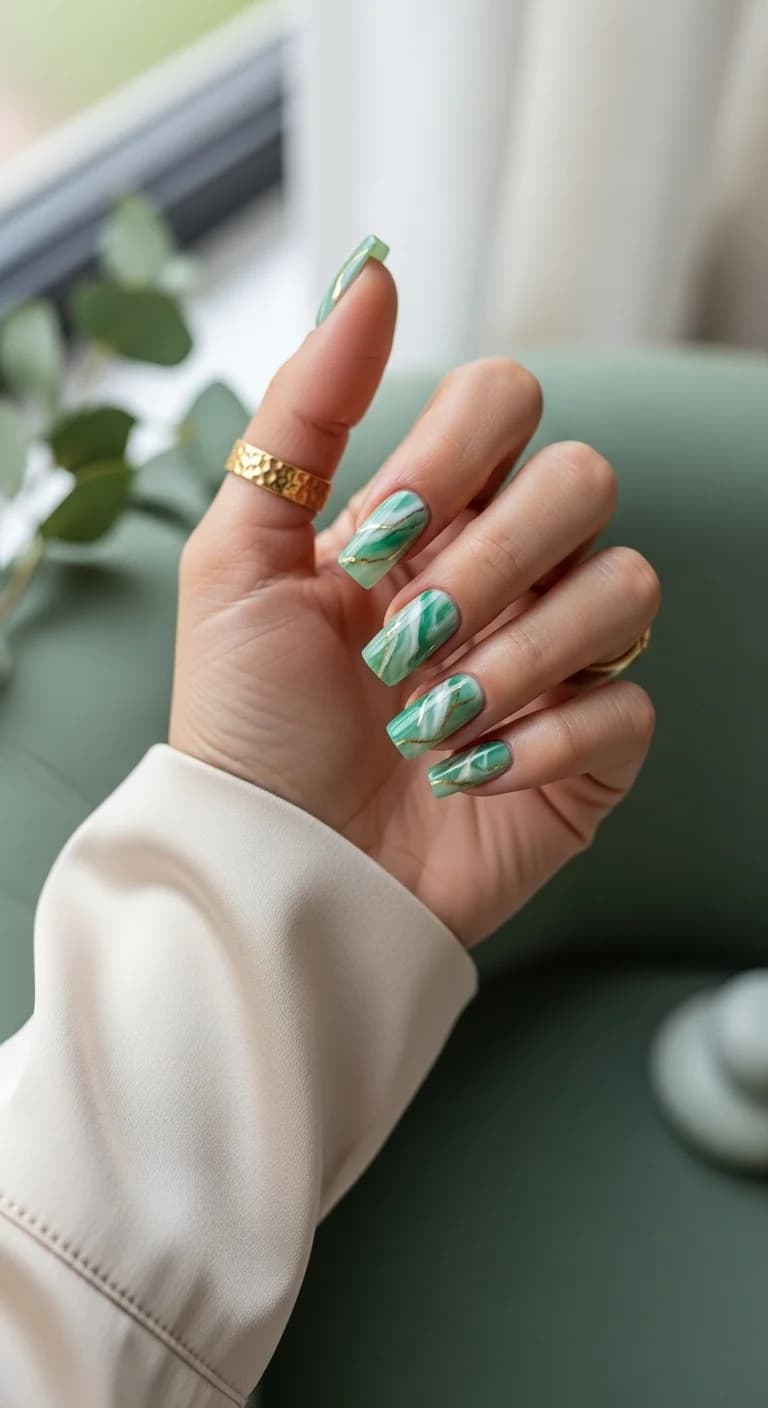
This manicure is like wearing a piece of abstract art right on your fingertips! It gives off a really sophisticated yet playful vibe, kind of like a dreamy, modern take on natural stone. The swirls are so mesmerizing, and they catch the light beautifully, making your nails look super chic and polished. I’ve always been a fan of marble nails, but this green twist feels so fresh and unique. It’s the kind of look that makes people do a double-take, in the best way possible!
The Design: The design features a beautiful, organic marble effect. Think of swirling shades of creamy white and different tones of green, from a soft sage to a deeper, almost emerald hue. These colors are blended together so seamlessly, creating those gorgeous, flowing lines that mimic natural marble. Each nail is a little different, with unique patterns of the swirls, which I think is key to making it look authentic and not too uniform. The finish on these is a super high-gloss top coat, which really makes the colors pop and gives it that luxurious, wet-look shine. It’s like looking into a polished gemstone!
How to recreate?:
- First, you’ll want to start with a clean, prepped nail. Apply a good base coat to protect your natural nail.
- Next, paint each nail with a base color. For this look, I’d suggest a milky, sheer white or a very light, almost translucent pale green. You want something that will let the other colors show through beautifully.
- Now for the fun part – the marble! You can do this in a couple of ways. One easy method is to use a marbling tool or a thin brush. Dip your brush into a darker green polish and paint a few random, squiggly lines on your nail. Then, using a lighter green and white polish, do the same, layering the colors and letting them slightly blend together. You can also use a sponge technique: place dots or lines of your white and green polishes onto a palette or foil, then lightly dab with a makeup sponge or a crumpled piece of plastic wrap, and press that onto the nail, gently twisting and dabbing to create the marbled effect. Remember to work relatively quickly before the polish dries!
- Keep adding layers of white and green, gently blending with your chosen tool, until you achieve a marble pattern you love. Don't aim for perfection; the natural, slightly imperfect look is what makes it so stunning.
- Once you’re happy with the marble design on each nail, let it dry completely. This is super important so you don’t smudge your beautiful work!
- Finally, apply a thick, glossy top coat over the entire nail. This will seal in the design, add incredible shine, and give it that smooth, polished finish that really elevates the marble effect. Let it dry thoroughly, and you’re all set!
Best for: I’m totally obsessed with this green marble design because it feels so effortlessly elegant. It's perfect for anyone who loves a bit of nature-inspired beauty but wants it with a modern, sophisticated twist. This manicure would be absolutely stunning for a spring or summer event, maybe a garden party or a fancy brunch. It also works surprisingly well for everyday wear if you want to add a little something special to your look. I wore these to a friend's baby shower, and they were such a hit! They're not too loud but definitely make a statement, and the glossy finish just makes them feel so luxurious. It’s the perfect blend of trendy and timeless, and I think that’s why I love it so much.
5. Stained Glass Window Coffin Nails
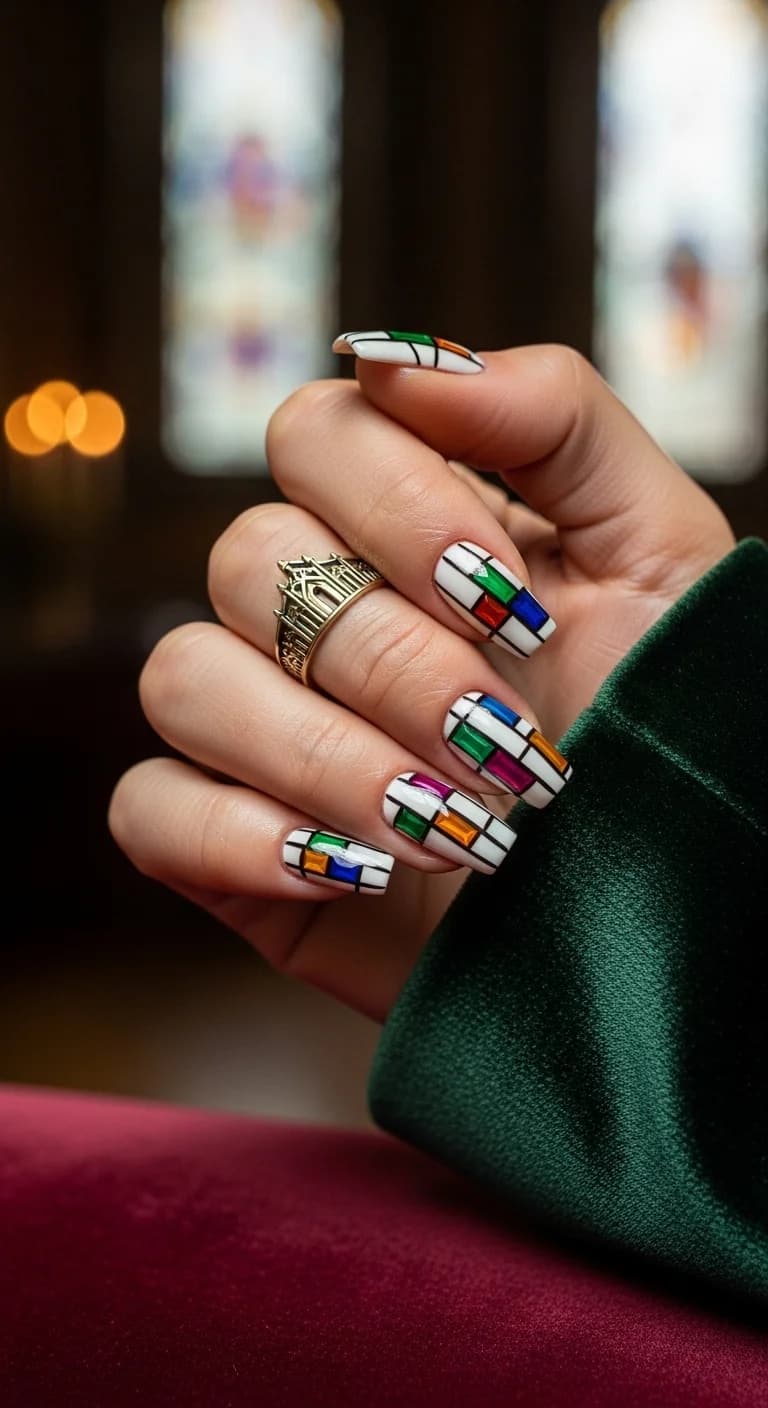
Prepare to be dazzled by these nails that look like miniature stained glass windows! This design is absolutely incredible, bringing the artistry of a cathedral right to your fingertips. It has this unique, almost mosaic-like quality that's super clean and graphic, but still feels so rich and artistic. I've never seen anything quite like it, and honestly, I'm completely captivated by the concept. It’s the kind of manicure that sparks conversation and just makes you feel so special and put-together.
The Design: This design mimics the look of a beautiful stained glass window, with sharp, clean lines dividing sections of color. The base color is a crisp, opaque white, which really makes the 'glass' sections stand out. The 'glass' itself is represented by blocks of color – think vibrant blues, deep reds, emerald greens, and warm oranges and yellows. These colors are applied in solid, opaque patches, framed by thin, precise black lines that mimic the leaded lines of a stained glass window. The shape of the nails is a trendy coffin or ballerina shape, which really elongates the fingers and provides a perfect canvas for this geometric art. The finish is a high-gloss top coat, giving the colored sections a smooth, glassy appearance.
How to recreate?:
- Start with your nails shaped into a coffin or ballerina style, and apply a good base coat.
- Paint each nail with two to three thin coats of a clean, opaque white polish. You want a perfectly smooth, solid white base that has no streaks.
- Now, it’s time to create the 'leaded' effect. Using a very fine detail brush and black nail polish, carefully draw thin, straight lines across the white base. Think of creating a grid pattern, but make it slightly irregular and organic, just like real stained glass. You'll need a steady hand for this! Outline some sections and divide others to create your window pane effect.
- Next, you'll fill in these sections with your chosen colors. Use a small detail brush to carefully paint in the different colored 'glass' pieces. You can choose a palette of bright, jewel-toned colors like red, blue, green, and yellow, or even go for more muted tones if you prefer. Make sure the color application is smooth and opaque, filling the sections perfectly up to the black lines.
- Pay attention to the arrangement of colors, making sure they contrast and complement each other. You can replicate a traditional stained glass pattern or create your own abstract design with the colored blocks.
- Once all the colored sections are filled in and the polish is completely dry, carefully apply a generous, glossy top coat over the entire nail. This will seal the design, give it that beautiful glass-like shine, and smooth out any texture. Let it dry completely, and admire your work!
Best for: I am absolutely living for this stained glass window manicure! It's such a unique and artistic design that's perfect for anyone who wants to stand out from the crowd. I think this would be incredible for a special occasion, like a holiday party, a wedding, or even just a really chic night out. The geometric shapes and bold colors give it a really modern edge, but the inspiration from stained glass adds a touch of timeless elegance. I could totally see myself wearing this for a gallery opening or a concert. It’s playful, sophisticated, and just plain cool. The contrast of the black lines against the bright colors on the white background is just stunning and so eye-catching. It’s a true conversation starter and feels like wearing a wearable piece of art!


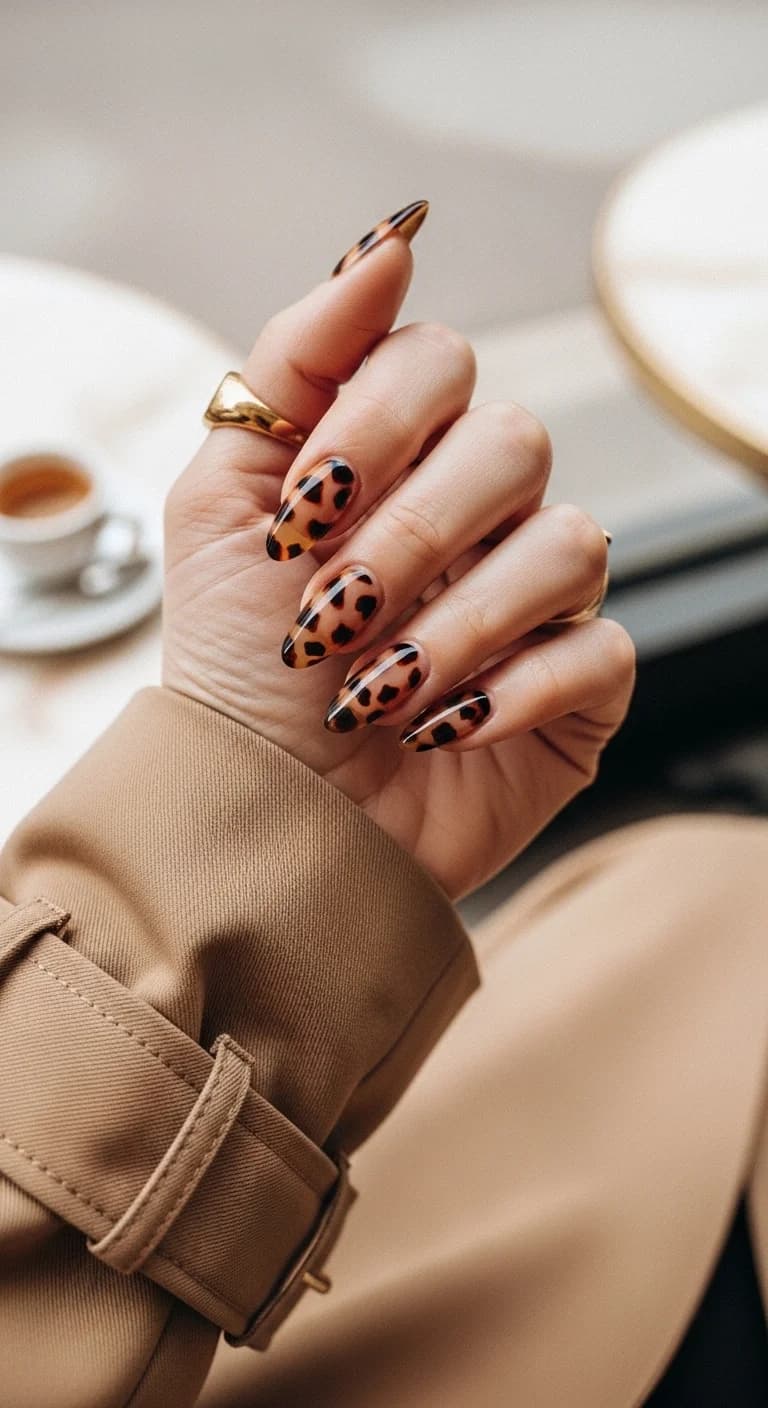
6. Sheer Nude with Brown Leopard Print
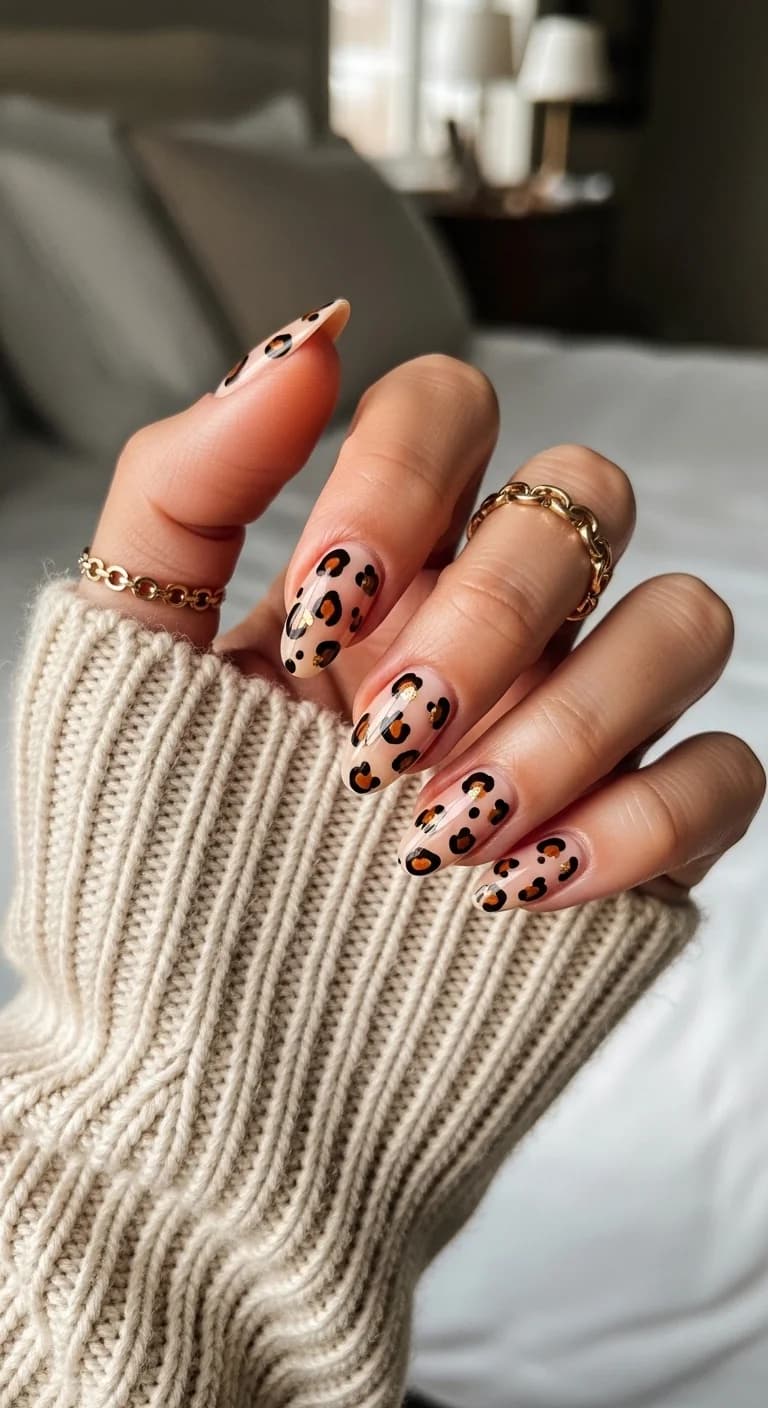
How fierce and chic are these leopard print nails? They're giving me all the classic, wild vibes but in a super sophisticated way. The sheer nude base makes the brown spots look so smooth and natural, like a beautiful animal print you'd see on a designer bag. They’re the perfect blend of sassy and classy, and I just can’t get enough! I wore these on a recent trip to the city, and they felt so empowering and stylish.
The Design: This design features a lovely sheer nude polish as the base color. It’s not opaque, so you can still see a hint of the natural nail underneath, giving it a really soft and natural look. The pattern is a classic leopard print, but instead of the usual black, the spots are done in a rich, warm brown. These spots are irregular in shape and size, with some having a slightly darker outline or a few smaller dots within them to mimic the texture of real animal fur. The brown used is a beautiful, earthy tone that pairs perfectly with the sheer nude. The overall finish is a high-gloss top coat, which adds a beautiful shine and makes the print look super sleek and polished. It's a very refined take on a bold pattern.
How to recreate?:
- Start by applying a sheer nude nail polish to your nails. You might need two thin coats to get a nice, even coverage that still looks translucent. Let it dry completely.
- Next, grab a warm, rich brown nail polish for the leopard spots. You’ll want a fine nail art brush or a dotting tool for this.
- Begin creating the leopard spots. They should be irregular in shape – think kidney beans or teardrops rather than perfect circles. Vary the size of the spots across each nail.
- Place the spots randomly, leaving some of the sheer nude base visible. For a more realistic look, you can add a slightly darker brown outline to some of the spots or add a few tiny dots within the larger spots.
- Make sure the placement looks natural and not too uniform. Don’t be afraid to let some spots overlap slightly or be partially cut off by the edge of the nail.
- Once you're happy with the placement of the brown spots, let the polish dry completely. This is crucial to avoid smudging.
- Apply a generous layer of glossy top coat over the entire nail. This will seal the design, give it a beautiful shine, and make the sheer nude base look even richer. Cap the free edge to help with longevity.
Best for: These nails are SO versatile! They’re perfect for adding a touch of wild sophistication to any outfit, whether it’s for a night out with friends, a business meeting, or even a casual day running errands. I love wearing these when I want to feel a bit more confident and put-together. They are also fantastic for transitional seasons like fall. I’m obsessed with them because they hit that perfect sweet spot between being a statement nail and being super wearable. They're a classic pattern with a modern, chic twist!
7. Dark Blue with Gold Constellation and Stars
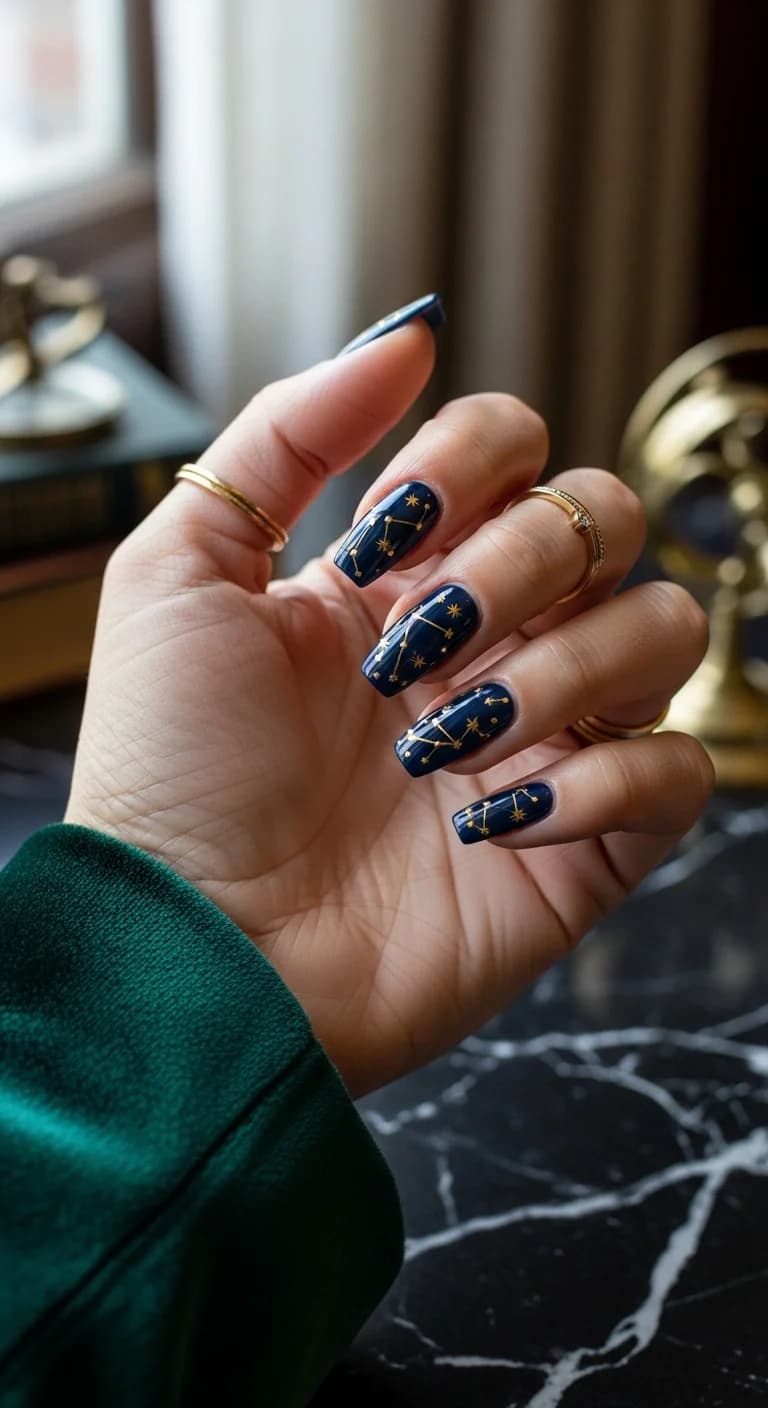
Look up, because these nails are out of this world! They feature a deep, midnight blue base that looks like the night sky, adorned with delicate gold constellations and sparkling stars. It’s so mystical and enchanting, like you're carrying a piece of the cosmos with you. I feel like these are perfect for anyone who loves astrology, the night sky, or just wants a touch of celestial magic on their fingertips. They're super dreamy and have a magical vibe I can't get enough of!
The Design: The base color is a rich, dark, almost inky blue, providing a deep and mysterious backdrop reminiscent of a clear night sky. Over this dark canvas, delicate lines of gold polish are painted to form various constellations. These lines connect small, glittering gold stars, scattered across the nails. Some nails might feature recognizable star patterns, while others have more abstract arrangements of stars and lines. The gold used is a bright, shimmery metallic, which stands out beautifully against the dark blue. The stars range in size from tiny specks to slightly larger points of light. The finish is a super glossy top coat, which gives the entire design a smooth, reflective surface, making the gold elements gleam like real stars against the deep blue sky.
How to recreate?:
- Start with a perfectly prepped nail. Apply a deep, dark blue nail polish as your base. You'll likely need two coats to get a truly opaque, night-sky effect. Let it dry completely.
- Once the blue base is dry, you'll need a fine nail art brush and some metallic gold polish. You can also use gold striping tape if you prefer cleaner lines, but freehand painting gives a more organic feel.
- Begin by painting the gold lines that connect the stars to form constellations. Think about patterns you like, or look up famous constellations for inspiration. Don't make the lines too thick; they should be delicate.
- Next, add the gold stars. You can use a tiny dotting tool or the very tip of your nail art brush to place small dots of gold polish where the lines intersect or just scattered around the nail.
- Vary the size of the stars slightly to add more dimension. Some can be tiny dots, while others might be slightly larger specks or even tiny star shapes if you have them.
- Continue adding constellations and scattered stars across all your nails until you achieve the desired celestial look. Make sure the gold polish is completely dry before the next step.
- Apply a generous, glossy top coat to seal the design. This will smooth out any texture from the polish and make the gold elements really shine like tiny stars in the night sky. Cap the edges for durability.
Best for: These nails are absolutely perfect for anyone who loves a touch of mystery and magic! They're fantastic for starry nights, gazing at the moon, or even for themed parties like Halloween or a celestial-themed event. I wore these last time I went stargazing, and they felt so fitting and magical. They are also great for adding a sophisticated, yet whimsical touch to any outfit. I'm obsessed with this design because it feels so enchanting and connects me to the wonder of the universe. It's a subtle nod to something bigger and more beautiful.


8. White Base with Colorful Paint Splatter
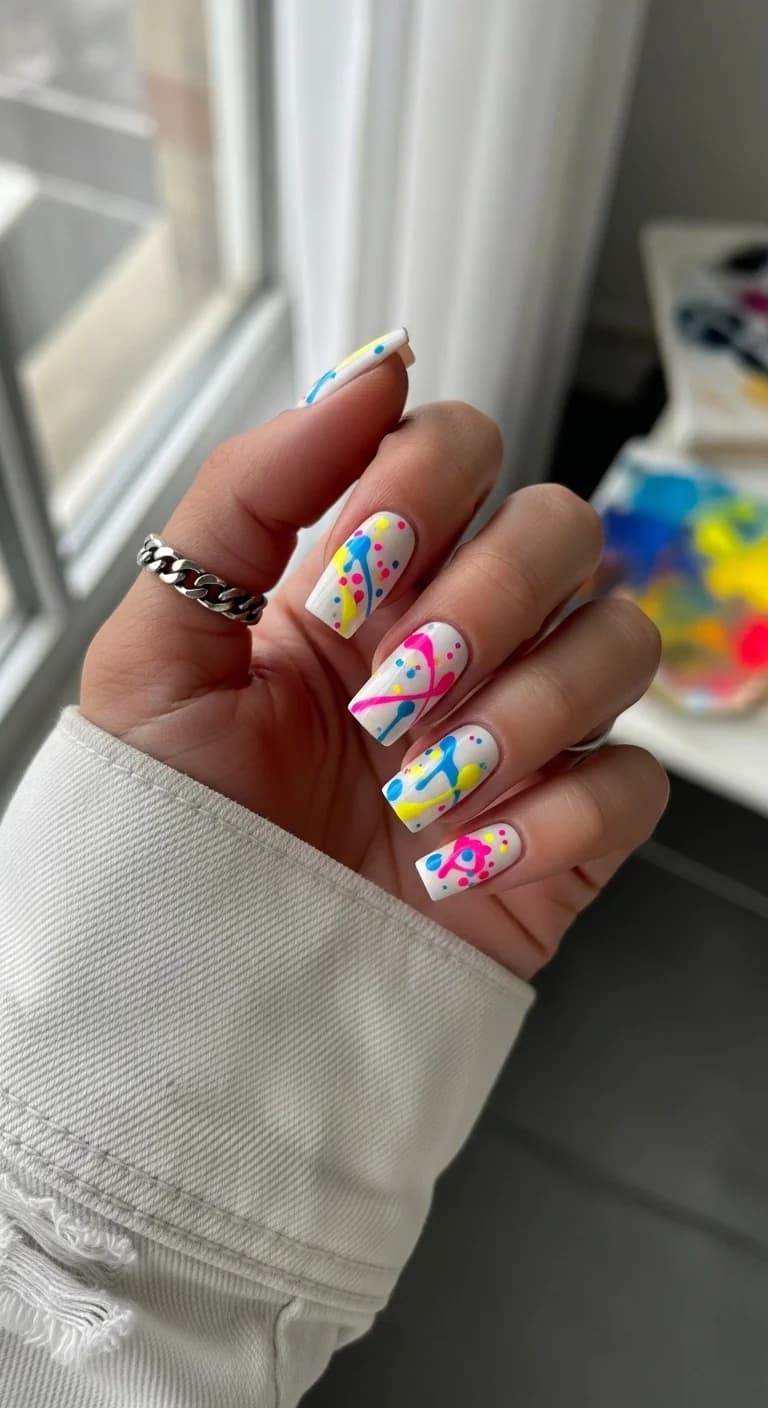
Unleash your inner artist with these super fun and playful paint splatter nails! They look like you’ve just finished a creative session, with vibrant splashes of pink, blue, and yellow randomly scattered across a clean white background. It’s such a cool, energetic design that screams creativity and fun! I wore these when I visited an art museum, and they felt so fitting and got tons of compliments. They’re the perfect way to add a pop of color and personality to your day!
The Design: The base for this design is a crisp, matte white polish. The matte finish gives it a unique, almost chalky look that really makes the colors of the splatters stand out. Over this white base, there are random splatters and drips of nail polish in bright, energetic colors. We see pops of hot pink, electric blue, and sunny yellow. The splatters are not perfectly uniform; some are small dots, while others are larger streaks or drips, giving a very realistic and dynamic paint-splatter effect. The edges of the splatters are slightly softened, as if they were flung onto the nail. The finish is a matte top coat, which enhances the artistic, painterly feel of the design and keeps the colors looking super bright without a lot of shine.
How to recreate?:
- Start by applying a matte white nail polish to your nails. Make sure it's completely dry before you start the splattering process.
- Gather your bright polishes in pink, blue, and yellow. You'll also need a straw or a stiff brush (like a toothbrush or an old makeup brush) for splattering.
- On a piece of paper or a palette, add a drop of your first color (e.g., pink). Dip the end of your straw or brush into the polish.
- Hold the straw a few inches above your nail and gently blow through it to splatter the polish onto the nail. Alternatively, you can flick the brush loaded with polish to create splatters.
- Repeat this process with the blue and yellow polishes, aiming for random placement and varying the intensity of the splatters. Don't be afraid to let them overlap a bit!
- Try to get a mix of small dots and larger streaks for a more realistic look. Work quickly so the polish doesn't start to dry out.
- Once you're happy with the splatter effect on all your nails, let the polish dry completely. Matte polishes can take a little longer to dry, so be patient.
- Apply a matte top coat over the entire design to seal it and maintain the flat, artistic finish. Make sure to cap the free edge.
Best for: These nails are perfect for anyone who loves art, creativity, or just wants to add a burst of fun color to their life! They’re amazing for casual outings, art classes, festivals, or any time you want to feel playful and energetic. I wore these to a local craft fair, and they were the perfect accessory! They really bring a vibrant and expressive vibe. I'm obsessed because they capture that feeling of spontaneous creativity and joy. They're like a little party on your fingertips, and they always make me feel inspired!
9. Clear Base with Black Leopard Print
Okay, these nails are giving me major fierce and fabulous vibes! They feature a super chic leopard print in a classic black and clear combo. The clear base makes the black spots really stand out, almost like they're floating on your nails. It's a sophisticated take on animal print, and I love how modern and edgy it feels. I wore these for a night out, and they were the perfect accessory – so stylish and definitely eye-catching!
The Design: This design uses a clear nail polish as the base, allowing the natural nail or a clear enhancement to show through. This gives the manicure a very light and airy feel. The pattern is a bold leopard print, rendered entirely in a deep, opaque black. The leopard spots are irregular in shape and size, with some featuring a slightly thicker outline or a few smaller dots within them to give a bit of depth and texture. These black spots are strategically placed across each nail, creating that iconic animal print look. The clear base makes the black spots appear super graphic and striking. The finish is a high-gloss top coat, which adds a beautiful shine and makes the black pop even more, creating a smooth, glass-like surface that catches the light.
How to recreate?:
- Start with perfectly prepped nails. Apply a clear nail polish or a clear gel polish as your base coat. Ensure it's completely dry or cured.
- Now, grab a black nail polish and a fine nail art brush or a dotting tool. This is where the magic happens!
- Begin creating the leopard spots. They should be irregular – think of teardrop or kidney bean shapes rather than perfect circles. Vary the size and placement of the spots on each nail.
- Make sure to leave plenty of the clear base showing through; this is key to the design. You can add a slightly thicker outline to some spots or even a few smaller dots inside the larger ones to give them more dimension.
- Don't be afraid to let some spots be partially off the edge of the nail or overlap each other slightly for a more natural look.
- Once you're happy with the placement of the black spots on all your nails, let the black polish dry completely. If using gel, cure it under your lamp.
- Apply a generous layer of glossy top coat over the entire nail. This will seal the design, give it a beautiful, high-shine finish, and make the black spots look super sharp and defined against the clear background. Cap the free edge for extra durability.
Best for: These nails are perfect for adding a touch of edgy glamour to any look! They're ideal for a night out, concerts, or any time you want to feel a bit more bold and confident. They’d also be amazing for a fashion event or just when you’re feeling your inner rockstar. I love them because they’re a classic animal print but with a really modern, sleek twist thanks to the clear base and black color. They're super versatile and always make me feel cool and put-together.


10. White Base with Black Wavy Lines
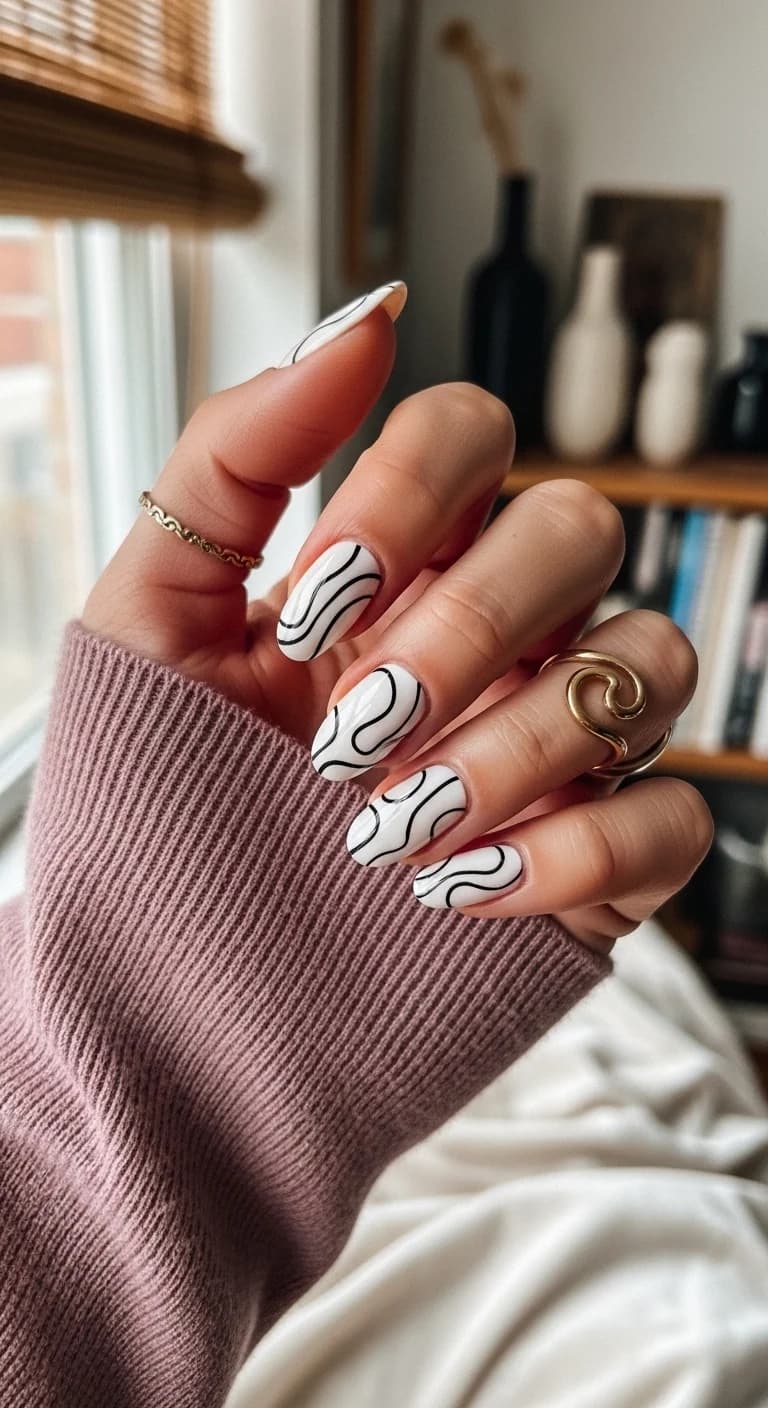
Feeling a bit wavy? These nails are pure minimalist art with their chic black and white wavy line design! The clean white base makes the flowing black lines really stand out, creating a dynamic and modern look. It's so simple yet incredibly effective, and I love how it adds a touch of abstract flair without being too much. I wore these on a weekend trip, and they were the perfect blend of stylish and understated. They’re just effortlessly cool!
The Design: This design features a crisp, opaque white nail polish as the base color on all the nails. This provides a clean and bright canvas. Over the white base, flowing, wavy lines are painted in a deep, glossy black polish. The lines vary in thickness slightly, adding to the organic feel, but they remain consistently thin and elegant. They snake across the nail surface in smooth, continuous curves, creating a sense of movement and energy. There's no specific pattern; the lines are placed organically and dynamically on each nail. The black polish has a high shine, which contrasts beautifully with the matte or semi-gloss white base (it's hard to tell the exact finish of the white from the image, but the black is definitely shiny). The overall effect is modern, graphic, and super clean.
How to recreate?:
- Start with a flawless, opaque white nail polish base. Apply one or two coats for perfect coverage and let it dry completely.
- Now, grab a glossy black nail polish and a very fine nail art brush or a striping tool. The key here is thin, elegant lines.
- Begin painting your wavy lines. Start from one edge of the nail and let the line flow smoothly across to the other side. Don't make them too sharp or angular; think gentle curves.
- Vary the placement of the lines on each nail. Some nails might have fewer, longer wavy lines, while others could have more, shorter ones. You can also have lines that start and stop in different places.
- Try to keep the thickness of the black lines consistent, or allow for very slight variations to add a hand-painted feel. The goal is elegance and flow.
- Ensure the black polish is completely dry. If you used a matte white base, the glossy black lines will provide a nice contrast. If you used a glossy white, the whole nail will have a super shiny finish.
- Apply a high-quality top coat to seal the design and protect the lines. This will also add extra shine and make the black lines pop even more against the white background. Cap the free edge of the nail.
Best for: These nails are perfect for anyone who loves a minimalist yet striking design. They’re fantastic for everyday wear, the office, or even dressed up for a night out. I wore these to a modern art exhibition, and they felt so fitting! They are incredibly versatile and complement any outfit without overpowering it. I'm obsessed with them because they're so chic and sophisticated in their simplicity. They have this cool, artsy vibe that I just adore, and they always make my nails look super polished.
11. Matte Dusty Blue
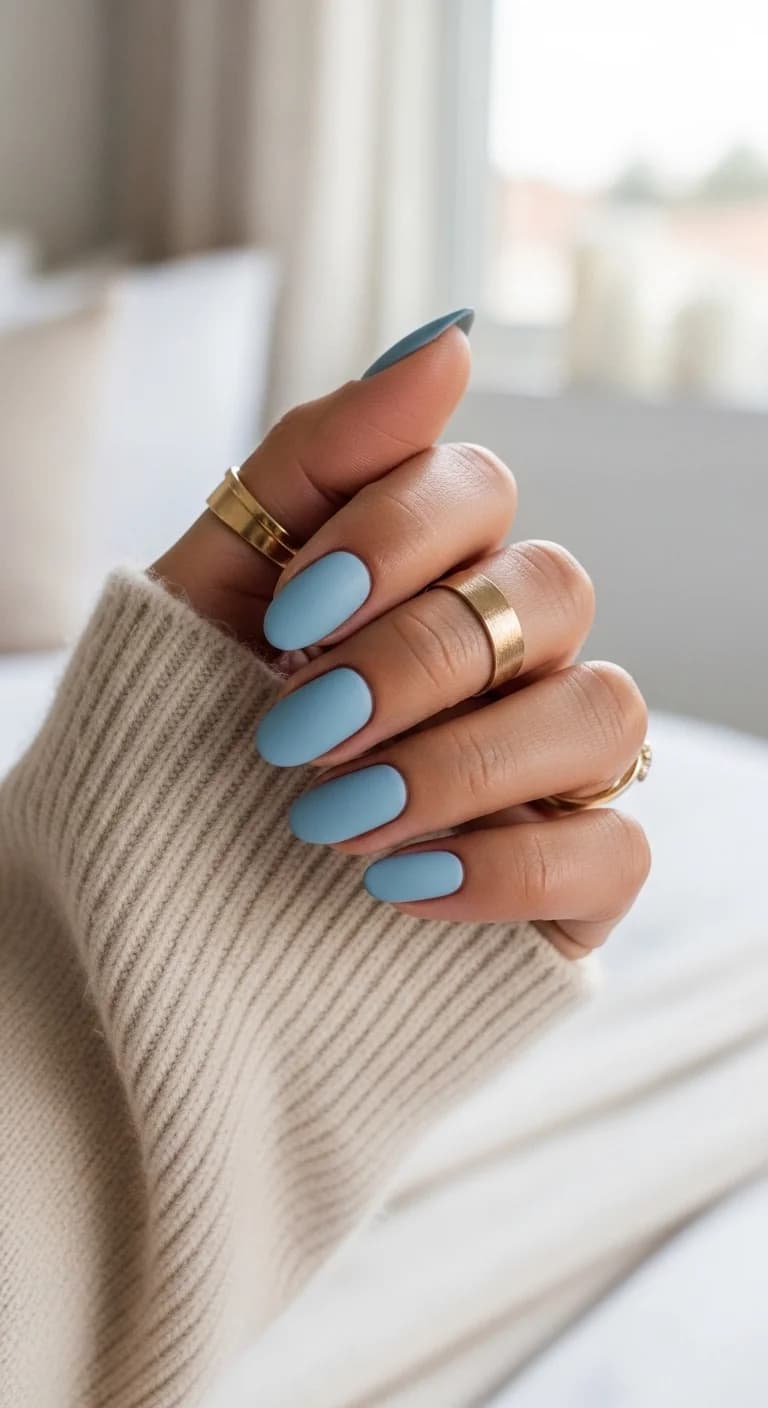
Prepare for ultimate chill vibes with this gorgeous matte dusty blue manicure! It’s such a serene and sophisticated color, like a calm sky on a slightly overcast day. The matte finish makes the color feel so velvety and chic, giving it a modern and understated elegance. Honestly, this shade is just so calming and universally flattering. I wore this on a cozy weekend at home, and it just made everything feel a little bit more peaceful and stylish.
The Design: This manicure features a single, solid color: a beautiful dusty blue. The shade is muted and soft, leaning towards a grayish-blue or a very pale denim color. It's not a bright or vibrant blue, but rather a sophisticated, muted tone that feels very calming and grounded. The absolute standout feature of this design is the finish: it's a perfect matte top coat. This matte finish gives the color a velvety, suede-like texture, completely eliminating any shine. This makes the color appear even richer and more complex. The shape of the nails is a soft almond or oval, which complements the smooth, understated color and finish.
How to recreate?:
- Start with perfectly prepped nails. Ensure they are clean, shaped, and free of any oils.
- Apply a high-quality dusty blue nail polish. You'll likely need two coats to achieve a smooth, opaque, and even color.
- Make sure each coat is completely dry before applying the next one. This will prevent streaking and ensure a flawless finish.
- Once the second coat of blue polish is fully dry, it's time for the special finish. Carefully apply a matte top coat over the entire nail.
- Ensure you cover the entire surface evenly to achieve that velvety, shine-free look. Avoid applying too thick a coat, as this can sometimes look streaky with matte finishes.
- Cap the free edge of the nail with both the color and the matte top coat to help prevent chipping and wear.
Best for: This color is just perfect for any occasion, honestly! It's so versatile and chic. I think it's absolutely ideal for everyday wear, especially if you want something sophisticated for the office or just a polished look for running errands. It’s also a fantastic choice for a wedding or a more formal event if you prefer a subtle nail color. I’m completely obsessed with this shade because it’s so calming and feels incredibly luxurious with that matte finish. It's the perfect 'my nails but better' shade, but with a cool, modern twist.


12. Light Blue with White 3D Ribbed Texture
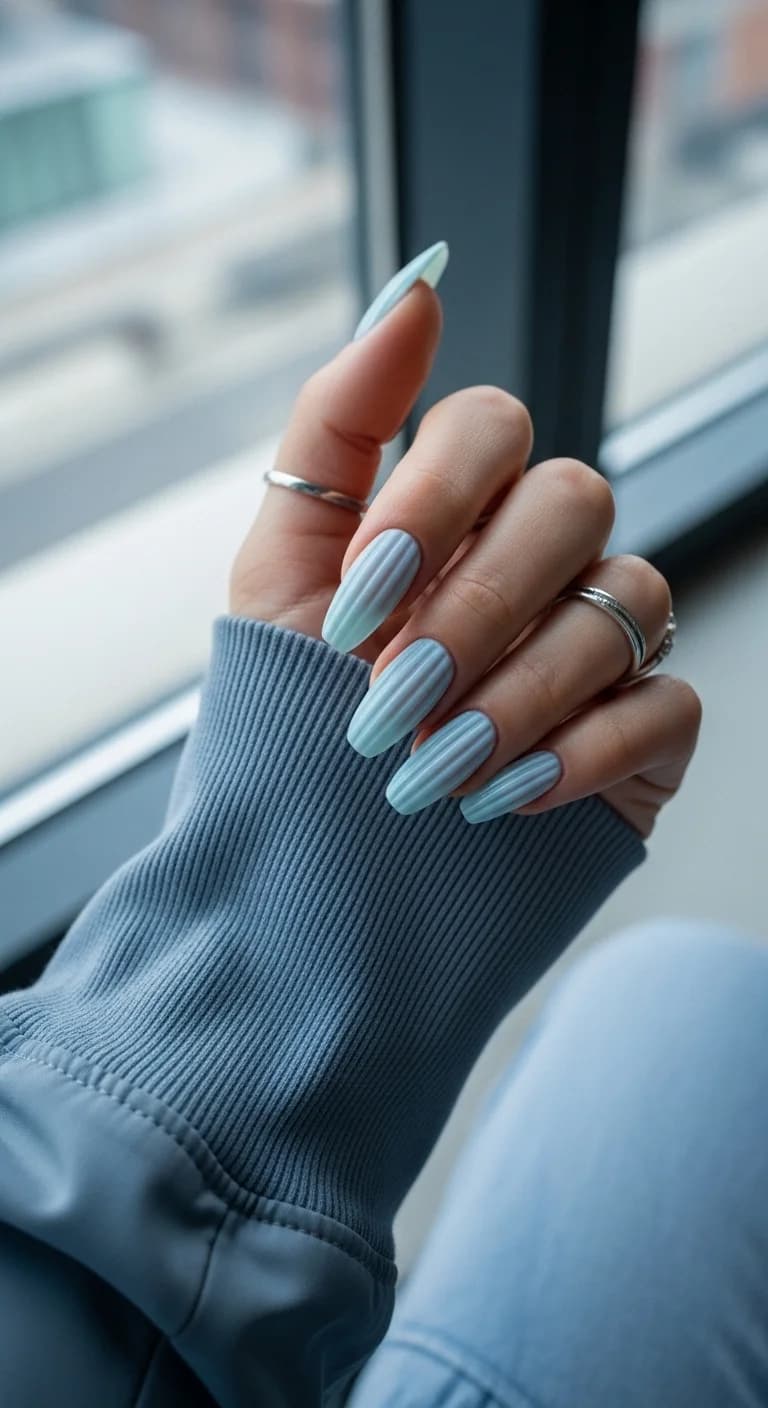
These nails are giving me major spa-day vibes, like something you'd see at a high-end resort! The design features a beautiful, soft light blue color with an incredible 3D ribbed texture that looks like delicate waves or soft pleats. It's so unique and tactile, and the subtle color combined with the texture is just pure elegance. I feel like these would be perfect for a vacation or any time I want my nails to feel super serene and sophisticated. They're absolutely divine!
The Design: The primary color is a soft, gentle light blue, reminiscent of seafoam or a clear sky. This color is applied as a smooth base. The real star of the show is the incredible 3D effect created on top of the blue base. Thin, raised lines or ridges run horizontally across each nail, creating a textured, ribbed appearance. These lines look almost like delicate waves or fine pleats, giving the nails a unique, tactile quality. The ridges catch the light, creating subtle shadows and highlights that enhance the dimensional effect. The blue color might be slightly lighter or paler in the recessed areas and a bit deeper on the raised ridges, adding to the visual depth. The finish appears to be a soft satin or a very subtle sheen, not overly glossy, which allows the texture to be the main focus.
How to recreate?:
- Start by applying a soft, light blue nail polish to your nails. You'll want a smooth, opaque finish, so two coats are probably best. Let this dry completely.
- Now, for the tricky part – creating the 3D texture! You'll need a builder gel or a thick acrylic gel specifically designed for creating 3D nail art. You can also use a very thick, high-viscosity top coat if it’s workable for building lines.
- Using a fine nail art brush or a specialized tool, carefully create thin, raised lines running horizontally across each nail. Think of delicate waves or fine ribbing. Work on one nail at a time.
- Place the lines closely together to create a continuous ribbed effect. Make sure the lines are even in height and thickness to maintain a cohesive look across all nails.
- Once you've created the ribbed design on all your nails, you'll need to cure them under a UV/LED lamp if you're using gel products. This will harden the 3D elements.
- After curing, you might want to gently buff over the surface with a fine-grit buffer to smooth out any sharp edges or imperfections, but be careful not to flatten the 3D design.
- Apply a top coat. Depending on the look you want, you could use a satin or a subtle glossy top coat. A matte finish might also work to emphasize the texture. Avoid overly thick top coats that could obscure the ridges.
- Cap the free edge to ensure the design lasts.
Best for: These nails are pure elegance and would be perfect for a spa day, a beach vacation, or any time you want to feel incredibly chic and serene. I think they're amazing for spring and summer, or even for a bridal manicure. I wore these for a relaxing weekend getaway, and they just elevated the whole experience! I'm obsessed because the texture is so unique and luxurious, and the soft blue color is just so calming. They feel special and sophisticated without being loud.
13. French Tips with Blue Accents and Rhinestones
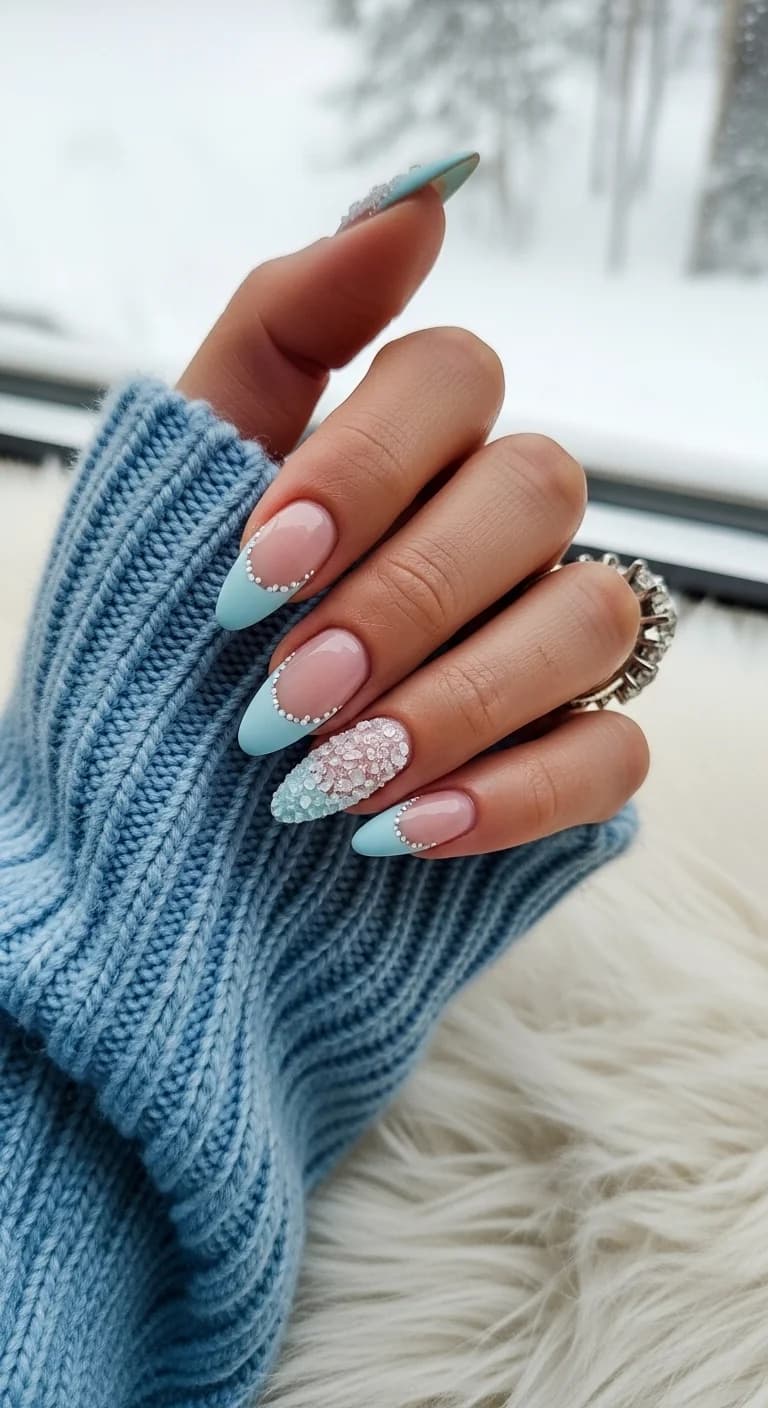
This manicure is the epitome of romantic elegance with a touch of modern flair! It features a classic French tip design, but with a soft, dreamy blue accent on the tips and a stunning cluster of rhinestones and iridescent embellishments. It feels so delicate and glamorous, like something a bride or a princess would wear! I absolutely adore the blend of the clean French base with the soft blue and the sparkling details; it’s just pure magic!
The Design: The base of the nails is a sheer, natural-looking pink or nude polish, giving that classic French manicure foundation. Instead of the traditional white tips, these nails feature tips painted in a soft, milky, or pastel blue shade. The blue tips are applied cleanly, following the natural curve of the nail. On one or two accent nails (it looks like maybe the ring finger), there's a beautiful embellishment. This includes a cluster of tiny, clear rhinestones and possibly some iridescent or pearly flat-back gems, arranged in a curve or a floral-like pattern. There might also be some fine silver or blue glitter mixed in with the gems. The combination of the sheer pink base, soft blue tips, and sparkling embellishments creates a look that is both classic and incredibly glamorous. The finish is a high-gloss top coat that makes everything shine and holds the embellishments securely.
How to recreate?:
- Start with a clean, prepped nail. Apply a sheer pink or nude polish as your base color. Let it dry completely.
- Now, for the French tips. Use a soft, milky blue nail polish. You can use a fine brush to paint the curve of the smile line, or use nail guides for a cleaner edge. Make sure the blue tips are applied evenly and smoothly.
- For the accent nail(s), after applying the base color and before the blue tip, you'll create the embellishment. Apply a bit of nail glue or a dab of clear gel polish where you want the gems to go.
- Carefully place your chosen rhinestones, iridescent gems, and perhaps some fine glitter onto the glue or gel. Arrange them in a pattern – maybe a crescent shape, a scattering, or a floral design.
- Once the embellishments are in place, let them set for a minute. Then, carefully paint the soft blue tip over the area where the gems begin, blending them slightly if possible, or simply painting the tip around the gems.
- If using gel for the embellishments and blue tip, cure the nail under a UV/LED lamp. If using regular polish, let it dry completely.
- Apply a generous, high-gloss top coat over all the nails, making sure to carefully coat over the embellishments to secure them. If using gel, cure again. If using regular polish, let it dry thoroughly.
Best for: These nails are absolutely perfect for a wedding, bridal shower, prom, or any special occasion where you want to feel extra elegant and glamorous! They're also a beautiful choice for a baby shower or a sophisticated spring event. I wore a similar style to my cousin's wedding, and they were the perfect touch of delicate sparkle. I'm obsessed because they blend the timeless beauty of a French manicure with a sweet, dreamy color and dazzling details. They feel so special and feminine!


14. Ombre French Fade with Metallic Silver Tips
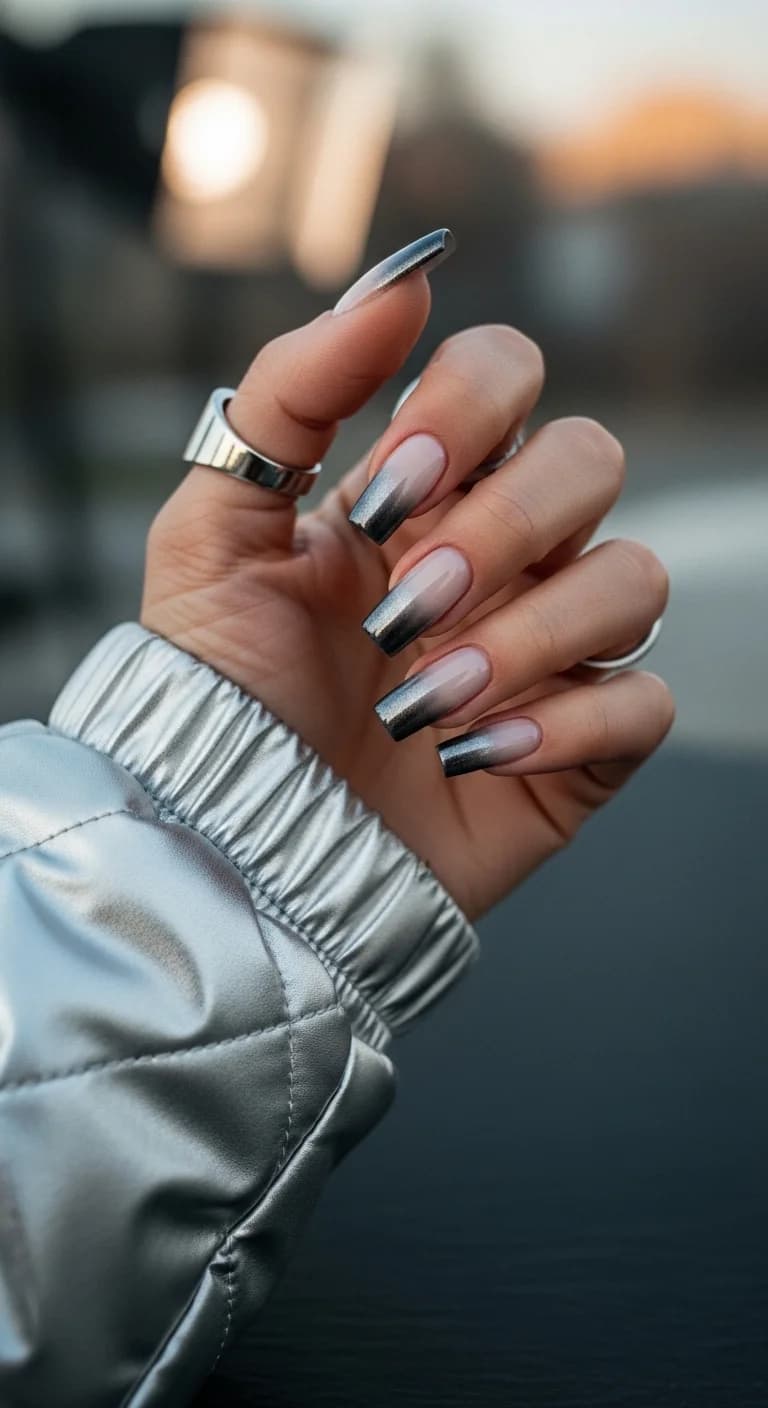
Talk about a futuristic French tip! These nails are stunning with a beautiful ombre fade from a soft, sheer pink to a sharp, metallic silver at the tips. It’s like a classic French manicure got a high-fashion, modern makeover! The blend of the soft base with the bold, reflective silver tips is super striking. I wore these for a night out recently, and they felt so sleek and edgy, almost like armor for my fingertips! They definitely make a statement.
The Design: This design starts with a soft, sheer pink or nude polish applied as a gradient base. The color transitions smoothly from the cuticle towards the free edge, creating a subtle ombre effect that looks very natural and elongates the nail. Instead of a traditional white tip, the free edge of the nail is painted with a highly reflective, metallic silver polish. This silver is applied in a sharp, defined line, creating a bold contrast with the soft pink base. The metallic finish is super shiny and mirror-like, giving the tips a futuristic and glamorous appearance. The nails are shaped into a classic coffin or square shape, which complements the sharp lines of the metallic tips. The overall finish is a high-gloss top coat that enhances the shine of both the pink base and the silver tips, making the whole manicure look incredibly polished and luxurious.
How to recreate?:
- Start with perfectly prepped nails. Apply a sheer pink or nude polish as your base. Create a smooth ombre effect by blending the color from cuticle to tip, ensuring it's lighter towards the tip if desired, or just a uniform sheer tone.
- Let the base color dry completely. If you're using gel, cure it under your lamp.
- Now, for the metallic tips. You'll need a highly reflective silver polish. For a super clean line, you can use French tip guides or stencils. Carefully place the stencil along the desired line where the pink base ends and the silver tip begins.
- Alternatively, if you're confident with a brush, use a fine nail art brush to carefully paint a sharp, clean line across the tip of the nail. You want a distinct edge where the pink meets the silver.
- Apply the metallic silver polish to the tip. You might need two coats to get a fully opaque, mirror-like finish. Ensure the application is smooth and even.
- Once the silver polish is completely dry (or cured if using gel), carefully remove the stencils if you used them.
- Apply a generous, high-gloss top coat over the entire nail. This will seal the design, smooth out any texture, and make both the pink base and the silver tips extra shiny and reflective. Make sure to cap the free edge.
Best for: These nails are SO chic and modern! They're perfect for a night out, a special event, or anytime you want to feel incredibly stylish and a little bit edgy. I wore these for a concert, and they were the perfect blend of glam and rock 'n' roll. They're also fantastic for making a statement in a professional setting if you want a touch of sophistication with an edge. I'm obsessed because they take a classic look and give it such a cool, futuristic update. They're sleek, shiny, and just undeniably cool!
15. White Base with Brown Cow Print

How cute are these cow print nails?! They're such a fun and trendy design that brings a playful, slightly rustic vibe to your look. The classic black and white cow print is always a winner, but this version uses a warm, rich brown which feels so cozy and chic. They’re perfect for adding a little personality to your everyday style! I wore these last fall, and they just felt so fitting for the season.
The Design: This design features a clean, opaque white base on all the nails, providing a bright and fresh canvas. Over this white background, a classic cow print pattern is applied using a warm, rich brown nail polish. The spots are irregular in shape and size, just like real cow spots, and they're placed randomly across each nail. Some spots might have a slightly darker outline or a few smaller brown dots within them to mimic the natural variation in animal print. The brown color used is a beautiful, earthy tone that pairs perfectly with the white base, giving it a softer, more approachable feel than a stark black. The finish is a high-gloss top coat that gives a beautiful shine and makes the colors look even more vivid and polished.
How to recreate?:
- Start by painting all your nails with a nice, opaque white nail polish. Make sure it's completely dry before you start painting the spots, as this will prevent smudging.
- Now, grab your warm, rich brown nail polish. You'll want a fine nail art brush or a dotting tool for this part.
- Begin creating the cow spots. Don't make them perfectly round! Real cow spots are irregular. Vary the size and shape of your brown spots across each nail. Think blobs and splotches rather than neat circles.
- Place the spots randomly, leaving some white space visible, just like on a cow. You can make some spots larger and some smaller to create a more natural look. Don't worry about making them perfectly symmetrical.
- For a more realistic touch, you can add a slightly darker brown outline to some of the spots or add a few tiny dots within the larger spots.
- Once you've applied the brown spots to all your nails, let the polish dry completely. This is really important to avoid any smearing when you add the top coat.
- Apply a good quality glossy top coat over the entire nail to seal the design and give it a beautiful, smooth shine. This will also help the colors pop and make the print look super clean.
Best for: These nails are just perfect for adding a touch of trendy charm to any outfit! They’re ideal for fall and winter, but honestly, cow print is a vibe all year round. They’d be super cute for a casual day out, a trip to the pumpkin patch, or even just when you want to feel a bit more playful and stylish. I personally adore them because they're such a fun twist on a classic pattern, and the brown color feels so warm and inviting. They always make me feel cozy and fashionable!


16. Deep Purple Glitter with Star Accents
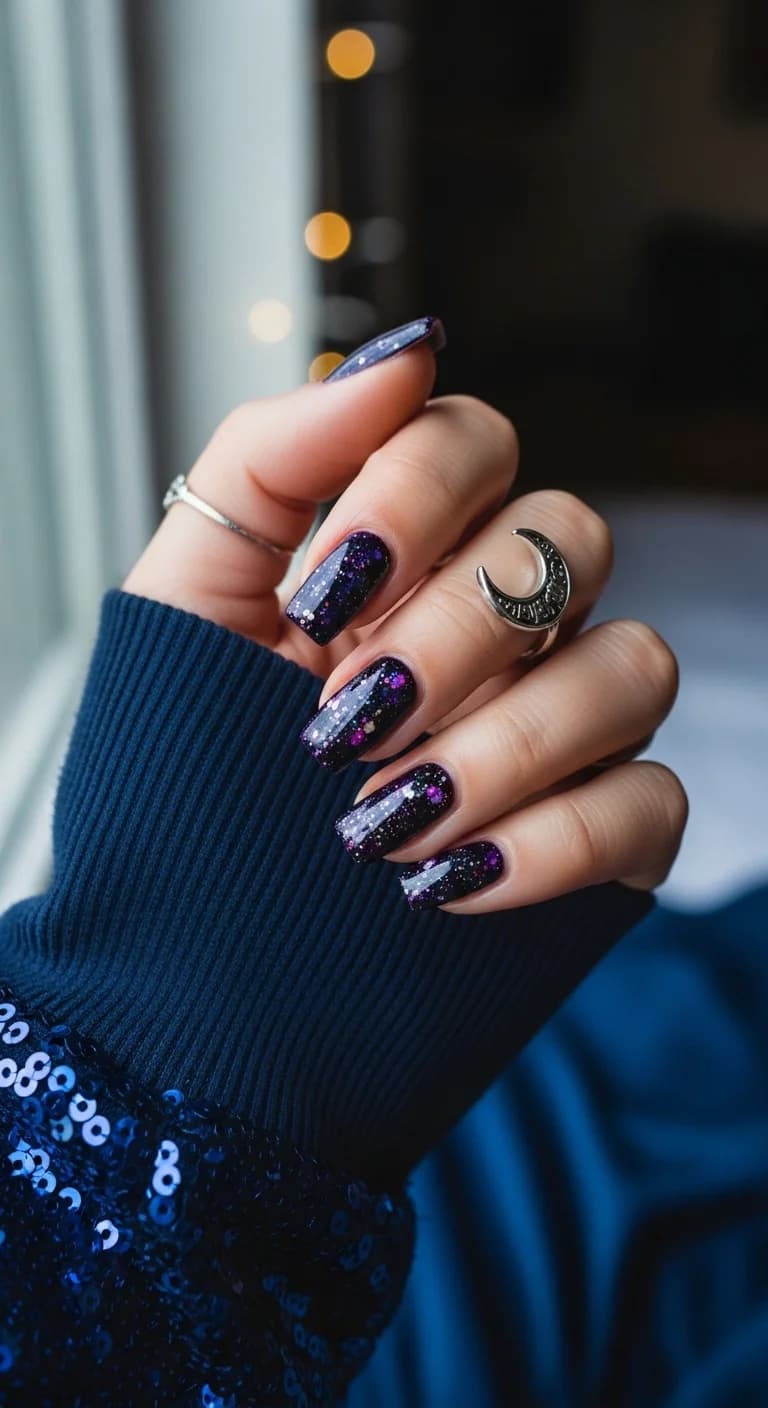
Get ready to twinkle with these absolutely magical starry night nails! They feature a deep, dark purple glitter base that sparkles like a galaxy, with delicate star accents scattered across. It feels so enchanting and celestial, like wearing a piece of the night sky! I wore these for a concert, and they were the perfect amount of sparkle and mystery. They just make me feel so glamorous and ready for anything!
The Design: The base color is a stunning, deep purple polish packed with glitter. It's not just a simple glitter polish; it looks like a multi-dimensional glitter bomb! There are fine glitters in various shades of purple and maybe even hints of blue and pink, creating a complex, sparkling effect. Within this glittery base, there are small, delicate star shapes, possibly in a lighter purple or a silver hue, scattered across the nails. These stars add an extra layer of celestial magic to the design. The overall effect is intensely sparkly and mesmerizing, like looking into a deep, glittering nebula or a field of tiny stars. The finish is a high-gloss top coat that seals in all the glitter and stars, making them incredibly smooth and providing maximum shine and depth.
How to recreate?:
- Start with clean, prepped nails. Apply a deep purple nail polish as your base color. This will help the glitter adhere better and provide depth.
- Now, grab your multi-dimensional purple glitter polish. Apply it generously over the dark purple base. You might need two or three coats to get that intense sparkle and coverage.
- While the glitter polish is still wet, carefully place small star-shaped glitter pieces or use a fine brush with a lighter purple or silver polish to paint tiny star shapes onto the nails. Scatter them across each nail.
- Alternatively, if you have loose star glitter, you can apply it over a layer of wet top coat or nail glue.
- Make sure the stars are distributed evenly and look like they are nestled within the glittery purple background.
- Once everything is applied, let the polish dry completely. You might feel some texture from the glitter.
- Apply a generous, smoothing top coat to encapsulate all the glitter and stars. This will make the surface super smooth and incredibly shiny. Cure under a UV/LED lamp if using gel, or let air dry thoroughly for regular polish. You might need a couple of coats of top coat to fully smooth out the glitter.
Best for: These nails are absolutely perfect for any occasion where you want to add some serious sparkle and magic! Think New Year's Eve, parties, concerts, or a night out on the town. They’re also great for anyone who loves celestial themes or just wants to feel extra glamorous. I wore these for a holiday party, and they were the absolute showstopper! I’m obsessed with them because they capture that feeling of wonder and enchantment, like looking up at a sky full of stars. They’re just pure magic on your fingertips!
17. White Base with Pink and Purple Butterflies
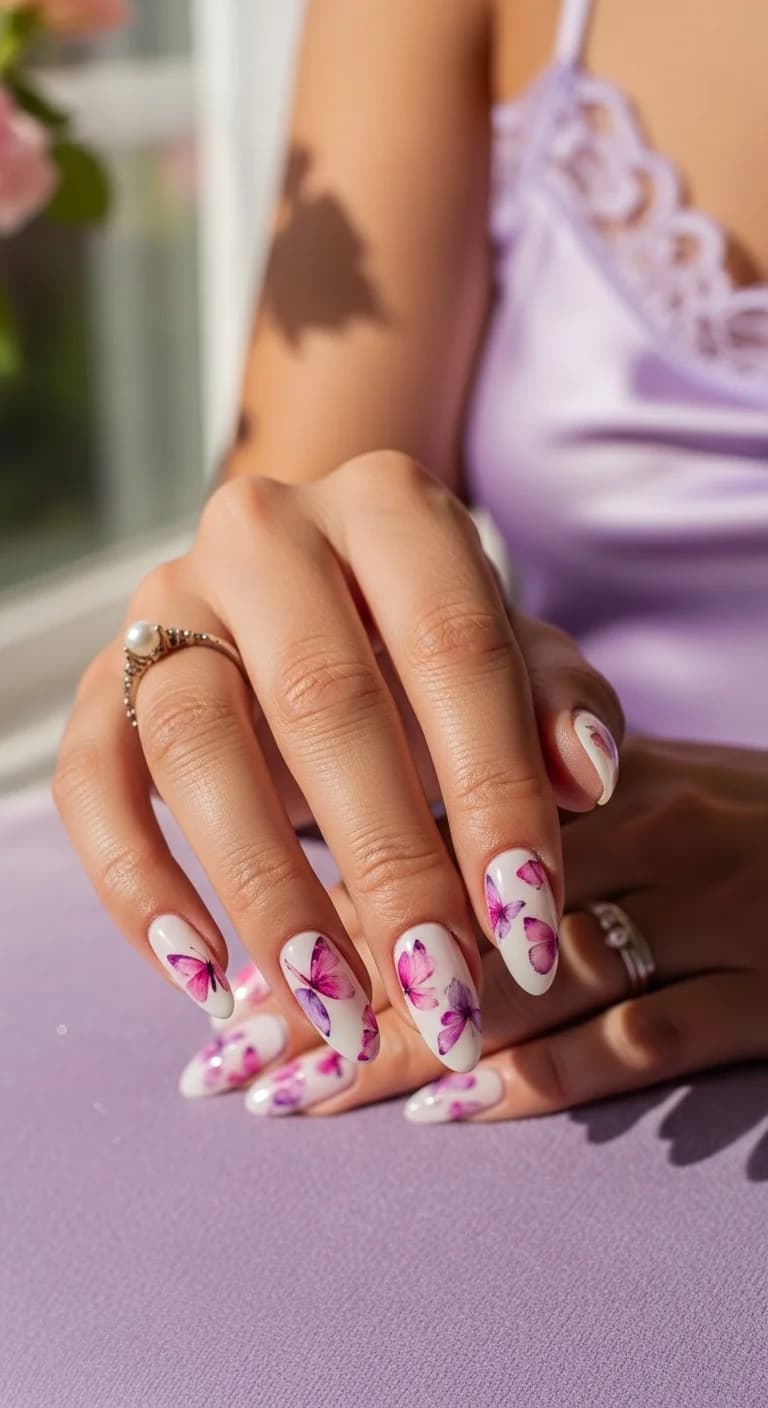
Prepare for the most enchanting nails you've ever seen! These feature a dreamy white base adorned with the most beautiful pink and purple butterflies. They look so delicate and whimsical, like a garden in bloom right on your fingertips. The butterflies have a soft, watercolor-like appearance, and the blend of pink and purple is just stunning. I wore these to a spring wedding, and they felt so perfectly romantic and feminine!
The Design: The base color for this design is a clean, bright white, which serves as a perfect canvas for the delicate butterfly art. The butterflies themselves are rendered in soft shades of pink and vibrant purple. The colors are blended together in a watercolor style, giving them a soft, ethereal, and almost translucent look. The edges of the butterfly wings aren't sharply defined; instead, they have a painterly, slightly blurred appearance, making them look very delicate and airy. The butterflies are scattered across the nails in various sizes and orientations, creating a whimsical and natural feel. The finish is a high-gloss top coat, which gives everything a beautiful, glass-like shine and makes the colors of the butterflies pop even more.
How to recreate?:
- Start with a pristine, opaque white nail polish as your base. Apply one or two coats for perfect coverage and let it dry completely.
- Now, for the butterflies. You'll need pink and purple nail polishes, along with a very fine nail art brush. You can also use butterfly stickers or decals if you prefer.
- If painting them freehand, start by sketching the basic outline of a butterfly with a light pink or lavender color. Don't worry about perfect detail yet.
- Next, use your pink and purple polishes to fill in the wings with a watercolor effect. Dab the colors on and blend them gently with your brush while they're still wet. Aim for soft transitions between the pink and purple, and maybe add some darker purple accents for depth.
- Alternatively, you can use a stamping technique with butterfly plates or apply water marble elements.
- Add small details like the butterfly body and antennae with a fine black or dark purple brush if you like, but keep it subtle.
- Ensure the butterfly designs are completely dry. If using stickers or decals, apply them carefully and smooth them down.
- Apply a generous, glossy top coat over the entire nail. This will seal the artwork, protect it, and give it that beautiful, smooth, glass-like finish. Make sure to cap the free edge.
Best for: These nails are an absolute dream for spring and summer! They're perfect for garden parties, picnics, Easter, or any occasion where you want to feel light, feminine, and romantic. I also think they'd make a beautiful bridal manicure or bridesmaid nails. I wore these for a recent outdoor wedding, and they felt so perfectly suited to the theme! I'm obsessed because they are just so delicate and beautiful, like wearing a little piece of nature's art. They make me feel so pretty and whimsical!


18. Iridescent Pink Glitter with Holographic Flakes

Prepare to dazzle with these absolutely stunning holographic glitter nails! They have this incredible iridescent pink base that catches the light from every angle, and it's loaded with holographic flakes that throw off rainbows. It's pure magic and sparkle! I wore these for a birthday party, and they were the ultimate accessory – so glamorous and eye-catching. They make me feel like I'm wearing pure disco ball magic!
The Design: This manicure is all about maximum sparkle and shine. The base color is an iridescent pink, which means it has a subtle shimmer that shifts in color depending on the light, often showing hints of peach, lavender, or blue. However, the main event is the incredible amount of glitter and holographic flakes packed into the polish. There are fine glitters that give the base its iridescent quality, but then there are larger, chunkier holographic flakes scattered throughout. These flakes catch the light and refract it into beautiful rainbow-like shimmers. The effect is dazzling and multi-dimensional, creating a look that is both sparkly and mesmerizing. The nails are shaped into elegant coffin or stiletto points, which further enhance the glamorous feel. The finish is a super-glossy top coat that smooths out the glitter and makes the holographic effect even more intense and impactful.
How to recreate?:
- Start with clean, prepped nails. Apply a sheer pink or nude polish as a base if you want a more subtle undertone, or go straight for a light pink polish to serve as the base for the glitter.
- Now, grab your iridescent pink glitter polish that's loaded with holographic flakes. Apply one or two generous coats to achieve full coverage and maximum sparkle.
- Make sure to get an even distribution of the glitter and flakes across each nail. You might want to gently push the flakes around with your brush to position them where you want them.
- If you find that the flakes aren't sticking well or the glitter isn't dense enough, you can use a clear top coat or a builder gel as a medium to apply loose holographic flakes and fine pink glitter. This allows you to build up the effect.
- Once the glitter and flakes are applied to your liking, let the polish dry completely. Glitter can sometimes take a little longer to dry.
- Apply a generous, smoothing top coat. This is crucial to encapsulate all the glitter and flakes, making the surface incredibly smooth and touchable. You might need two coats of top coat to fully cover the texture.
- If using gel polish, cure the top coat under your UV/LED lamp. If using regular polish, let it air dry thoroughly. Cap the free edge for durability.
Best for: These nails are made for celebrations and making a statement! They are absolutely perfect for parties, holidays, festivals, or any time you want your nails to be the absolute center of attention. They would be amazing for New Year's Eve or a birthday bash. I wore these for my best friend's bachelorette party, and they were the most talked-about accessory! I’m obsessed because they are just pure, unadulterated sparkle and magic. They make me feel so glamorous and ready to shine!
19. Modern French with Silver Metallic Outline
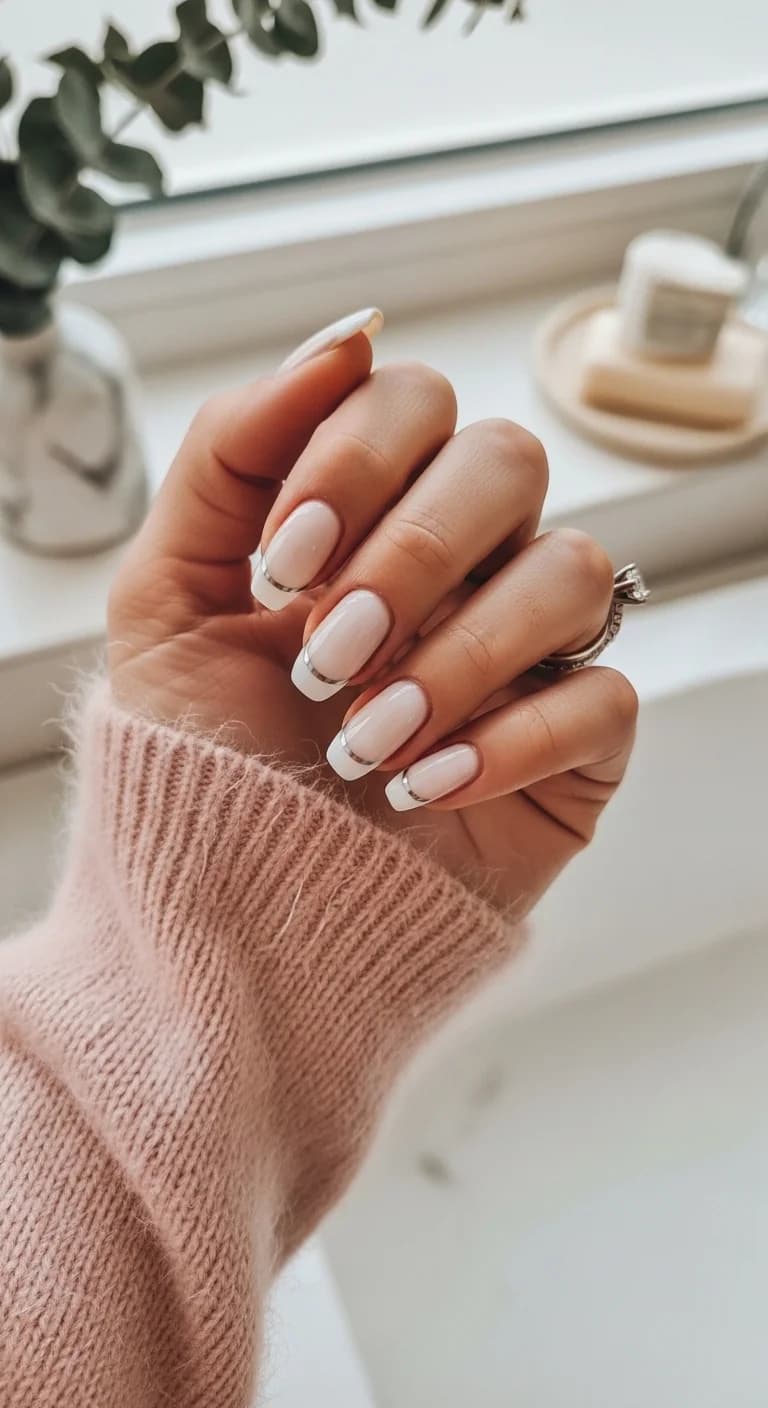
This is such a chic and updated take on the classic French manicure! Instead of the traditional white tips, these nails feature a soft, sheer pink base with a super clean, sharp outline of metallic silver at the very edge. It’s so minimalist yet incredibly striking. The silver outline adds just the right amount of modern glam without being overdone. I wore these for a sophisticated brunch, and they felt so polished and effortlessly cool!
The Design: The base of the nails is a sheer, milky pink polish, providing a clean and natural look that elongates the nail shape. The defining feature is the very fine, precise line of metallic silver polish applied right at the free edge, outlining the tip of the nail. This isn't a full silver tip, but rather a delicate border that follows the natural curve of the smile line. The silver is highly reflective and has a mirror-like finish, creating a sharp, graphic contrast with the soft pink base. The lines are incredibly thin and perfectly executed, giving the manicure a sophisticated and modern feel. The overall finish is a high-gloss top coat, which enhances the shine of both the pink base and the metallic silver outline, making the entire design look super smooth and refined.
How to recreate?:
- Start with clean, prepped nails. Apply a sheer, milky pink nail polish. You might need two coats for an even coverage. Let it dry completely.
- Now, you'll need a very fine nail art brush or a striping tool and a highly reflective metallic silver polish.
- Carefully paint a super thin line of silver polish right along the free edge of the nail. The goal is to create a delicate outline, not a full tip. Think of it as a tiny silver border.
- Try to keep the line as consistent in thickness as possible all the way around the tip of the nail. It should follow the natural curve of your nail's edge.
- Alternatively, you can use a stencil if you struggle with freehanding thin lines, though a freehand line often looks more organic.
- Once the silver outline is painted, let the polish dry completely. Be very careful not to smudge it.
- Apply a generous, high-gloss top coat over the entire nail. This will seal the design, add maximum shine, and make the silver outline pop. Ensure you cap the free edge to protect the design.
Best for: These nails are the definition of chic and modern! They are perfect for the office, a date night, or any time you want a sophisticated look with a subtle hint of glam. They’d also be stunning for a minimalist wedding or a formal event. I love wearing these when I want my nails to look polished and put-together without being too flashy. I’m obsessed because it’s such a clever update to a classic French tip. It’s minimalist, elegant, and has just the right amount of metallic shine to make it feel special.


20. White Base with Abstract Navy and Black Swirls

These nails have such a cool, artistic vibe with their abstract navy and black swirls on a white background! They look like modern art pieces, with dynamic, flowing patterns that are totally mesmerizing. The contrast between the clean white and the deep, moody blues and blacks is super striking. I feel like these are perfect for anyone who loves a bit of edgy sophistication and wants their nails to tell a story. They're incredibly chic and have a unique, almost painterly quality.
The Design: The base of this design is a clean, opaque white nail polish, providing a bright and crisp contrast to the darker colors. Over this white base, abstract swirls and organic shapes are created using deep navy blue and black nail polishes. The colors are applied in a way that they blend and bleed into each other, creating soft edges and a watercolor-like effect. Some areas might show pure navy, others pure black, and many areas will have a beautiful mix of both, creating deep, moody tones. The lines aren't sharp or perfectly defined; instead, they have a fluid, brush-stroke appearance, giving the design a very artistic and organic feel. The overall effect is reminiscent of ink spreading on wet paper or the patterns in dark marble. The finish is a high-gloss top coat that seals the design and enhances the depth and shine of the colors.
How to recreate?:
- Start with a flawless, opaque white nail polish base. Apply one or two coats for perfect coverage and let it dry completely.
- Now, grab your deep navy blue and black nail polishes. You'll need a fine nail art brush or a dotting tool.
- On a palette or a piece of foil, place small amounts of the navy and black polish next to each other. You can add a drop of clear polish or blending solution to help them meld.
- Using your brush, gently swirl the navy and black polishes together. Don't overmix; you want to see distinct colors and beautiful blends, not just a muddy mess.
- Carefully pick up some of the swirled color with your brush and apply it to the nail in sweeping, abstract motions. Think about creating organic shapes and flowing lines.
- You can also try the 'wet on wet' technique: paint some broad strokes of navy and black onto the white base while it's still slightly tacky, then use a clean brush dipped in blending solution (like isopropyl alcohol or nail art thinner) to gently smudge and swirl the colors together.
- Continue adding swirls and blending until you achieve a dynamic, abstract pattern on each nail. Work intuitively and let the colors guide you.
- Once you're happy with the design, let the polish dry completely. Then, apply a generous, glossy top coat to seal the artwork and give it that beautiful, reflective shine. Cap the free edge.
Best for: These nails are perfect for anyone who loves a sophisticated, artistic, and slightly edgy look. They're fantastic for a night out, a creative event, or even for adding a touch of modern flair to everyday wear. I wore these on a moody, rainy day, and they just felt so perfectly atmospheric! They are also great for complementing darker outfits or adding a pop of interest without being overly colorful. I'm obsessed because they have that perfect blend of mystery and artistry. They're abstract, chic, and always look incredibly polished.
21. White Base with Pink, Blue, and Grey Plaid Pattern

How charming and preppy are these plaid nails?! They feature a classic plaid pattern in a sophisticated mix of pink, blue, and grey over a clean white base. It feels so put-together and a little bit edgy, like something you'd see on a fashion runway or a stylish college campus. I absolutely love the clean lines and the balanced color palette; they’re perfect for adding a touch of pattern and personality! I wore these for a fall photoshoot, and they were the perfect touch of classic style.
The Design: The base for this design is a crisp, opaque white nail polish, which provides a clean and bright canvas for the plaid pattern. The pattern itself consists of intersecting lines of different colors to create the plaid effect. We see thin lines of a soft pink, a muted blue (perhaps a periwinkle or dusty blue), and a cool grey. These lines intersect to form the classic plaid grid. The lines are sharp and clean, giving the design a very precise and graphic look. The colors are well-balanced, creating a harmonious and sophisticated pattern. The finish is a high-gloss top coat that seals the design, adds a beautiful shine, and makes the colors pop against the white background. The overall effect is neat, classic, and stylish.
How to recreate?:
- Start with a perfect, opaque white nail polish base. Apply one or two coats for full coverage and let it dry completely.
- Now, you'll need your pink, blue, and grey nail polishes, along with a very fine nail art brush or a striping tool. Thin lines are key for a clean plaid look.
- First, paint the vertical lines. Using your pink polish, create several evenly spaced vertical lines across the nail. Let them dry.
- Next, using your blue polish, paint more vertical lines, positioning them between the pink lines. You can alternate colors if you prefer.
- Once the vertical lines are dry, you'll add the horizontal lines. Using your grey polish, carefully paint horizontal lines that intersect with the vertical ones, creating the plaid grid. Make sure the lines are thin and clean.
- You can adjust the colors and placement to create different plaid variations. For example, you could add thinner white lines or use slightly different shades of pink, blue, and grey.
- Ensure all the lines are completely dry before proceeding. This is very important to avoid smudging.
- Apply a generous, glossy top coat over the entire nail to seal the design and give it a beautiful, smooth shine. Cap the free edge for durability.
Best for: These plaid nails are incredibly versatile and stylish! They're perfect for fall and winter, but honestly, they work year-round for anyone who loves a classic, preppy, or slightly edgy look. They'd be amazing for everyday wear, the office, or even dressed up for a casual holiday gathering. I wore these for a trip to the countryside, and they felt so fitting and chic. I’m obsessed with them because they’re a timeless pattern with a fresh, modern color combination. They’re sophisticated, fun, and always look super put-together!


22. White Base with Multi-Colored Speckled Pattern
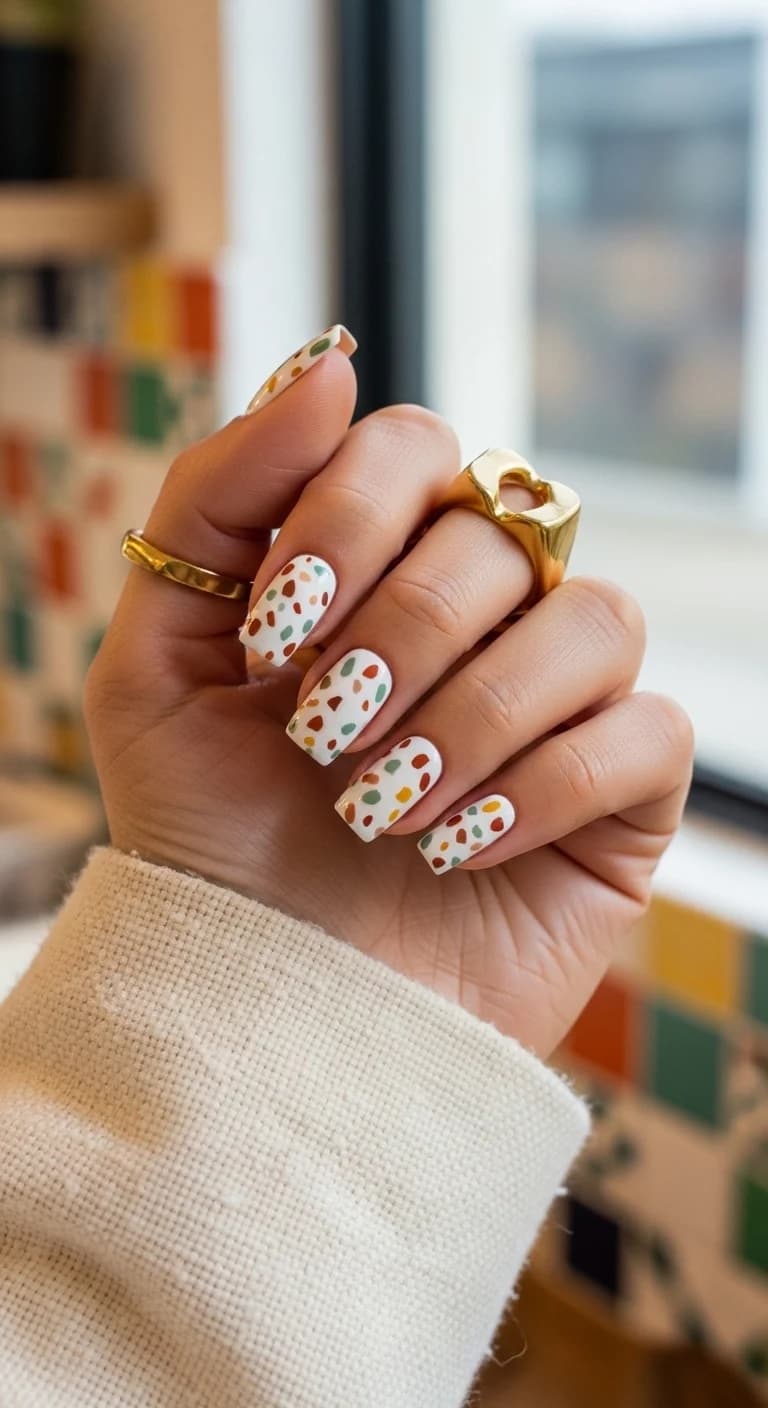
These nails are like little pieces of terrazzo or abstract confetti art! They feature a clean white base covered in a playful scattering of colorful speckles in earthy tones like terracotta, olive green, mustard yellow, and brown. It’s such a fun, organic, and modern design. I love how the different colors and slightly irregular shapes of the speckles come together to create something visually interesting and totally unique. They feel so fresh and artistic!
The Design: The base color is a clean, opaque white nail polish, providing a bright and neutral background. Scattered across this white base are numerous small speckles or dots of color. These speckles are not perfectly uniform; they vary slightly in size and shape, giving a natural, organic feel. The colors used are a beautiful mix of earthy and warm tones: a rich terracotta or burnt orange, a muted olive green, a warm mustard yellow, and a deep brown. These colors are applied in random clusters and single dots across each nail, creating a speckled or terrazzo-like effect. The speckles have soft edges, suggesting they were applied with a dotting tool or a fine brush. The finish is a high-gloss top coat that seals the design, smooths out the surface, and makes the colors of the speckles really pop against the white background.
How to recreate?:
- Start with a clean, opaque white nail polish base. Apply one or two coats for perfect coverage and let it dry completely.
- Gather your polishes in terracotta/burnt orange, olive green, mustard yellow, and deep brown. You'll also need a fine nail art brush or a set of dotting tools in various small sizes.
- Using your dotting tools or the tip of a fine brush, start applying small dots and speckles of each color onto the white base. Vary the size of the dots – some can be tiny, others slightly larger.
- Place the speckles randomly across each nail. Think about creating clusters and also single dots spread out. Don't aim for perfect symmetry; the irregularity is what makes it look so cool and natural.
- Try to distribute the colors evenly across all your nails, ensuring a good mix of each shade on every nail.
- Make sure the speckles are completely dry before moving to the next step. This is important to avoid smudging.
- Apply a generous, glossy top coat over the entire nail. This will seal the design, give it a beautiful shine, and make the colors of the speckles stand out. Cap the free edge for durability.
Best for: These nails are perfect for anyone who loves a modern, artistic, and slightly bohemian vibe! They're fantastic for everyday wear, casual outings, or adding a unique touch to your style. They’d be especially great for spring and summer, or for anyone who loves natural, earthy tones. I wore these on a trip to an artisan market, and they felt so perfectly suited to the atmosphere! I’m obsessed because they’re so unique and visually interesting. They’re playful, sophisticated, and have that cool, handcrafted feel.
23. Blue and White Swirl Marble Effect
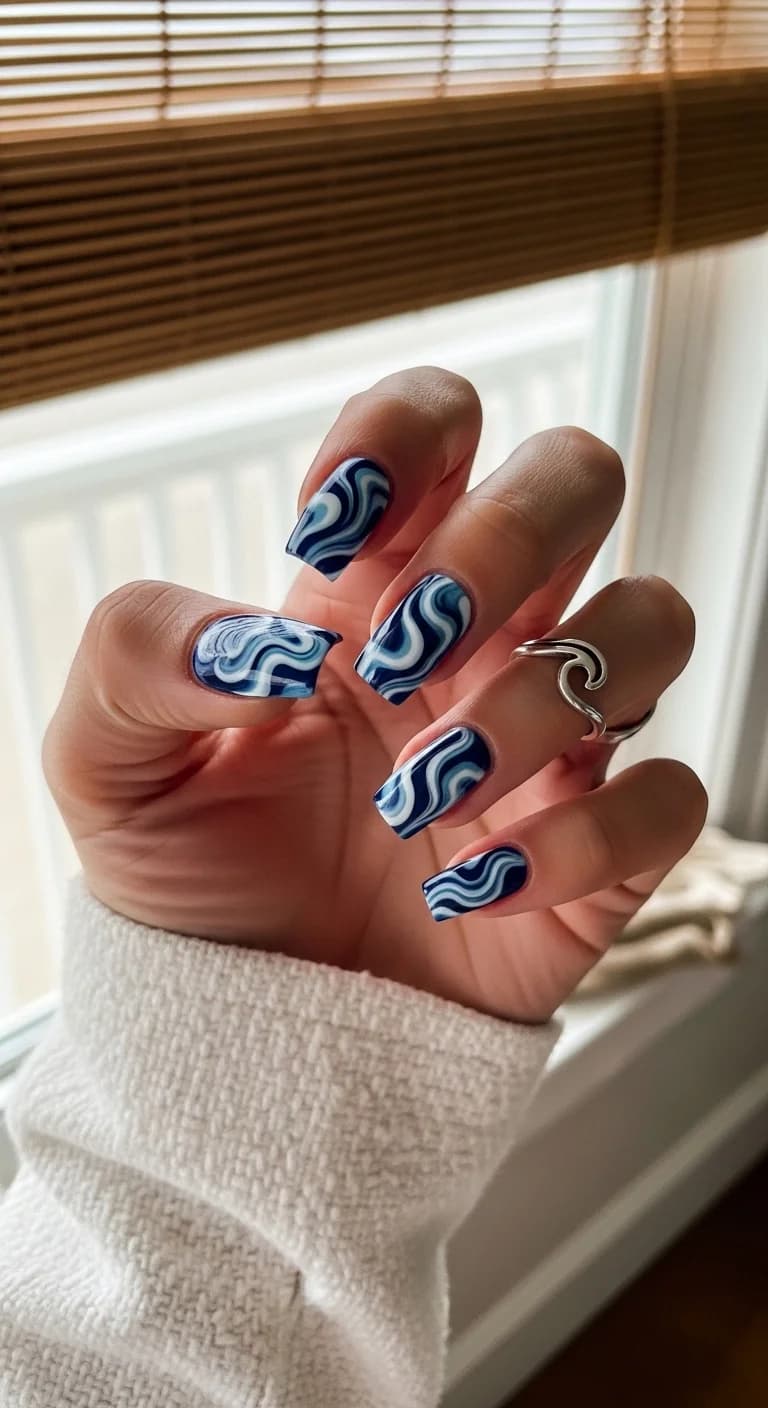
Dive into these mesmerizing blue and white swirl nails! They have an incredible marble effect that looks like flowing water, ocean waves, or even beautiful agate stone. The contrast between the crisp white and the deep, dynamic blues is absolutely stunning and creates so much movement. It feels so calming yet so striking. I wore these on a beach vacation, and they were the perfect accessory – so chic and serene!
The Design: This design features a captivating marble effect created with various shades of blue and white nail polish. The base is a bright, clean white, serving as the canvas for the swirling colors. Overlaying this white base are fluid, organic swirls of deep navy blue and a lighter, sky blue. These colors are blended together seamlessly, creating a beautiful sense of depth and movement, much like natural marble or swirling water. The lines are not sharply defined but rather soft and painterly, giving the design an artistic and fluid appearance. Some areas might appear more opaque with concentrated color, while others have a more translucent, blended look. The finish is a high-gloss top coat, which enhances the depth of the blues and makes the entire design look super smooth and glass-like, really bringing out the watery or stone-like quality.
How to recreate?:
- Start with a clean, opaque white nail polish base. Apply one or two coats for perfect coverage and let it dry completely.
- Now, grab your navy blue and sky blue nail polishes, along with a fine nail art brush or a toothpick.
- On a palette or a piece of foil, place small drops of the navy blue and sky blue polishes next to each other. You can add a tiny drop of clear polish to help them blend more easily.
- Using your brush, gently swirl the blues together. Don't overmix; you want to maintain distinct shades and create beautiful marbled patterns.
- Carefully pick up some of the swirled blue color with your brush and apply it to the nail in sweeping, organic motions. Think about how waves or marble patterns flow across a surface.
- You can also use the 'wet on wet' technique: paint some blue lines or blobs on the white base while it's still slightly tacky, then use a clean brush dipped in a blending solution (like isopropyl alcohol or nail art thinner) to gently smudge and swirl the colors.
- Layer colors and blend until you achieve the desired marble effect. Let the blues bleed into the white base for a more seamless look.
- Once you're happy with the marble design on all your nails, let the polish dry completely. Then, apply a generous, glossy top coat to seal the design and give it that beautiful, smooth, glass-like finish. Cap the free edge.
Best for: These nails are perfect for anyone who loves a calming, serene, yet incredibly stylish look. They're ideal for vacations, beach trips, or any time you want to channel a relaxed and sophisticated vibe. They also work beautifully for spring and summer. I wore these on a recent trip to the coast, and they felt so fitting with the ocean theme! I’m obsessed because they capture the beauty of water and marble so perfectly. They're chic, calming, and always look effortlessly cool.


24. Black and White Zebra Print
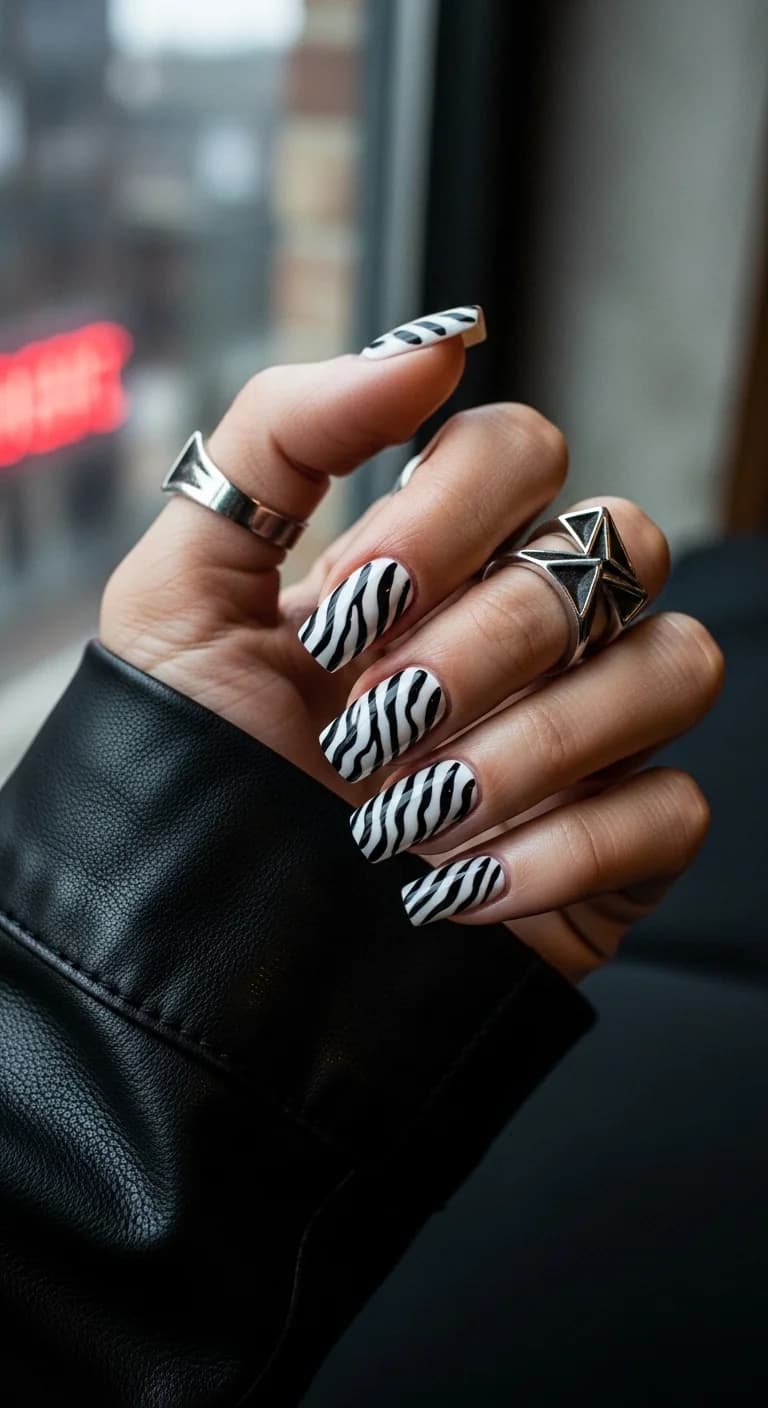
Get ready to unleash your wild side with these fierce zebra print nails! They feature a classic black and white pattern that’s always in style and brings a bold, edgy vibe to any look. The contrast is super sharp and graphic, making a definite statement. I wore these for a night out, and they felt so powerful and stylish – like I had a bit of rock 'n' roll energy on my fingertips!
The Design: This design showcases a classic zebra print pattern. The base color is a crisp, opaque white, providing a clean and bright background. Bold, irregular black stripes are painted across the white base to mimic the natural pattern of a zebra's coat. The stripes vary in thickness and placement, with some thicker, wavy lines and some thinner, more angular ones, creating an authentic and dynamic look. The black is a deep, opaque shade, providing a strong contrast against the white. The edges of the black stripes are relatively clean but have a slightly organic feel, not perfectly sharp, which adds to the realism of the print. The finish is a high-gloss top coat that seals the design, adds a beautiful shine, and makes the black and white contrast even more striking.
How to recreate?:
- Start with a perfect, opaque white nail polish base. Apply one or two coats for full coverage and let it dry completely. A smooth base is key!
- Now, grab your black nail polish and a very fine nail art brush or a striping tool. Thin, precise lines are crucial for a good zebra print.
- Begin painting the black stripes. Think irregular, wavy shapes rather than straight lines. Start from one side of the nail and let the stripe flow organically across.
- Vary the thickness and curvature of the stripes. Some can be thicker and more dominant, while others can be thinner and more delicate. Don't make them too uniform; asymmetry is key to a natural look.
- Place the stripes randomly across the nail, ensuring there's a good balance of black and white. You can have stripes that start and stop at different points.
- Make sure the black polish is completely dry before moving to the top coat. This is very important to avoid smudging the stripes.
- Apply a generous, glossy top coat over the entire nail. This will seal the design, add a beautiful shine, and make the black and white contrast pop even more. Cap the free edge for durability.
Best for: These zebra print nails are perfect for anyone who loves a bold, edgy, and timeless statement! They are fantastic for a night out, concerts, parties, or just whenever you want to add a touch of wildness to your style. They'd also be great for Halloween or themed events. I wore these when I went to a rock concert, and they felt so perfectly on-brand! I’m obsessed because zebra print is such a classic pattern, and this black and white version is always chic and cool. They make me feel confident and a little bit fierce!
Tips to Make Your July Manicure Last Longer
July brings high heat, frequent swimming, beach trips, and outdoor activities—all of which can take a heavy toll on your manicure. Whether you're rocking cow prints or elegant matte blue tones, use these essential tips to extend the life of your gorgeous nails:
- Seal the Edges: When applying your top coat, don't forget to "cap" the free edge of your nails. Sweeping the brush along the very tip seals the polish and prevents water and sand from lifting the edges.
- Protect Against UV Discoloration: Strong summer sun can cause light shades or neon colors to yellow or fade. Always finish with a UV-protectant top coat to lock in the true color.
- Moisturize Your Cuticles Daily: Chlorine and saltwater dehydrate your nail beds, leading to chipping and cracking. Keep your nails flexible and healthy by applying a nourishing cuticle oil every single night.
- Wear Gloves for Yard Work and Cleaning: Avoid direct contact with harsh cleaning chemicals and soil when gardening, as they can quickly dull a high-gloss or matte finish.
- Dab on an Extra Top Coat Layer Mid-Week: Give your nails a quick shield boost by applying a thin layer of top coat 3 to 4 days after your manicure. This is especially helpful if you're spending lots of time in the pool or sand!
Conclusion
July is the perfect month to experiment with your nail art, whether you're leaning into cozy contrasts like a hot pink sweater paired with white confetti glitter, channeling retro cool with cow print nails, or opting for clean abstract aesthetics like green swirls. With 24 stunning July nail ideas ranging from absolute playfulness to sheer sophistication, you have all the inspiration you need to keep your hands looking flawless during the peak of summer.
Take these ideas to your next salon visit, or try recreating them at home. Don't forget to save your favorites, share them with friends, and enjoy showing off your fresh, beautiful nails all July long!
Loving This Guide? Get More Like This! 💌
Want to impress with clothes? Want to look good? Subscribe to Whatsmyshape Newsletter and get weekly fashion guides, exclusive outfit ideas, and beauty tips delivered directly to your inbox. No spam, just pure style inspiration! ✨