
Halloween nail art splits into two camps: the overtly spooky and the quietly seasonal. This list covers both. Some of these designs feature hand-painted skulls, spiderwebs, and pumpkins. Others lean into the mood with deep plum marbles, crescent moons, and dark chrome finishes that feel autumnal without being costume-y.
You do not need to go full horror to participate in the season. A grey marble with a single crescent moon reads as Halloween if you want it to, but it also works as an everyday fall manicure. That versatility is what makes these 51 designs useful beyond October 31st. Many of them transition seamlessly into November and beyond.
The skill range here is wide. Some designs rely on simple color blocking or minimal line work. Others require detail brushes, chrome powder, cat-eye magnets, or steady freehand painting. Each entry explains the tools and application method so you can pick something that matches your patience level.
51 Halloween Nail Designs
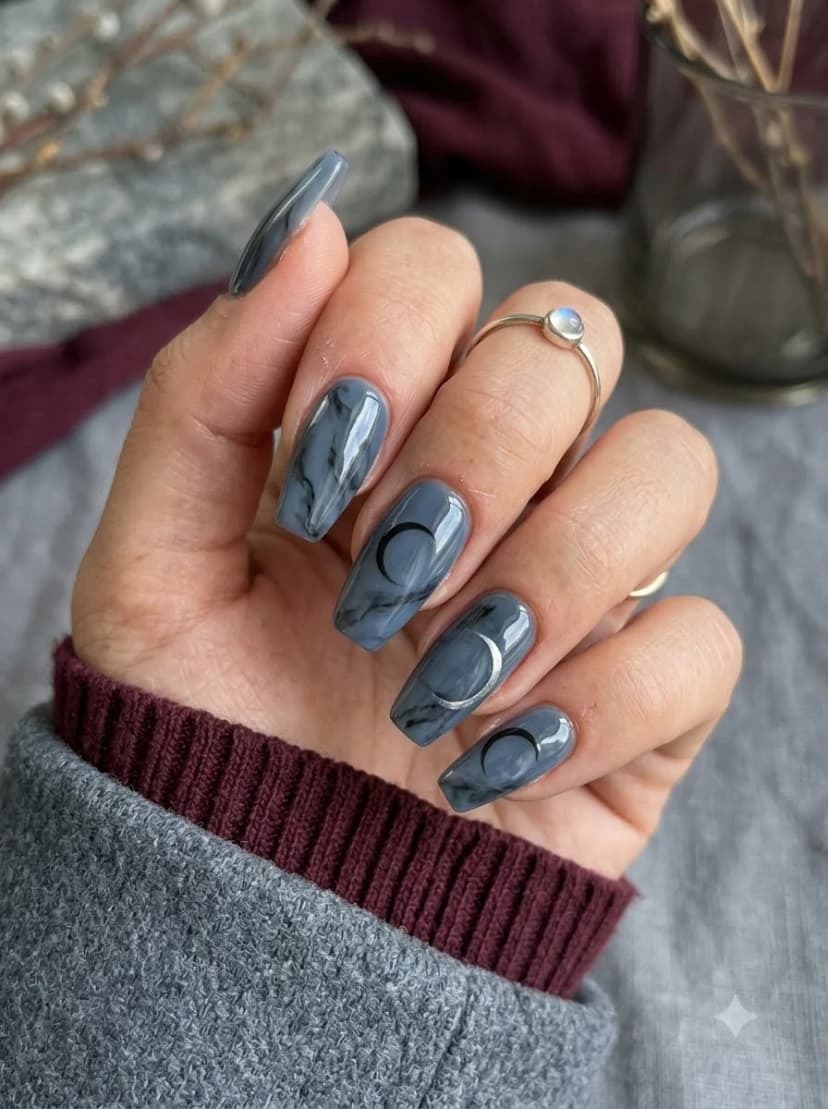
1. Grey Marble Moon Phase Nails
OVERVIEW:
The base is a smoky blue-grey with dark marble veining that reads like polished stone. Three nails carry a moon phase progression: two black crescents and one reflective silver crescent. The long tapered coffin shape gives the marble and oversized moon outlines room to breathe.
What makes this design work is restraint. Three celestial accents are balanced by nails left as uninterrupted marble. The alternating black and silver moon outlines keep the set dimensional without making every nail feel identical.
The wet-on-wet marble technique means each nail will look slightly different. Some will have more white veining, others more dark grey. That variation is the point. If you try to make every nail match exactly, you will overwork the swirls and lose the organic quality.
DESIGN BREAKDOWN:
Moody marble with celestial accents. The grey-blue palette does the heavy lifting.
- Nail Color Used: Sheer grey-blue base, black and white for marble veining, black and silver for crescent moons.
- Suitable Nail Shape: Long tapered coffin or square. The elongated surface suits the large moon outlines.
- Design Element: Marble swirls on all nails with black and silver crescent moon accents on three nails.
- Finish: High-gloss top coat to seal the marble and add depth.
- Tools Used: Toothpick or fine brush for marble, detail brush for moons.
GET THE LOOK AT HOME:
Work one nail at a time. The marble requires a wet base to drag through.
- Base: Apply one coat of sheer grey-blue. Let dry.
- Wet layer: Apply a second thin coat. Do not let it dry.
- Drop colors: Place tiny dots of black and white onto the wet nail. Use a toothpick to drag through them in flowing lines. Three or four drags maximum.
- Moons: Paint black crescent outlines on two accent nails and a silver crescent on a third, varying the orientation to create a moon-phase progression.
- Seal: Wait five minutes, then apply a thick top coat to smooth out texture.
Pro Tip: If the marble looks muddy, you are over-mixing. Use fewer drops and limit yourself to three drags per nail.


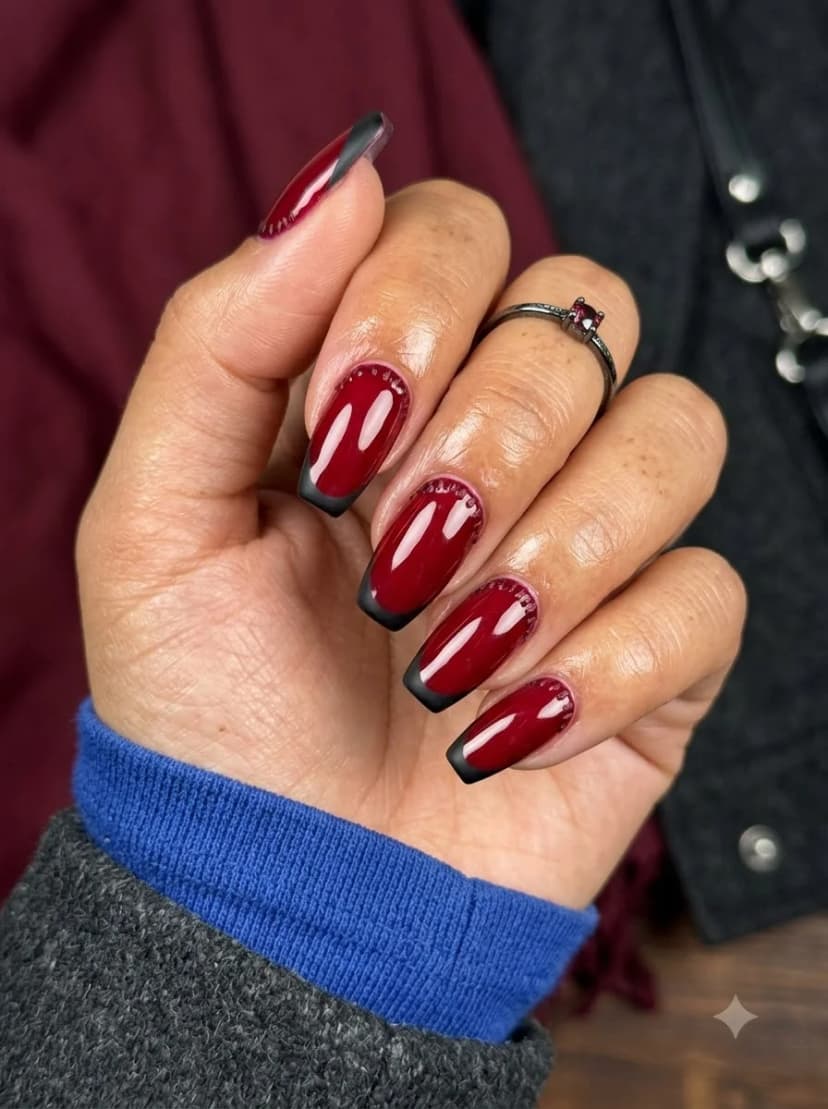
2. Deep Burgundy Black French Tip Gem Nails
OVERVIEW:
A deep wine-red base with black French tips creates a gothic take on the classic French manicure. Curved rows of tiny burgundy and silver rhinestones trace the cuticle on each nail, catching light without overwhelming the design. The coffin shape provides a flat, wide tip that makes the black French line crisp and readable.
The burgundy reads differently depending on lighting. In natural daylight, it leans toward a warm berry tone. Under indoor lighting, it deepens to near-black. That shift gives the design dimension that a flat cream polish would not achieve.
Practical note: applying French tips over a dark base means any unevenness in the line shows immediately. Use French tip guides if your freehand is not confident. The guides create a clean smile line every time.
DESIGN BREAKDOWN:
Gothic French on a dark base. The rhinestones add subtle sparkle without clutter.
- Nail Color Used: Deep burgundy or wine-red base, opaque black for tips, burgundy and silver rhinestones.
- Suitable Nail Shape: Coffin or ballerina. The flat tip defines the French line.
- Design Element: Black French tips over burgundy base with curved rhinestone rows along the cuticle.
- Finish: High-gloss top coat to seal rhinestones and enhance the burgundy depth.
- Tools Used: French tip guides, rhinestone picker, top coat for adhesion.
GET THE LOOK AT HOME:
Apply the base color first, then add French tips and rhinestones as finishing details.
- Base: Apply two coats of deep burgundy to all nails. Let dry fully.
- French tips: Place French tip guides across each nail. Paint the exposed tip with black polish in two thin coats.
- Remove guides: Peel off guides while the black is still slightly wet for the cleanest edges.
- Rhinestones: Trace a shallow curve along each cuticle with rhinestone glue. Place several tiny burgundy and silver stones side by side to form a neat half-moon row.
- Seal: Apply a generous top coat over everything, making sure to encapsulate the rhinestones.
Pro Tip: If rhinestones keep popping off, try using a dedicated rhinestone glue instead of top coat. It holds better over two weeks.
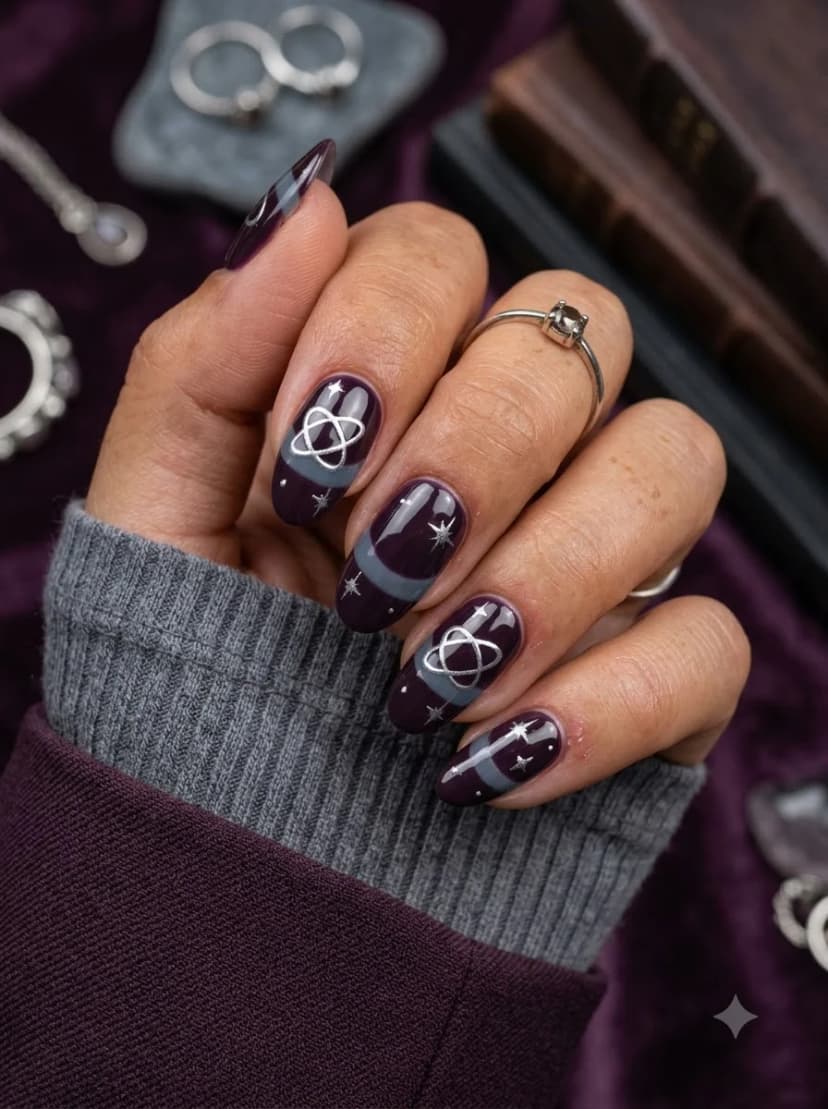
3. Dark Plum Celestial Stripe Nails
OVERVIEW:
Dark plum nails with grey curved swooping stripes and white star and atom-like symbols painted across them. The overall effect feels like a celestial tarot card or alchemist's notebook. The stars and geometric symbols sit on top of the grey stripes, creating a layered look that rewards close inspection.
The almond shape suits this design because the curved stripes follow the natural taper of the nail. On shorter, squarer shapes, the swooping lines would feel cramped. The plum base is dark enough that the white symbols pop without needing a contrasting background.
This design requires patience with the layering. Each element, base color, grey stripes, white symbols, needs to dry before the next goes on. Budget at least an hour for the full set.
DESIGN BREAKDOWN:
Layered celestial elements on a dark base. Each layer needs dry time before the next.
- Nail Color Used: Deep plum or dark purple base, medium grey for stripes, white for symbols.
- Suitable Nail Shape: Almond. The tapered shape complements the flowing stripes.
- Design Element: Grey curved stripes with white star and atom symbols layered on top.
- Finish: Glossy top coat to seal all layers and add shine.
- Tools Used: Striping brush for curves, fine detail brush for symbols.
GET THE LOOK AT HOME:
Build the design in three distinct layers with full dry time between each.
- Plum base: Apply two coats of deep plum. Let dry completely.
- Grey stripes: Using a striping brush, paint curved, flowing lines across each nail. Vary the direction on each nail. Let dry.
- White symbols: Using a fine detail brush, paint small stars, dots, and atom-like shapes in white over the stripes.
- Seal: Apply a thick top coat to smooth out the texture from the layered paint.
Pro Tip: Practice the star shapes on paper first. A simple four-pointed star is just two intersecting lines with tapered ends.


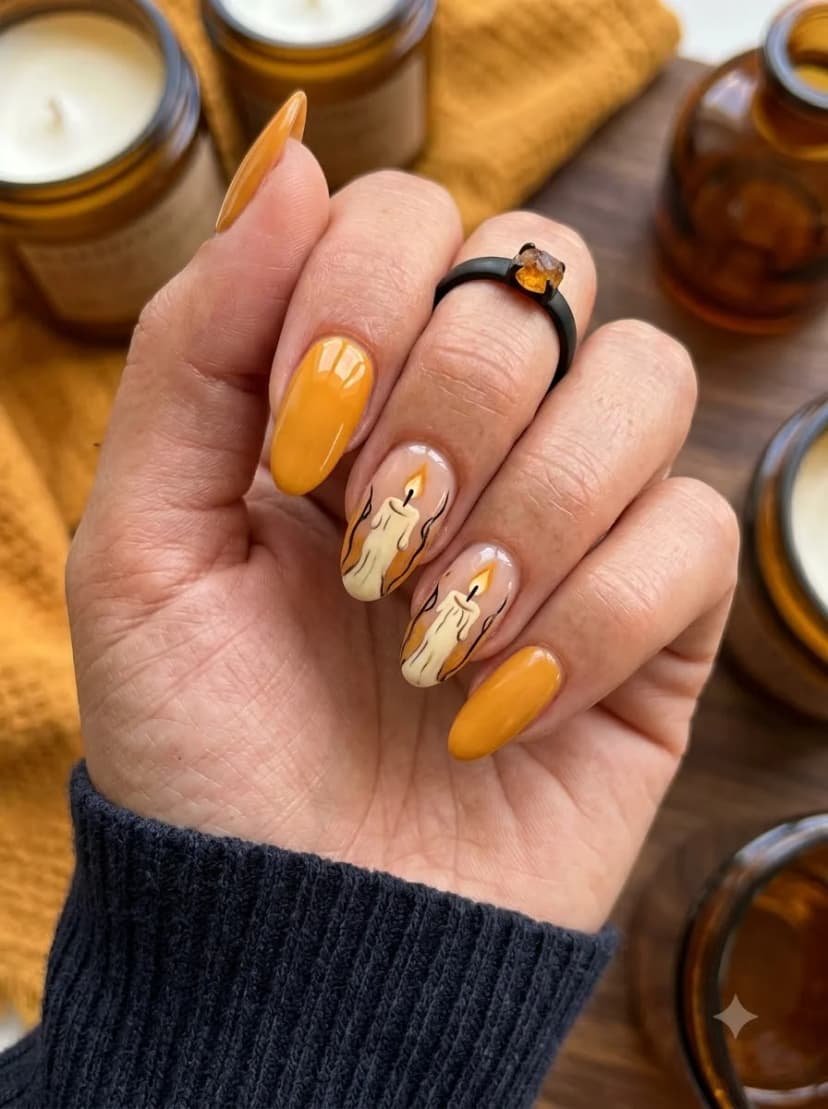
4. Mustard Yellow Candle Art Nails
OVERVIEW:
Warm mustard yellow on most nails with hand-painted candle illustrations on two accent nails. The candles are painted in cream with dripping wax details and orange flames on a sheer nude base. The contrast between the solid mustard and the detailed candle art creates a set that feels cozy and gothic at the same time.
The candle painting style is loose and illustrative rather than hyper-realistic. The flames are simple teardrop shapes, the wax drips are suggested with curved lines. That looseness makes the design approachable for intermediate painters who do not have steady enough hands for photorealism.
Yellow polish is notoriously streaky. You will need three thin coats rather than two to get even coverage. Use a ridge-filling base coat to give the polish a smooth surface to grip.
DESIGN BREAKDOWN:
Solid warm base with illustrative accent art. The candle detail is the focal point.
- Nail Color Used: Warm mustard yellow, sheer nude for accent nails, cream, orange, and black for candle art.
- Suitable Nail Shape: Almond. The tapered shape suits the illustrative style.
- Design Element: Solid mustard on most nails, with hand-painted candle art on accent nails.
- Finish: Glossy top coat for a warm, polished look.
- Tools Used: Fine detail brush for candle illustration, cleanup brush.
GET THE LOOK AT HOME:
Paint the solid yellow nails first. They build confidence before the detail work.
- Yellow nails: Apply a ridge-filling base coat. Follow with three thin coats of mustard yellow, letting each dry fully.
- Accent base: Apply two coats of sheer nude to the accent nails.
- Candle bodies: Using a detail brush and cream polish, paint vertical oval shapes for the candle bodies.
- Details: Add dripping wax lines in cream along the sides. Paint orange teardrop flames at the top. Add a thin black wick line.
- Seal: Apply a glossy top coat to all nails.
Pro Tip: If the yellow feels too streaky after three coats, try thinning your polish with a drop of nail polish thinner. Thick polish is the number one cause of streaking.
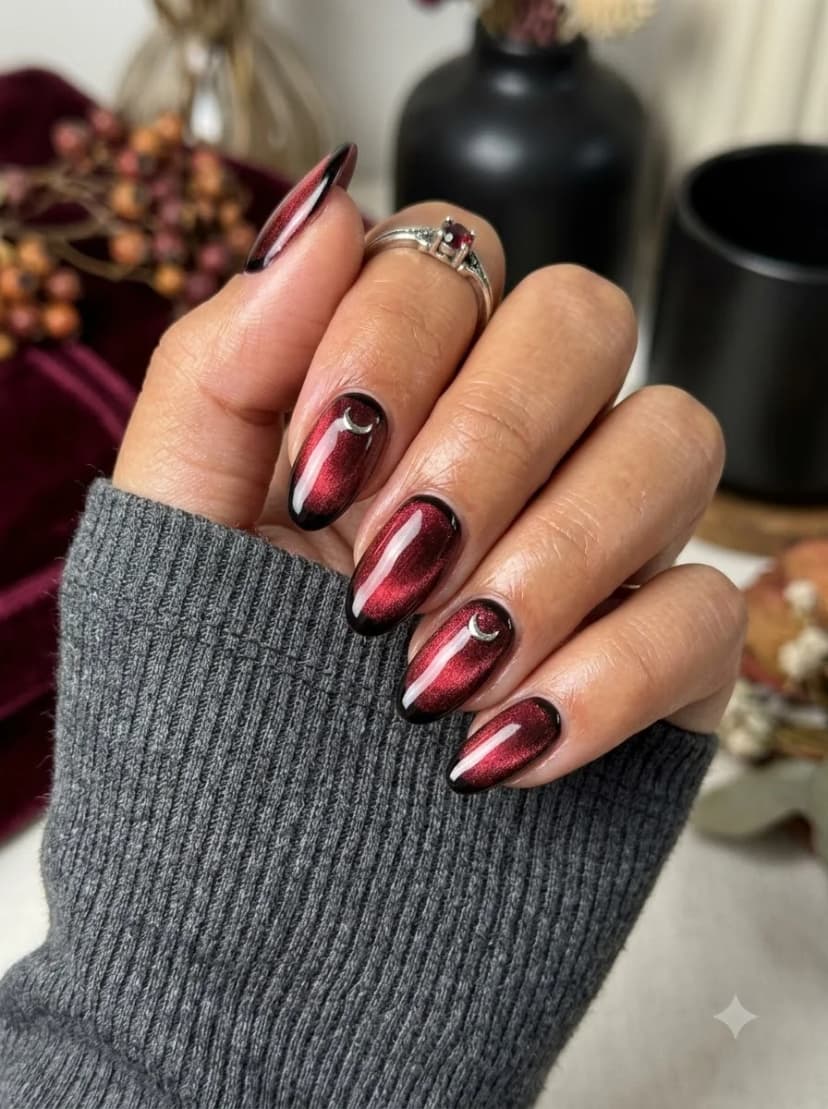
5. Red Cat-Eye Black Tip Moon Nails
OVERVIEW:
Deep red cat-eye polish creates a dimensional, jewel-toned base that shifts between bright crimson and near-black depending on the angle. Black French tips add structure, and silver crescent moons on the index and ring fingers tie everything to the Halloween theme. The almond shape maximizes the cat-eye light-shifting effect.
Cat-eye polish uses magnetic particles suspended in the formula. Holding a magnet over wet polish concentrates those particles into a line or swirl that catches light differently as you move your hand. The result looks like polished garnet or velvet caught in stage lighting.
This design requires gel products and a UV or LED lamp. Regular polish versions of cat-eye exist, but the magnetic effect is less pronounced and does not last as long. If you are investing the time, gel is worth the setup.
DESIGN BREAKDOWN:
Magnetic polish with French tips and a celestial accent. The cat-eye effect is the star.
- Nail Color Used: Deep red cat-eye gel polish, black for tips, silver for moon accent.
- Suitable Nail Shape: Almond. The curved surface maximizes the light shift.
- Design Element: Red cat-eye base with black French tips and two silver crescent moon accents.
- Finish: High-gloss gel top coat.
- Tools Used: Cat-eye magnet, UV or LED lamp, detail brush for moon.
GET THE LOOK AT HOME:
Work one nail at a time. The magnet must be held over wet polish, so you cannot batch this process.
- Base: Apply a thin coat of black gel polish. Cure under the lamp.
- Cat-eye coat: Apply one coat of red cat-eye gel. Do not cure yet.
- Magnet: Hold the magnet 5mm above the wet polish for 10 to 15 seconds. The particles will concentrate into a line.
- Cure: Immediately cure to lock the pattern in place.
- Tips and moon: Paint black French tips on each nail. Paint silver crescent moons on the index and ring fingers.
- Top coat: Apply glossy gel top coat and cure one final time.
Pro Tip: Use a black base coat under the red cat-eye. It makes the red appear deeper and the magnetic line more pronounced.


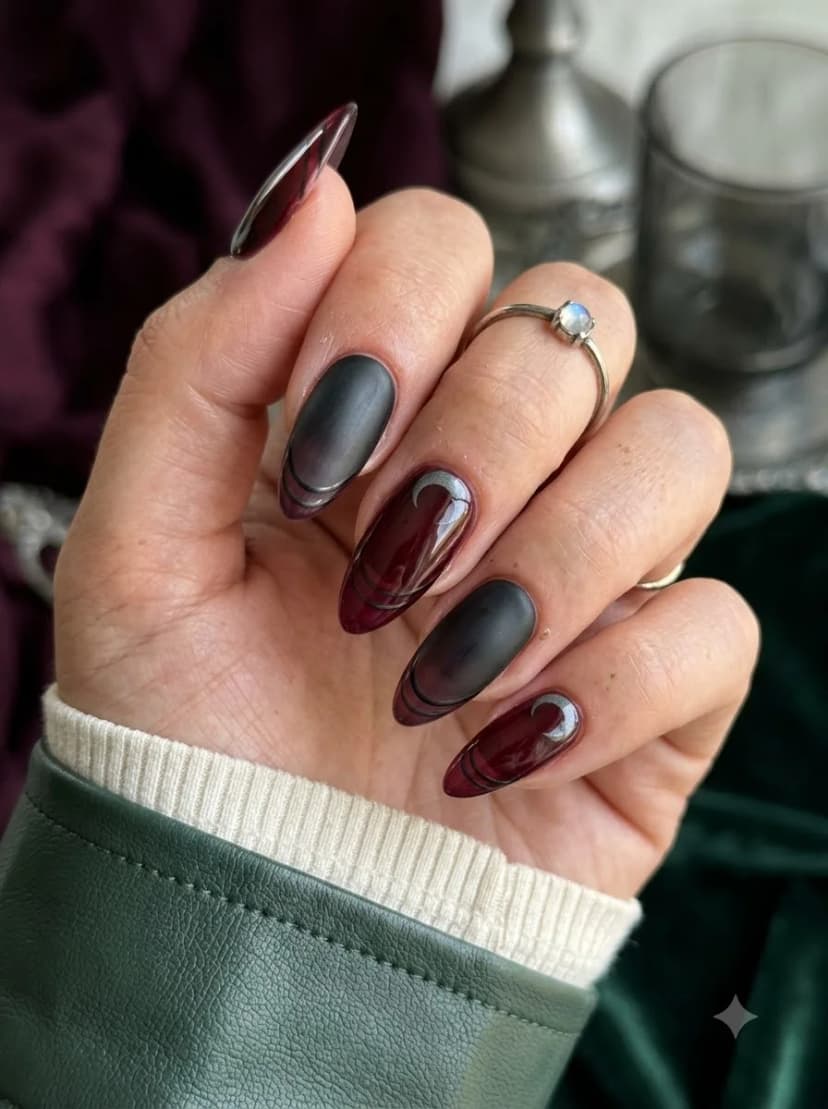
6. Matte Black Burgundy Ombre Moon Nails
OVERVIEW:
Alternating nails between matte black and glossy burgundy creates a texture contrast that is striking in person and subtle in photos. The burgundy nails feature a gradient that darkens toward the tips, with crescent moon details painted near the cuticle. The matte black acts as a visual anchor between the richer, glossier nails.
The ombre on the burgundy nails goes from a warm wine tone at the base to near-black at the tip. This gradient gives each nail a sense of depth that a solid color would not achieve. The crescent moons are placed near the cuticle, which keeps them visible without competing with the ombre.
Matte top coats show every fingerprint and scratch. If you work with your hands a lot, the matte nails will start looking worn by day three. Consider keeping this design for a weekend event rather than a full two-week wear cycle.
DESIGN BREAKDOWN:
Texture does the heavy lifting. Matte and gloss alternate for push-pull contrast.
- Nail Color Used: Pure black, deep burgundy for ombre, white or silver for moons.
- Suitable Nail Shape: Almond. The curved surface suits both the ombre and the moon placement.
- Design Element: Matte black on some nails, burgundy ombre with crescent moon accents on others.
- Finish: Matte top coat on black nails, glossy on burgundy nails.
- Tools Used: Makeup sponge for ombre, detail brush for moons, two different top coats.
GET THE LOOK AT HOME:
The order of operations matters. Apply matte and glossy top coats to different nails at the end.
- Black nails: Apply two coats of black polish to alternating nails. Let dry.
- Burgundy ombre: On the remaining nails, apply two coats of burgundy. While the second coat is wet, sponge black polish onto the tips to create a gradient.
- Moons: Once dry, paint small crescent moons near the cuticle on the burgundy nails.
- Matte: Apply matte top coat only to the black nails. Apply glossy top coat to the burgundy nails.
Pro Tip: If you want the glossy burgundy to pop even more, use a high-shine top coat like Seche Vite. It creates a mirror finish that contrasts dramatically with the matte black.
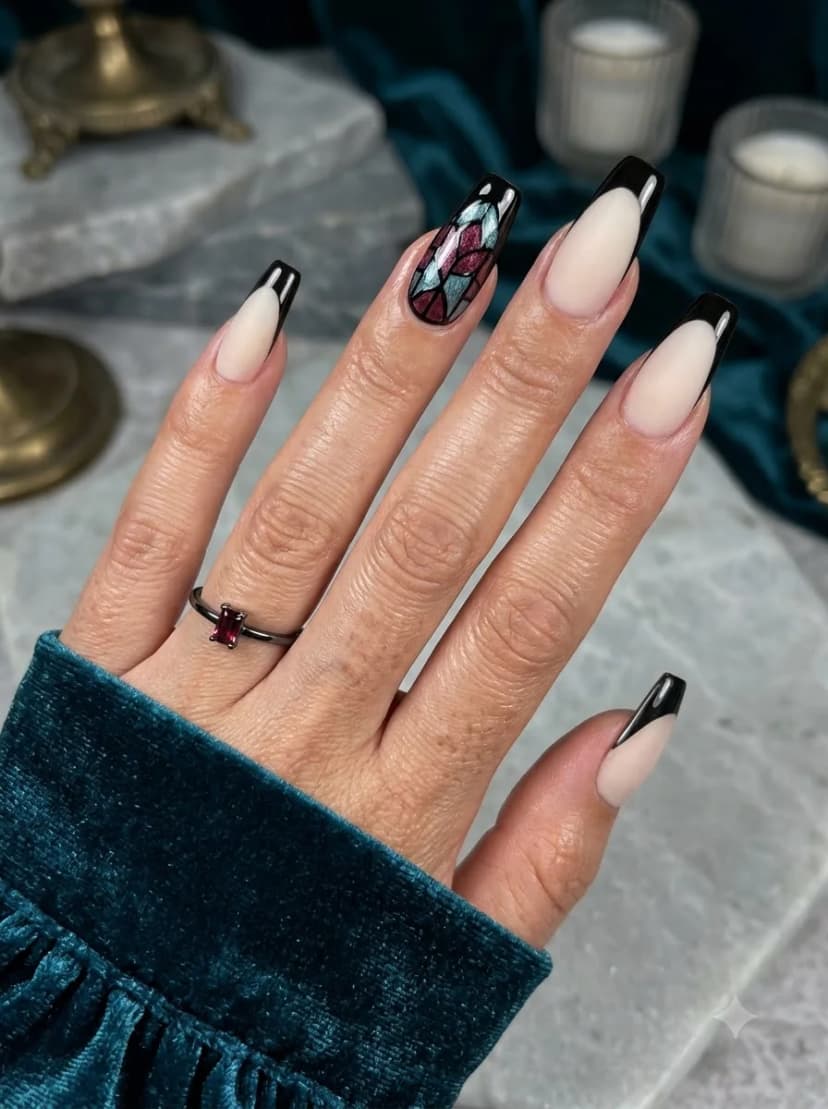
7. Cream Black French Tip Stained Glass Nails
OVERVIEW:
Cream or nude base with black French tips on most nails, and one accent nail featuring a stained glass window pattern in burgundy, teal, and black lines. The accent nail breaks up the uniformity of the French tips and adds a gothic cathedral quality to the set. The pictured almond shape provides enough length for the stained glass detail while keeping the set elegant.
The stained glass pattern uses thin black lines to create geometric sections filled with deep jewel tones. It looks complex but is actually built from simple shapes: triangles, diamonds, and curved arches. The key is keeping the black outlines thin and consistent.
This design works well for anyone who wants Halloween nails that pass in professional settings. The French tips read as classic, and the stained glass accent is subtle enough that it looks like abstract art rather than a holiday theme.
DESIGN BREAKDOWN:
Classic French with a gothic accent. The stained glass nail is the focal point.
- Nail Color Used: Cream or nude base, opaque black for tips, burgundy and teal for stained glass sections.
- Suitable Nail Shape: Coffin or almond. Both provide enough surface for the accent detail.
- Design Element: Black French tips on most nails, stained glass pattern on one accent nail.
- Finish: High-gloss top coat for a polished look.
- Tools Used: French tip guides, fine detail brush for stained glass lines.
GET THE LOOK AT HOME:
Complete the French tips first, then add the stained glass as the final detail.
- Base: Apply two coats of cream or nude to all nails. Let dry.
- French tips: Use French tip guides to paint black tips on all nails except the accent nail.
- Stained glass: On the accent nail, use a fine brush and black polish to paint thin geometric lines creating sections. Fill sections with burgundy and teal.
- Seal: Apply a glossy top coat to everything.
Pro Tip: Keep the black outlines for the stained glass as thin as possible. Thick lines make the design look heavy rather than delicate.


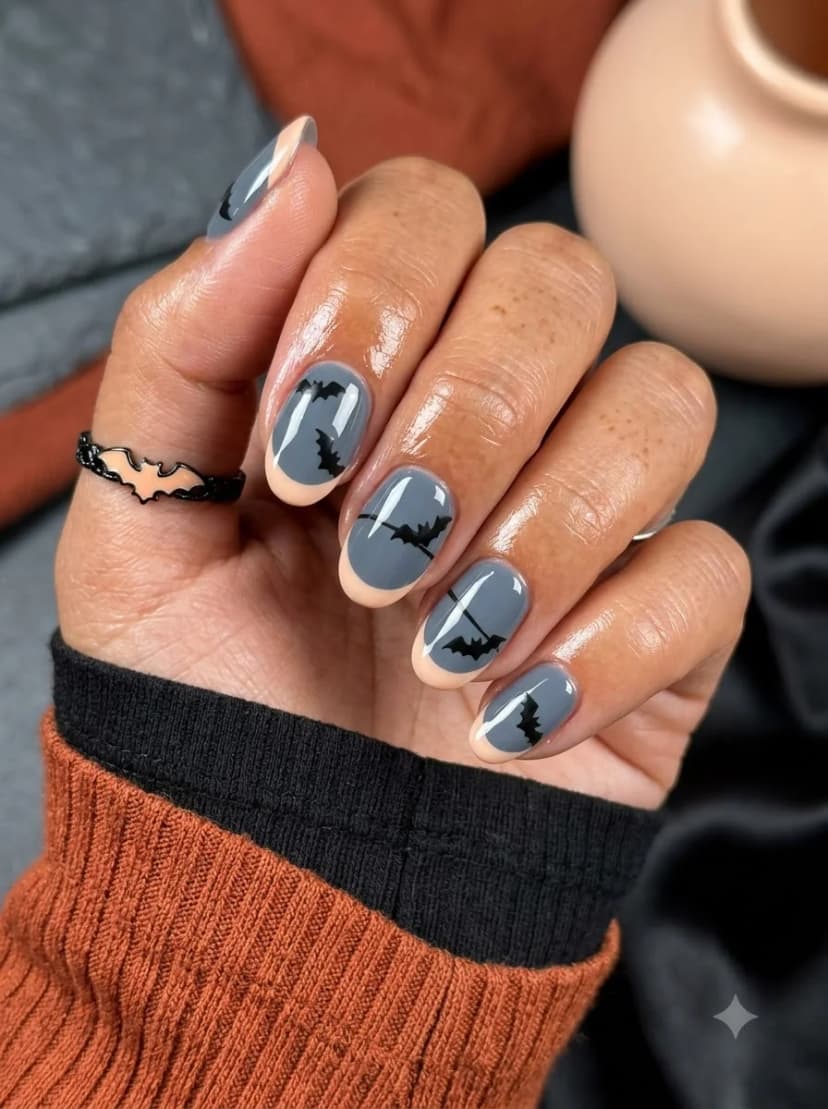
8. Grey Bat Silhouette French Tip Nails
OVERVIEW:
Soft grey nails with nude or beige French tips and black bat silhouettes painted across the nails. The bats are scattered in different sizes and orientations, some flying upward, others angled sideways. The grey base keeps everything muted and wearable, while the bat shapes add the Halloween element.
The short almond shape works well here because the bats are small enough to fit without looking cramped. The nude French tip is an unusual choice that adds warmth to the cool grey base. It reads as more intentional than a standard white tip.
Bat silhouettes are one of the easier Halloween motifs to paint. The basic shape is just a curved body with two angular wings. Even imperfect bats read clearly from a normal viewing distance.
DESIGN BREAKDOWN:
Muted palette with playful silhouettes. The bats are simpler to paint than they look.
- Nail Color Used: Soft grey base, nude or beige for French tips, black for bat silhouettes.
- Suitable Nail Shape: Short almond or oval. The compact shape suits the small bat shapes.
- Design Element: Nude French tips with scattered black bat silhouettes.
- Finish: Glossy top coat for a clean finish.
- Tools Used: French tip guides or liner brush, fine detail brush for bats.
GET THE LOOK AT HOME:
The French tips are the foundation. Paint the bats after everything is dry.
- Grey base: Apply two coats of soft grey to all nails. Let dry.
- Nude tips: Use French tip guides or a liner brush to paint nude or beige tips on each nail.
- Bats: Using a fine detail brush and black polish, paint small bat silhouettes across the nails. Vary the size and direction.
- Seal: Apply a glossy top coat to finish.
Pro Tip: If freehand bats feel intimidating, use a dotting tool for the body and two small strokes for the wings. It approximates the shape well enough from normal viewing distance.
9. Navy Blue Constellation Moon Nails
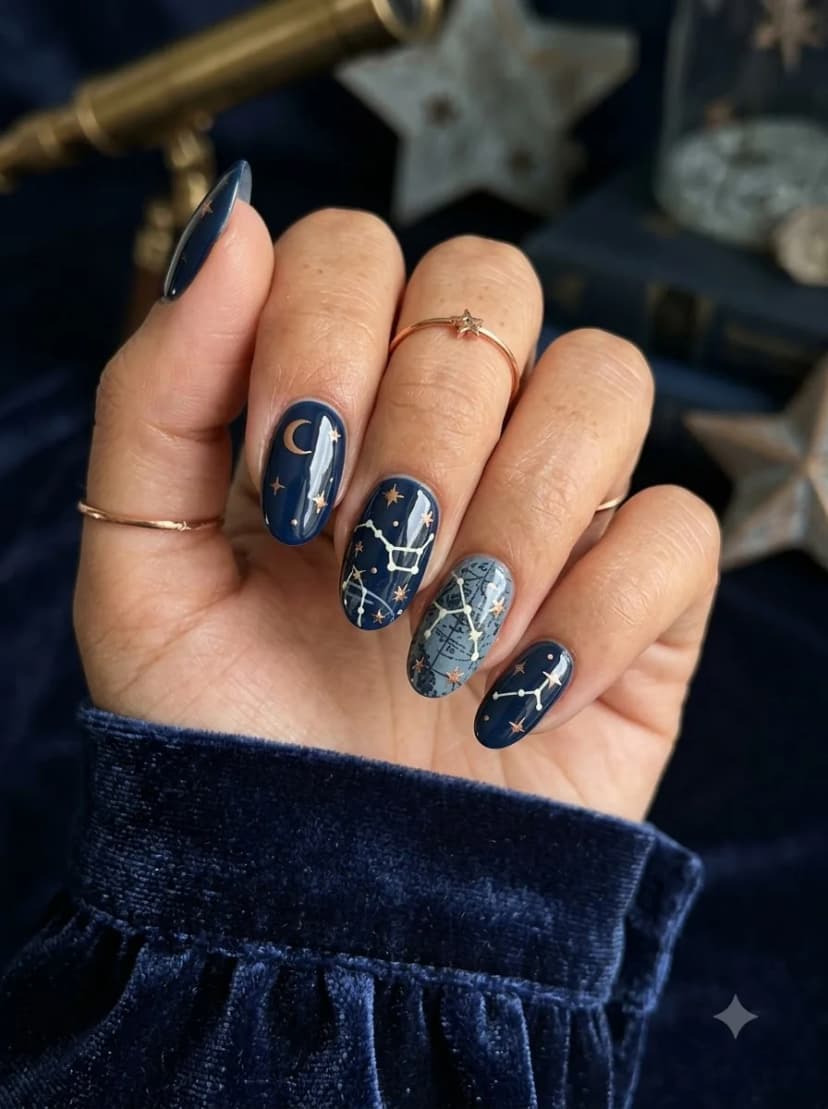
OVERVIEW:
Deep navy blue nails with white constellation patterns, gold crescent moons, and mixed gold-and-white star details. One accent nail features a lighter blue-grey celestial map pattern. The metallic gold elements catch light against the dark navy, creating a night-sky effect that reads as mystical rather than overtly Halloween.
The almond shape suits the celestial theme because the tapered tip mimics the pointed quality of stars. The navy base is dark enough that the gold details pop without needing a contrasting background. The lighter accent nail breaks up the darkness and adds visual variety.
The constellation patterns are built from small white dots connected by thin ivory lines. Each nail can feature a different constellation, or you can scatter the dots randomly for a more abstract night-sky effect. Both approaches work.
DESIGN BREAKDOWN:
Night sky on nails. The white constellation work and gold celestial accents create the contrast.
- Nail Color Used: Deep navy blue, lighter blue-grey for the map accent, white for constellations, and gold metallic for the moon and small stars.
- Suitable Nail Shape: Almond. The pointed tip complements the celestial theme.
- Design Element: White constellation patterns, gold crescent moons and stars, plus a celestial-map accent over navy and blue-grey.
- Finish: High-gloss top coat to enhance the gold shimmer.
- Tools Used: Fine detail brush, dotting tool for stars.
GET THE LOOK AT HOME:
Paint the constellation dots first, then connect them with thin lines.
- Navy base: Apply two coats of deep navy to all nails. Let dry.
- Accent nail: Paint one nail with lighter blue-grey for variety.
- Constellations: Using a dotting tool and white polish, place small dots in constellation patterns. Connect them with thin ivory lines.
- Moons and stars: Paint small crescent moons and four-pointed stars scattered across the nails.
- Seal: Apply a glossy top coat to lock everything in.
Pro Tip: Look up actual constellation maps for reference. Real constellations have irregular spacing that looks more authentic than evenly distributed dots.


10. Bronze Cat-Eye Pumpkin Art Nails
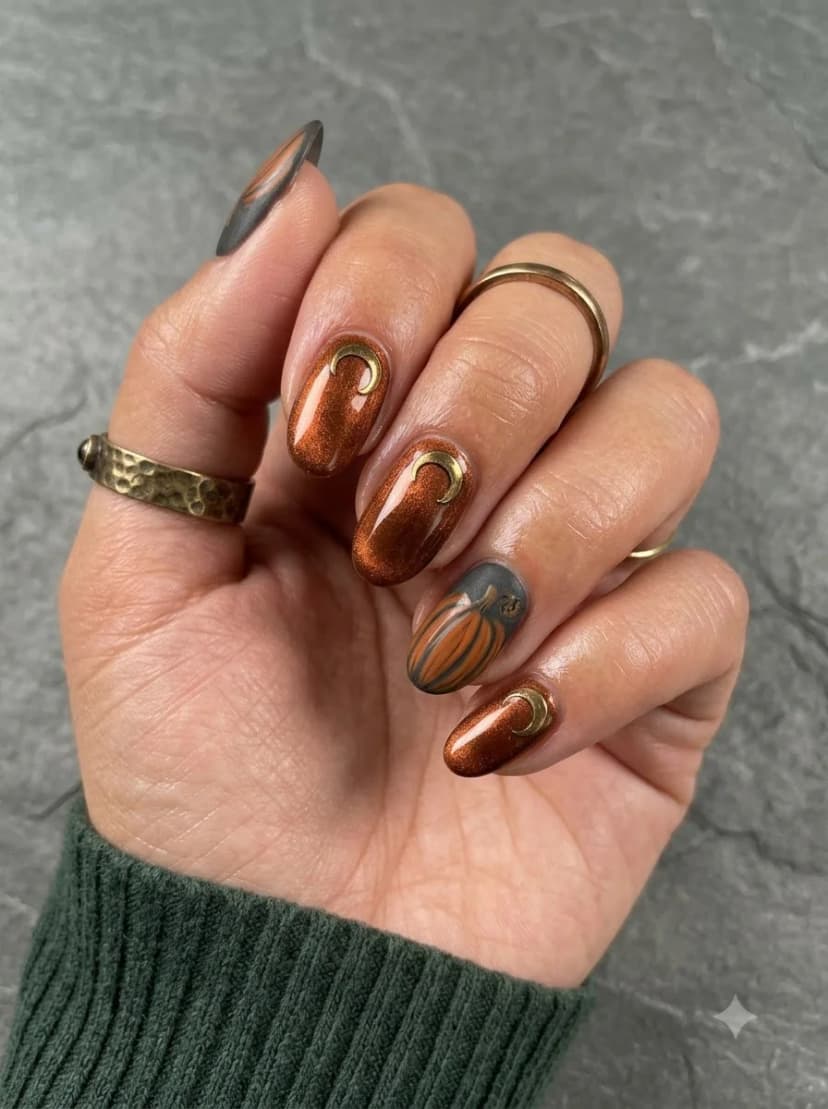
OVERVIEW:
Rich bronze cat-eye polish with a magnetic shimmer that shifts between copper and gold. Two accent nails feature hand-painted pumpkin art on a grey base, with a gold crescent moon detail. The cat-eye finish on the solid nails creates a dimensional, almost liquid-metal quality that catches light from every angle.
The bronze is warm enough to read as autumnal without being overtly Halloween. The pumpkin art on the accent nails grounds the design in the season, but the cat-eye finish on the remaining nails carries the set into November and beyond.
Cat-eye polish requires gel products and a magnet. The burnishing step is non-negotiable for achieving the metallic shift. Without the magnet, you get a standard shimmer polish rather than the concentrated light band that makes cat-eye distinctive.
DESIGN BREAKDOWN:
Metallic cat-eye with seasonal accent art. The bronze finish does most of the work.
- Nail Color Used: Bronze cat-eye gel polish, grey for accent nails, orange and black for pumpkin art.
- Suitable Nail Shape: Almond. The curved surface maximizes the cat-eye effect.
- Design Element: Bronze cat-eye on most nails, hand-painted pumpkin art on accent nails.
- Finish: High-gloss gel top coat.
- Tools Used: Cat-eye magnet, UV or LED lamp, fine detail brush for pumpkin art.
GET THE LOOK AT HOME:
Complete the cat-eye nails first, then paint the pumpkin accents.
- Cat-eye nails: Apply black gel base, cure. Apply bronze cat-eye gel, hold magnet 5mm above for 10 to 15 seconds, cure.
- Accent base: Apply two coats of grey to accent nails, cure.
- Pumpkin art: Using orange polish, paint round pumpkin shapes. Add black vertical lines for the ridges and a small stem.
- Moon detail: Paint a gold crescent moon on one accent nail.
- Seal: Apply glossy gel top coat and cure.
Pro Tip: Keep the pumpkin shapes simple. Two or three curved vertical lines on an orange circle read as a pumpkin from any distance.
11. Deep Plum Gold Moon Star Nails
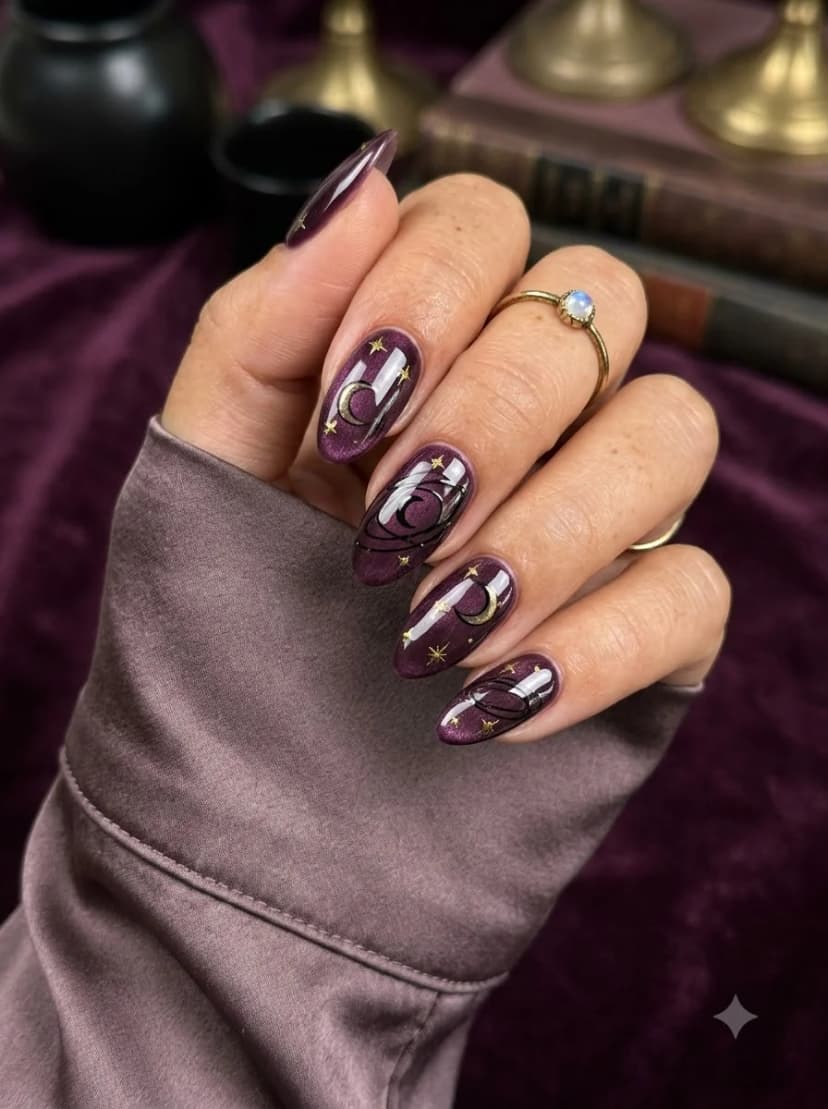
OVERVIEW:
Deep plum shimmer nails combine gold crescent moons and stars with black orbital rings wrapped around plum circular centers. The planned, layered motifs resemble miniature planetary diagrams and feel more alchemist than astronomy.
The almond shape works well here because the curved surface lets the shimmer catch light at multiple angles. The gold details sit on top of the plum without competing with the shimmer, thanks to the metallic contrast between the warm gold and cool purple.
This is a forgiving design for beginners. The stars can be simple four-pointed shapes, the moons are just crescent curves. Imperfection adds to the hand-painted quality rather than detracting from it.
DESIGN BREAKDOWN:
Shimmer base with metallic celestial art. The gold elements pop against the plum.
- Nail Color Used: Deep plum with shimmer particles, gold metallic for moons and stars, and black for orbital linework.
- Suitable Nail Shape: Almond. The tapered shape suits the flowing celestial elements.
- Design Element: Gold moons and stars with black orbital rings surrounding plum circular centers.
- Finish: High-gloss top coat to enhance both the plum shimmer and gold metallic.
- Tools Used: Fine detail and liner brushes for moons, stars, and orbital rings.
GET THE LOOK AT HOME:
Build the central circles and black orbit lines before adding the smaller gold celestial details.
- Plum base: Apply two coats of shimmer plum to all nails. Let dry.
- Orbit motifs: Paint plum circular centers, then surround them with fine black elliptical orbit lines.
- Gold details: Add gold crescent moons and small four-pointed stars around the orbital motifs.
- Seal: Apply a glossy top coat to lock in the design.
Pro Tip: Load your brush fully but not dripping with the gold polish. A dry brush creates scratchy, broken lines. A wet brush creates smooth, flowing curves.


12. Charcoal Copper Drip and Grid Nails
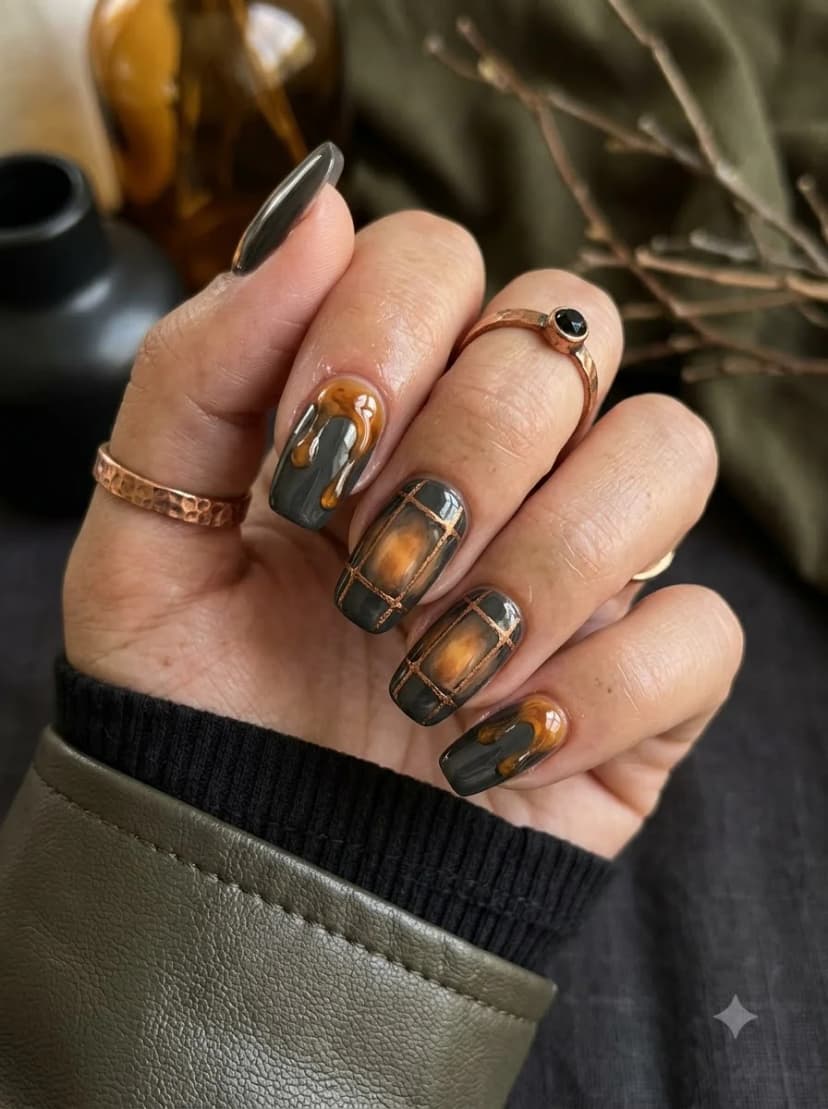
OVERVIEW:
Charcoal gray nails with copper-colored 3D dripping effects on two accent nails. Two more nails combine copper rectangular grid frames with glowing amber panels. The overall effect is industrial and gothic, like rusted metal over aged stone.
The 3D drip effect is created by layering thick drops of copper polish or gel that sit raised above the nail surface. This adds actual texture to the design, which looks striking in person but can snag on fabric. If you prefer a smooth surface, paint the drip shapes flat instead of building them up.
The copper grid pattern is built from thin horizontal and vertical lines framing smoky amber centers. Keeping the rectangular sections narrow preserves the aged-window effect without hiding the charcoal base.
DESIGN BREAKDOWN:
Industrial gothic with mixed techniques. The copper and charcoal combination carries the mood.
- Nail Color Used: Charcoal, copper metallic for drips and grid, black for depth.
- Suitable Nail Shape: Coffin or almond. Both suit the industrial aesthetic.
- Design Element: Mixed techniques: 3D copper drips and copper grid frames around amber panels.
- Finish: High-gloss top coat to seal the 3D elements.
- Tools Used: Striping brush for grid, dotting tool or brush for drip building.
GET THE LOOK AT HOME:
This design takes patience. Each technique needs its own application time.
- Base: Apply two coats of charcoal grey to all nails. Let dry.
- Amber panels: On two nails, blend a smoky amber center while leaving the charcoal visible around it.
- Grid nails: Frame the amber centers with thin copper horizontal and vertical lines.
- Drip nails: Build up thick drops of copper polish at the tips, letting them extend downward in organic drip shapes.
- Seal: Apply a thick top coat to encapsulate everything.
Pro Tip: If building 3D drips feels too risky, paint the drip shapes flat with a detail brush. The visual effect is similar without the texture that catches on things.
13. Grey Cemetery Gates Moon Nails
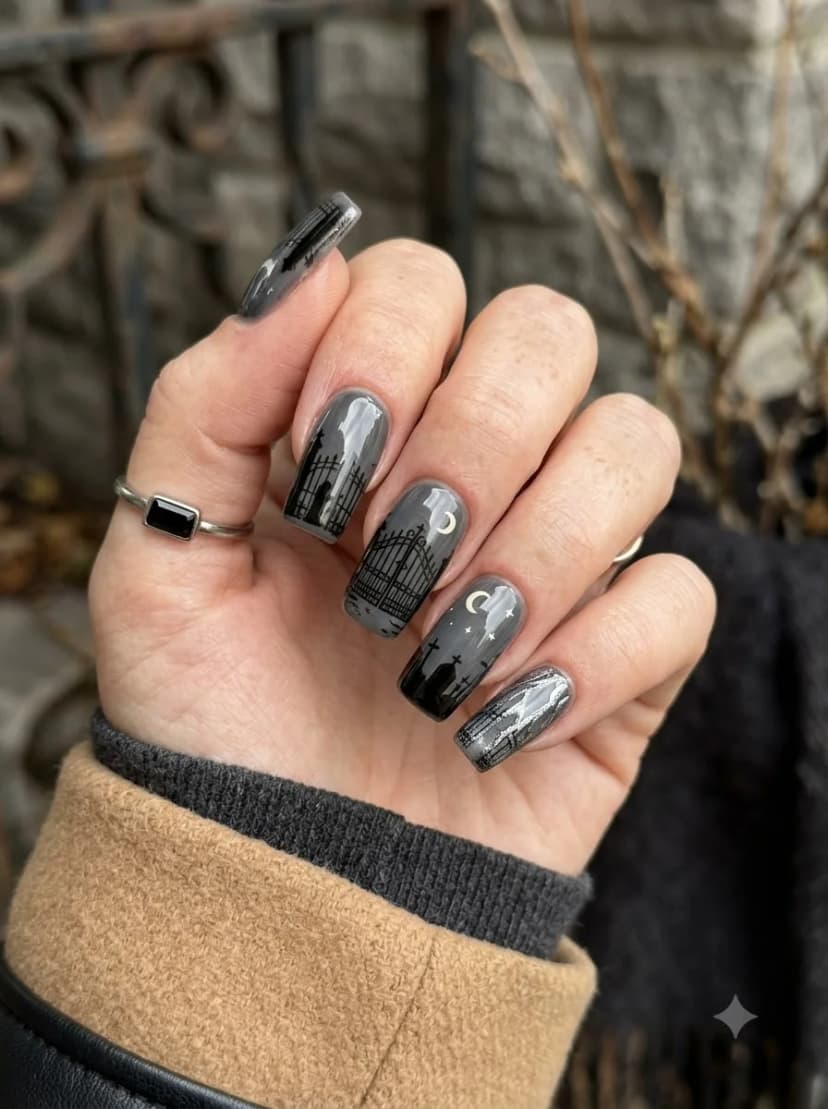
OVERVIEW:
Grey nails with detailed black and white line art depicting cemetery gates, crescent moons, stars, and graveyard silhouettes. Each nail tells part of the scene: one has the ornate iron gates, another shows the moon and stars, and others feature headstone silhouettes and bare trees. The grey base reads as overcast sky.
The detail work here is intricate. The cemetery gates feature individual iron bars and decorative scrollwork. The graveyard silhouettes include varied headstone shapes and bare tree branches. This is a design for someone who enjoys painting fine details and has the patience for it.
The coffin shape provides a flat, elongated canvas that suits the detailed line art. On shorter nails, the cemetery scene would get compressed and lose its narrative quality.
DESIGN BREAKDOWN:
Detailed scene painting across multiple nails. This is the most technically demanding design on this list.
- Nail Color Used: Medium grey base, black and white for line art.
- Suitable Nail Shape: Coffin or long almond. The elongated shape provides canvas for the detailed art.
- Design Element: Cemetery gates, moons, stars, and graveyard silhouettes painted across multiple nails.
- Finish: Glossy top coat to seal the line art.
- Tools Used: Ultra-fine detail brush, white and black polish.
GET THE LOOK AT HOME:
Plan the scene across your nails before you start painting. Sketch it on paper first.
- Grey base: Apply two coats of medium grey to all nails. Let dry.
- Sketch outlines: Using a thin brush and black polish, outline the major shapes on each nail: gates on one, moon on another, headstones on others.
- Fill details: Add the fine details: iron bars on the gates, stars around the moon, branches on trees.
- White highlights: Use white to add moon glow, star highlights, and fence highlights.
- Seal: Apply a generous top coat to smooth out any texture from the layered paint.
Pro Tip: If the detail work feels overwhelming, simplify. Paint just the cemetery gates on one nail and moons on the others. A partial scene still reads as intentional.


14. Terracotta Butterfly Wing Chrome Nails
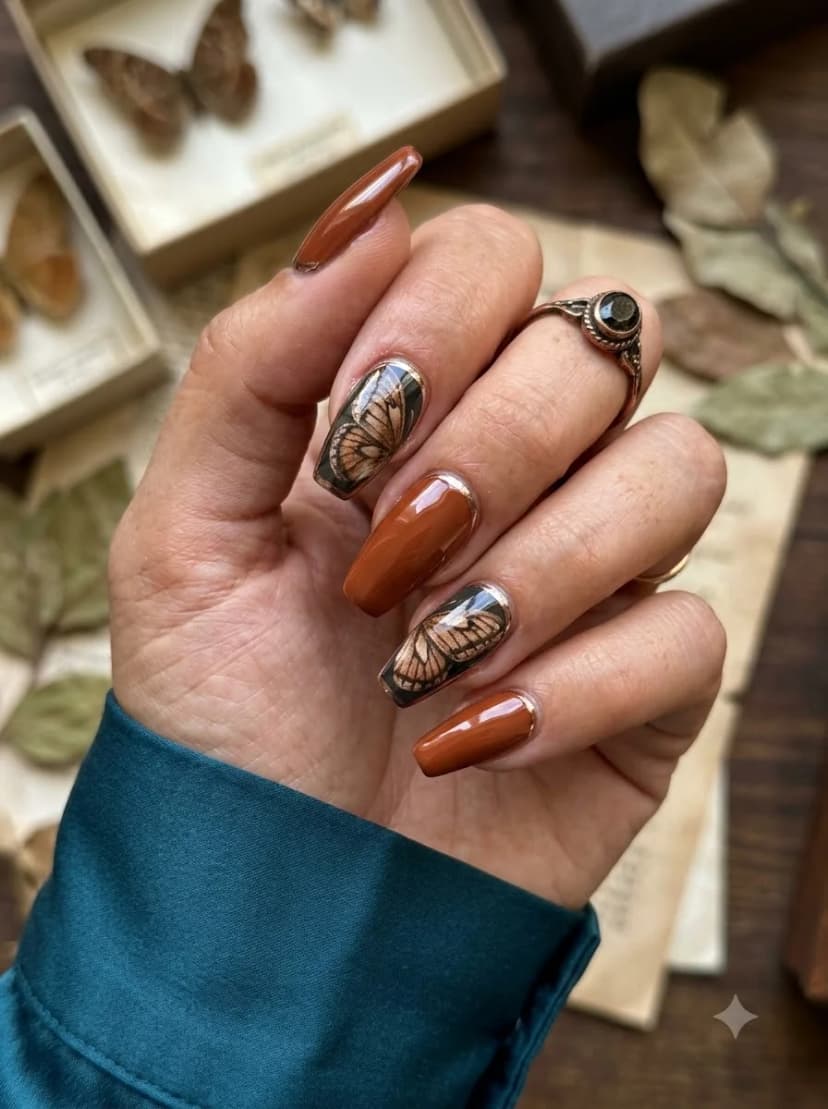
OVERVIEW:
Rich terracotta nails alternate with two reflective silver-chrome accents featuring detailed beige and brown butterfly wings. Dark outlines define the wing cells while the mirrored background gives the naturalist design a jewelry-like finish.
The butterfly detail is built from translucent cream and tan sections separated by fine brown-black veins. A decal can reproduce the delicate pattern more reliably, while confident painters can build it with a very fine liner.
The coffin shape provides a flat surface that lets the wing pattern spread naturally. On almond nails, the wings would curve with the nail surface, which also works but changes the proportions.
DESIGN BREAKDOWN:
Naturalist art on a warm base. The butterfly wings are the centerpiece.
- Nail Color Used: Terracotta brown, silver chrome, cream, tan, and dark brown-black for the wings.
- Suitable Nail Shape: Coffin or almond. Both suit the detailed wing art.
- Design Element: Solid terracotta nails with two silver-chrome butterfly-wing accents.
- Finish: High-gloss top coat to seal the art.
- Tools Used: Chrome powder and applicator, fine liner brush or butterfly-wing decals, and tweezers.
GET THE LOOK AT HOME:
Complete the terracotta nails first, then build the reflective butterfly accents separately.
- Terracotta nails: Apply two coats of rich terracotta to the solid nails. Let dry.
- Chrome accents: Apply and burnish silver chrome over the two accent nails.
- Wing cells: Add translucent cream and tan wing sections, or place thin butterfly-wing decals over the chrome.
- Veins: Define the cells with fine brown-black lines and a darker outer edge.
- Seal: Apply a glossy top coat to everything.
Pro Tip: Keep some silver chrome visible around the wings. That reflective border is what separates this set from a standard butterfly manicure.
15. Dark Plum Red Spider Lily Nails
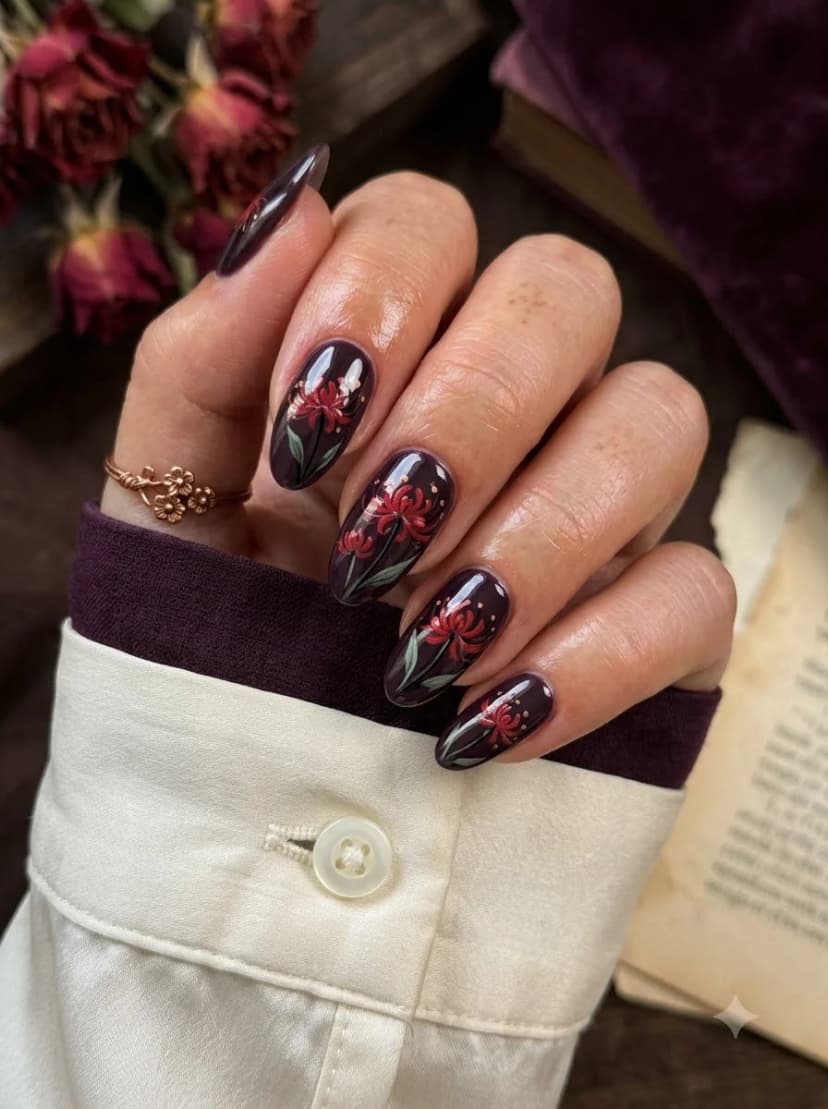
OVERVIEW:
Deep plum or dark purple nails with hand-painted red spider lily flowers and green leaves. The spider lilies are painted in a loose, illustrative style with layered red petals and thin green stems. The dark base makes the red flowers pop dramatically. Small gold dot accents scattered among the flowers add a subtle metallic touch.
Spider lilies are associated with death and final goodbyes in several cultures, which gives this design a layered Halloween meaning beyond just aesthetics. The flower shape is distinctive: long, curved petals that radiate outward like spider legs.
The painting style is loose and organic rather than precise. The petals blend into each other slightly, which gives them a watercolor quality. Trying to paint each petal individually usually results in something stiff rather than natural.
DESIGN BREAKDOWN:
Dark base with botanical horror art. The spider lilies are beautiful but carry symbolic weight.
- Nail Color Used: Deep plum base, red for flowers, green for stems, gold for dot accents.
- Suitable Nail Shape: Almond. The organic shape complements the floral art.
- Design Element: Hand-painted red spider lilies with green leaves and gold dot accents.
- Finish: Glossy top coat to seal the artwork.
- Tools Used: Small detail brush for flowers and stems.
GET THE LOOK AT HOME:
Paint the flowers loosely. Spider lilies look better when they are not perfectly defined.
- Base: Apply two coats of deep plum to all nails. Let dry.
- Stems: Using a detail brush and green polish, paint thin curved stems on each nail.
- Petals: Using red polish, paint long, curved petal shapes radiating outward from the stem tops. Keep the strokes loose.
- Gold dots: Add small gold dots scattered around the flowers for accents.
- Seal: Apply a glossy top coat to lock everything in.
Pro Tip: Dilute your red polish slightly with a drop of top coat to create a watercolor consistency. This makes the petals look more organic and less like stamped shapes.


16. Brown Cat-Eye Chrome Swirl Nails
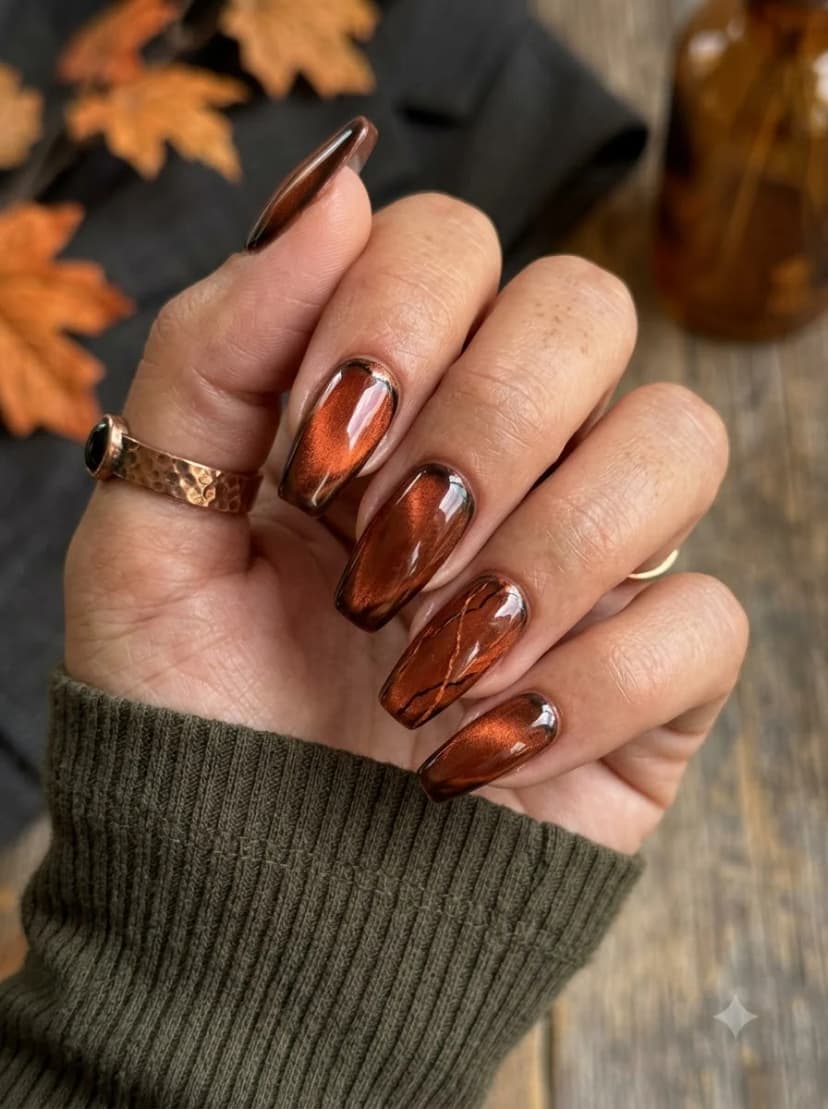
OVERVIEW:
Rich brown cat-eye polish with a swirling chrome effect that creates depth and movement across each nail. The magnetic particles catch light in flowing patterns that shift between dark chocolate and warm copper depending on the angle. The almond shape maximizes the light-refracting quality of the cat-eye finish.
DESIGN BREAKDOWN:
Warm magnetic base with swirling metallic movement. The cat-eye effect creates dimension without complex art.
- Nail Color Used: Brown cat-eye gel polish over black base.
- Suitable Nail Shape: Almond or coffin.
- Design Element: Brown cat-eye base with magnetic chrome swirl effect.
- Finish: Glossy gel top coat to enhance depth and protect the magnetic particles.
- Tools Used: Cat-eye magnet, UV or LED lamp.
GET THE LOOK AT HOME:
Work one nail at a time. The magnet must be held over wet cat-eye gel before curing.
- Base: Apply black gel base to all nails. Cure under lamp for 30 seconds.
- Cat-eye coat: Apply a thin layer of brown cat-eye gel polish over the black base. Do not cure yet.
- Magnet: Hold the cat-eye magnet above the wet polish for 10 to 15 seconds. Move it slowly to create the swirling light pattern.
- Cure: Immediately cure under the lamp to lock the magnetic pattern in place before it disperses.
- Seal: Apply glossy gel top coat and cure one final time for a smooth, high-shine finish.
Pro Tip: Use a black base coat under the brown cat-eye. It makes the color appear deeper and the magnetic line more pronounced.
17. Blue-Grey Silver Chrome Stripe Gem Nails
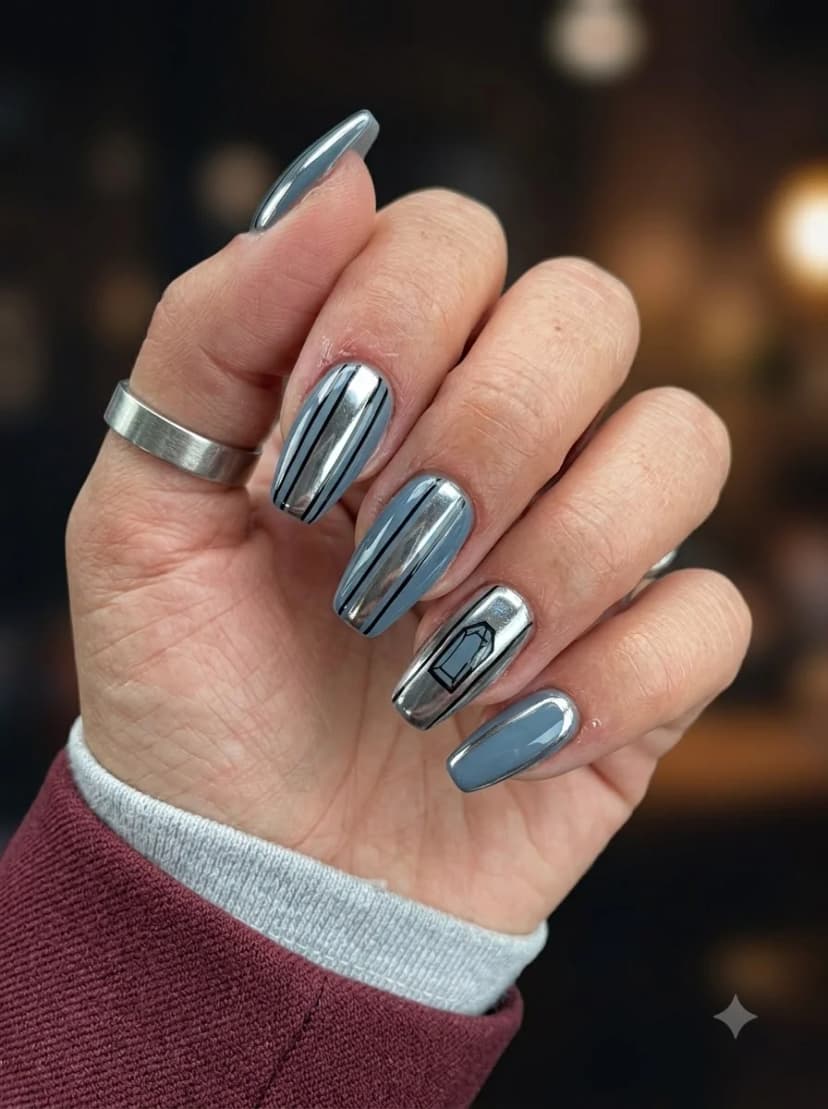
OVERVIEW:
Blue-grey and mirror-silver chrome alternate across this coffin-shaped set. Two nails layer slim black pinstripes over blue-grey panels and chrome, one chrome nail carries a black outlined gemstone, and one nail remains solid blue-grey for balance.
DESIGN BREAKDOWN:
Mixed blue-grey and mirror chrome surfaces with precise black pinstripes and one geometric gemstone outline.
- Nail Color Used: Blue-grey, silver chrome, and black for pinstripes and the gem outline.
- Suitable Nail Shape: Coffin. The flat surface suits the geometric precision.
- Design Element: Mixed solid blue-grey, chrome panels, black pinstripes, and one outlined gem accent.
- Finish: Non-wipe gel top coat to seal the chrome powder.
- Tools Used: Striping brush, chrome powder, detail brush.
GET THE LOOK AT HOME:
Plan which nails will stay blue-grey, receive chrome, or combine both finishes before adding the black details.
- Blue-grey base: Apply two coats to every nail and cure, leaving one nail solid.
- Chrome: Burnish silver chrome over selected full nails and narrow vertical panels.
- Pinstripes: Add thin black vertical lines along the edges of the blue-grey and chrome panels.
- Gem accent: On the accent nail, outline a geometric gem shape with the same black polish and fine brush.
- Seal: Apply a non-wipe gel top coat to lock the chrome and prevent scratching.
Pro Tip: Burnish the chrome powder firmly with a sponge applicator. Light pressure creates glitter rather than a mirror finish.


18. Grey Silver Geometric Faceted Nails
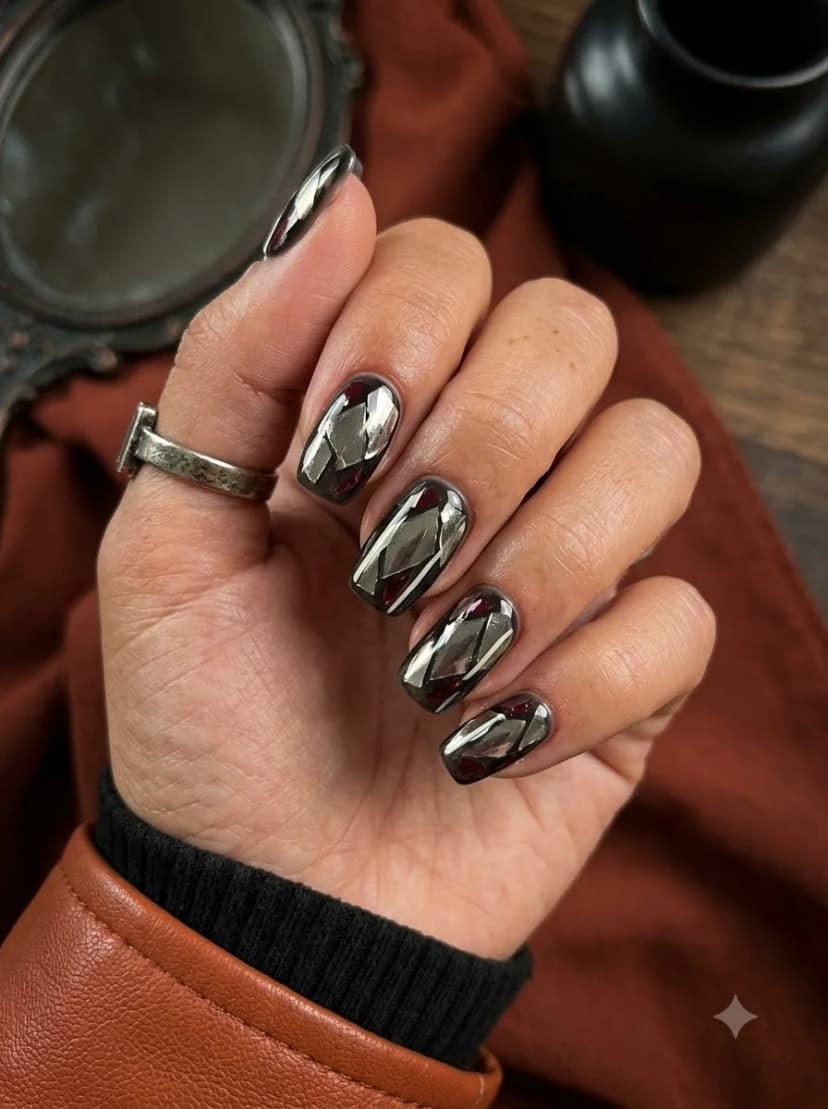
OVERVIEW:
Grey and silver geometric nails with a faceted, shattered-mirror appearance. Each nail features angular shapes that catch light differently, creating a three-dimensional effect that looks like polished metal or cut gemstone. The overall impression is industrial and modern, with a gothic edge.
DESIGN BREAKDOWN:
Industrial metallic art with 3D faceted geometry. Clean lines are critical.
- Nail Color Used: Grey base, silver chrome for faceted geometric shapes, with black and deep burgundy shadow sections between the reflective facets.
- Suitable Nail Shape: Short oval, almond, or squoval. The compact shape keeps the facets dense.
- Design Element: Angular faceted geometric shapes in grey and silver chrome.
- Finish: High-gloss top coat to enhance reflections.
- Tools Used: Striping brush, chrome powder, detail brush.
GET THE LOOK AT HOME:
Outline angular facets first, then fill alternating sections for dimensional contrast.
- Base: Apply two coats of medium grey polish. Let dry completely.
- Geometric layout: Using a fine brush and silver chrome, outline angular, faceted shapes on each nail. Think triangles and trapezoids that catch light at different angles.
- Fill sections: Fill alternating facets with silver chrome polish, leaving some sections grey for contrast.
- Refine edges: Use a thin brush to sharpen the lines between facets. Clean edges make the 3D effect convincing.
- Seal: Apply a high-gloss top coat to enhance the reflective quality of the chrome facets.
Pro Tip: Keep the geometric lines thin and precise. Thick lines make the faceted effect look heavy rather than sharp.
19. Grey Googly Eyes Nails
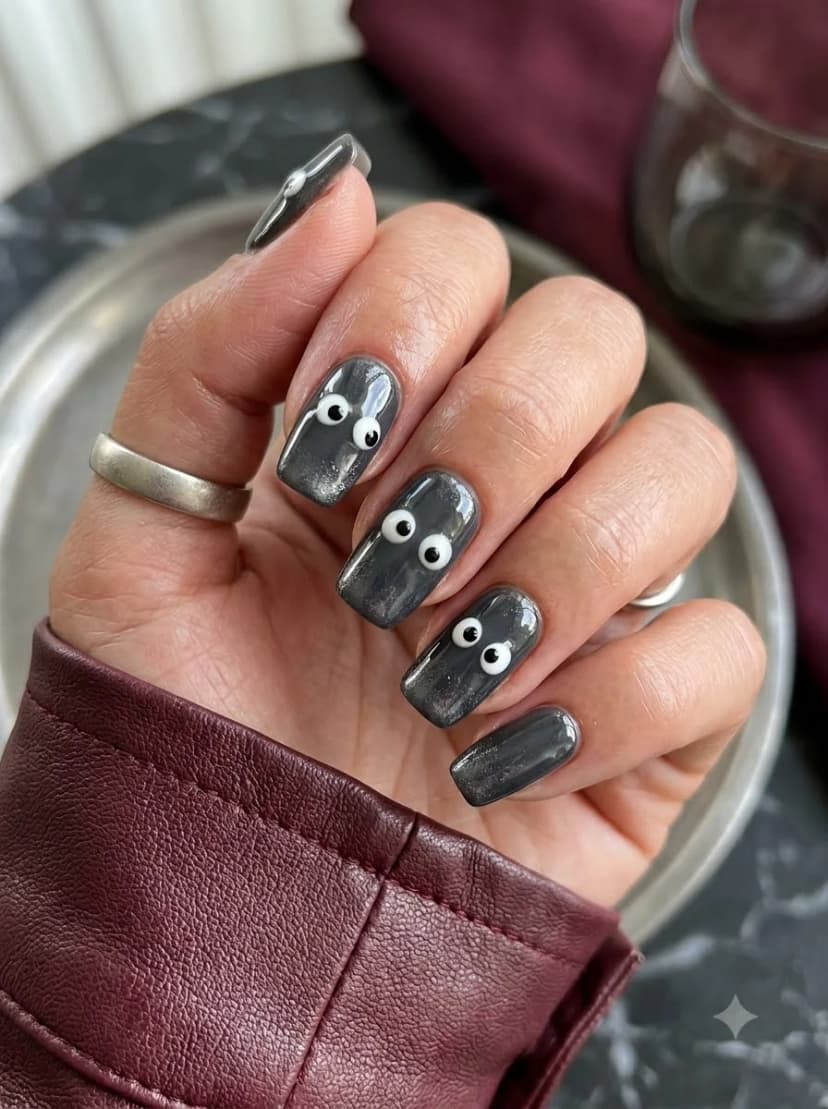
OVERVIEW:
Dark grey nails with white and black googly eyes painted on them. The eyes are scattered across each nail in different sizes and orientations, some looking left, others right, some straight ahead. The effect is playful and slightly unsettling, perfect for Halloween without being genuinely creepy. The grey base keeps everything muted.
DESIGN BREAKDOWN:
Playful Halloween pattern on a neutral muted base. Eyeball placement adds character.
- Nail Color Used: Dark grey base, white and black for googly eyes.
- Suitable Nail Shape: Short square or squoval. The compact shape works for the playful details.
- Design Element: Scattered hand-painted googly eyes in varying sizes and gaze directions.
- Finish: Glossy top coat to protect dots.
- Tools Used: Dotting tool, fine detail brush.
GET THE LOOK AT HOME:
Use dotting tools of different sizes for the white circles, then offset black dots for pupils.
- Base: Apply two coats of dark grey polish. Let dry fully.
- White circles: Using a dotting tool and white polish, paint circles of varying sizes across each nail. Place them randomly for a scattered effect.
- Pupils: Add black dots inside each white circle. Offset the pupils slightly left, right, or center to create the googly-eye effect.
- Vary directions: Make sure some eyes look left, others right, and some straight ahead. Uniform direction kills the playful effect.
- Seal: Apply a glossy top coat to protect the painted details.
Pro Tip: Vary the eye directions on each nail. Eyes all looking the same way looks uniform rather than playful.


20. Silver Chrome Starburst Swirl Nails
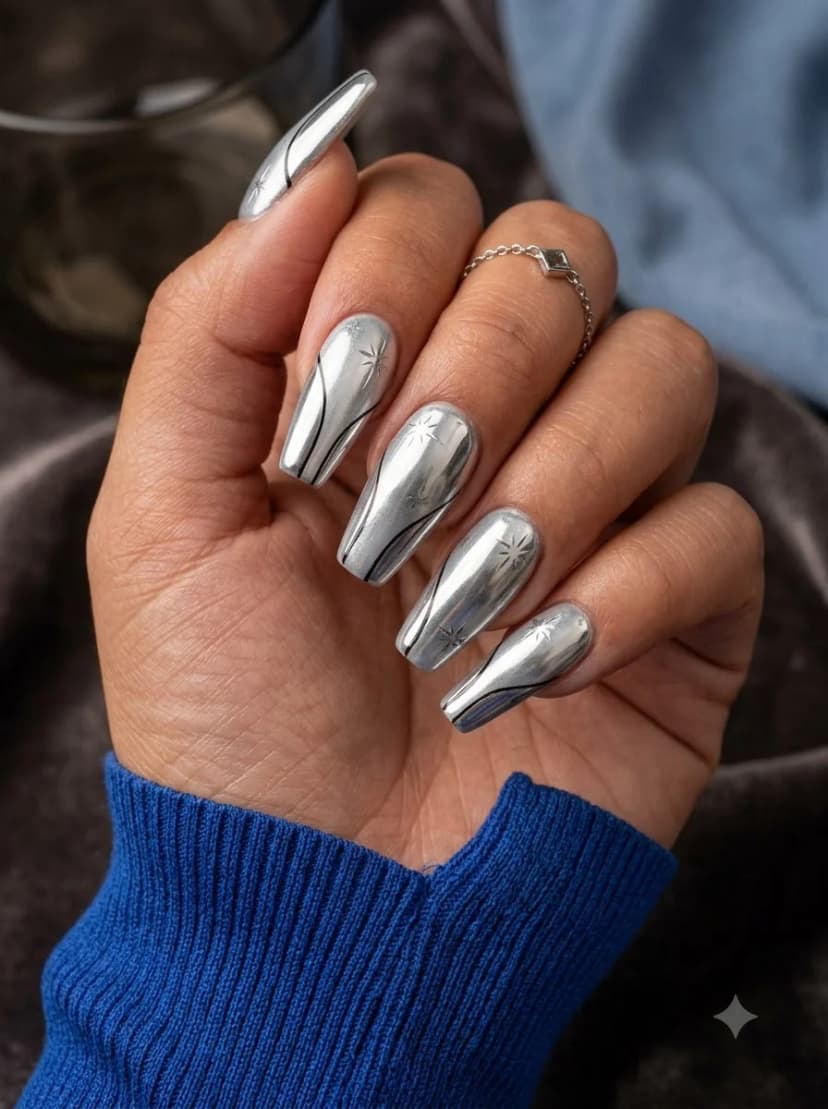
OVERVIEW:
Silver chrome nails combine black and smoke-grey swooping lines with subtle etched grey starbursts. The mirror base reflects everything around it, while the mixed line weights create a fluid celestial pattern.
DESIGN BREAKDOWN:
Liquid silver base with black line work. Celestial starbursts create a mystical mood.
- Nail Color Used: Silver chrome base, black for the strongest swoops, and smoke-grey for shadow lines and starbursts.
- Suitable Nail Shape: Almond or coffin.
- Design Element: Mirror silver chrome base with black and grey swooping lines with etched grey starbursts.
- Finish: Non-wipe gel top coat to lock the chrome.
- Tools Used: Fine detail brush for starburst patterns.
GET THE LOOK AT HOME:
Keep brush well-loaded with black polish to ensure smooth, continuous lines over chrome.
- Chrome base: Apply silver chrome powder over a cured base and burnish to a mirror finish.
- Starbursts: Use smoke-grey polish to add subtle radiating starbursts across the chrome.
- Swirls: Add black and grey swooping lines that taper along the sides of each nail.
- Balance: Keep the density consistent across all nails. Too many elements on one nail makes the set look uneven.
- Seal: Apply a non-wipe gel top coat to protect the chrome and painted details.
Pro Tip: Keep your brush loaded with black polish for smooth, flowing swirl lines. A dry brush creates scratchy, broken lines.
21. Cobalt Blue Moon Stars Eye Nails
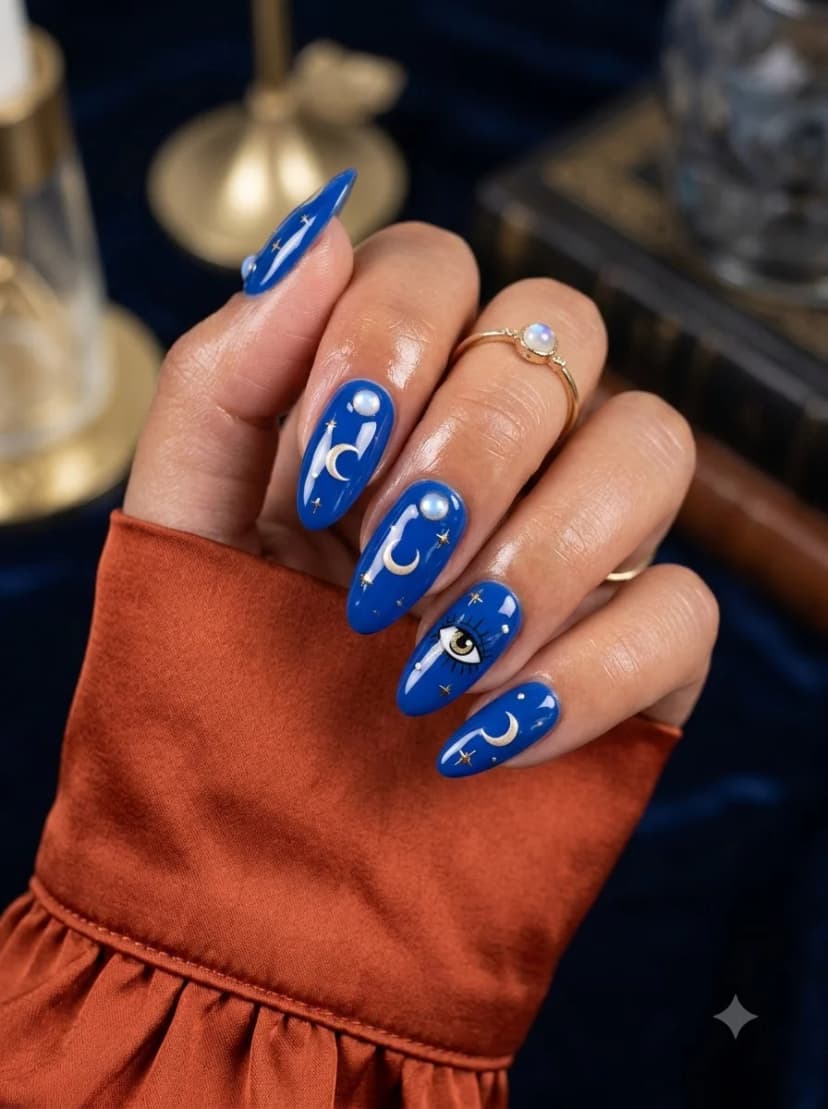
OVERVIEW:
Bright cobalt blue nails with white crescent moons, gold stars, and an evil eye design on one accent nail. Small pearl embellishments sit near some of the moons. The blue is bold and saturated, creating a vivid backdrop for the white and gold celestial details. The evil eye adds a protective, mystical element to the set.
DESIGN BREAKDOWN:
Bold jewel-tone celestial set with 3D pearl embellishments and symbolic accent art.
- Nail Color Used: Cobalt blue base, white for moons, gold for stars, pearl accents.
- Suitable Nail Shape: Almond. The tapered shape suits the flowing details.
- Design Element: Deep blue base with white moons, gold stars, evil eye accent, and pearl studs.
- Finish: Glossy top coat encapsulating pearls.
- Tools Used: Detail brush for moons and stars, dotting tool.
GET THE LOOK AT HOME:
Paint celestial motifs first, then attach pearls into wet top coat for strong placement.
- Base: Apply two coats of cobalt blue polish. Let dry completely.
- Moons: Using a detail brush and white polish, paint crescent moon shapes on select nails.
- Stars: Paint small gold star shapes scattered around the moons. Keep them delicate.
- Evil eye: On the accent nail, paint the evil eye design with concentric circles in white, blue, and black.
- Pearls: Place small pearl embellishments near the moons using top coat as adhesive.
- Seal: Apply a generous top coat to encapsulate the pearls and seal all details.
Pro Tip: Place the evil eye on your ring finger for the most visible accent position.


22. Emerald Green Stained Glass Window Nails
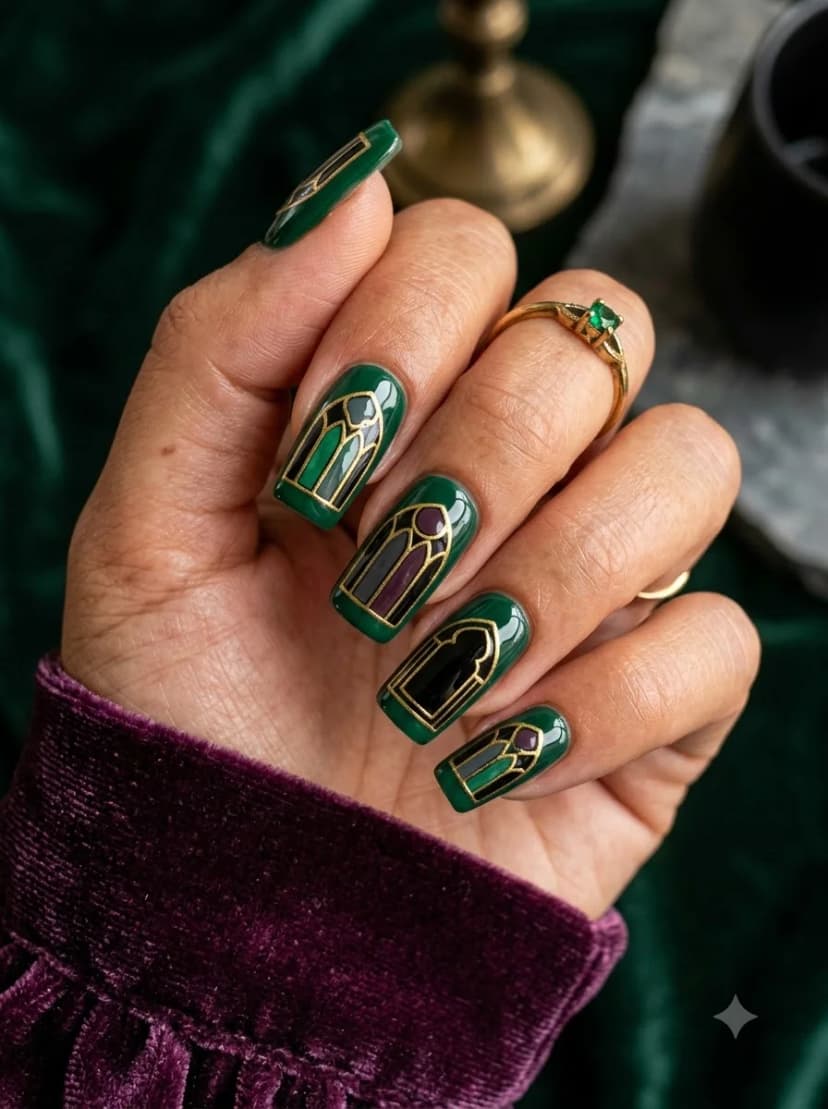
OVERVIEW:
Deep forest green nails with gold-outlined stained glass window patterns. Each accent nail features arched window shapes filled with translucent sections of teal, purple, and green, separated by thin gold lines. The overall effect is distinctly gothic, resembling cathedral windows. The green base is rich and saturated.
DESIGN BREAKDOWN:
Gothic cathedral window art with gold leading and jewel-toned translucent color blocks.
- Nail Color Used: Deep forest green, gold for outlines, teal and purple for glass sections.
- Suitable Nail Shape: Almond or coffin.
- Design Element: Forest green base with gold-framed cathedral arch stained glass windows.
- Finish: High-gloss top coat to enhance stained glass transparency.
- Tools Used: Ultra-fine detail brush for intricate line work.
GET THE LOOK AT HOME:
Outline the gothic arches in gold first, then fill window panes with sheer stained glass colors.
- Base: Apply two coats of deep forest green. Let dry fully.
- Gold outlines: Using a fine brush and gold polish, outline arched window shapes on the accent nails.
- Fill sections: Fill the window sections with translucent teal, purple, and lighter green to create the stained glass effect.
- Refine: Add thin gold lines between the colored sections to simulate the leading in stained glass.
- Seal: Apply a high-gloss top coat to enhance the jewel-toned colors.
Pro Tip: Keep the gold outlines as thin as possible. Thick lines make the stained glass look heavy rather than delicate.
23. Chocolate Brown Gold Line Nails
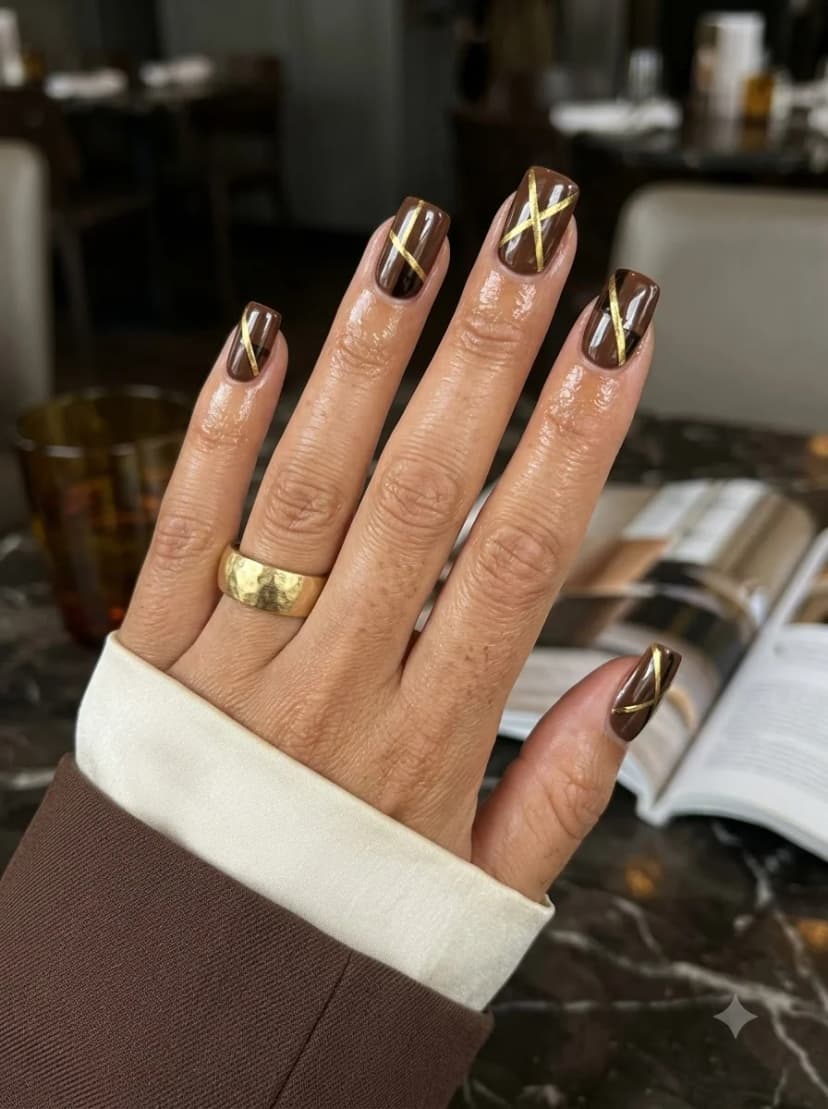
OVERVIEW:
Chocolate brown nails with thin diagonal gold lines crossing once or twice to create simple X-shaped patterns. The lines are precise and metallic, catching light against the deep brown base. The effect is minimal and sophisticated, more art deco than Halloween, but the dark palette keeps it seasonal. The coffin shape provides a flat surface for the clean line work.
DESIGN BREAKDOWN:
Geometric linear art on a warm moody brown. Precise line placement creates understated art deco elegance.
- Nail Color Used: Chocolate brown base, gold metallic for diagonal lines.
- Suitable Nail Shape: Almond or coffin. Both complement the warm tones.
- Design Element: Deep brown base with crisscrossing metallic gold diagonal lines.
- Finish: Glossy top coat to seal metallic line work.
- Tools Used: Striping brush for geometric lines.
GET THE LOOK AT HOME:
Use a long striping brush or tape to keep each minimal diagonal crisp.
- Base: Apply two coats of chocolate brown polish. Let dry completely.
- First diagonal: Paint one thin gold diagonal across each nail, varying the direction.
- Cross lines: Add a second diagonal to selected nails to create a single clean X rather than a grid.
- Variation: Leave some nails with one diagonal and others with two intersecting lines.
- Seal: Apply a glossy top coat to protect the gold lines from chipping.
Pro Tip: Use striping tape to mask sections if you want perfectly straight diagonal lines.


24. Dark Green Black Occult Symbol Nails
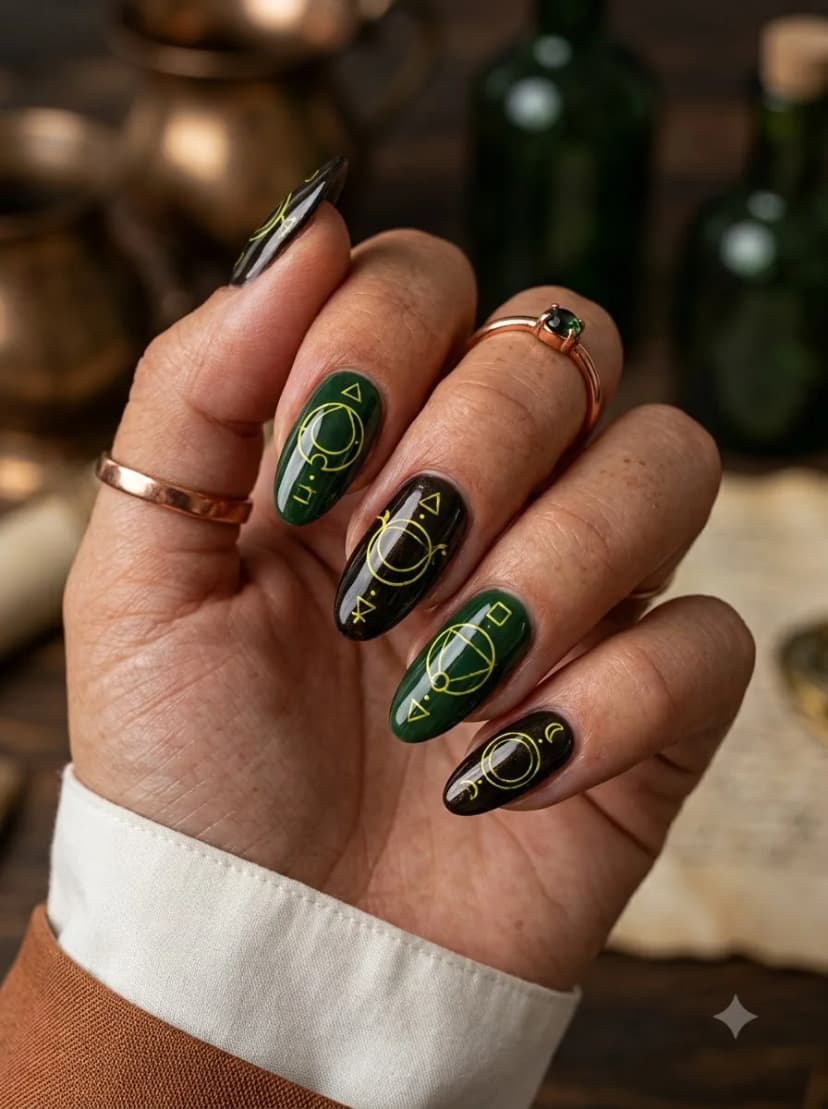
OVERVIEW:
Alternating dark green and black nails carry gold occult symbols and alchemy circles painted across them. The symbols include crescent moons, triangles, circles with dots, and other mystical sigils. The gold metallic paint stands out sharply against both deep base colors. The overall effect is like pages from a grimoire or alchemist's notebook.
DESIGN BREAKDOWN:
Mystical grimoire art alternating dark emerald and black. Metallic gold sigils unify both base colors.
- Nail Color Used: Dark green and black bases, gold metallic for occult symbols and circles.
- Suitable Nail Shape: Almond. The tapered shape suits the flowing details.
- Design Element: Alternating forest-green and black nails with gold alchemical sigils and geometry.
- Finish: Glossy top coat for depth.
- Tools Used: Fine detail brush for occult symbols.
GET THE LOOK AT HOME:
Reference actual alchemy diagrams to keep symbols crisp and authentically spaced.
- Base: Alternate two coats of dark green and black polish across the hand. Let dry fully.
- Symbols: Using a fine brush and gold metallic polish, paint occult symbols across each nail. Include crescent moons, triangles, and circles with dots.
- Alchemy circles: On select nails, paint larger circular sigils with smaller symbols inside them.
- Placement: Spread the symbols unevenly across each nail for an authentic, grimoire-like appearance.
- Seal: Apply a glossy top coat to protect the gold paint and add depth to the green base.
Pro Tip: Look up real alchemy symbols for reference. The specific shapes carry historical meaning.
25. Purple Grey French Tip Nails
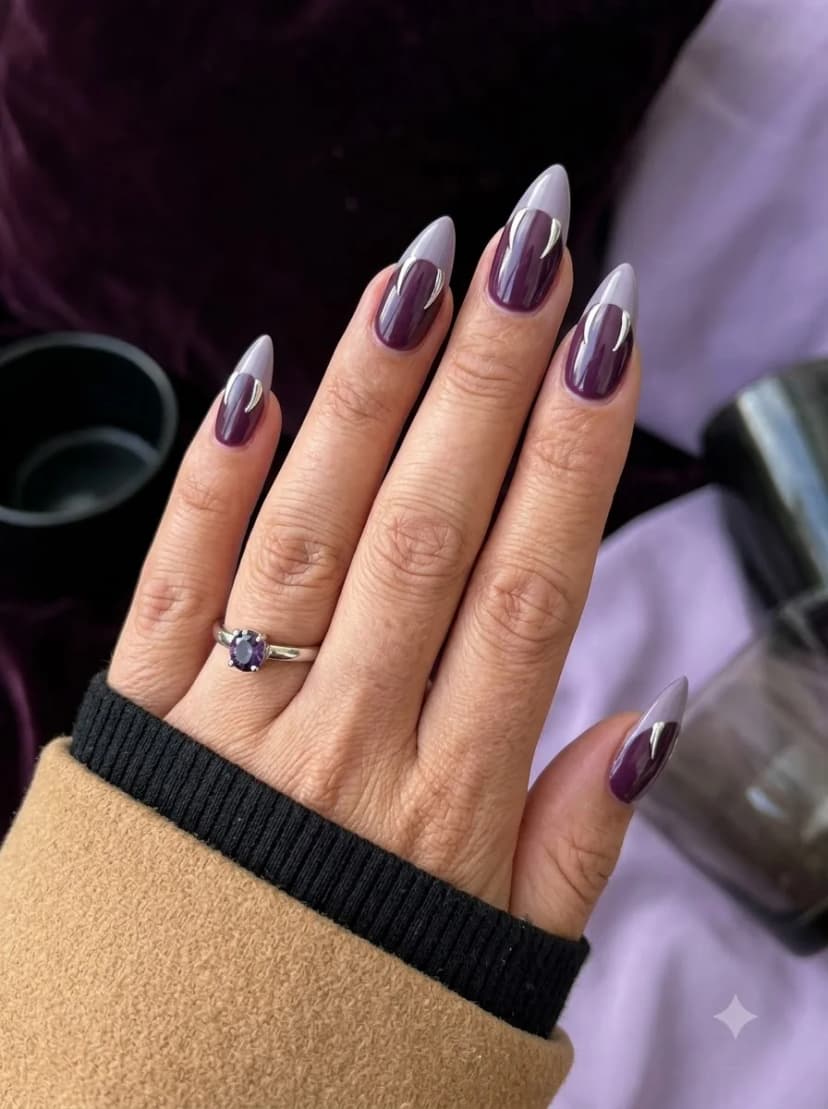
OVERVIEW:
Purple nails with grey or lavender French tips, accented with silver chrome lines where the two colors meet. The purple base is rich and saturated, while the lighter tips create a soft contrast. The silver line at the smile line adds a metallic detail that elevates the simple French format. The stiletto or almond shape suits the elegant color combination.
DESIGN BREAKDOWN:
Two-tone moody French tip with silver smile line framing. Classic elegance with gothic hues.
- Nail Color Used: Purple base, grey or lavender for tips, silver chrome for the accent line.
- Suitable Nail Shape: Stiletto or almond. The pointed shape enhances the dramatic aesthetic.
- Design Element: Rich purple base, grey/lavender French tips, silver chrome smile line border.
- Finish: High-gloss top coat.
- Tools Used: French tip guides or liner brush, detail brush.
GET THE LOOK AT HOME:
Clean smile lines are key; add the silver line right at the junction to hide minor imperfections.
- Base: Apply two coats of rich purple polish. Let dry completely.
- French tips: Using French tip guides or a liner brush, paint grey or lavender tips on each nail.
- Silver line: At the smile line where the purple meets the tip color, paint a thin silver chrome line using metallic polish and a striping brush.
- Clean edges: Remove French tip guides while the polish is still slightly wet for the sharpest line.
- Seal: Apply a glossy top coat to seal all layers and add shine.
Pro Tip: Peel off French tip guides while the tip color is still slightly wet for the cleanest smile line.


26. Clear Pressed Flower Nails
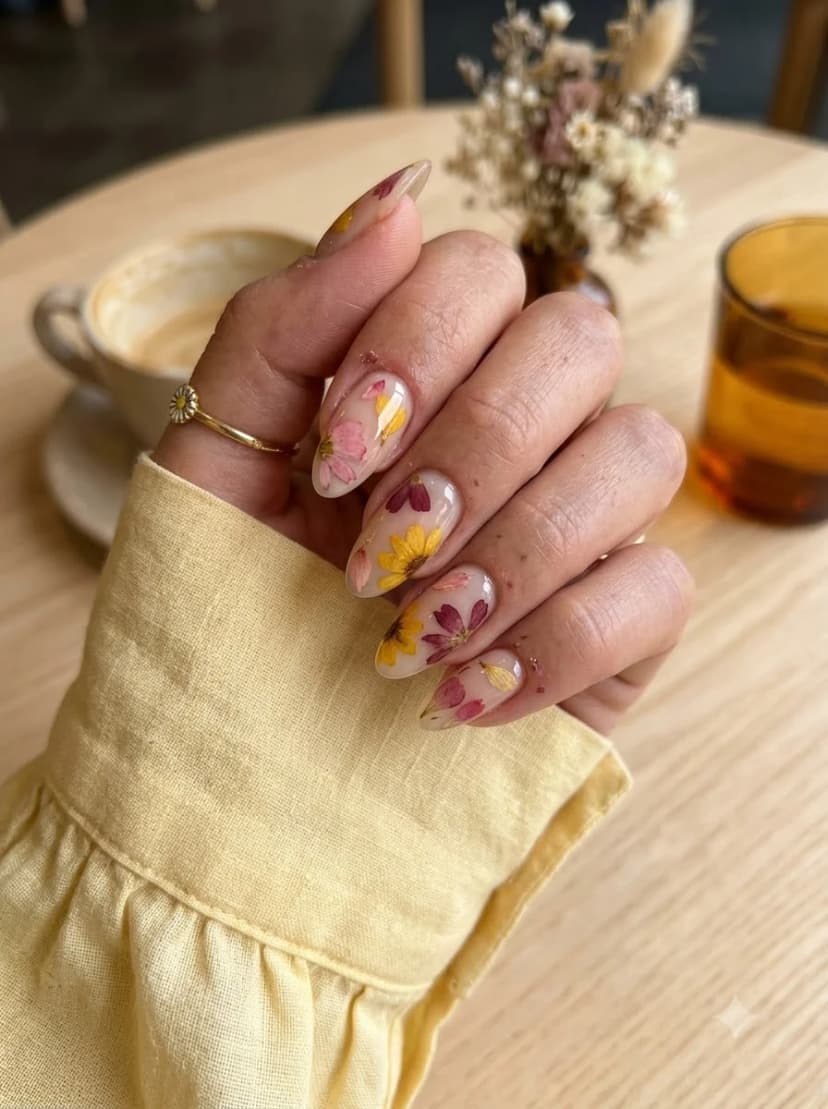
OVERVIEW:
Clear or sheer nude nails with actual pressed flowers embedded in the polish. Pink, yellow, and burgundy dried flowers sit flat against the nail surface, sealed under clear top coat. The effect is botanical and delicate, like specimens preserved in resin. This design works for anyone who wants a natural, non-gothic take on fall nails.
DESIGN BREAKDOWN:
Botanical specimen art using real dried flowers encapsulated in crystal-clear gel or top coat.
- Nail Color Used: Clear or sheer nude base, dried pressed flowers, clear top coat.
- Suitable Nail Shape: Almond. The organic shape suits the botanical art.
- Design Element: Encapsulated dried flowers over sheer nude base.
- Finish: Ultra-glossy thick top coat to level surface.
- Tools Used: Tweezers for flower placement, clear top coat.
GET THE LOOK AT HOME:
Ensure flowers lie completely flat before sealing under multiple top coat layers.
- Base: Apply one coat of sheer nude polish. Let it dry for one minute but keep it slightly tacky.
- Flower placement: Using tweezers, press dried flowers flat onto the nail surface. Arrange them randomly for a botanical look.
- Press flat: Gently press each flower to ensure it lies completely flat against the nail. Raised edges will catch and lift.
- Seal layers: Apply two to three layers of clear top coat, letting each dry fully, to fully encapsulate the flowers.
- Smooth: If the surface feels uneven, apply one final thick coat of top coat to level everything out.
Pro Tip: Make sure flowers are completely flat before sealing. Raised edges will catch on things and lift the top coat.
27. Mustard Orange Crow Feather Nails
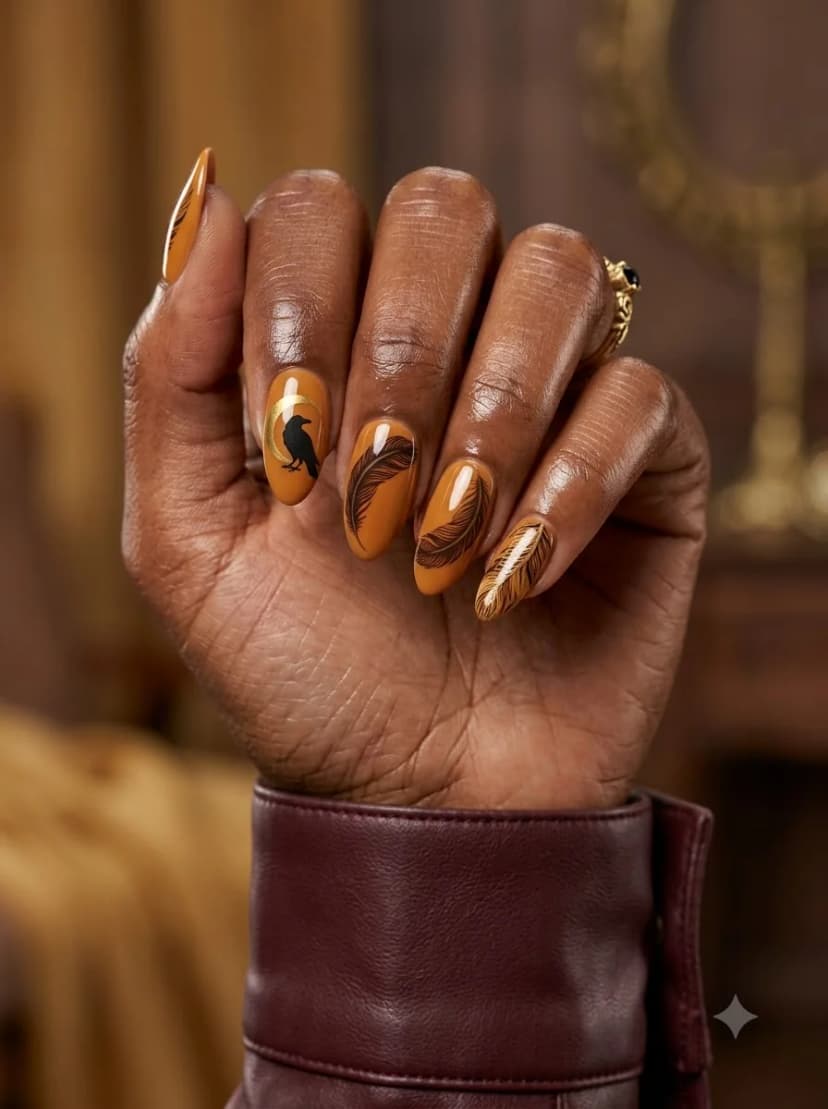
OVERVIEW:
Mustard orange nails with hand-painted black crow silhouettes and detailed feather art on accent nails. The crow is depicted in profile with spread wings, and the feather art shows individual barbs and quill details. The warm orange base contrasts sharply with the black line work, making the bird imagery pop. The almond shape suits the illustrative style.
DESIGN BREAKDOWN:
Illustrative crow and feather art on a warm autumnal orange background.
- Nail Color Used: Mustard orange base, black for crow and feather details.
- Suitable Nail Shape: Almond or coffin. Both suit the detailed illustration.
- Design Element: Solid mustard orange base with black crow silhouette and feather artwork.
- Finish: Glossy top coat.
- Tools Used: Fine detail brush for illustration.
GET THE LOOK AT HOME:
Block out the solid crow silhouette first before adding delicate feather barbs along edges.
- Base: Apply two coats of mustard orange polish. Let dry completely.
- Crow silhouette: On accent nails, use a fine brush and black polish to paint a crow in profile with spread wings.
- Feather details: Add individual feather barbs and quill details with thinner brush strokes.
- Balance: Keep the remaining nails solid orange to let the crow art be the focal point.
- Seal: Apply a glossy top coat to protect the detailed illustration.
Pro Tip: Paint the crow in silhouette first, then add feather details with thinner strokes.


28. Dark Green Vine Leaf Art Nails
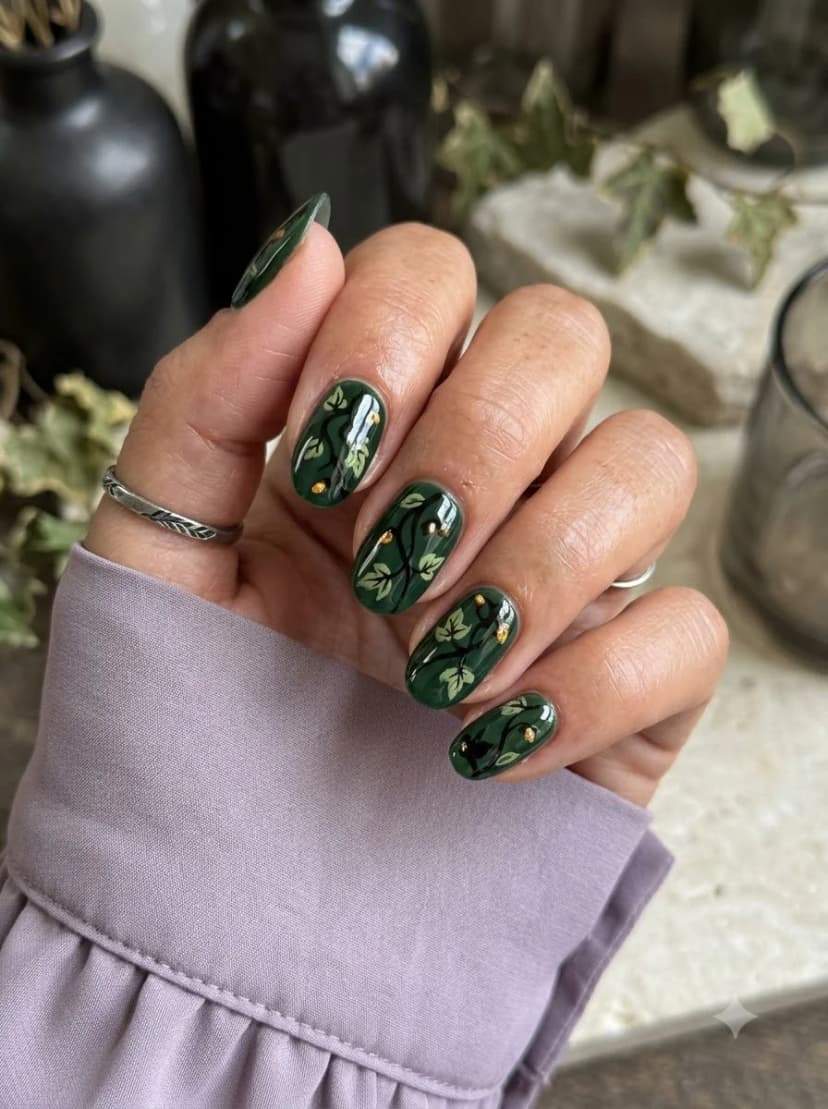
OVERVIEW:
Dark forest green nails with hand-painted vine and leaf art. The vines wind across each nail with small leaves branching off. Some nails feature tiny gold berry or bud accents among the greenery. The overall effect is botanical and organic, like pressed ivy or woodland foliage. The green base is deep enough to read as moody without being overtly Halloween.
DESIGN BREAKDOWN:
Moody foliage art with winding vines, leaves, and metallic gold berry accents.
- Nail Color Used: Dark forest green base, lighter green and gold for vine art.
- Suitable Nail Shape: Almond or coffin.
- Design Element: Deep green base with winding green vines, leaves, and gold dot berries.
- Finish: Glossy top coat.
- Tools Used: Fine detail brush for illustration.
GET THE LOOK AT HOME:
Paint fluid S-curve vines across the nail, then add leaves at natural alternating intervals.
- Base: Apply two coats of dark forest green. Let dry fully.
- Vines: Using a detail brush and lighter green polish, paint winding vine shapes across each nail.
- Leaves: Add small oval leaves branching off the vines at irregular intervals.
- Gold accents: Place tiny gold dots among the vines to suggest berries or buds.
- Seal: Apply a glossy top coat to lock the botanical art in place.
Pro Tip: Practice the vine shapes on paper first. Simple curved lines with small oval leaves at the ends read as botanical art.
29. Lavender Cloud Moon Nails
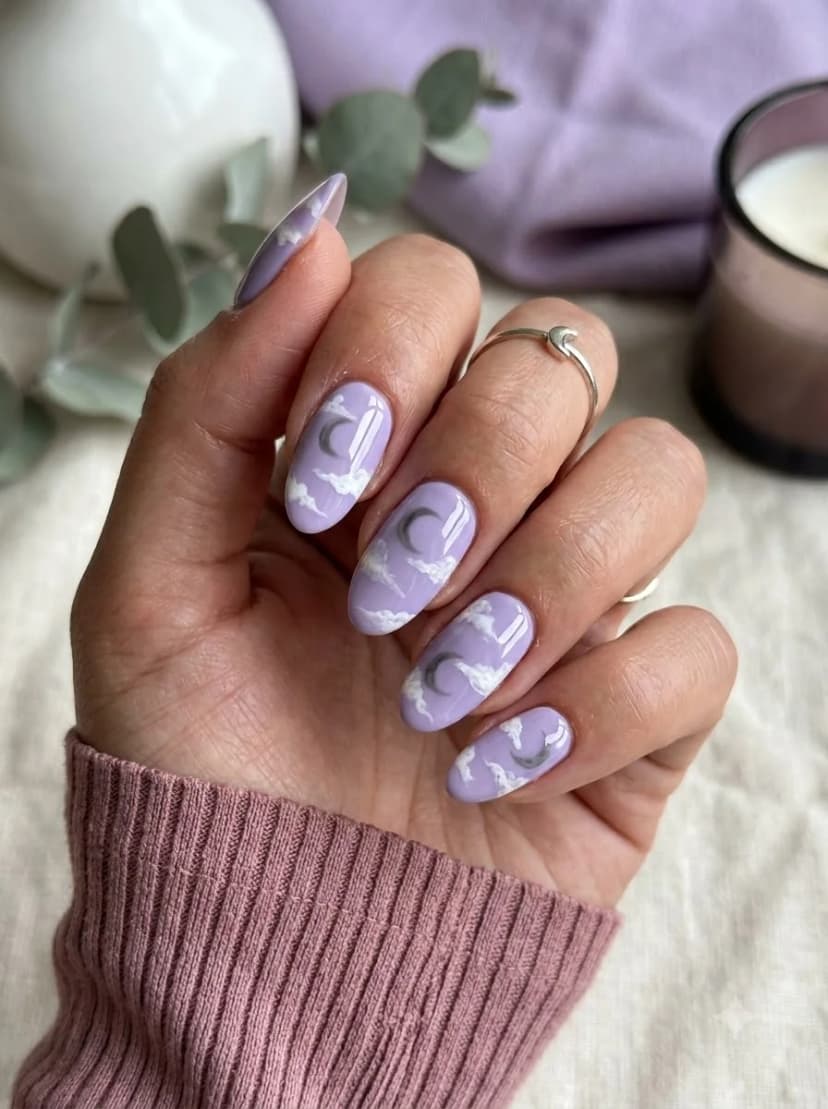
OVERVIEW:
Soft lavender nails with small fluffy white cloud bands and grey-lavender crescent moon details. The clouds are painted in light, broken clusters that give the nails a dreamy, ethereal quality. The moon accents add a celestial touch without overwhelming the pastel palette. The almond shape complements the soft, organic cloud shapes.
DESIGN BREAKDOWN:
Pastel celestial theme combining soft cloud bands with muted crescent moon accents.
- Nail Color Used: Soft lavender base, white for clouds, grey-lavender for moons.
- Suitable Nail Shape: Almond. The organic shape suits the botanical art.
- Design Element: Soft lavender base, fluffy white cloud bands, and grey-lavender crescent moons.
- Finish: Glossy top coat.
- Tools Used: Detail brush for clouds and moons, plus a small dotting tool for cloud clusters.
GET THE LOOK AT HOME:
Dilute white polish slightly or feather edges with a brush to create soft, translucent cloud effects.
- Base: Apply two coats of soft lavender polish. Let dry completely.
- Clouds: Using white polish and a fine brush or dotting tool, build small broken cloud clusters across each nail. Keep them light and airy.
- Moons: Add silver crescent moon details among the clouds using a detail brush.
- Spacing: Leave some nails with just clouds and others with moons to create visual variety.
- Seal: Apply a glossy top coat to enhance the dreamy quality of the design.
Pro Tip: Use several small cloud puffs instead of one heavy white shape. The lavender should remain visible between the clusters.


30. Mustard Green Outline Brown Chrome Nails
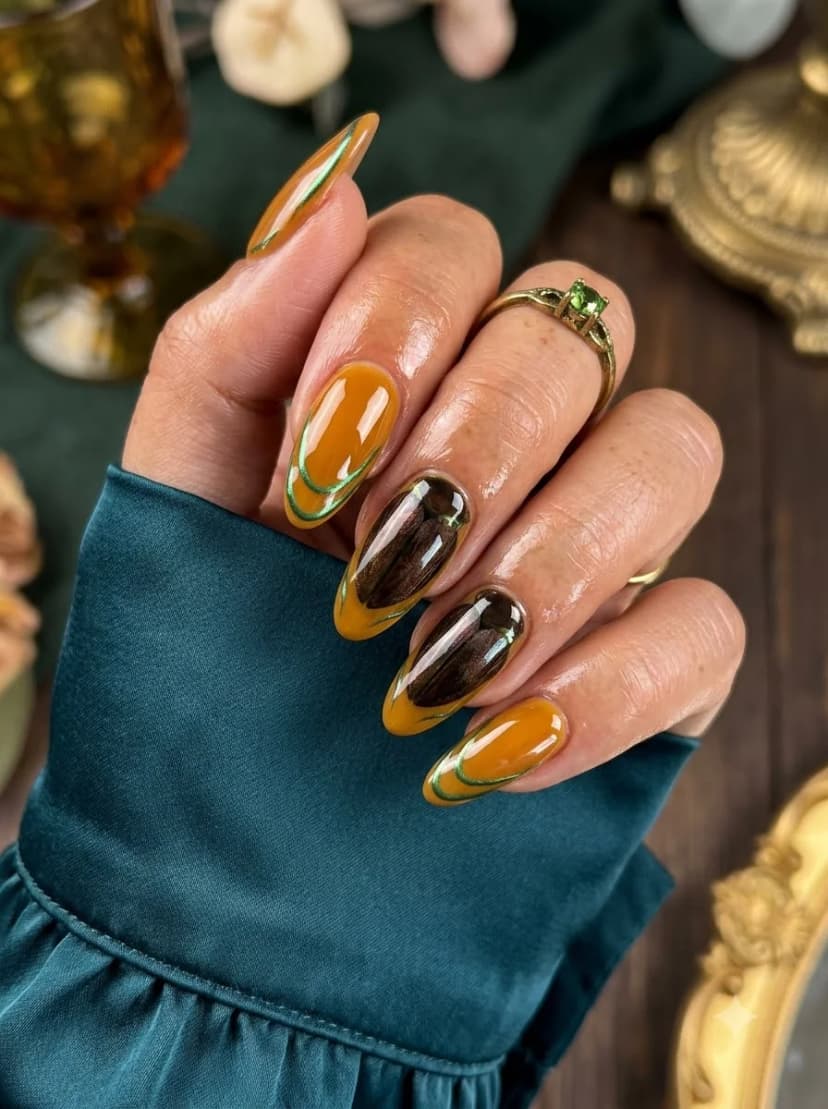
OVERVIEW:
Three mustard-orange nails feature thin double-curved metallic-green outlines. Two accent nails use dark brown or near-black chrome centers finished with mustard tips. The warm-and-cool contrast feels vintage and apothecary-like, while the elongated almond shape follows the flowing contours.
DESIGN BREAKDOWN:
Vintage apothecary color blocking that pairs curved green outlines with dark brown chrome accents and mustard tips.
- Nail Color Used: Mustard-orange, metallic green, and dark brown or black chrome.
- Suitable Nail Shape: Almond. The tapered shape suits the flowing details.
- Design Element: Double green contour lines over mustard nails plus two brown-chrome, mustard-tip accents.
- Finish: High-gloss top coat.
- Tools Used: Fine liner brush, chrome or cat-eye gel, magnet if using magnetic gel, and UV or LED lamp.
GET THE LOOK AT HOME:
Complete the mustard contour nails first, then build the darker reflective accent nails.
- Mustard nails: Apply two coats of mustard-orange to three nails. Let dry completely.
- Green outlines: Use a liner brush to paint two nested metallic-green curves following one side and the tip of each mustard nail.
- Chrome accents: Apply dark brown or black chrome to two nails, keeping the reflection centered and vertical.
- Mustard tips: Finish the dark accent nails with curved mustard-orange tips.
- Seal: Apply a glossy top coat to protect the metallic lines.
Pro Tip: Keep the green lines thin and deliberate. Thick lines overwhelm the mustard base.
31. Purple Beige Checkerboard Star Nails
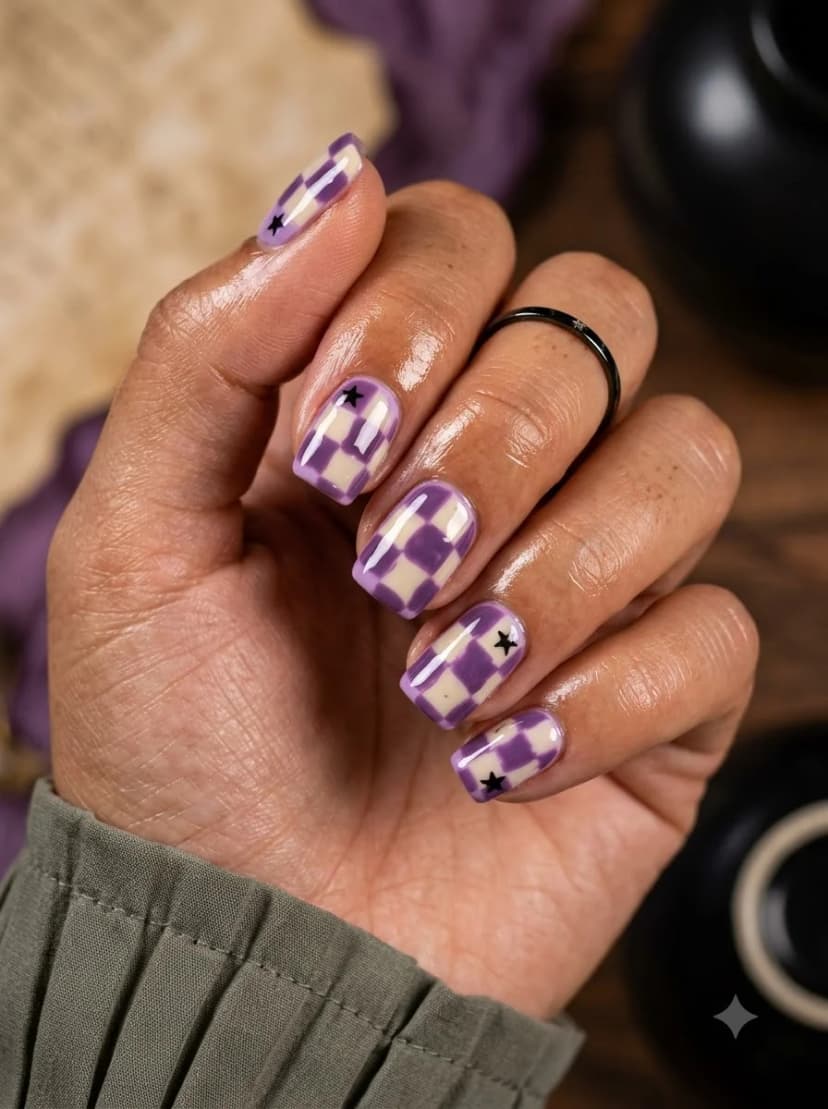
OVERVIEW:
Purple and beige checkerboard pattern on most nails with small black star accents on select nails. The checkerboard uses alternating purple and beige squares in a regular grid pattern. The black stars break up the geometric regularity and add a playful, witchy element. The short square shape works well for the grid pattern.
DESIGN BREAKDOWN:
Playful graphic checkerboard with delicate star motifs. Grid lines need neat execution.
- Nail Color Used: Purple and beige for checkerboard, black for star accents.
- Suitable Nail Shape: Short square or squoval. The compact shape works for the playful details.
- Design Element: Alternating purple/beige checkerboard grid with scattered black star accents.
- Finish: High-gloss top coat.
- Tools Used: Striping tape or thin brush for checkerboard grid.
GET THE LOOK AT HOME:
Grid out lines first using striping tape to get straight, clean checkerboard squares.
- Base: Apply two coats of beige polish. Let dry fully.
- Grid: Using striping tape or a thin brush, create a checkerboard grid pattern on each nail.
- Fill squares: Alternate filling the grid squares with purple polish, creating a regular checkerboard pattern.
- Stars: On select nails, paint small black star shapes over the checkerboard for a witchy accent.
- Seal: Apply a glossy top coat to protect the geometric pattern.
Pro Tip: Start the checkerboard from the center of the nail and work outward. This keeps the pattern centered even if edges are imperfect.


32. Pink Shimmer Leaf Branch Nails
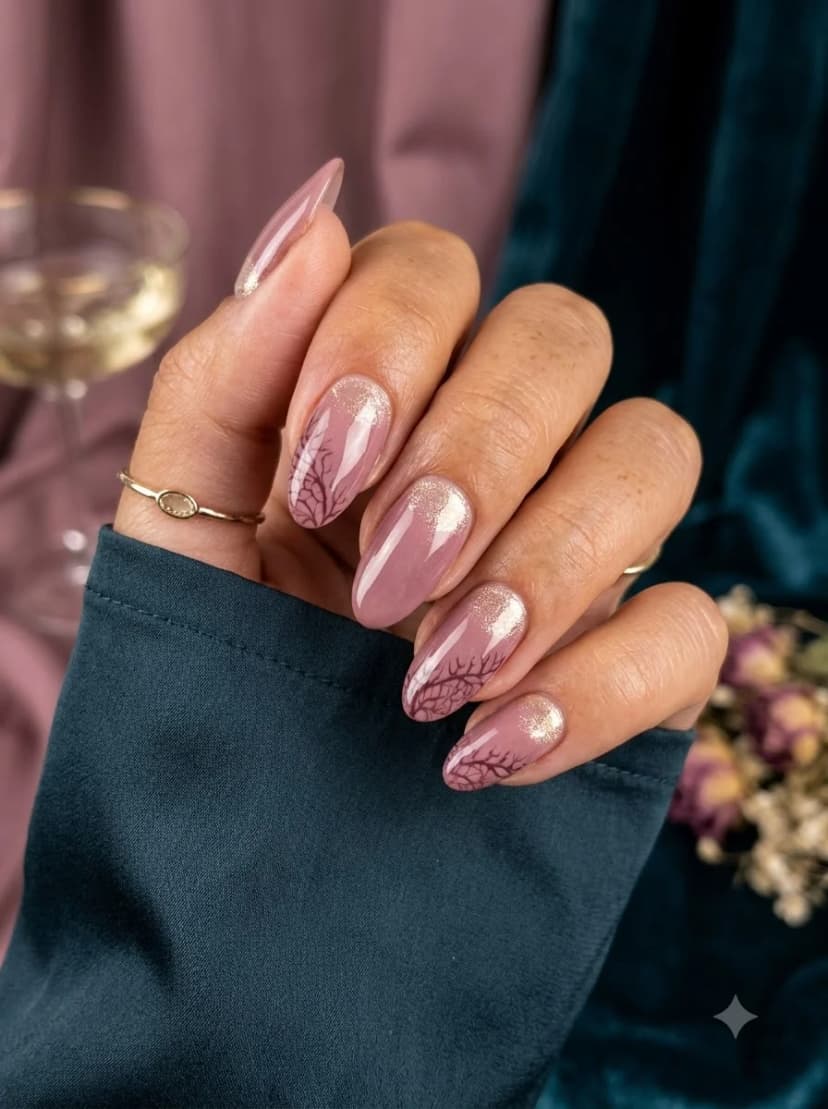
OVERVIEW:
Dusty pink nails carry a soft pearlescent shimmer across the entire set. Three accent nails feature fine burgundy skeletal leaves and branching veins that sweep in from the sidewalls. The tonal botanical pattern feels romantic, delicate, and slightly gothic.
DESIGN BREAKDOWN:
Burgundy skeletal leaf linework over a unified dusty-pink shimmer base.
- Nail Color Used: Dusty pink shimmer and dark burgundy for the leaf and branch linework.
- Suitable Nail Shape: Almond. The organic shape suits the botanical art.
- Design Element: Pearlescent pink base with burgundy skeletal leaves on three accent nails.
- Finish: Glossy top coat.
- Tools Used: Fine detail brush for branch art.
GET THE LOOK AT HOME:
Paint each central leaf vein first, then taper narrow leaf segments from it with light pressure.
- Base: Apply two coats of dusty pink shimmer to every nail. Let dry completely.
- Shimmer: Add a thin pearlescent layer across the set if the pink base does not already contain shimmer.
- Leaf branches: On three accent nails, use dark burgundy to paint curved center veins and narrow leaf segments extending from them.
- Balance: Leave two nails without line art so the shimmer base remains visible.
- Seal: Apply a glossy top coat to lock the glitter and branch art in place.
Pro Tip: Taper each leaf segment to a fine point. Blunt strokes make the botanical pattern look heavy.
33. Olive Green Spiderweb Spider Nails
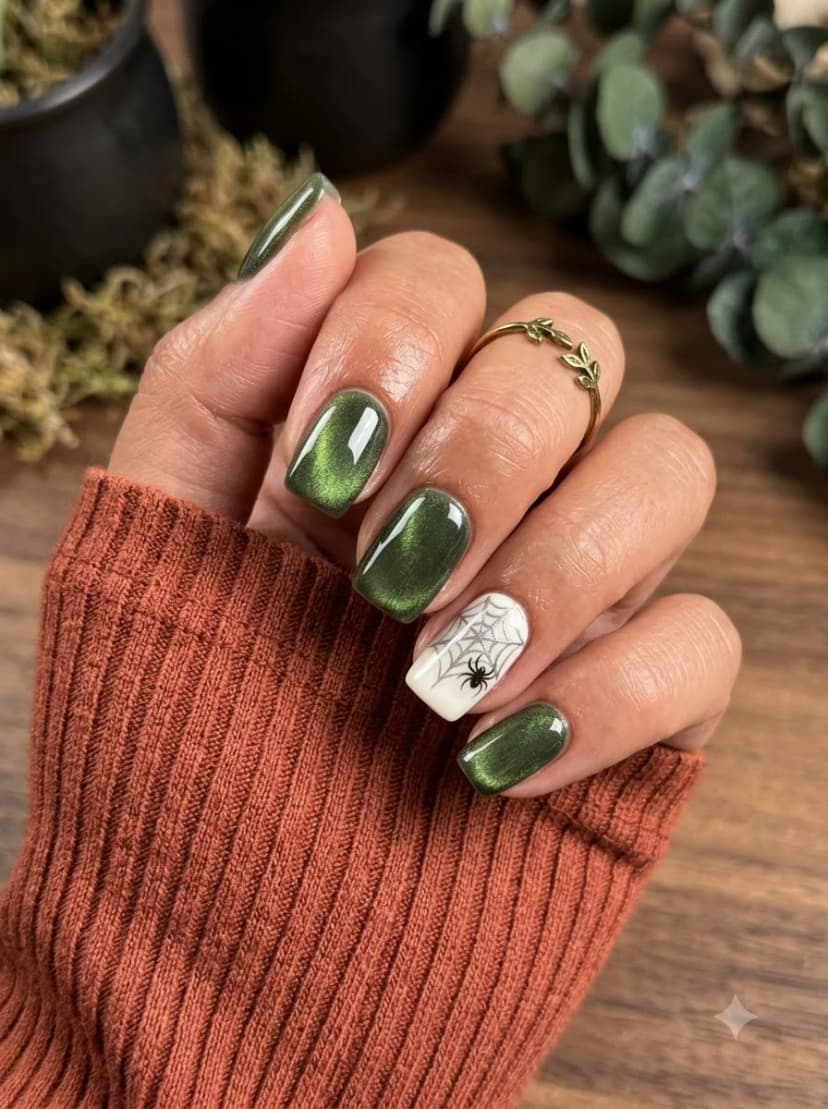
OVERVIEW:
Olive green cat-eye nails with a white accent nail featuring a black spiderweb and spider detail. The cat-eye finish on the green nails creates a dimensional shimmer that shifts as you move your hand. The spiderweb accent nail is the focal point, with fine radiating lines and a small spider hanging beneath the web. The contrast between the shimmer green and flat white creates visual variety.
DESIGN BREAKDOWN:
Olive magnetic shimmer paired with a high-contrast spiderweb accent nail.
- Nail Color Used: Olive green cat-eye gel polish, white and black for spiderweb accent.
- Suitable Nail Shape: Short square or squoval. The compact shape suits the accent details.
- Design Element: Olive green cat-eye base with crisp black spiderweb and spider art on white accent nail.
- Finish: Glossy gel top coat.
- Tools Used: Cat-eye magnet, UV or LED lamp.
GET THE LOOK AT HOME:
Cure cat-eye nails first, then execute detailed spiderweb line work on the stark white accent.
- Cat-eye base: Apply olive green cat-eye gel polish. Use the magnet to create the dimensional shimmer effect. Cure under lamp.
- Accent nail: On one accent nail, apply a white base coat and let it cure fully.
- Spiderweb: Using black polish and a fine brush, paint radiating lines from one corner of the accent nail. Connect them with concentric curved lines.
- Spider: Paint a small black spider just beneath the web with a dotting tool for the body and a thin brush for its legs.
- Seal: Apply glossy gel top coat over all nails and cure one final time.
Pro Tip: Hold the cat-eye magnet as close to the wet polish as possible without touching it. Distance weakens the magnetic effect.


34. Teal Ghost Star French Tip Nails
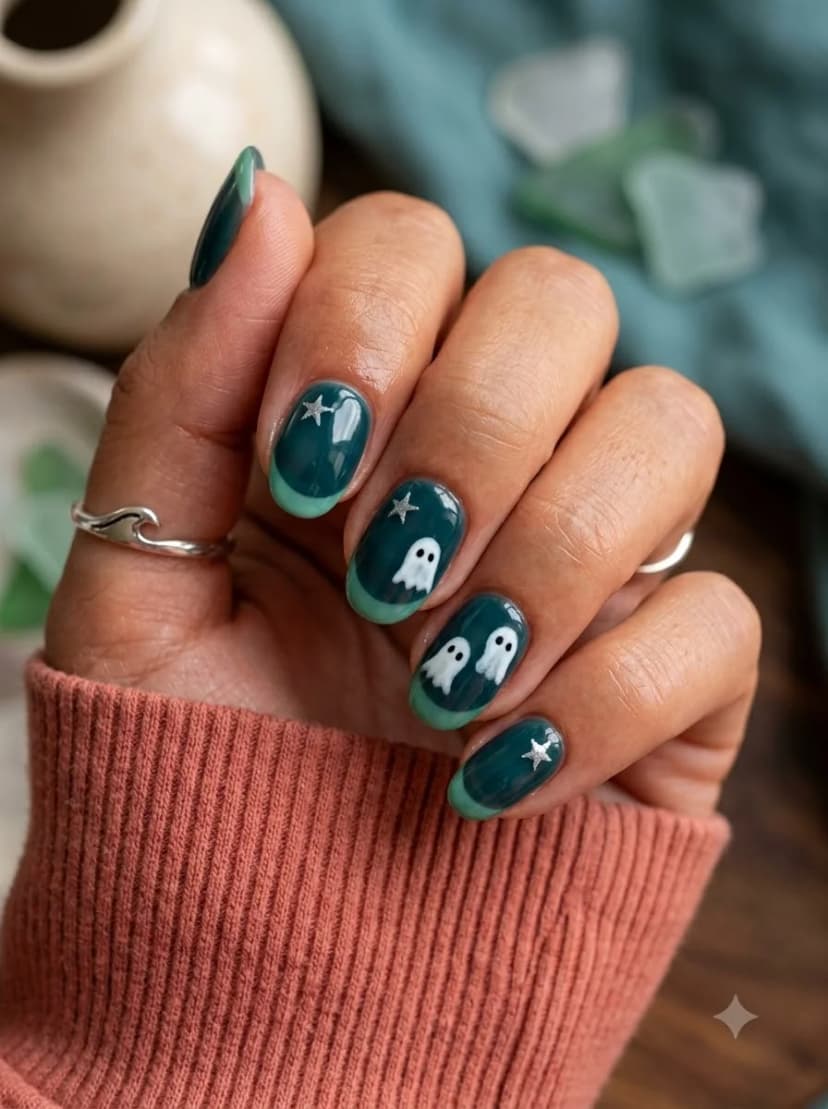
OVERVIEW:
Deep teal nails with lighter teal or mint French tips and small white ghost and silver star details. The ghosts are simple, friendly shapes with round eyes, not threatening. The stars are small and scattered, adding a celestial touch. The two-tone teal palette keeps the design cohesive while the French tip format adds structure.
DESIGN BREAKDOWN:
Two-tone teal French tips with cute hand-painted ghosts and silver stars.
- Nail Color Used: Deep teal base, lighter teal for tips, white for ghosts, silver for stars.
- Suitable Nail Shape: Short almond or oval. The compact shape suits the accent details.
- Design Element: Deep teal base, mint tips, white mini ghosts, silver stars.
- Finish: Glossy top coat.
- Tools Used: French tip guides or liner brush, detail brush.
GET THE LOOK AT HOME:
Map out French tip boundaries before dotting cute ghost silhouettes across the nails.
- Base: Apply two coats of deep teal polish. Let dry completely.
- French tips: Paint lighter teal or mint French tips on each nail using guides or a liner brush.
- Ghosts: On select nails, paint small white ghost shapes with round bodies and two dot eyes.
- Stars: Scatter small silver star details among the ghosts using a detail brush.
- Seal: Apply a glossy top coat to protect all the painted details.
Pro Tip: Keep the ghost shapes simple. A rounded body with two dot eyes reads as a ghost from any distance.
35. Lime Green Stitched Frankenstein Nails
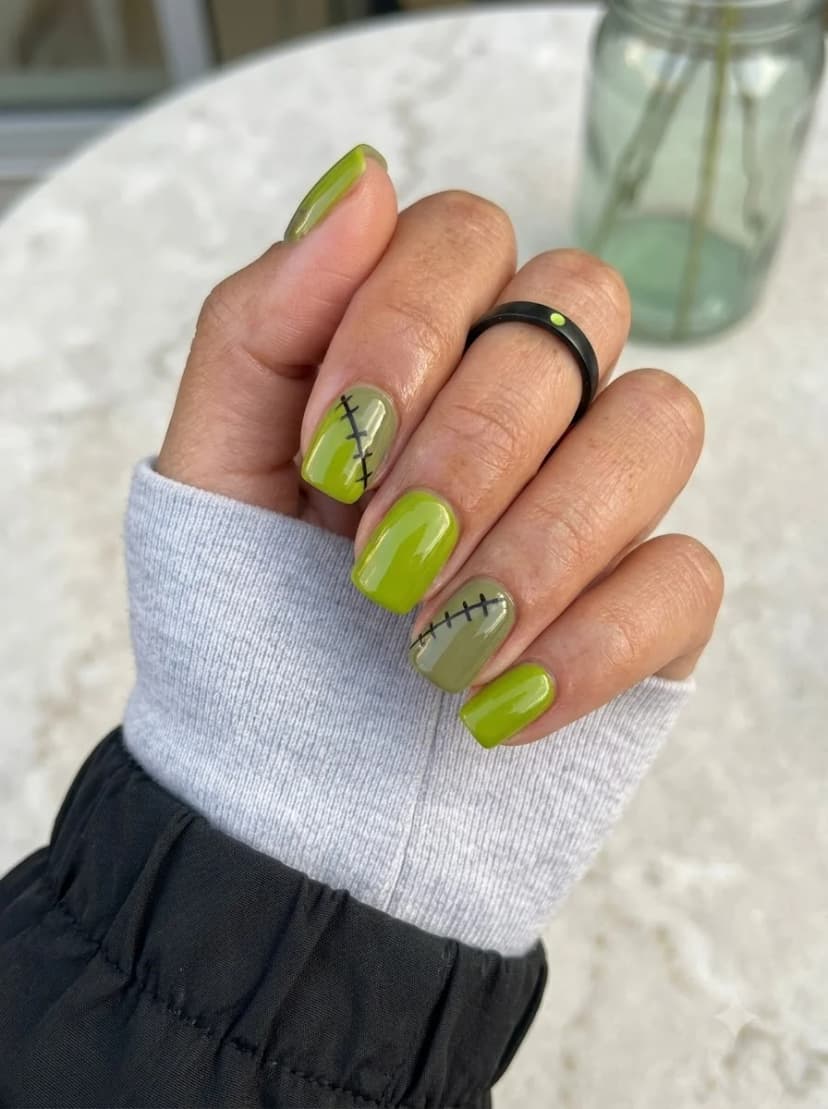
OVERVIEW:
Lime green nails alternate with muted translucent sage-grey patch accents and black stitched seams, resembling Frankenstein's monster. The stitches cross the boundaries between the brighter and muted sections. The effect is playful and clearly Halloween-themed without being dark or creepy. The bright green keeps the mood light.
DESIGN BREAKDOWN:
Vivid neon green patchwork with hand-painted black seam stitches.
- Nail Color Used: Lime green, translucent sage-grey, and black for stitched lines.
- Suitable Nail Shape: Short square or squoval. The compact shape works for the playful details.
- Design Element: Lime green base, two-tone block accents, black cross-stitch lines.
- Finish: Glossy top coat.
- Tools Used: Fine liner or detail brush.
GET THE LOOK AT HOME:
Keep stitch lines slightly uneven for a realistic hand-stitched patchwork look.
- Base: Apply two coats of lime green polish. Let dry completely.
- Patch accents: On selected nails, add translucent sage-grey sections beside the lime base to create muted patchwork blocks.
- Stitch lines: Using black polish and a thin brush, paint cross-stitch lines across the nails. Make them slightly irregular for an authentic stitched effect.
- Seam crossing: On two-tone nails, place the stitch lines where the two colors meet to enhance the Frankenstein effect.
- Seal: Apply a glossy top coat to protect the stitch details.
Pro Tip: Make the stitch lines slightly irregular. Perfectly uniform stitches look machine-made rather than hand-painted.


36. Teal Marble Moon Star Nails
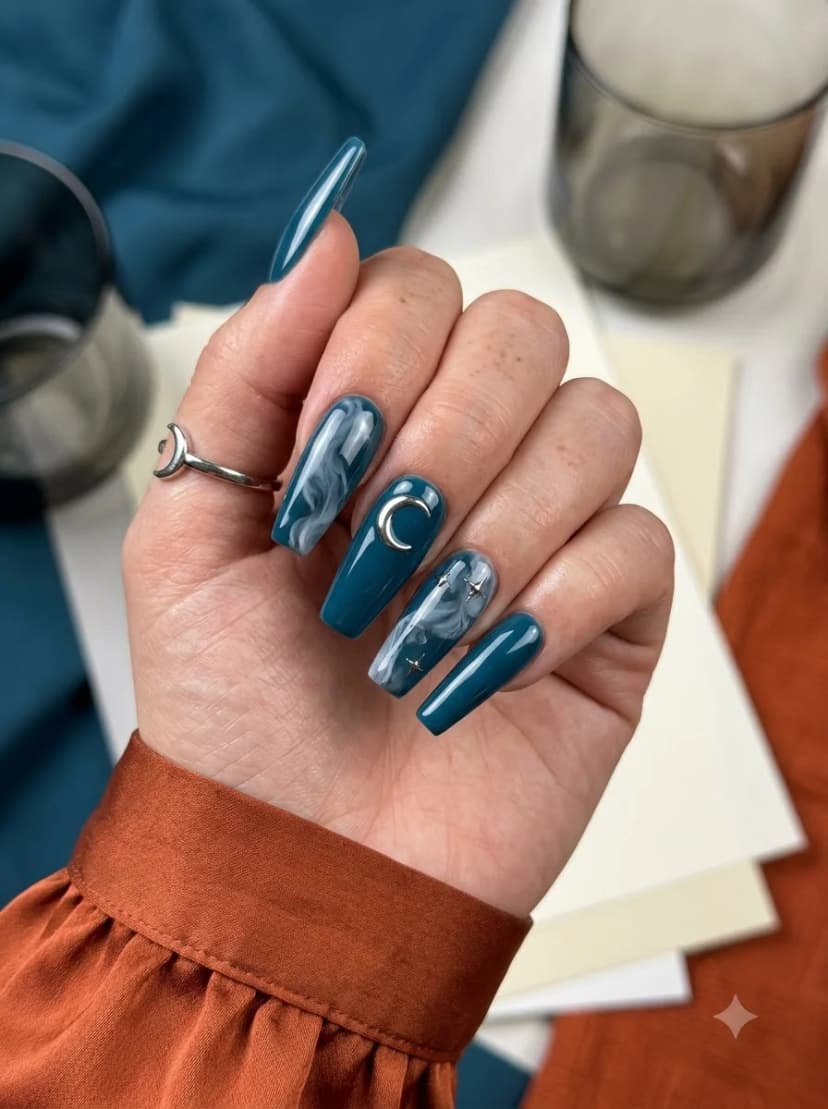
OVERVIEW:
Solid deep teal nails alternate with smoky teal, white, and grey marble accents. A raised silver crescent anchors one solid nail, while small black and silver stars sit over a marble accent. The coffin shape gives each finish enough space to remain distinct.
DESIGN BREAKDOWN:
Solid teal and smoky marble color blocking finished with raised metallic celestial accents.
- Nail Color Used: Teal base, white and grey for marble, silver for moons and stars.
- Suitable Nail Shape: Almond or coffin.
- Design Element: Alternating solid teal and smoky marble nails with one silver crescent and mixed stars.
- Finish: Thick glossy top coat to smooth marble texture.
- Tools Used: Toothpick or brush for marble, tweezers and gem gel or nail glue for metallic accents.
GET THE LOOK AT HOME:
Keep two nails solid teal and reserve the smoky marble technique for the accent nails.
- Solid nails: Apply two coats of deep teal to two nails and let them dry.
- Marble base: Apply teal to the accent nails, then add a second wet layer.
- Marble: Drop tiny dots of white and grey onto the wet accent nails. Use a toothpick to drag through them in flowing lines. Three or four drags maximum.
- Celestial accents: Attach a raised silver crescent to one solid nail, then add small black and silver stars to one marble nail.
- Seal: Apply a thick top coat to smooth out any texture from the marble technique.
Pro Tip: Limit marble drags to three per nail maximum. Over-mixing creates muddy colors instead of distinct veins.
37. Lavender Smoky Marble Mixed-Star Nails
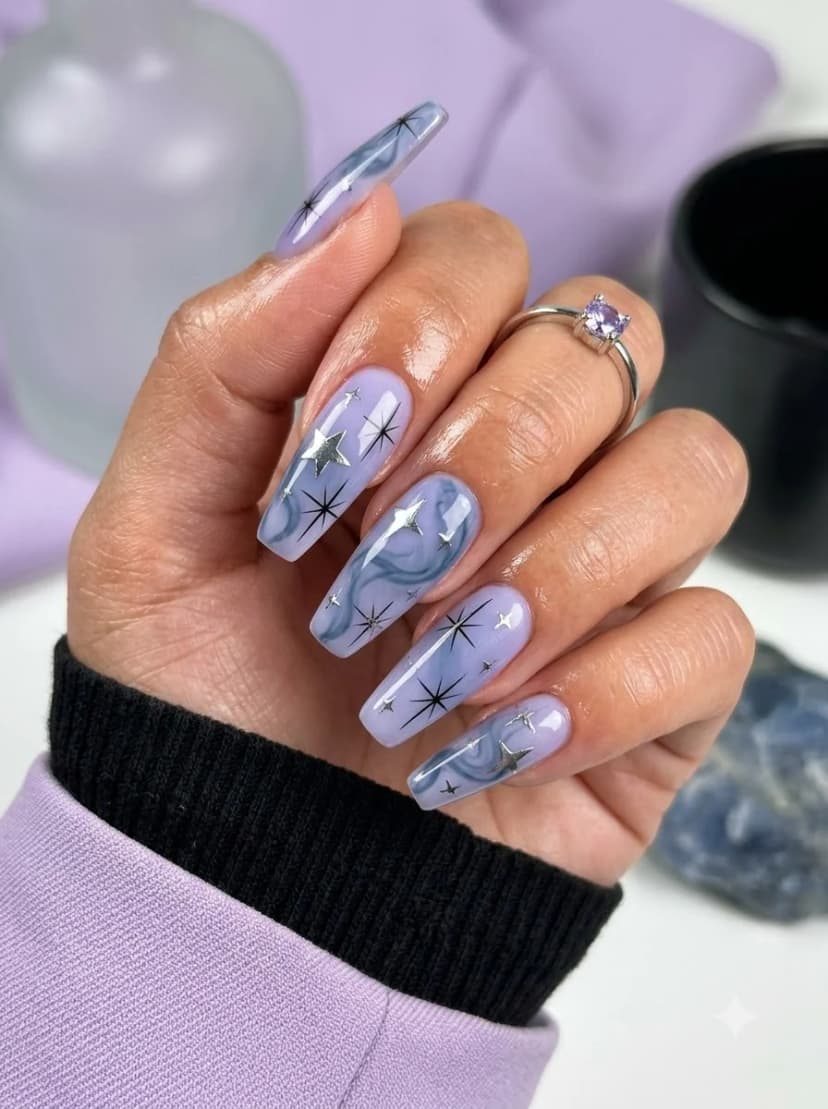
OVERVIEW:
Glossy lavender nails feature smoky blue-grey swirls, fine black starbursts, small silver stars, and one large reflective silver star accent. The mixture of painted and dimensional details feels dreamy and celestial rather than overtly spooky.
DESIGN BREAKDOWN:
Lavender and smoky blue-grey marble with black line-art starbursts and mixed silver star accents.
- Nail Color Used: Lavender, smoky blue-grey, black for starbursts, and silver for decals or charms.
- Suitable Nail Shape: Almond or coffin.
- Design Element: Smoky marble bands, black starbursts, small silver stars, and one large silver star.
- Finish: High-gloss top coat.
- Tools Used: Marble brush, fine liner brush, tweezers, silver star decals or charms, and gem gel.
GET THE LOOK AT HOME:
Keep the blue-grey swirls translucent so the lavender background remains visible.
- Base: Apply one coat of lavender polish. Let dry.
- Wet layer: Apply a second thin coat. Do not let it dry.
- Smoky marble: Add translucent blue-grey to the wet lavender and draw it into broad, cloud-like swirls.
- Starbursts: Paint fine black radiating starbursts, then place small silver stars and one larger silver star accent with tweezers.
- Seal: Apply a glossy top coat to enhance the marble depth and protect the starburst accents.
Pro Tip: Keep the marble lighter than you think you need. Lavender marble can easily look muddy if too much dark purple is used.


38. Grey Silver Coffin Frame and Cross Nails
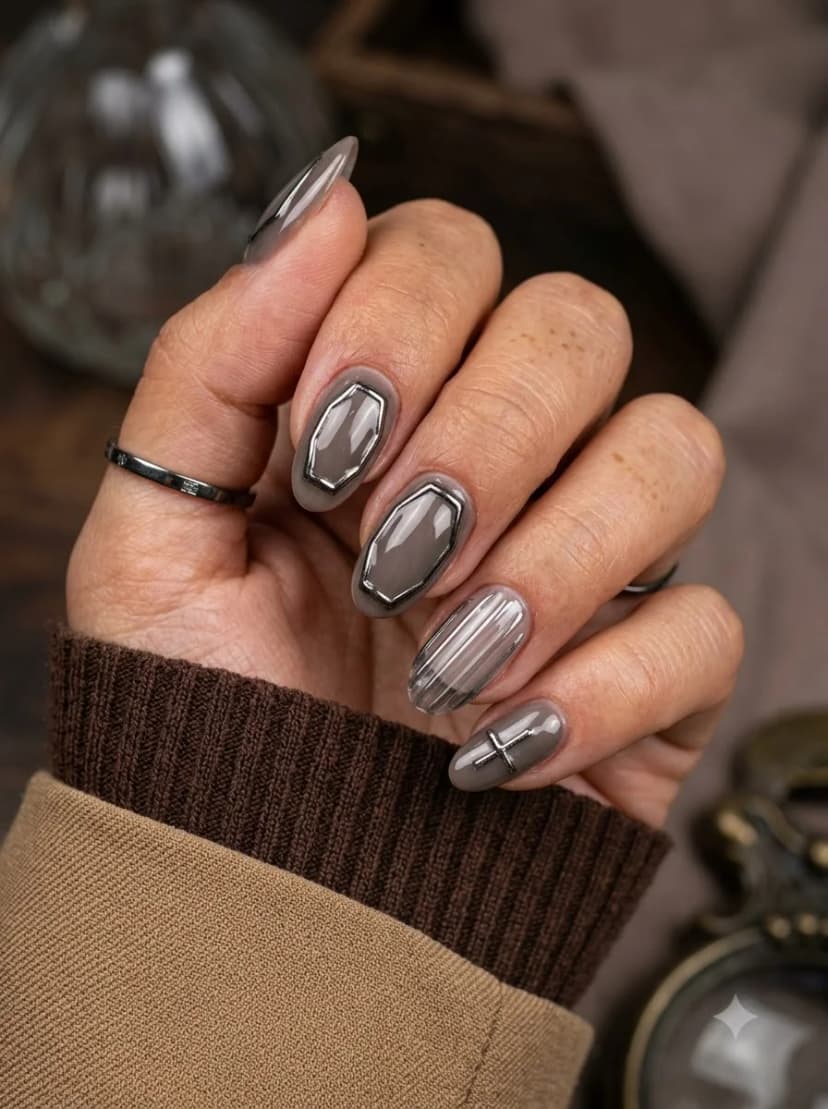
OVERVIEW:
Taupe-grey nails mix four distinct silver details: raised black-and-chrome coffin-shaped frames on two nails, vertical chrome ridges on one, and a slim silver cross on another. The short oval shape keeps the sculptural gothic accents compact and wearable.
DESIGN BREAKDOWN:
Sculptural gothic metalwork combining coffin frames, vertical ridges, and a cross over a muted grey base.
- Nail Color Used: Taupe-grey, silver chrome, and black for the recessed frame outlines.
- Suitable Nail Shape: Short oval or almond. The compact surface suits the raised metal details.
- Design Element: Raised coffin frames, chrome ridges, and a silver cross over grey nails.
- Finish: Non-wipe gel top coat.
- Tools Used: Thick liner or builder gel, fine brush, chrome powder, and chrome applicator.
GET THE LOOK AT HOME:
Build each raised motif in gel before applying chrome so the frames, ridges, and cross retain their dimension.
- Base: Apply two coats of medium grey polish. Let dry completely.
- Coffin frames: Build two elongated coffin-shaped outlines with black and raised gel, then cure.
- Ridges: Add several parallel vertical gel lines to one accent nail and cure.
- Cross: Build a slim raised cross on another nail. Rub silver chrome onto the cured raised details.
- Seal: Apply a non-wipe gel top coat to protect the chrome finish.
Pro Tip: Keep the builder-gel lines thin but raised. Bulky frames will overwhelm the short nail shape.
39. Tortoiseshell Gold Line Nails
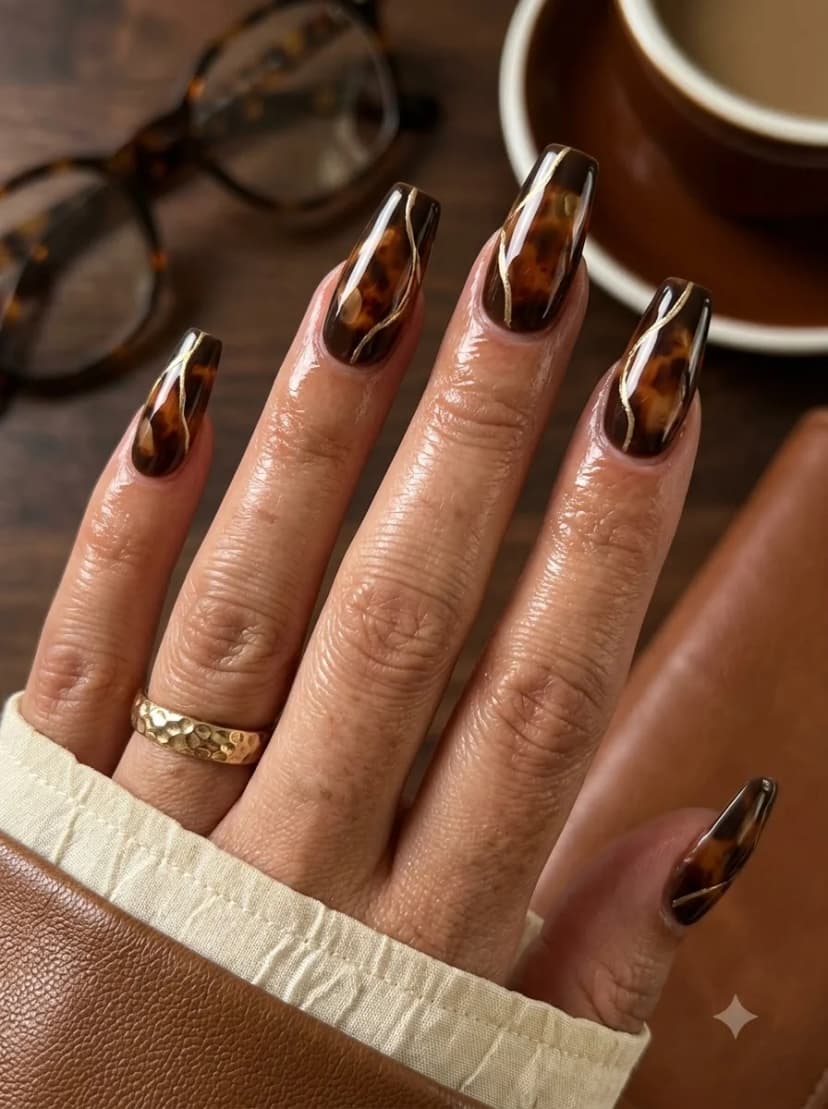
OVERVIEW:
Classic tortoiseshell pattern in warm amber and dark brown with thin gold lines crossing some nails. The tortoiseshell creates depth through layered translucent colors, while the gold lines add a geometric, art deco element. The warm palette reads as autumnal rather than overtly Halloween. The almond shape complements the organic tortoiseshell pattern.
DESIGN BREAKDOWN:
Translucent amber tortoiseshell depth accented with geometric metallic gold pinstripes.
- Nail Color Used: Amber, dark brown, and black for tortoiseshell, gold for lines.
- Suitable Nail Shape: Almond or coffin. Both complement the warm tones.
- Design Element: Layered tortoiseshell pattern with crisp gold diagonal line overlays.
- Finish: High-gloss top coat to maximize depth.
- Tools Used: Striping brush for geometric lines.
GET THE LOOK AT HOME:
Dab brown and black spots into wet jelly amber polish to let edges bleed organically.
- Base: Apply a sheer amber or warm nude base coat. Let dry.
- Tortoiseshell: Using a brush, dab spots of dark brown and black polish onto the wet base. Let them bleed slightly into the amber for an organic pattern.
- Depth: Layer additional translucent amber over the spots to create depth. Real tortoiseshell has layers of color.
- Gold lines: Once dry, use a striping brush and gold metallic polish to paint thin diagonal lines across select nails.
- Seal: Apply a high-gloss top coat to enhance the layered depth of the tortoiseshell.
Pro Tip: Real tortoiseshell spots are irregular. Use the brush tip to drag edges into organic shapes.


40. Navy Cat-Eye Blue Porcelain Accent Nails
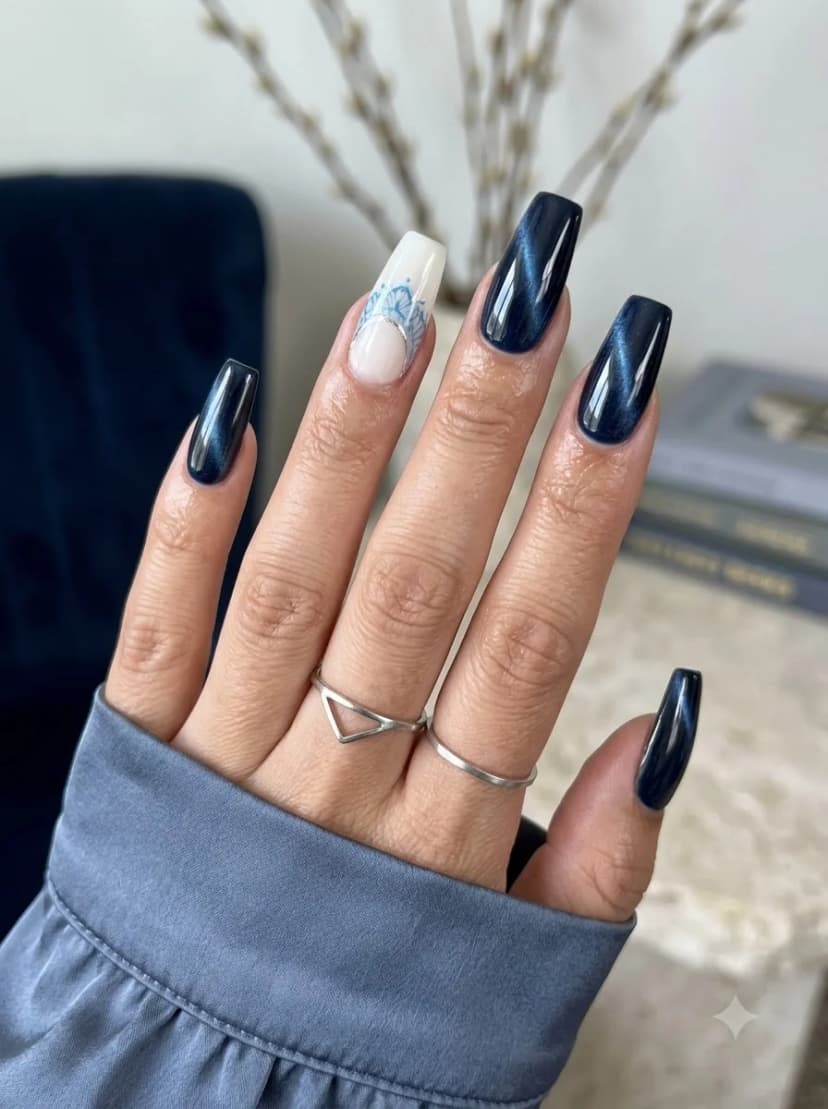
OVERVIEW:
Four deep navy cat-eye nails create a velvet-like magnetic shimmer. One white accent nail features a pale-blue porcelain or lace-inspired ornamental motif finished with a small curved row of silver gems.
DESIGN BREAKDOWN:
A detailed blue porcelain accent paired with moody navy magnetic shimmer.
- Nail Color Used: Navy cat-eye gel, white, pale blue, and silver gems.
- Suitable Nail Shape: Almond or coffin. Both suit the detailed illustration.
- Design Element: Four navy cat-eye nails and one white ornamental porcelain accent with a gem arc.
- Finish: High-gloss top coat.
- Tools Used: Cat-eye magnet, UV or LED lamp, fine detail brush, rhinestone picker, and gem gel.
GET THE LOOK AT HOME:
Complete the magnetic navy nails before focusing on the ornamental white accent.
- Cat-eye nails: Apply navy magnetic gel to four nails, position the shimmer with a magnet, and cure.
- Accent base: Paint one nail opaque white and cure or let it dry completely.
- Porcelain motif: Paint a fine pale-blue ornamental or lace-like motif across the white nail.
- Gem arc: Place a short curved row of tiny silver gems beneath the blue detail.
- Seal: Apply a glossy top coat to protect the porcelain detail and enhance the navy depth.
Pro Tip: Keep the gem arc narrow and centered so it frames the porcelain detail without crowding it.
41. Dark Red Black Lace White Cameo Nails
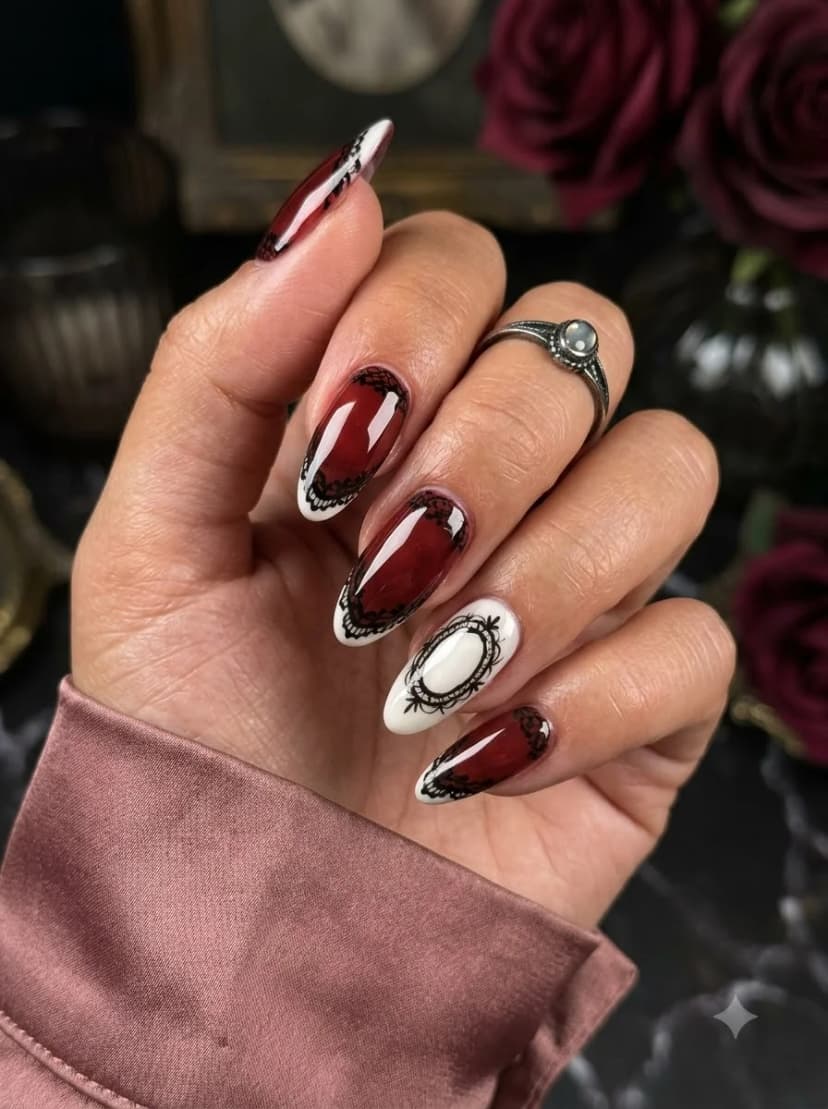
OVERVIEW:
Deep red wine-colored nails combine crisp white French edges with black lace detailing around the tips and cuticles. The white accent nail features an ornate black oval cameo frame with a light open center, resembling Victorian jewelry. The overall effect is elegant gothic romance.
DESIGN BREAKDOWN:
Victorian gothic romance featuring delicate lace trim and a cameo medallion accent.
- Nail Color Used: Deep red wine, black lace linework, and white for French edges and the cameo nail.
- Suitable Nail Shape: Almond or coffin.
- Design Element: Wine-red nails with white French edges, black lace at tips and cuticles, and one white framed cameo accent.
- Finish: High-gloss top coat.
- Tools Used: Ultra-fine detail brush for intricate line work.
GET THE LOOK AT HOME:
Use tiny scalloped strokes for the lace mesh, then build up the cameo frame in layers.
- Base: Apply two coats of deep red wine polish. Let dry fully.
- French edges: Add narrow white French tips to the wine-red nails.
- Lace: Paint black scallops and mesh details around selected tips and cuticle edges.
- Cameo accent: On the white accent nail, paint an ornate black oval frame while leaving the center light.
- Refine: Add fine details to the lace and cameo. Budget extra time for the scalloped edges.
- Seal: Apply a glossy top coat to protect the intricate details.
Pro Tip: The lace detail is the most time-consuming part. Budget extra time for the scalloped edges and mesh patterns.


42. Cream Dark Purple Occult Symbol Nails
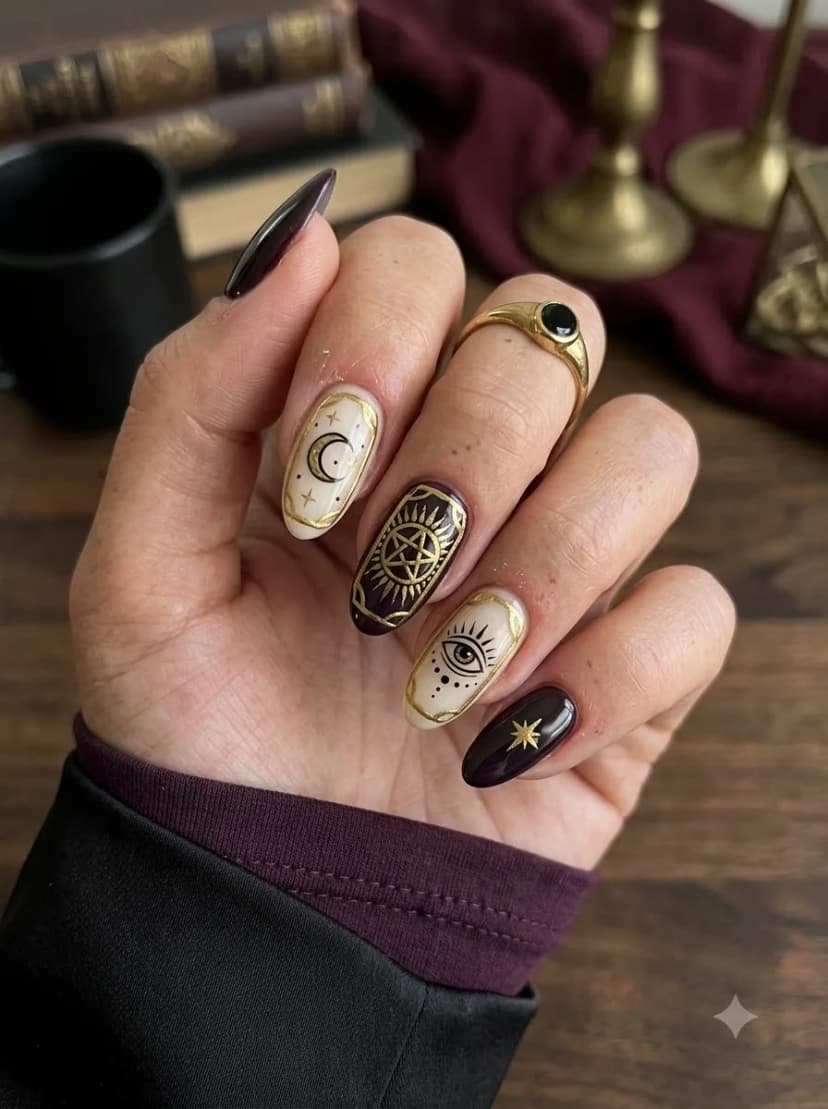
OVERVIEW:
Cream and dark purple nails mix black and gold occult symbols, celestial designs, and tarot-inspired framing. The cream nails use primarily black moons and eye symbols inside gold borders, while the purple nails carry richer gold sun and star motifs.
DESIGN BREAKDOWN:
Tarot-card styling that balances black linework and gold framing across cream and purple bases.
- Nail Color Used: Cream and dark purple bases, black linework, and metallic gold details.
- Suitable Nail Shape: Almond. The tapered shape suits the flowing details.
- Design Element: Cream nails with black-and-gold symbols plus purple nails with gold celestial motifs.
- Finish: Glossy top coat.
- Tools Used: Fine detail brush for occult symbols.
GET THE LOOK AT HOME:
Balance symbol density across cream and purple nails to maintain visual harmony.
- Base: Apply cream polish to some nails and dark purple to others. Let dry completely.
- Cream symbols: Paint black moons and eye details on the cream nails, then add thin gold borders and stars.
- Alchemy patterns: On the purple nails, paint geometric alchemy patterns with the same gold polish.
- Cohesion: Keep the symbol density balanced across both base colors so the set looks unified.
- Seal: Apply a glossy top coat to protect the gold symbols and add richness to both base colors.
Pro Tip: Look up real tarot card imagery for symbol reference. The specific shapes add authenticity.
43. Light Blue Topographic Lime Starburst Nails
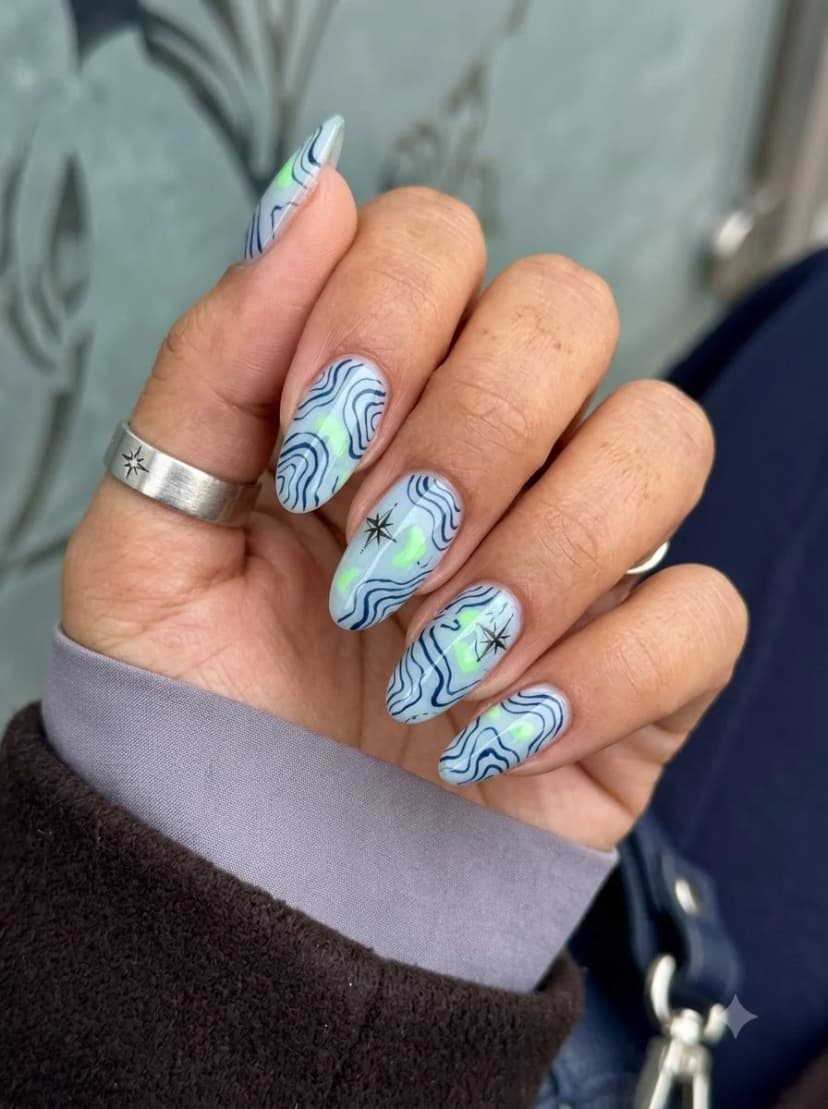
OVERVIEW:
Icy light-blue nails feature flowing navy topographic contour lines, translucent neon-lime wisps, and sharp black starbursts. The unexpected green highlights glow against the cool blue base, giving the graphic set an ethereal, slightly otherworldly finish.
DESIGN BREAKDOWN:
Navy topographic waves, neon-lime highlights, and black celestial starbursts over an icy-blue base.
- Nail Color Used: Icy light blue, navy for contour lines, neon lime for wisps, and black for starbursts.
- Suitable Nail Shape: Almond. The tapered shape suits the flowing details.
- Design Element: Light-blue base with navy contour lines, lime wisps, and black starbursts.
- Finish: High-gloss top coat.
- Tools Used: Fine liner brush for contour lines and starbursts, plus a small brush for lime wisps.
GET THE LOOK AT HOME:
Flow wavy lines parallel to each other across the nail plate for a smooth liquid effect.
- Base: Apply two coats of light blue polish. Let dry completely.
- Wavy lines: Using dark blue polish and a fine brush, paint flowing wavy lines across each nail. Keep them moving in the same general direction for cohesion.
- Lime wisps: Add irregular translucent neon-lime shapes between the navy contours.
- Starbursts: Paint a few fine black radiating stars over the completed pattern.
- Seal: Apply a glossy top coat to enhance the ethereal quality of the design.
Pro Tip: Keep the wavy lines flowing in the same general direction across all nails for visual cohesion.


44. Nude French Tip Leaf Art Nails
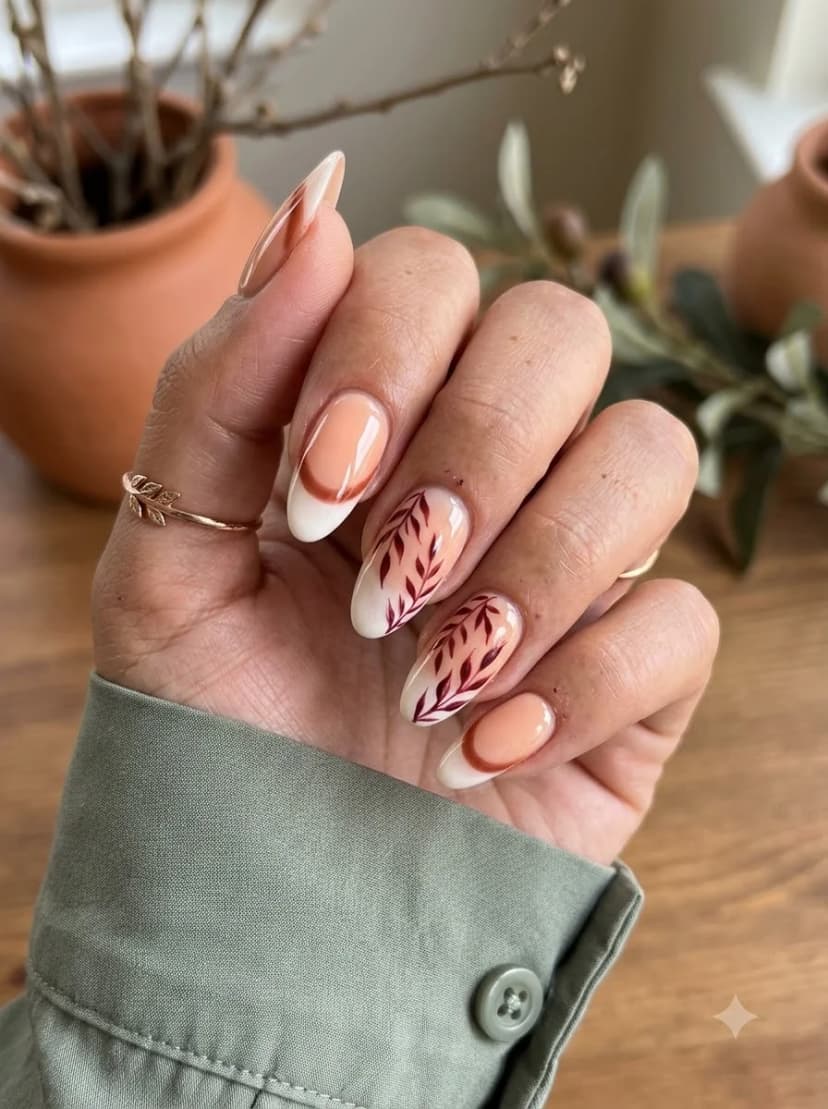
OVERVIEW:
Nude or peach nails with white French tips on some nails and burgundy or deep red leaf/fern art on accent nails. The leaves are painted in a botanical illustration style with visible veins and organic shapes. The French tips add a classic element while the leaf art introduces seasonal, woodland imagery. The overall effect is natural and autumnal.
DESIGN BREAKDOWN:
Autumnal woodland fusion combining clean white French tips with burgundy botanical leaf art.
- Nail Color Used: Nude or peach base, white for tips, burgundy for leaf art.
- Suitable Nail Shape: Almond. The organic shape suits the botanical art.
- Design Element: Nude base, crisp white French tips, hand-painted burgundy fern/leaf accents.
- Finish: Glossy top coat.
- Tools Used: French tip guides or liner brush, detail brush.
GET THE LOOK AT HOME:
Alternate French tips and leaf illustrations across fingers for a balanced natural manicure.
- Base: Apply two coats of nude or peach polish. Let dry completely.
- French tips: Paint white French tips on some nails using guides or a liner brush for clean edges.
- Leaf art: On accent nails, use burgundy or deep red polish and a detail brush to paint leaf and fern botanical shapes with visible veins.
- Balance: Alternate French tip nails and leaf art nails across both hands for visual variety.
- Seal: Apply a glossy top coat to protect the botanical art and French tips.
Pro Tip: Paint the leaves with a light hand. The nude or peach base should show through between the leaf shapes.
45. Orange Half-Moon Pumpkin Accent Stiletto Nails
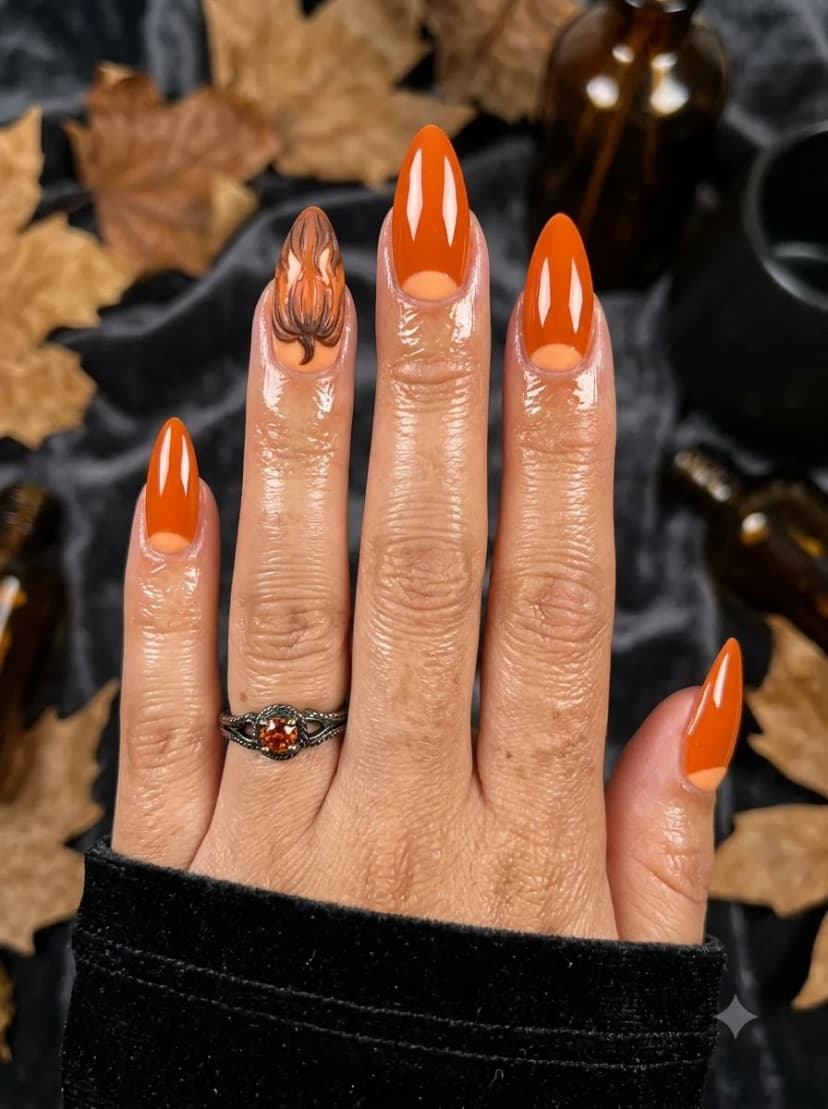
OVERVIEW:
Glossy bright-orange stiletto nails leave rounded nude half-moons exposed at the cuticles. One nude-peach accent nail features a dimensional brown-and-orange pumpkin with curved ridges and a small dark stem. The pointed shape and negative-space half-moons keep the set bold but polished.
DESIGN BREAKDOWN:
High-impact orange half-moon manicure with one sculptural autumn pumpkin accent.
- Nail Color Used: Bright orange, nude-peach, layered brown and orange for the pumpkin, and dark brown for its ridges and stem.
- Suitable Nail Shape: Stiletto or almond. The pointed shape enhances the dramatic aesthetic.
- Design Element: Orange reverse-French half-moons with one dimensional pumpkin accent.
- Finish: High-gloss top coat.
- Tools Used: Half-moon guides, detail brush, and optional builder gel for raised pumpkin ridges.
GET THE LOOK AT HOME:
Establish the orange half-moons first, then build the dimensional pumpkin on a single nude-peach accent nail.
- Base: Apply a nude-peach base to every nail and let it dry completely.
- Orange half-moons: Place curved guides near the cuticles and paint the exposed length bright orange, leaving the nude half-moon visible.
- Pumpkin accent: Leave one nail nude-peach and build a rounded pumpkin with layered orange and brown strokes.
- Ridges and stem: Add curved dark-brown ridges and a small stem. Use builder gel first if you want the raised illustrated texture shown in the image.
- Seal: Apply a glossy top coat to protect the pumpkin art and add shine.
Pro Tip: Keep the nude half-moons evenly sized. They are as important to the composition as the pumpkin accent.


46. Dark Red Copper Wax Seal Nails
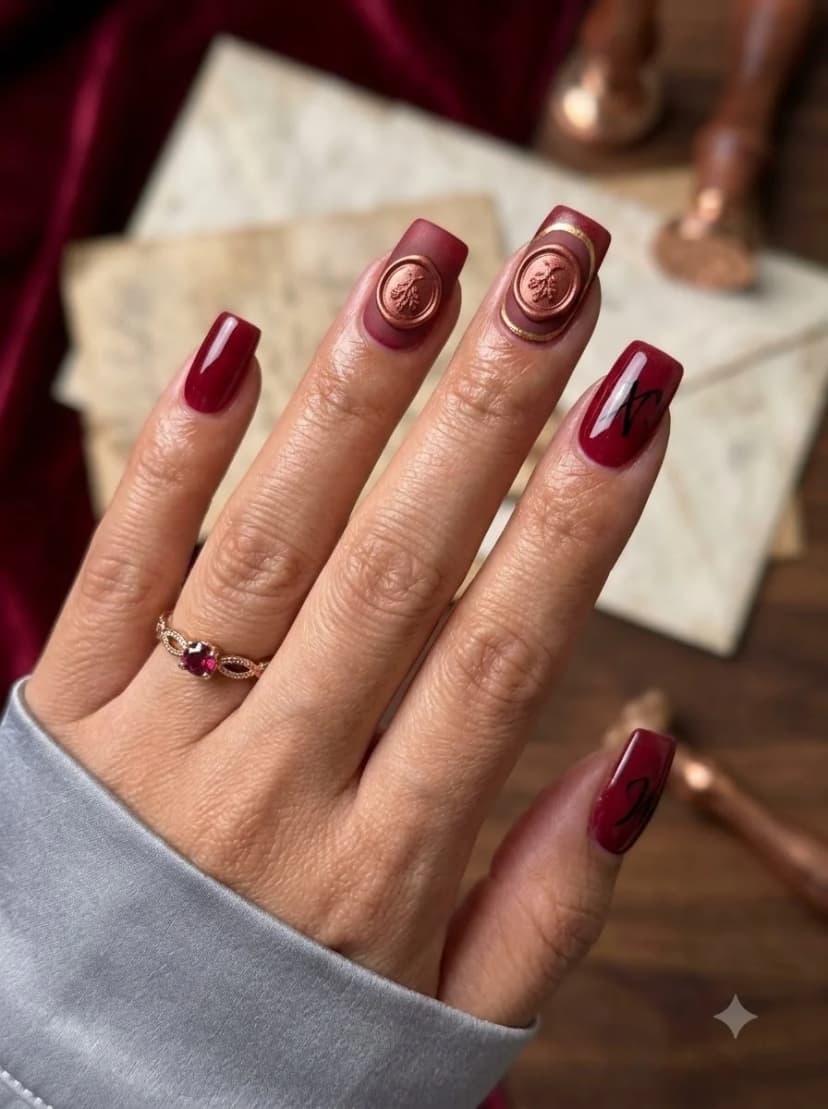
OVERVIEW:
Dark red or burgundy square nails with copper wax seal accents on two nails and black calligraphy details on others. The wax seal elements are three-dimensional copper circles with embossed designs. The calligraphy adds elegant script details. The overall effect is like an ancient manuscript or Victorian correspondence. Rich, dark, and distinctly gothic.
DESIGN BREAKDOWN:
Gothic letter art with 3D metallic copper wax seal charms and black calligraphy.
- Nail Color Used: Dark red base, copper for wax seal accents, black for calligraphy.
- Suitable Nail Shape: Square or coffin. The flat surface suits the detailed art.
- Design Element: Deep burgundy base with 3D copper wax seal studs and black script linework.
- Finish: Glossy top coat around seal borders.
- Tools Used: Fine detail brush for illustration.
GET THE LOOK AT HOME:
Adhere 3D wax seal charms firmly with nail glue before executing fine script lines around them.
- Base: Apply two coats of dark red or burgundy polish. Let dry fully.
- Wax seal charms: Using nail glue, press copper wax seal charms onto two accent nails. Hold firmly for 10 seconds.
- Calligraphy: On other nails, use black polish and a fine brush to paint elegant script or calligraphy details.
- Placement: Position the wax seals and calligraphy so they complement each other across the hand.
- Seal: Apply a top coat around the edges of the wax seals to reinforce the glue bond.
Pro Tip: Use nail glue rather than top coat to adhere the wax seal charms. Top coat adhesion weakens within days.
47. Sheer Grey Skull Line Art Nails
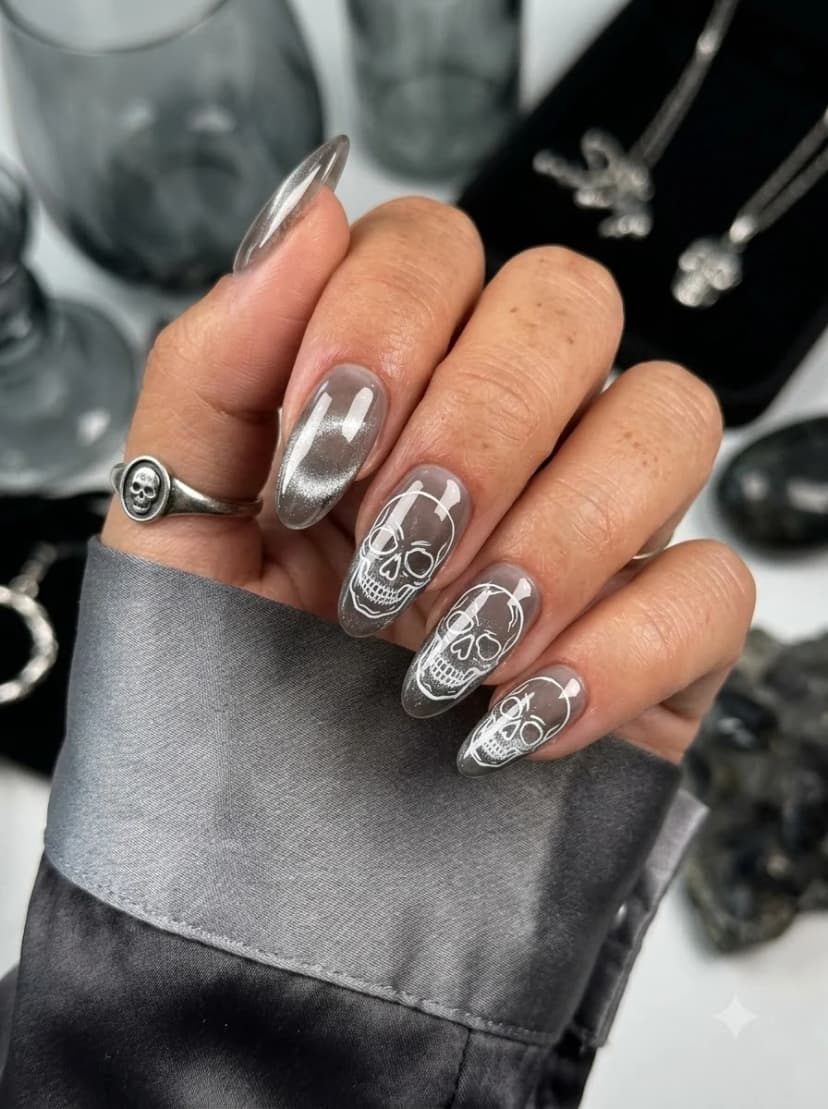
OVERVIEW:
Sheer grey or smoky translucent nails with detailed white skull line art on three nails. The skulls are rendered in fine white outlines, showing eye sockets, nasal cavities, and teeth with careful detail. The sheer grey base creates a ghostly, ethereal quality. A silver magnetic-shimmer nail provides a reflective accent. The overall effect is gothic glamour rather than horror.
DESIGN BREAKDOWN:
Ethereal smoky base with precise white skull anatomy illustrations and silver shimmer.
- Nail Color Used: Sheer grey base, white for skull line art, silver shimmer.
- Suitable Nail Shape: Medium almond or oval. The elongated curve suits the skull outlines.
- Design Element: Translucent grey base, detailed white skull linework, silver shimmer accent.
- Finish: Glossy top coat.
- Tools Used: Fine detail brush for skull art.
GET THE LOOK AT HOME:
Paint delicate white outlines with a steady light touch over smoky translucent polish.
- Base: Apply two coats of sheer grey or smoky translucent polish. Let dry completely.
- Skull outlines: On three nails, use white polish and an ultra-fine brush to paint detailed skull outlines showing eye sockets, nasal cavities, and teeth.
- Precision: Keep the white lines thin and precise. Thick lines make the skulls look cartoonish rather than elegant.
- Shimmer accent: Finish one nail with silver magnetic shimmer for gothic glamour.
- Seal: Apply a glossy top coat to protect the skull line art and enhance the sheer base.
Pro Tip: Keep the skull outlines thin and precise. Thick white lines make the skulls look cartoonish rather than elegant.


48. Deep Burgundy Spiderweb Detail Nails
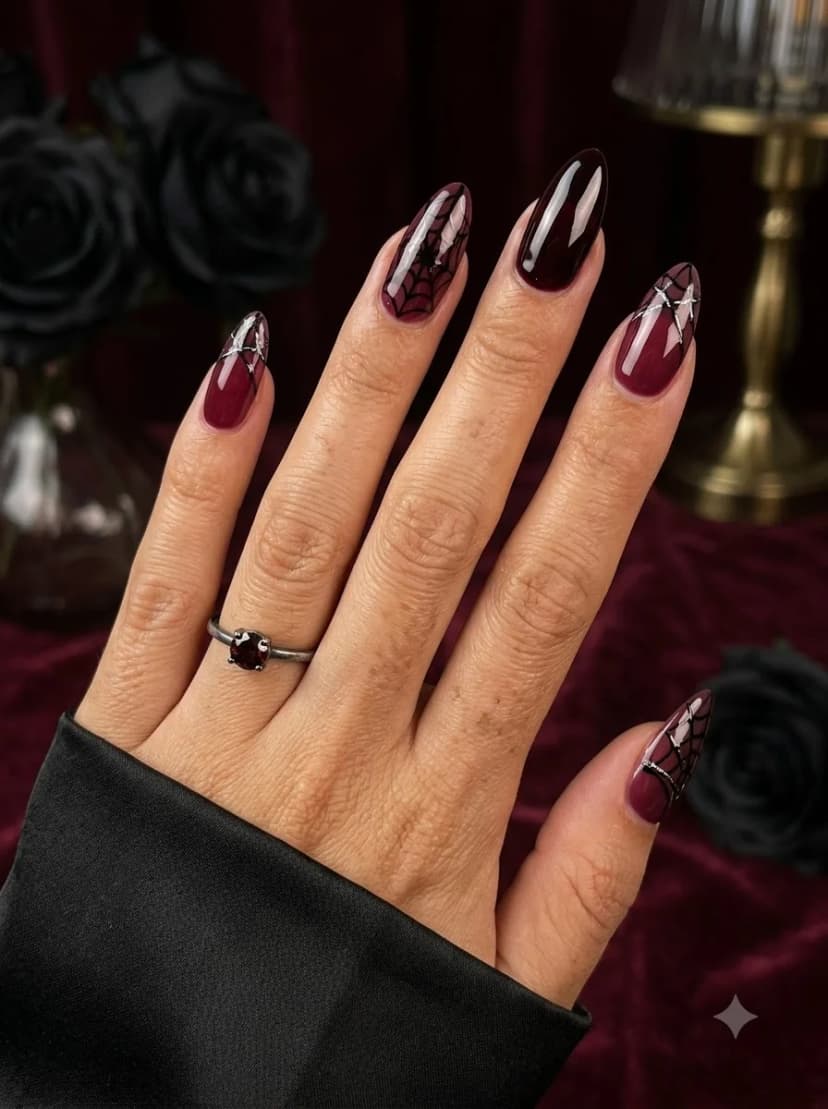
OVERVIEW:
Deep burgundy stiletto nails combine black spiderwebs with fine silver-chrome tip outlines, intersecting metallic accents, and tiny star details. One nail remains solid burgundy, giving the detailed nails room to stand out.
DESIGN BREAKDOWN:
Classic gothic burgundy stilettos mixing asymmetric black webs with sharp silver celestial accents.
- Nail Color Used: Deep burgundy, black for webs, and silver chrome for outlines and stars.
- Suitable Nail Shape: Long almond or stiletto.
- Design Element: Black corner spiderwebs, silver tip outlines and star accents, plus one solid nail.
- Finish: High-gloss top coat.
- Tools Used: Fine liner brush, silver chrome gel or polish, and a detail brush for stars.
GET THE LOOK AT HOME:
Start web lines from one corner of the nail tip for an organic, asymmetric flow.
- Base: Apply two coats of deep burgundy polish. Let dry fully.
- Spiderweb layout: On the nail tips, use black polish and a fine brush to paint radiating lines from one corner.
- Web lines: Connect the radiating lines with concentric curved lines to complete the spiderweb pattern.
- Silver accents: Add narrow chrome outlines at selected tips and small intersecting star details.
- Seal: Apply a glossy top coat to protect the spiderweb details.
Pro Tip: Start the spiderweb from one corner of the nail and radiate outward. This creates a natural, asymmetric web pattern.
49. Purple Cat-Eye Chrome Flame Tip Nails
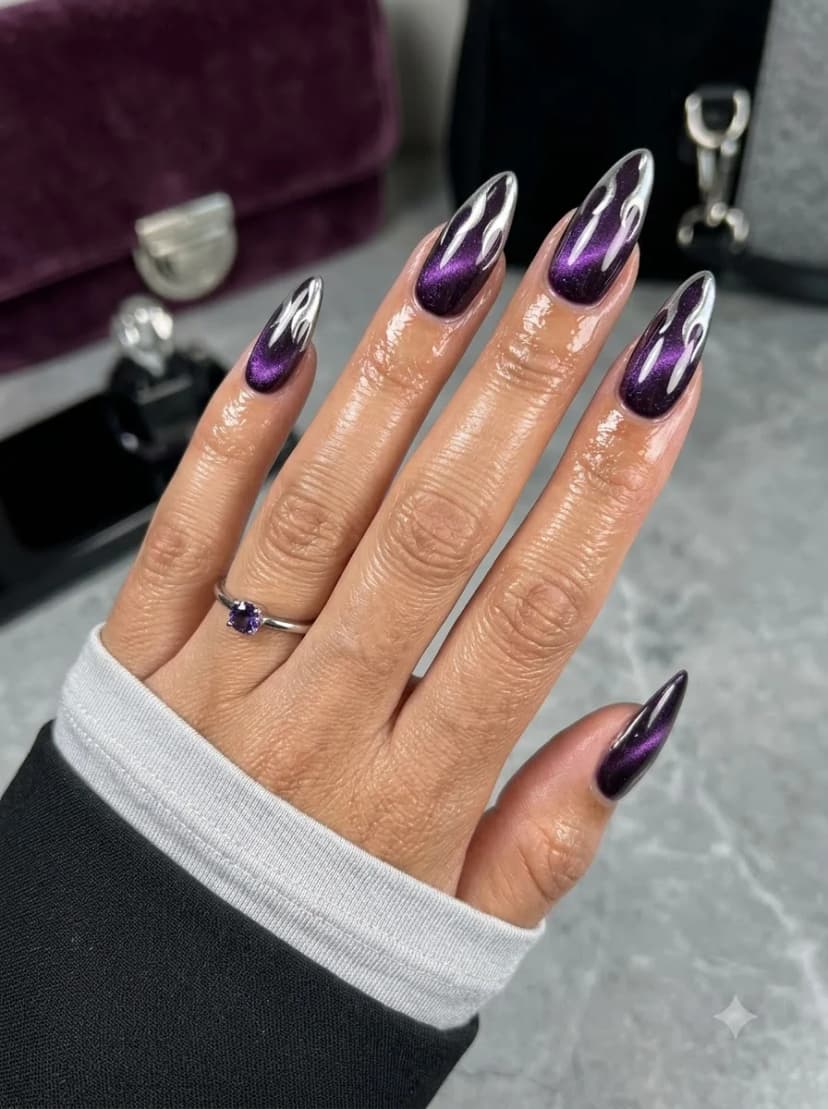
OVERVIEW:
Purple cat-eye polish with silver chrome flame tips on stiletto nails. The cat-eye effect creates a dimensional purple that shifts between violet and near-black. The silver chrome at the tips is painted in flame or tongue shapes that contrast sharply with the purple base. The stiletto shape amplifies the dramatic, witchy aesthetic. This is a bold, high-impact design.
DESIGN BREAKDOWN:
Dramatic witchy aesthetic pairing magnetic purple cat-eye depth with molten silver chrome flame tips.
- Nail Color Used: Purple cat-eye gel polish, silver chrome for flame tips.
- Suitable Nail Shape: Stiletto or long almond.
- Design Element: Violet cat-eye base with mirror silver chrome flame tips on stilettos.
- Finish: High-shine gel top coat.
- Tools Used: Cat-eye magnet, UV or LED lamp, thin liner brush, no-wipe gel, chrome powder, and applicator.
GET THE LOOK AT HOME:
Magnetize and cure the purple cat-eye base completely, then build the mirror-silver flame shapes with no-wipe gel and chrome powder.
- Cat-eye base: Apply purple cat-eye gel polish. Use the magnet to create the dimensional violet effect. Cure under lamp.
- Flame layout: Plan the flame or tongue shapes at the tips of each stiletto nail.
- Flame gel: Paint the flame shapes at the tips with no-wipe gel and a thin liner brush, then cure.
- Chrome: Rub silver chrome powder over the cured flame gel, dust away the excess, and keep the shapes bold.
- Seal: Apply glossy gel top coat and cure one final time.
Pro Tip: The chrome flame tips are the hardest part. Use a thin liner brush and work slowly for clean edges.


50. Grey Black V-Tip Silver Line Nails
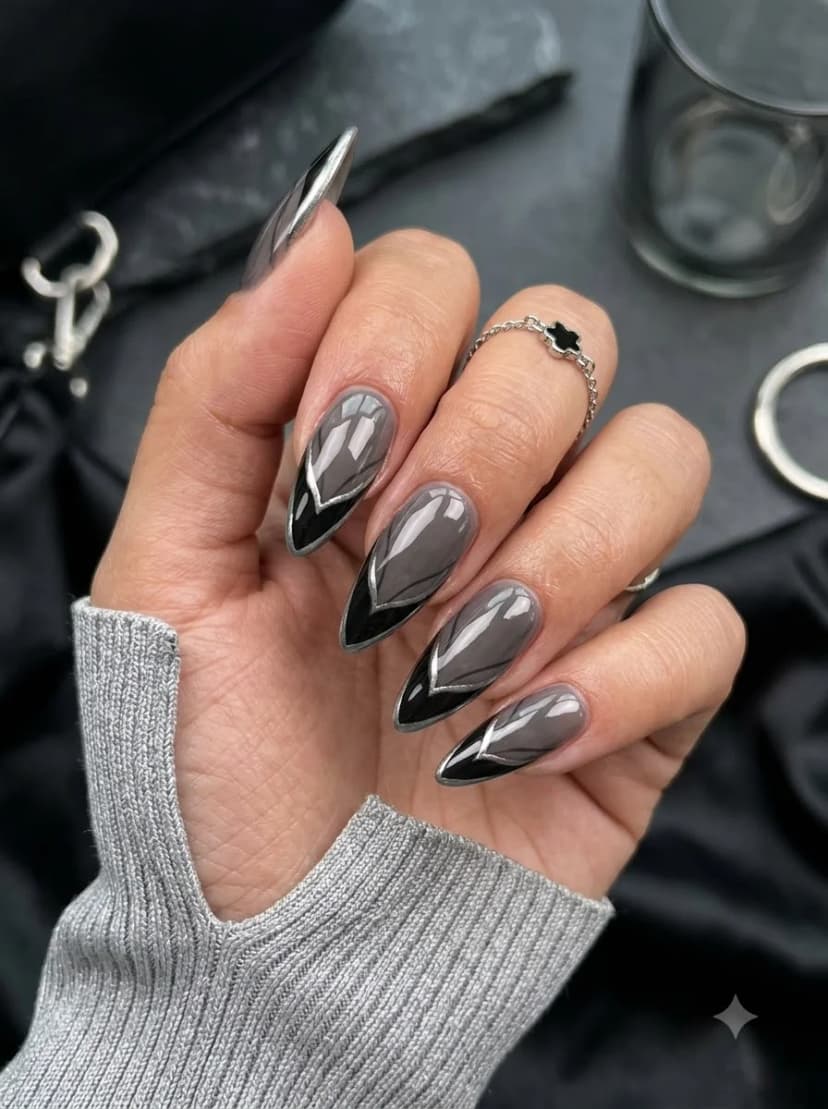
OVERVIEW:
Smooth grey nails feature one glossy black pointed V-tip per nail. A thin silver-chrome border traces each black tip, while an additional silver diagonal or vertical line cuts across the grey base. The long almond or stiletto shape reinforces the sharp art deco geometry.
DESIGN BREAKDOWN:
A single black V-tip, silver chrome border, and one extra metallic line over each grey nail.
- Nail Color Used: Grey base, glossy black V-tips, and silver chrome linework.
- Suitable Nail Shape: Long almond or stiletto. The pointed shape follows the V-tip geometry.
- Design Element: One black pointed French tip with a silver border and angular silver accent line.
- Finish: Glossy top coat.
- Tools Used: Striping brush, chrome powder, detail brush.
GET THE LOOK AT HOME:
Paint one clean black V-tip on each nail, then add the silver border and a separate angular accent line.
- Base: Apply two coats of grey polish. Let dry completely.
- Black V-tip: Paint one glossy black pointed French tip on each nail.
- Silver border: Trace the upper edge of each black tip with a thin silver-chrome line.
- Accent line: Add one additional silver diagonal or vertical line across the grey portion of each nail.
- Seal: Apply a glossy top coat to protect the V-tip and silver linework.
Pro Tip: Keep the silver border consistently thin. A heavy outline will overpower the black V-tip.
51. Tortoiseshell Pumpkin Outline Nails
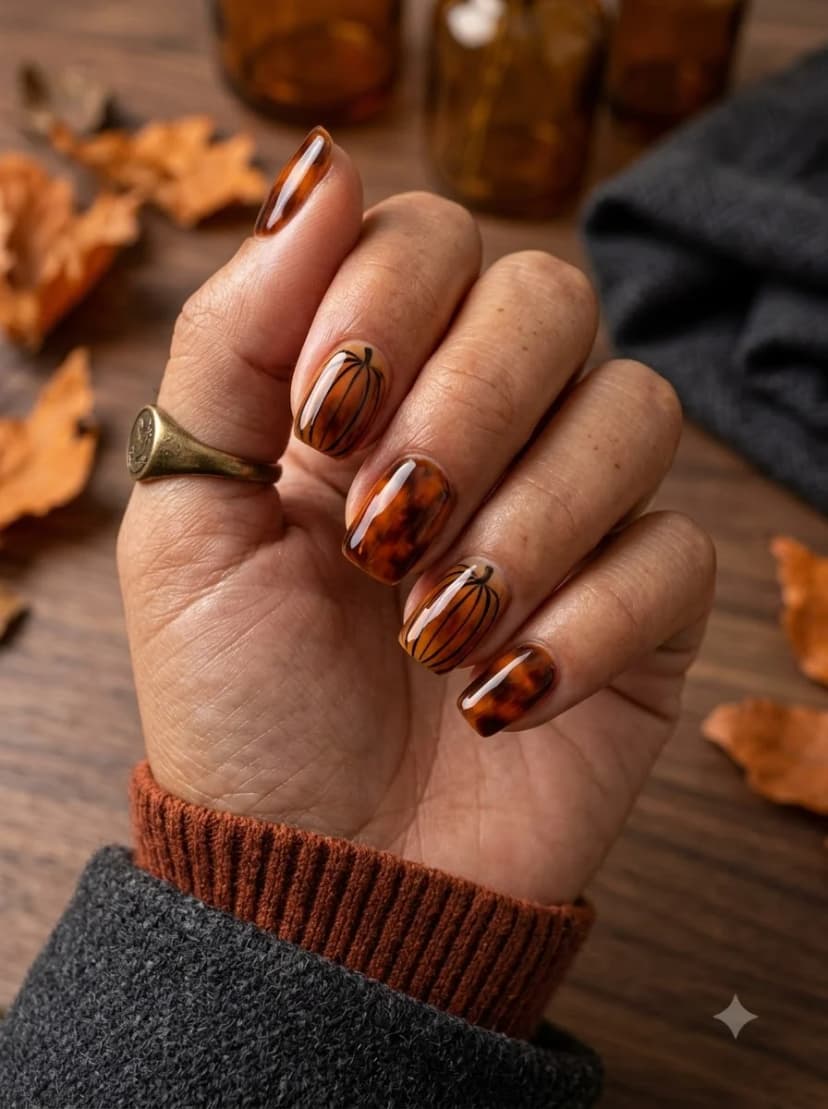
OVERVIEW:
Every nail uses a glossy layered tortoiseshell pattern in amber, caramel, brown, and black. Two accent nails carry thin black pumpkin outlines drawn directly over the tortoiseshell, allowing the warm pattern to fill each pumpkin naturally.
DESIGN BREAKDOWN:
Warm tortoiseshell throughout with restrained black pumpkin contour art on two nails.
- Nail Color Used: Amber and dark brown for tortoiseshell and black for pumpkin line art.
- Suitable Nail Shape: Short rounded square or squoval. The compact shape suits the outlined pumpkins.
- Design Element: Tortoiseshell on every nail with thin black pumpkin outlines on two accents.
- Finish: High-gloss top coat to emphasize depth.
- Tools Used: Detail brush for pumpkin art.
GET THE LOOK AT HOME:
Build the tortoiseshell across the entire set first, then draw simple black pumpkin contours on two nails.
- Tortoiseshell base: Apply the tortoiseshell technique using amber, brown, and black polish on every nail. Let dry fully.
- Pumpkin outline: On two nails, draw a rounded black outer contour while leaving the tortoiseshell visible inside.
- Ridge lines: Add several thin curved black lines inside each outline to suggest pumpkin sections.
- Stems: Paint small brown or black stems at the top of each pumpkin.
- Seal: Apply a high-gloss top coat to enhance both the tortoiseshell depth and the pumpkin art.
Pro Tip: Do not fill the pumpkins with orange. The tortoiseshell pattern should remain visible inside every black contour.


Tips to Make Your Halloween Manicure Last Longer
Start with clean, dry nails and remove any oil from the nail plate before applying base coat. Cap the free edge with every color and top-coat layer, especially on pointed shapes where tip wear appears first.
Let painted line art dry fully before sealing it so the fine details do not drag. Secure pearls, chrome pieces, and raised accents with gem gel or nail glue, then apply top coat around their edges instead of flooding over their surfaces.
Wear gloves for cleaning and prolonged water exposure, use cuticle oil daily, and refresh the top coat after several days if the finish begins to dull. Matte nails should be cleaned gently because oils and scratches show more readily than they do on glossy finishes.
Conclusion
Halloween nails do not have to be costume-y to be effective. This list proves that the season works just as well in moody marbles, celestial moons, and dark chrome finishes as it does in overt skulls and spiderwebs.
The best Halloween manicure is one you actually enjoy wearing for two weeks. If full-on ghost art feels like too much, a deep plum with a crescent moon accent gives you the seasonal nod without the commitment. If you want to go all in, the cemetery gates and stained glass designs reward the extra effort.
Start with the designs that match your current skill level. Simple color blocking, French tips, and minimal line art are the quickest options. Cat-eye and chrome finishes require magnetic gel, careful curing, or powder application, while the hand-painted scenes demand the most patience and control. Either way, you have 51 options to choose from.
Loving This Guide? Get More Like This! 💌
Want to impress with clothes? Want to look good? Subscribe to Whatsmyshape Newsletter and get weekly fashion guides, exclusive outfit ideas, and beauty tips delivered directly to your inbox. No spam, just pure style inspiration! ✨