
Fall nails are about warmth. Not the bright, punchy warmth of summer, but the muted, grounded kind that shows up in a cup of coffee, a wool sweater, or the last leaves clinging to a tree. The color palette shifts toward brown, burgundy, forest green, and gold, and the designs get a little more textured and layered.
This guide covers 25 designs that range from straightforward solid colors to detailed hand-painted art. Some of them are simple enough for a Sunday evening at home. Others will take patience and a steady hand. Either way, you will find something here that fits your skill level and the mood you want to set for the season.
25 Fall Nail Designs
1. Brown Plaid Nails
OVERVIEW:
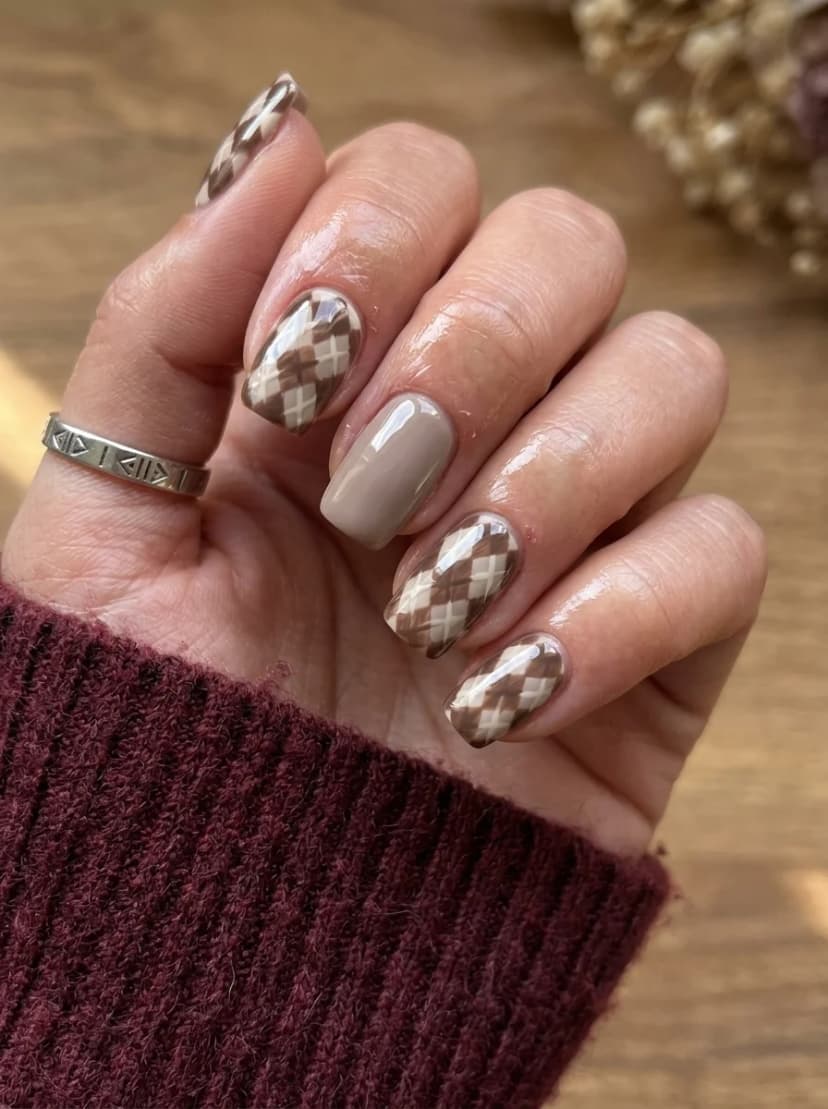
Plaid is one of those patterns that reads as distinctly fall without trying too hard. This version keeps the tonal range narrow, everything stays within taupe, cream, and brown, so the overall effect is warm and cohesive rather than busy. The argyle-inspired check pattern on four nails is balanced by a solid taupe accent on the ring finger, which gives your eye a resting place.
The almond shape works well here because the pattern has enough surface area to read clearly. On shorter nails, the intersecting lines would get compressed and lose the geometric quality that makes plaid look intentional. The glossy finish over the entire set unifies the patterned and solid nails into one cohesive look.
One thing to know: getting clean, straight lines on a curved nail surface takes practice. The lines near the edges will distort slightly, and that is fine. If you aim for perfectly straight lines, you will spend twice as long fixing mistakes that nobody will notice from a normal viewing distance.
DESIGN BREAKDOWN:
Geometric pattern in a warm neutral palette. One solid nail keeps it grounded.
- Nail Color Used: Warm taupe, cream, and medium brown for the plaid pattern. A slightly lighter taupe for the solid accent nail.
- Suitable Nail Shape: Medium to long almond. The elongated shape gives the plaid room to develop its pattern.
- Design Element: Argyle-style plaid on four nails, solid taupe on the ring finger.
- Finish: High-gloss top coat for a polished, unified look.
- Tools Used: Thin striping brush or striping tape, cleanup brush with acetone.
GET THE LOOK AT HOME:
Work in layers. Each set of lines needs to dry before you add the crossing lines, or the colors will bleed.
- Base: Apply two coats of warm taupe to all nails. Let dry completely.
- Horizontal lines: Use a striping brush or tape to create thin horizontal lines in cream and medium brown across each nail. Space them evenly.
- Vertical lines: Once the horizontal lines are dry, add crossing vertical lines in the same colors.
- Solid accent: Paint the ring finger with two coats of the lighter taupe.
- Seal: Apply a thick top coat to smooth out any texture from the layered lines.
Pro Tip: Use striping tape for the straightest lines. Press it down firmly and remove it while the polish is still slightly wet for the cleanest edges.


2. Burgundy Chrome Nails
OVERVIEW:
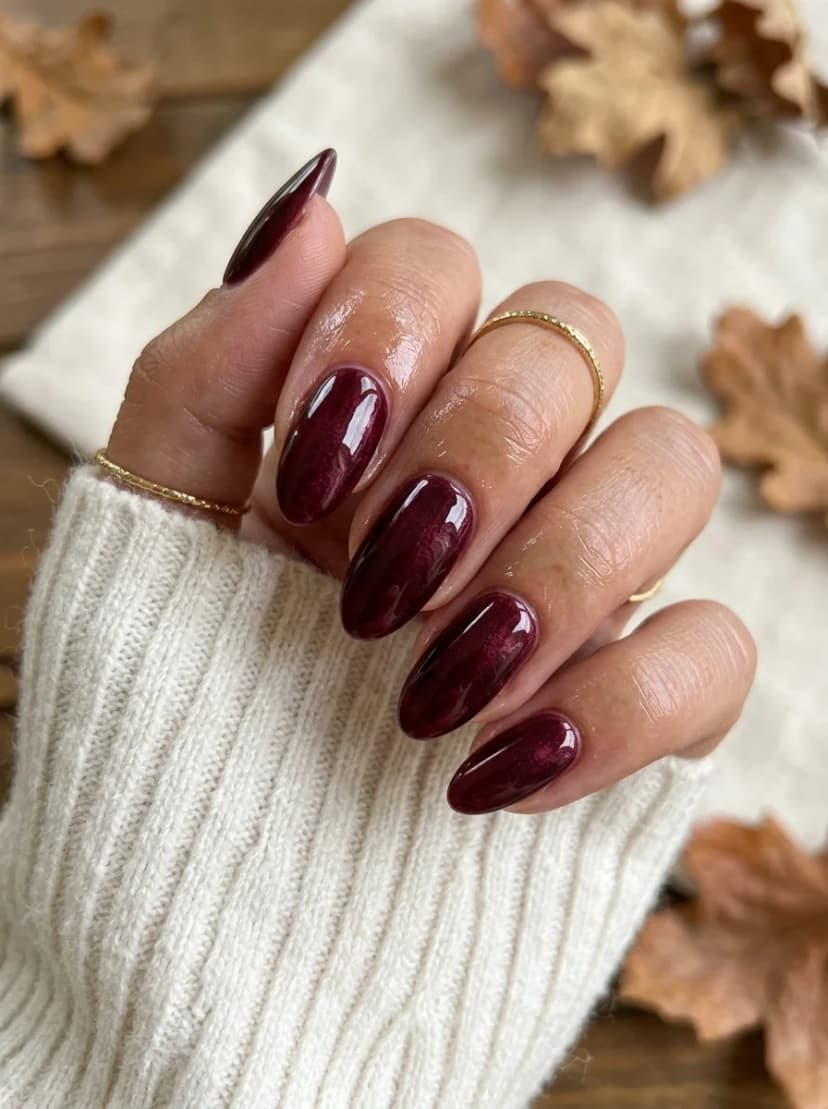
This is a solid-color manicure that does not need any pattern or accent nails to feel complete. The deep burgundy has a chrome or shimmer finish that catches light and creates a sense of depth you would not get from a flat cream polish. The color sits somewhere between dark wine and black cherry, rich enough to feel seasonal without being so dark it reads as black indoors.
The almond shape is the ideal match for this color. The tapered tip elongates the fingers, and the curved surface lets the chrome finish shift between brighter and darker tones as your hand moves. It is the kind of manicure that looks expensive even though it is a single color applied to every nail.
Chrome and shimmer polishes show brush strokes more than cream finishes. Apply in thin, deliberate strokes and resist the urge to go back over areas that look uneven. The self-leveling properties of most chrome polishes will smooth things out as they dry.
DESIGN BREAKDOWN:
Single color, high-impact finish. The chrome does all the work.
- Nail Color Used: Deep burgundy chrome or shimmer polish. OPI "Malaga Wine" in a shimmer finish or similar.
- Suitable Nail Shape: Almond or coffin. Both complement the richness of the color.
- Design Element: Solid burgundy chrome on all nails.
- Finish: High-gloss top coat to enhance the chrome depth.
- Tools Used: None beyond standard polish application.
GET THE LOOK AT HOME:
This is one of the simplest designs on this list. The key is in the prep and application technique.
- Prep: Push back cuticles and buff the nail surface. Chrome polish magnifies every ridge.
- Base coat: Apply one coat of base coat and let it dry fully.
- Two thin coats: Apply two thin coats of burgundy chrome, letting each dry for three minutes between coats. Thick coats will bubble and show brush strokes.
- Seal: Apply a glossy top coat in one smooth stroke. Cap the free edge to prevent tip chipping.
Pro Tip: If you see brush strokes after the first coat, do not panic. The second coat usually evens them out. If they persist, try thinning your polish with a drop of nail polish thinner.
3. Emerald Green with Gold Leaf Art
OVERVIEW:
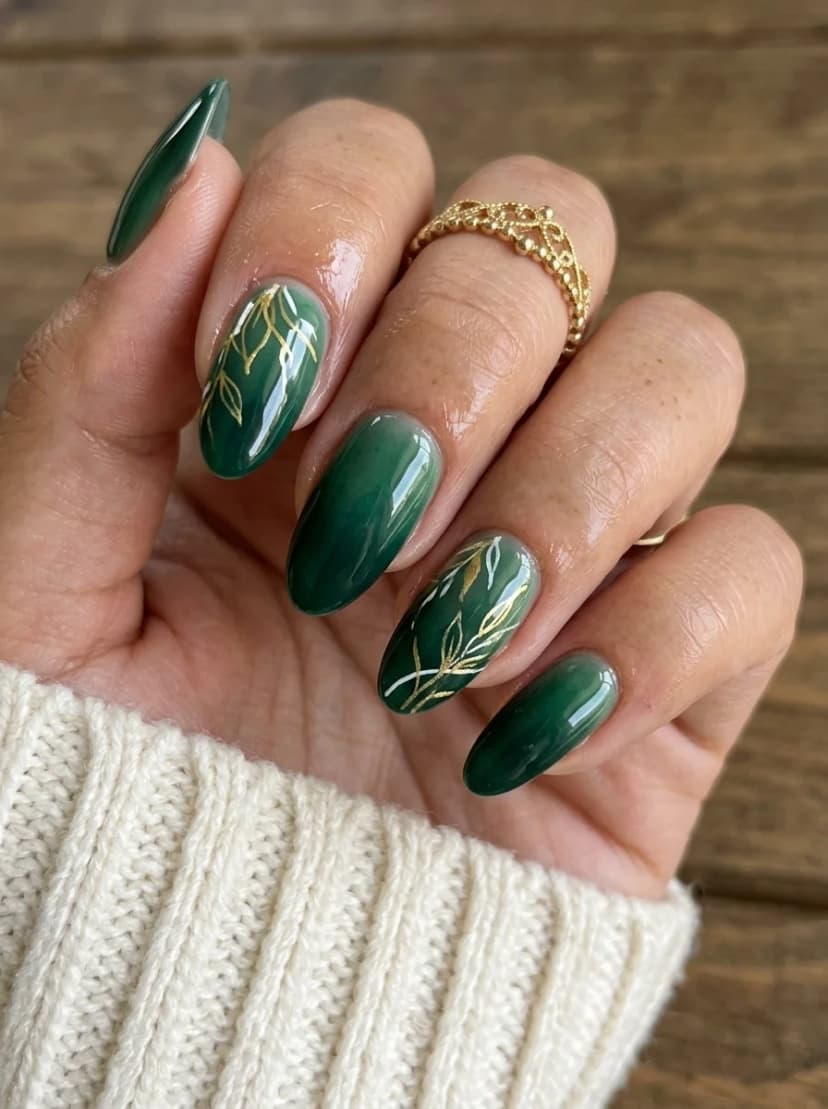
Deep emerald green is one of those colors that feels luxurious without being flashy. This design pairs it with hand-painted gold leaf line art on two accent nails, which adds a botanical, almost vine-like quality. The gold catches light against the dark green in a way that looks more like jewelry than nail art.
The solid green nails are not just filler. The color itself has a depth and saturation that makes each nail look like a polished gemstone. The high-gloss finish amplifies that effect. You could wear just the solid green and it would still feel complete.
The gold line art requires a very thin brush and a steady hand. If you are not confident with freehand work, gold striping tape cut into small leaf shapes can approximate the look. It will not have the same organic quality, but it will be faster and more forgiving.
DESIGN BREAKDOWN:
Rich jewel tone with delicate metallic art. The contrast between solid and detailed nails is what makes it work.
- Nail Color Used: Deep emerald green, gold metallic polish or gold leaf for the line art.
- Suitable Nail Shape: Almond. The tapered shape complements the botanical theme.
- Design Element: Solid emerald on three nails, gold leaf line art on two accent nails.
- Finish: High-gloss top coat to enhance the green depth and seal the gold art.
- Tools Used: Fine detail brush for gold line art, cleanup brush.
GET THE LOOK AT HOME:
Paint the solid green nails first. They are straightforward and will build your confidence before the detail work.
- Green nails: Apply two coats of emerald green to three nails. Let dry.
- Accent base: Apply one coat of the same green to the accent nails. Let dry.
- Gold line art: Using a fine detail brush and gold metallic polish, paint thin, flowing vine and leaf shapes across the accent nails. Keep the lines delicate.
- Seal: Apply a glossy top coat to all nails. Be gentle over the gold art to avoid smearing.
Pro Tip: Practice the leaf shapes on a piece of paper first. Simple curved lines with small oval shapes at the ends read as leaves without requiring advanced skill.


4. Brown Marble with Gold Leaf
OVERVIEW:
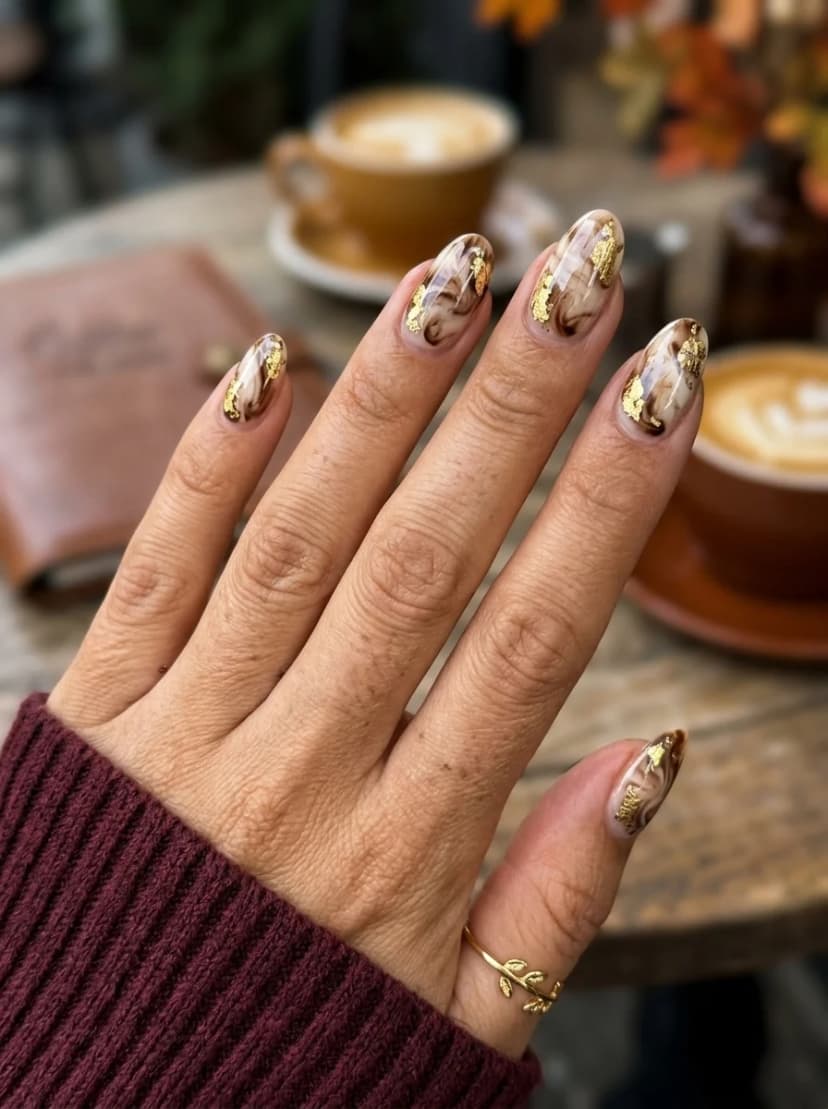
Brown marble designs walk a fine line between looking sophisticated and looking muddy. This one stays on the right side by using a sheer nude base instead of white, which makes the brown and cream swirls feel submerged rather than painted on top. The gold leaf flakes scattered across each nail add a metallic flash that breaks up the organic pattern.
The wet-on-wet technique used here means every nail will look different. Some will have more cream, others more dark brown, and the gold leaf placement is random by nature. That variation is part of the appeal. If you try to make every nail match, you will overwork the swirls and end up with a muddy brown mess instead of distinct marble veins.
This design photographs well under warm lighting. Cool fluorescent light can make the brown tones look flat, so if you are planning to show these off on social media, aim for natural or warm indoor light.
DESIGN BREAKDOWN:
Organic marble technique with metallic accents. Every nail is unique.
- Nail Color Used: Sheer warm nude base, chocolate brown, cream, and gold leaf flakes.
- Suitable Nail Shape: Almond or coffin. The elongated shape gives the marble room to breathe.
- Design Element: Brown and cream marble swirls with scattered gold leaf flakes.
- Finish: High-gloss top coat to seal the gold leaf and create a polished stone effect.
- Tools Used: Toothpick or fine brush, tweezers for gold leaf, foil palette.
GET THE LOOK AT HOME:
Work one nail at a time. The wet-on-wet technique requires you to move quickly before the base dries.
- Base: Apply one coat of sheer nude to all nails. Let dry.
- Wet layer: Apply a second thin coat of nude. Do not let it dry.
- Drop colors: While the base is wet, place small dots of brown and cream onto the nail. Use a toothpick to drag through them in flowing lines. Three or four drags per nail maximum.
- Gold leaf: While the marble is still tacky, use tweezers to press small gold leaf flakes onto the surface.
- Seal: Wait five minutes, then apply a thick top coat to smooth out texture and encapsulate the gold leaf.
Pro Tip: If the marble looks muddy, you are over-mixing the colors. Use fewer drops and limit yourself to three drags per nail. Let the colors blend naturally rather than forcing them.
5. Chocolate Brown with Gold Swirls
OVERVIEW:
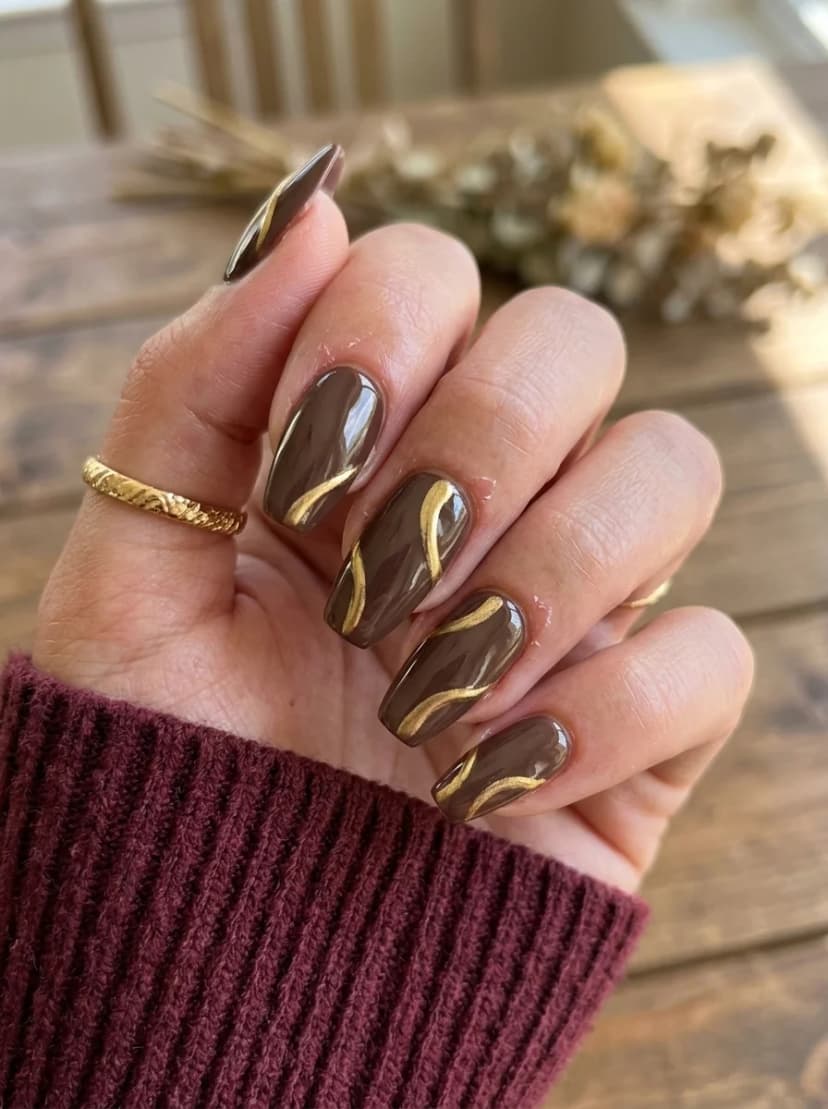
Dark chocolate brown as a base color is one of the easiest ways to signal that your manicure has entered its fall era. The gold swirl lines painted on top elevate it from a simple solid to something with movement and visual interest. The swirls are not uniform, which gives the design an organic, almost calligraphic quality.
What makes this combination work is the contrast between the deep, opaque brown and the reflective gold. The gold catches light at different angles, so the design looks different depending on how your hand is positioned. In direct light, the swirls pop. In dimmer settings, they recede into the brown and the overall effect becomes more subtle.
The almond shape suits this design because the swirls follow the natural curve of the nail. On shorter, squarer shapes, the flowing lines would feel cramped and lose their elegance.
DESIGN BREAKDOWN:
Dark base, metallic accent lines. Minimal effort, maximum payoff.
- Nail Color Used: Deep chocolate brown base, gold metallic polish for the swirls.
- Suitable Nail Shape: Almond. The tapered shape lets the swirls flow naturally.
- Design Element: Solid chocolate brown with gold metallic swirl lines on each nail.
- Finish: High-gloss top coat to enhance both the brown depth and gold shimmer.
- Tools Used: Thin striping brush for the gold swirls.
GET THE LOOK AT HOME:
The brown base is the easy part. The swirls require a loaded brush and confident strokes.
- Brown base: Apply two coats of chocolate brown to all nails. Let dry fully.
- Gold swirls: Load a striping brush with gold metallic polish. Paint one or two flowing, curved lines across each nail. Vary the direction and thickness on each nail.
- Seal: Apply a glossy top coat to lock in the design. Use a light hand over the gold to avoid smearing.
Pro Tip: Keep your brush fully loaded but not dripping. A dry brush creates scratchy, broken lines. A wet brush creates smooth, flowing curves. If the gold looks too thin, go over the line once more without letting it dry between strokes.


6. Gold Tortoiseshell Nails
OVERVIEW:
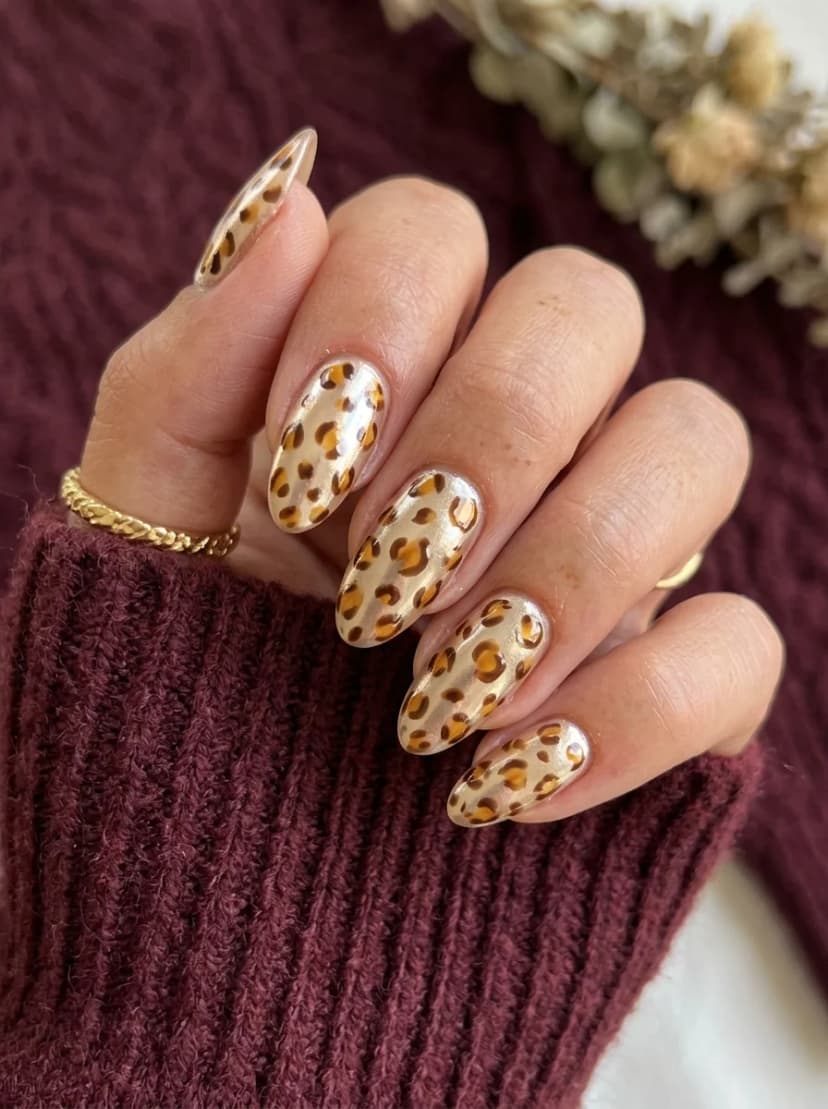
This is not your standard leopard print. The base is a metallic champagne gold, and the spots are amber and dark brown, which pushes the design into tortoiseshell territory rather than animal print. The result is something that looks more like polished gemstone than nail art.
The gold base does most of the heavy lifting. It catches light in a way that makes the brown spots look like they are floating on a metallic surface rather than sitting on top of flat polish. That dimensional quality is what separates this from a typical tortoiseshell design.
One practical note: metallic bases show every imperfection in the application. If your coats are uneven or you have brush strokes, the gold will amplify them. Take your time with the base and apply thin, even coats.
DESIGN BREAKDOWN:
Metallic base with organic spots. The gold base is the foundation of the whole look.
- Nail Color Used: Champagne gold metallic base, amber, and dark brown for the spots.
- Suitable Nail Shape: Almond. The organic shape suits the tortoiseshell pattern.
- Design Element: Gold metallic base with scattered amber and dark brown spots.
- Finish: High-gloss top coat to seal the pattern and enhance the metallic base.
- Tools Used: Dotting tool or small brush for the spots.
GET THE LOOK AT HOME:
Build the base first, then add spots while the gold is still slightly tacky so they blend naturally.
- Gold base: Apply two thin coats of champagne gold metallic polish. Let each coat dry fully.
- Amber spots: Use a dotting tool to place irregular amber spots across each nail. Vary the sizes.
- Dark accents: While the amber is still wet, add smaller dark brown spots partially overlapping the amber. The colors will blend slightly at the edges.
- Seal: Apply a thick top coat to smooth out the spot texture and add depth.
Pro Tip: Real tortoiseshell spots are not round. Use the tip of your brush to drag the edges of each spot into irregular shapes. Two or three spots per nail is enough. More than that and the design starts looking cluttered.
7. Burgundy Ombre with Gold Foil
OVERVIEW:
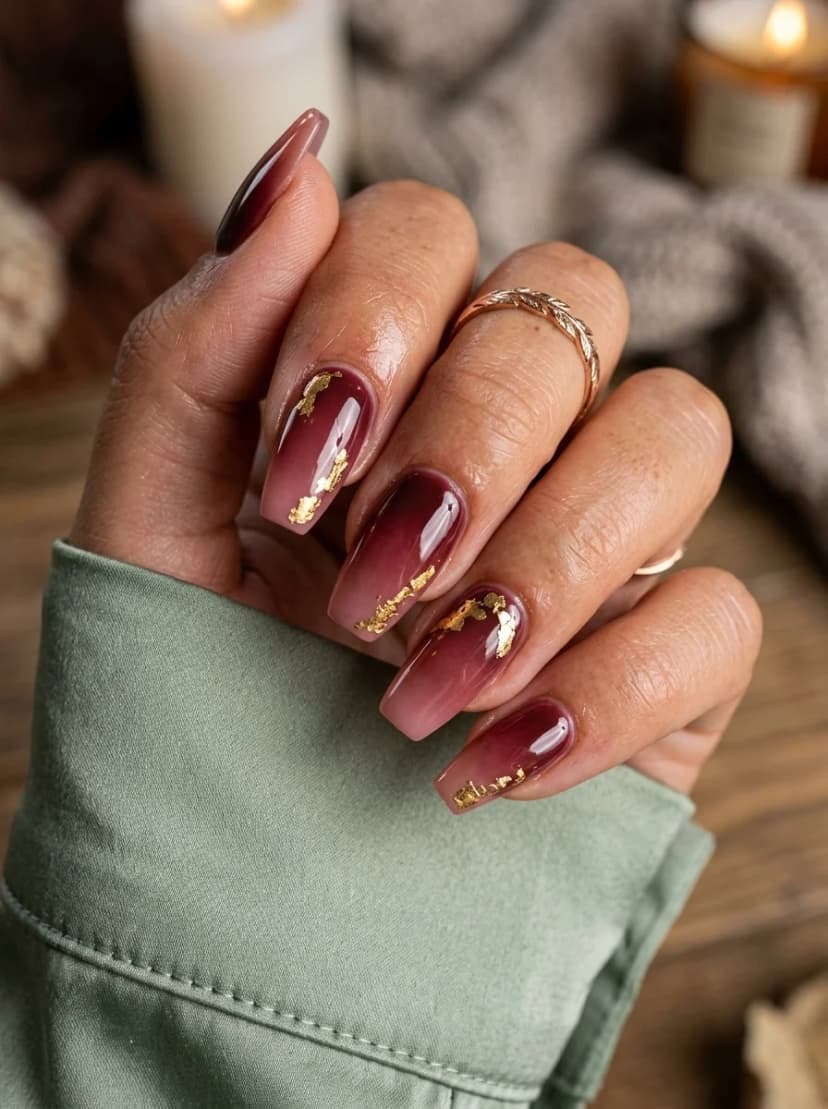
The ombre effect here goes from a sheer nude at the cuticle to a deep burgundy at the tip, creating a gradient that looks like the color is bleeding downward. Gold foil flakes scattered across the transition zone add a metallic interruption that breaks up the gradient and catches light.
Coffin shape works particularly well for ombre designs because the flat, wide tip gives the darkest color room to land. The gradient has more surface area to develop compared to a rounded or almond shape, where the color transition happens over a shorter distance.
The gold foil is optional but worth the extra effort. Without it, the ombre is still attractive, but the foil adds a layer of texture and luxury that takes the design from nice to noticeable. If you have never worked with gold foil before, this is a forgiving design to start with because the random placement means there is no wrong way to do it.
DESIGN BREAKDOWN:
Gradient technique with metallic accent. The transition zone is where the magic happens.
- Nail Color Used: Sheer nude or milky pink base, deep burgundy for the tips, gold leaf flakes.
- Suitable Nail Shape: Coffin or ballerina. The flat tip gives the ombre room to develop.
- Design Element: Nude-to-burgundy ombre gradient with gold foil flakes at the transition zone.
- Finish: High-gloss top coat to seal the foil and enhance the gradient.
- Tools Used: Makeup sponge for ombre, tweezers for gold foil.
GET THE LOOK AT HOME:
The sponge technique for ombre is forgiving but requires patience between layers.
- Base: Apply two coats of sheer nude to all nails. Let dry.
- Sponge preparation: On a makeup sponge, paint a stripe of nude polish and a stripe of burgundy polish directly below it, slightly overlapping.
- Dab the gradient: Press the sponge onto each nail with a rolling motion. Repeat two to three times per nail, allowing a few seconds between each pass for the color to build.
- Clean edges: Use a cleanup brush dipped in acetone to remove polish from the skin around each nail.
- Gold foil: Press small gold flakes onto the transition zone where the nude meets the burgundy.
- Seal: Apply a thick top coat to encapsulate the foil and smooth out any texture from the sponge.
Pro Tip: If the gradient looks patchy after the first pass, do not add more polish to the sponge. Just press again with what is already there. Adding more polish creates a thick, lumpy layer that takes forever to dry.


8. Olive Green French Tip with Line Art
OVERVIEW:
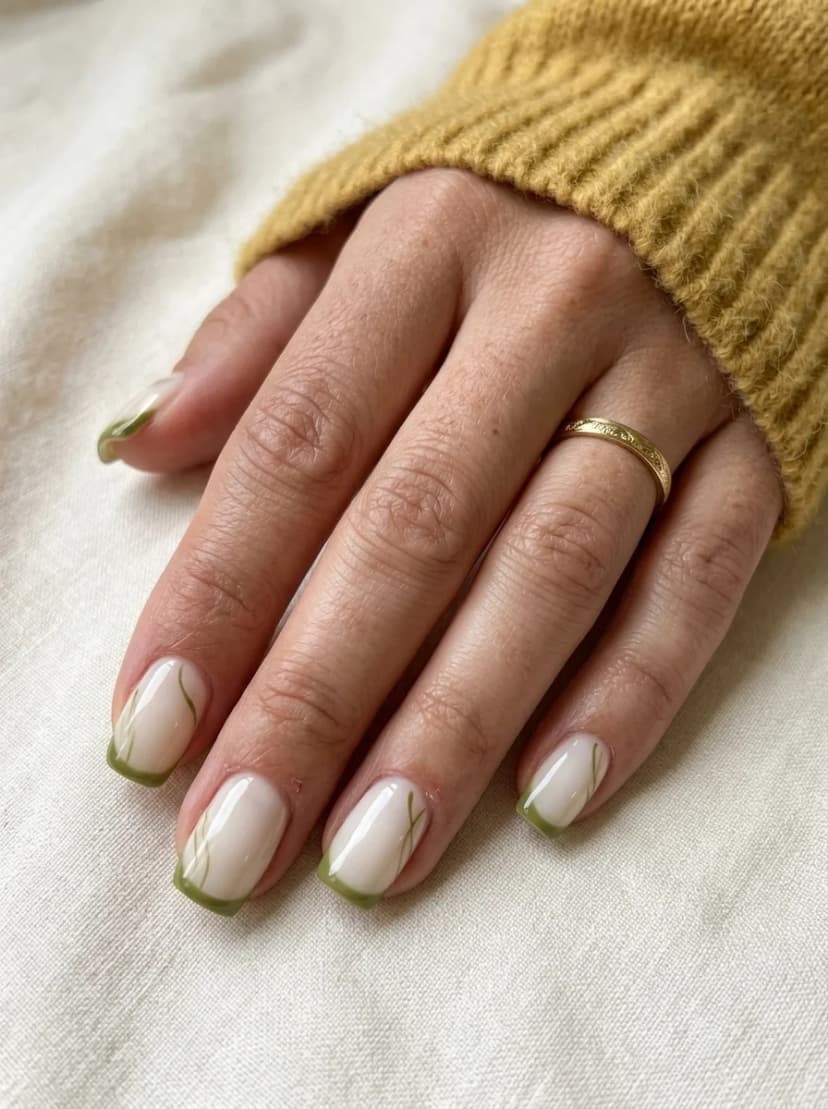
A French tip in olive green instead of white is a subtle shift that changes the entire mood of the manicure. The sheer nude base keeps things natural and understated, while the green tips add an earthy, autumnal quality. The thin, curved line art painted over the tips adds a botanical detail that ties the whole design together.
The short almond shape is the right call for this design. The tips are thin enough that they do not overwhelm the nail, and the line art has just enough space to read without looking cramped. On longer nails, you could make the tips thicker and the line art more elaborate.
This is a good design for anyone who wants to try colored French tips without committing to a bright or metallic color. Olive green is muted enough to work in professional settings while still feeling seasonal and intentional.
DESIGN BREAKDOWN:
Classic French structure, earthy color, delicate accent work.
- Nail Color Used: Sheer nude or milky pink base, olive green for the tips and line art.
- Suitable Nail Shape: Short almond or oval. The soft shape complements the botanical feel.
- Design Element: Olive green French tips with thin, curved green line art over the tips.
- Finish: Glossy top coat for a clean, polished look.
- Tools Used: French tip guides or liner brush for tips, fine detail brush for line art.
GET THE LOOK AT HOME:
Do the French tips first, then add the line art as a finishing detail.
- Base: Apply two coats of sheer nude. Let dry.
- Green tips: Use French tip guides or a liner brush to paint thin olive green tips on each nail.
- Line art: Using a fine detail brush and the same green, paint one or two thin, curved lines extending from the tip downward. Keep them organic and flowing.
- Seal: Apply a glossy top coat to finish.
Pro Tip: Peel off the French tip guides while the green is still slightly wet. Waiting until it is fully dry can cause the polish to lift at the edges when you remove the guide.
9. Red Chrome Cat-Eye Nails
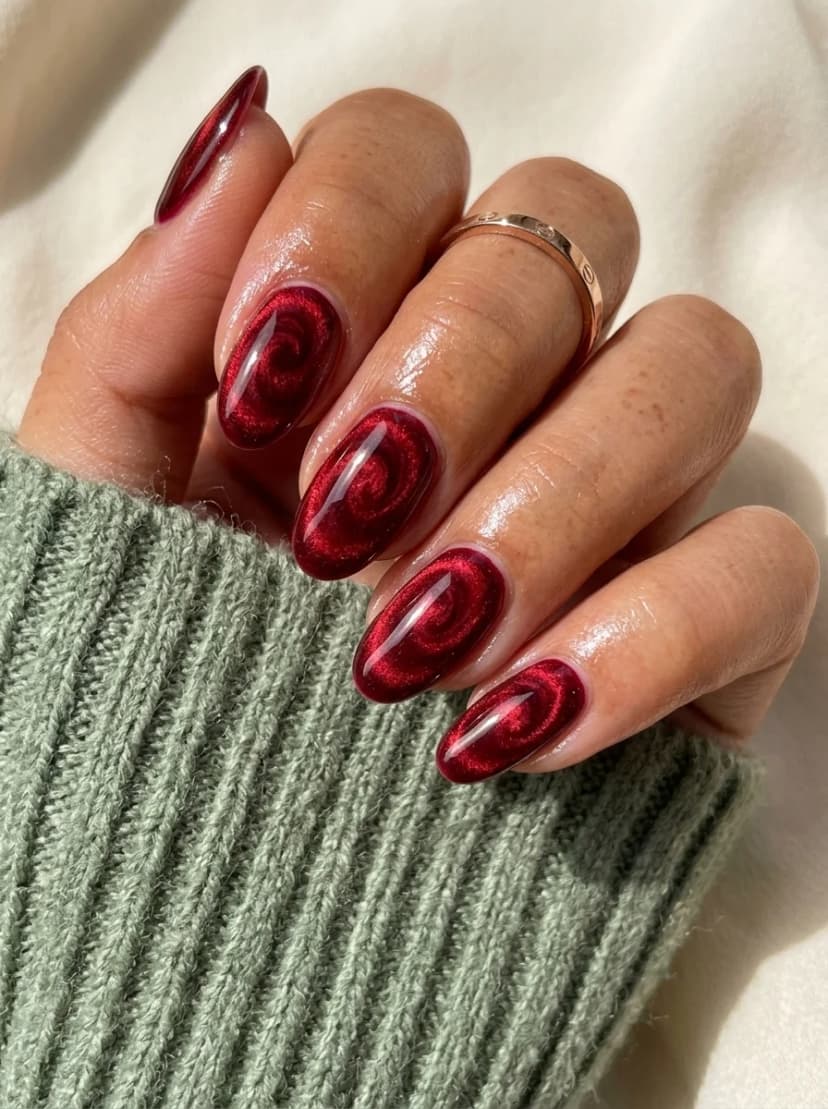
OVERVIEW:
Cat-eye polish uses magnetic particles suspended in the formula to create a dimensional, shifting effect. This deep red version produces a swirl of light that moves across the nail as you tilt your hand. The result looks like polished garnet or a velvet curtain caught in stage lighting.
The effect is created by holding a magnet near the wet polish, which pulls the metallic particles into a concentrated line or swirl. The placement of the magnet determines where the light catches, so you can customize the look on each nail. Some people prefer a single diagonal line. Others go for a more scattered, aurora-like pattern.
Cat-eye polish requires gel products and a UV or LED lamp for best results. Regular polish versions exist, but the magnetic effect is less pronounced and does not last as long. If you are investing the time in this design, gel is worth the extra setup.
DESIGN BREAKDOWN:
Magnetic polish creates a three-dimensional light effect. The magnet is the tool that makes or breaks the design.
- Nail Color Used: Deep red cat-eye gel polish.
- Suitable Nail Shape: Almond. The curved surface maximizes the light-shifting effect.
- Design Element: Red cat-eye magnetic effect on all nails.
- Finish: High-gloss gel top coat for a glass-like finish.
- Tools Used: Cat-eye magnet, UV or LED lamp.
GET THE LOOK AT HOME:
Work one nail at a time. The magnet needs to be held over wet polish, so you cannot batch this process.
- Base: Apply a thin coat of black gel polish as a base. Cure under the lamp.
- Cat-eye coat: Apply one coat of red cat-eye gel polish. Do not cure yet.
- Magnet: Hold the cat-eye magnet about 5mm above the wet polish for 10 to 15 seconds. The metallic particles will concentrate into a line or swirl.
- Cure: Immediately cure under the lamp to lock the pattern in place.
- Top coat: Apply a glossy gel top coat and cure one final time.
Pro Tip: If the cat-eye line looks faint, you may be holding the magnet too far away. Get it as close to the polish surface as possible without touching it. The closer the magnet, the more concentrated the particles.


10. Terracotta with Floral Art
OVERVIEW:
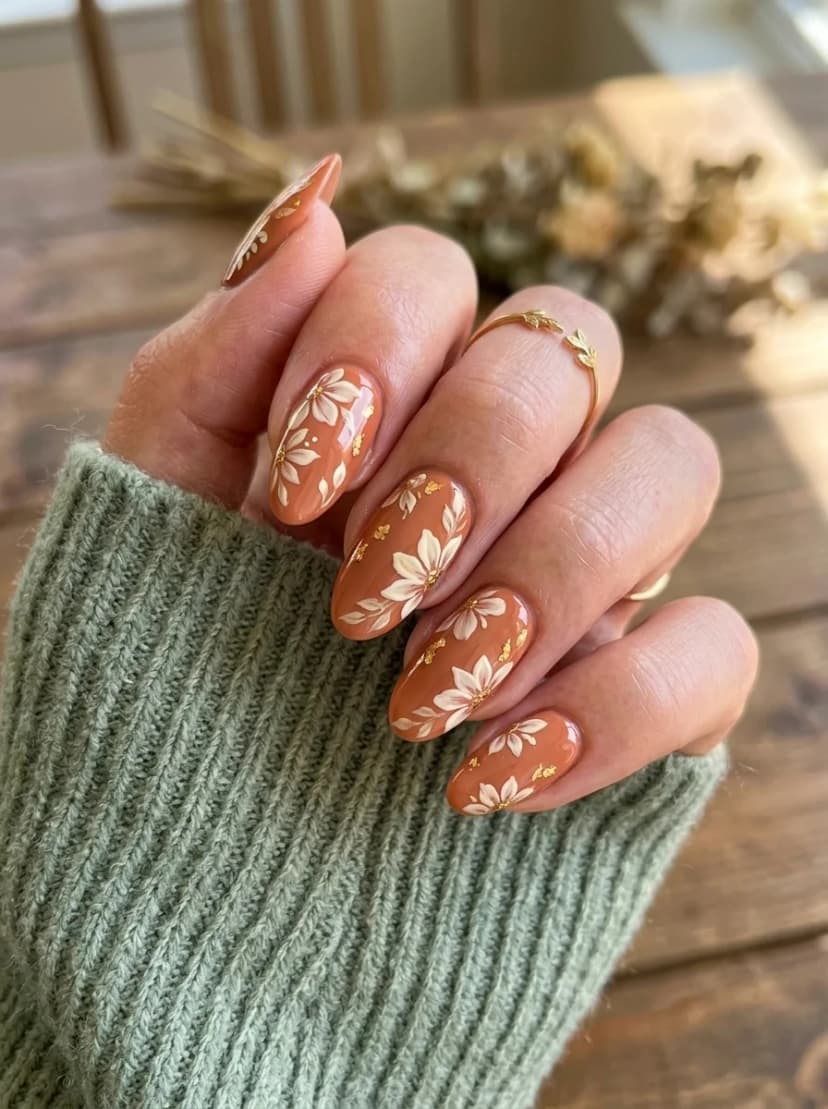
Terracotta is the color of fall in a bottle. This warm, burnt orange-brown works as both a solid and a background for art, which is exactly how this design uses it. The hand-painted cream-colored flowers with gold leaf accents sit on top of the terracotta base, creating a set that feels like pressed botanicals under glass.
The floral painting style is loose and painterly rather than hyper-detailed. The petals are suggested with broad strokes rather than individually rendered, which gives them an organic, natural quality. The gold leaf scattered among the flowers adds a metallic dimension that catches light and elevates the whole design.
This is a good design for intermediate painters. The flowers do not require precision, but you do need to be comfortable with a detail brush and have some sense of composition. If you are newer to nail art, start with fewer flowers per nail and build up.
DESIGN BREAKDOWN:
Warm base with painterly florals. The loose style is intentional, not sloppy.
- Nail Color Used: Terracotta or cognac brown base, cream or off-white for flowers, gold leaf flakes.
- Suitable Nail Shape: Almond. The natural curve suits the botanical theme.
- Design Element: Hand-painted cream flowers with gold leaf accents on a terracotta base.
- Finish: High-gloss top coat to seal the art and gold leaf.
- Tools Used: Small detail brush, tweezers for gold leaf.
GET THE LOOK AT HOME:
Paint the flowers before adding the gold leaf. The foil goes on last so it sits on top of the design.
- Base: Apply two coats of terracotta to all nails. Let dry.
- Flowers: Using a detail brush and cream polish, paint loose petal shapes in clusters of three to five. Keep the strokes broad and organic.
- Gold leaf: While the top coat is still tacky, press small gold flakes near the flowers. Arrange them randomly.
- Seal: Apply a thick top coat to encapsulate everything and smooth out texture.
Pro Tip: If your flowers look muddy, you are using too much polish on the brush. Wipe most of it off and use light, feathery strokes. The terracotta base should show through slightly between the petals.
11. Rose Gold Chrome Nails
OVERVIEW:
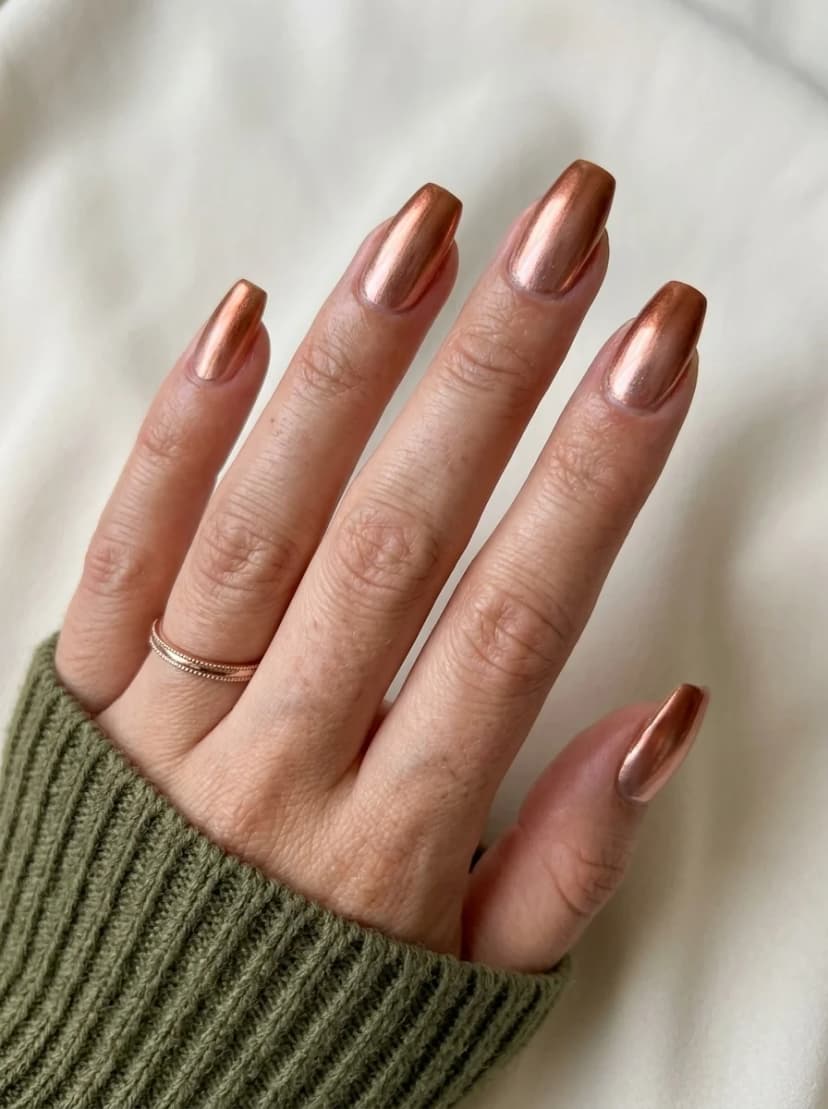
Rose gold chrome is one of those finishes that looks different in every lighting condition. In natural daylight, it reads as a warm, blush-toned copper. Under indoor lighting, it shifts toward a deeper, more saturated rose. The mirror-like quality of chrome powder is what sets this apart from regular metallic polish, which cannot achieve that liquid-metal look.
The coffin shape gives the chrome a wide, flat surface to showcase its reflectivity. Every angle produces a different light pattern, which makes this design particularly engaging in person. Photos capture one moment, but the live experience of watching the color shift as you move your hands is what makes chrome worth the effort.
Chrome powder requires a no-wipe gel top coat as a base for the powder to adhere to. If you burnish the powder onto a regular top coat, you will get a glitter effect rather than a mirror finish. The burnishing step is non-negotiable.
DESIGN BREAKDOWN:
All chrome, all nails. The finish is the entire design.
- Nail Color Used: Rose gold chrome powder over a nude or pink gel base.
- Suitable Nail Shape: Coffin or almond. Both showcase the chrome effect well.
- Design Element: Full rose gold chrome on all nails.
- Finish: Mirror chrome finish, sealed with a no-wipe top coat.
- Tools Used: Chrome powder, sponge applicator, no-wipe gel top coat, UV or LED lamp.
GET THE LOOK AT HOME:
This is a gel-only design. The chrome powder does not work with regular polish.
- Base: Apply two coats of nude or pink gel polish. Cure each coat.
- No-wipe top coat: Apply a thin layer of no-wipe gel top coat. Cure.
- Burnish: Using a sponge applicator, rub rose gold chrome powder into the cured surface. Apply firm pressure and work in small circular motions until the mirror finish appears.
- Dust off: Use a fluffy brush to remove excess powder from the nails and surrounding skin.
- Seal: Apply another layer of no-wipe top coat and cure to protect the chrome finish.
Pro Tip: If the chrome looks patchy or grainy, your top coat may not be fully cured. Try curing for an additional thirty seconds before burnishing. The powder adheres best to a perfectly cured, slightly warm surface.


12. Brown Plaid with Bow Details
OVERVIEW:
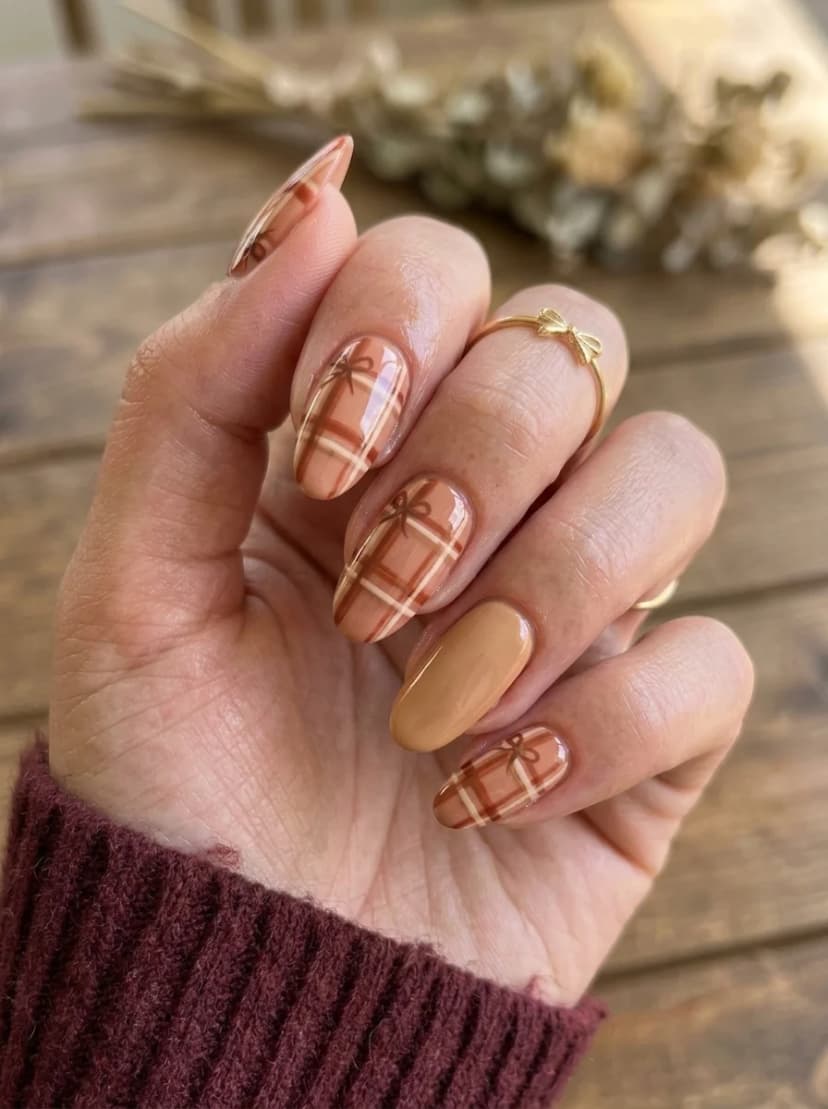
Plaid gets a feminine twist with small bow details painted at the intersections of the lines. The warm brown and cream color palette keeps everything grounded, while the bows add a playful, almost gift-wrapped quality. The solid warm brown on the ring finger provides a visual break from the pattern.
The sheer, slightly translucent base beneath the plaid gives the design depth. The lines do not sit flat on the nail; they appear to float over a warm, skin-toned background. That layering effect makes the plaid look more like woven fabric than painted polish.
The bows are the hardest part of this design. They require two small loops and two tails, all painted at a tiny scale. If you are not confident with freehand bows, a dotting tool can approximate the shape: two dots for the loops and two short strokes for the tails. It is less precise but still reads as a bow from normal viewing distance.
DESIGN BREAKDOWN:
Plaid with a decorative accent. The bows add charm without overwhelming the pattern.
- Nail Color Used: Sheer nude base, warm brown, cream, and white for the plaid, darker brown for bows.
- Suitable Nail Shape: Almond or oval. The soft shapes complement the feminine details.
- Design Element: Brown and cream plaid with small bow details on accent nails, solid brown on ring finger.
- Finish: Glossy top coat for a polished, fabric-like quality.
- Tools Used: Thin striping brush for plaid lines, fine detail brush for bows.
GET THE LOOK AT HOME:
Complete the plaid first, then add the bows as the final detail.
- Base: Apply two coats of sheer nude to all nails. Let dry.
- Plaid lines: Using a striping brush, paint thin horizontal and vertical lines in brown and cream to create the plaid pattern.
- Bows: On the accent nails, use a detail brush to paint small bow shapes at the intersections of the plaid lines. Two loops and two short tails.
- Solid accent: Paint the ring finger with two coats of warm brown.
- Seal: Apply a glossy top coat to everything.
Pro Tip: Paint the bows last, after the plaid is fully dry. If you try to add bows while the plaid lines are still wet, the colors will bleed into each other and the bow shape will blur.
13. Tortoiseshell and Copper Chrome Mix
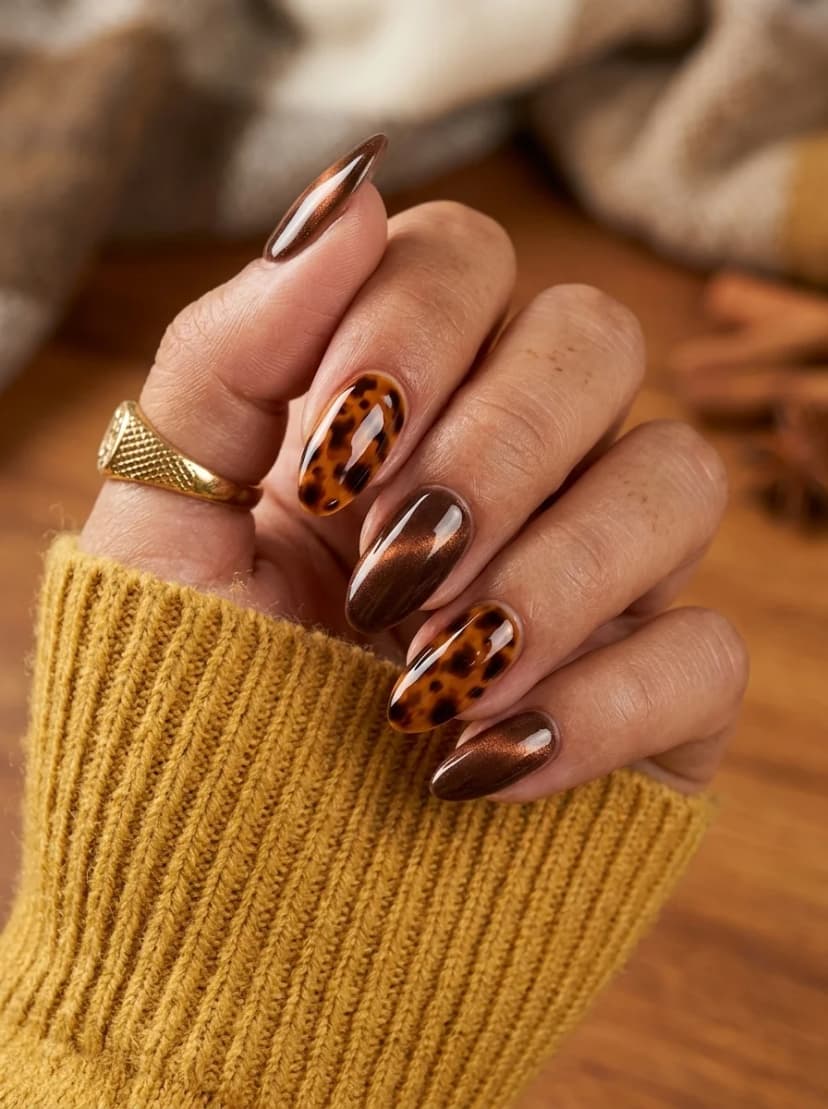
OVERVIEW:
Alternating between tortoiseshell and solid copper chrome nails creates a set with two distinct textures that share a warm color family. The tortoiseshell has depth and organic variation, while the copper chrome provides a smooth, reflective counterpoint. The two styles prevent each other from becoming monotonous.
The copper chrome is a good match for the tortoiseshell because both sit in the same warm, brown-based palette. A silver or gold chrome would create a more dramatic contrast, but the copper keeps the overall look cohesive and grounded.
Chrome powder and tortoiseshell require different techniques, which means this design takes longer than a single-technique manicure. Budget at least an hour for the full set if you are working with gel products.
DESIGN BREAKDOWN:
Two techniques, one warm palette. The alternation keeps things interesting.
- Nail Color Used: Amber, dark brown, and black for tortoiseshell; copper chrome powder for metallic nails.
- Suitable Nail Shape: Almond. The curved surface suits both the tortoiseshell depth and chrome reflectivity.
- Design Element: Alternating tortoiseshell and solid copper chrome nails.
- Finish: High-gloss on tortoiseshell, mirror chrome on copper nails.
- Tools Used: Detail brush for tortoiseshell, chrome powder, sponge applicator, no-wipe top coat.
GET THE LOOK AT HOME:
Complete the tortoiseshell nails first, then move to the chrome nails.
- Tortoiseshell nails: Apply a sheer amber base. While wet, drop small spots of dark brown and black. Use a toothpick to drag through them. Cure or dry.
- Copper chrome nails: Apply copper gel polish and cure. Apply no-wipe top coat and cure. Burnish copper chrome powder into the surface with a sponge applicator.
- Alternation: Assign tortoiseshell to the thumb, middle, and pinky. Copper chrome goes on the index and ring fingers.
- Seal: Apply a final top coat to all nails. Use no-wipe top coat on the chrome nails to preserve the mirror finish.
Pro Tip: If you do not have gel products, you can use a metallic copper polish as a substitute for the chrome nails. The mirror finish will not be as intense, but the warm copper tone will still complement the tortoiseshell.


14. Deep Green Cat-Eye Nails
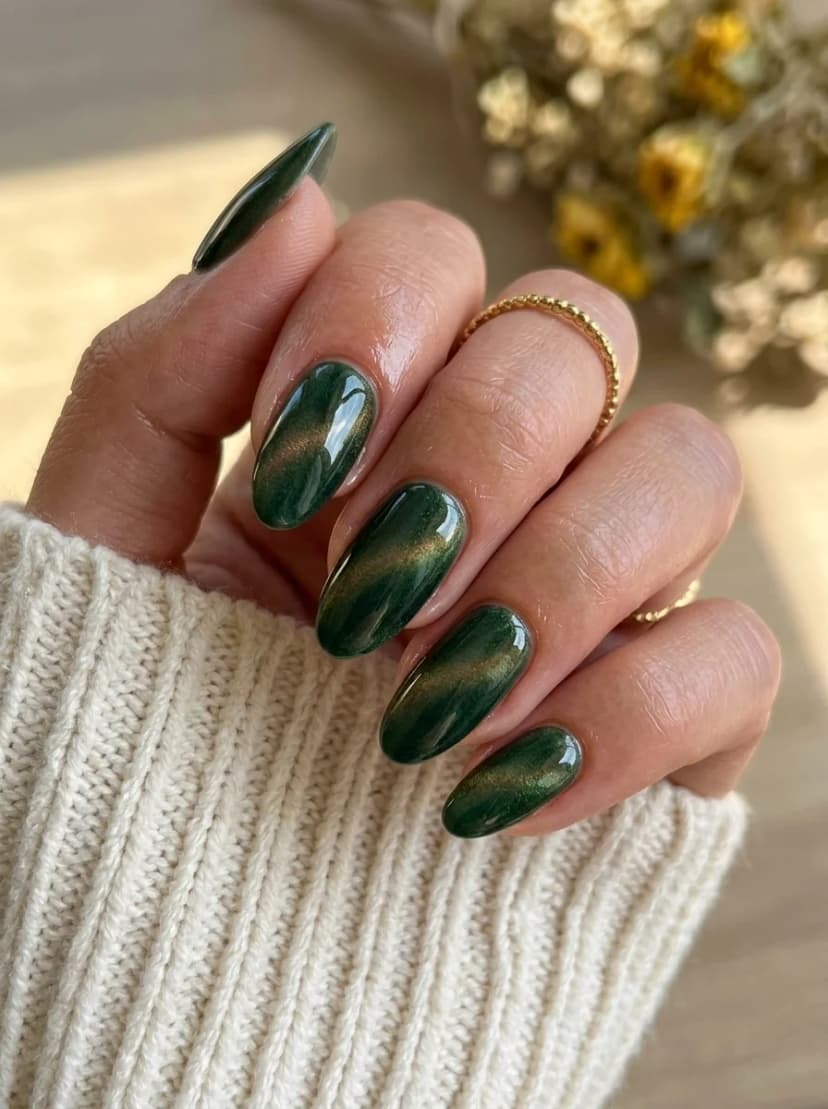
OVERVIEW:
Forest green cat-eye is a color and finish combination that feels distinctly autumnal. The magnetic particles in the polish create a band of golden-green light that shifts across the nail surface as you move your hand. Against the deep green base, the effect looks like light filtering through a canopy of leaves.
This is a single-technique design, which means it is faster to execute than multi-pattern manicures. Every nail gets the same treatment, and the cat-eye effect provides enough visual interest that no accent nails or additional art is needed.
Green cat-eye polish is less common than blue or purple versions, so you may need to order it online rather than finding it at a local beauty supply store. The extra effort is worth it. This particular shade of green with the gold-shift magnetic line is one of the most striking cat-eye combinations available.
DESIGN BREAKDOWN:
Magnetic polish does all the work. The magnet placement determines the final look.
- Nail Color Used: Deep forest green cat-eye gel polish.
- Suitable Nail Shape: Almond. The curved surface maximizes the light-shifting effect.
- Design Element: Green cat-eye magnetic effect on all nails.
- Finish: High-gloss gel top coat.
- Tools Used: Cat-eye magnet, UV or LED lamp.
GET THE LOOK AT HOME:
The process is identical to the red cat-eye design. One nail at a time, magnet over wet polish, cure immediately.
- Base: Apply a thin coat of black gel polish. Cure.
- Cat-eye coat: Apply one coat of green cat-eye gel. Do not cure.
- Magnet: Hold the magnet 5mm above the wet polish for 10 to 15 seconds. Experiment with the angle to create different light patterns.
- Cure: Immediately cure under the lamp.
- Top coat: Apply glossy gel top coat and cure one final time.
Pro Tip: Use a black base coat under the green cat-eye. It makes the green appear deeper and the magnetic line more pronounced. Skipping the black base results in a lighter, less dramatic effect.
15. Multi-Tone Brown Nails
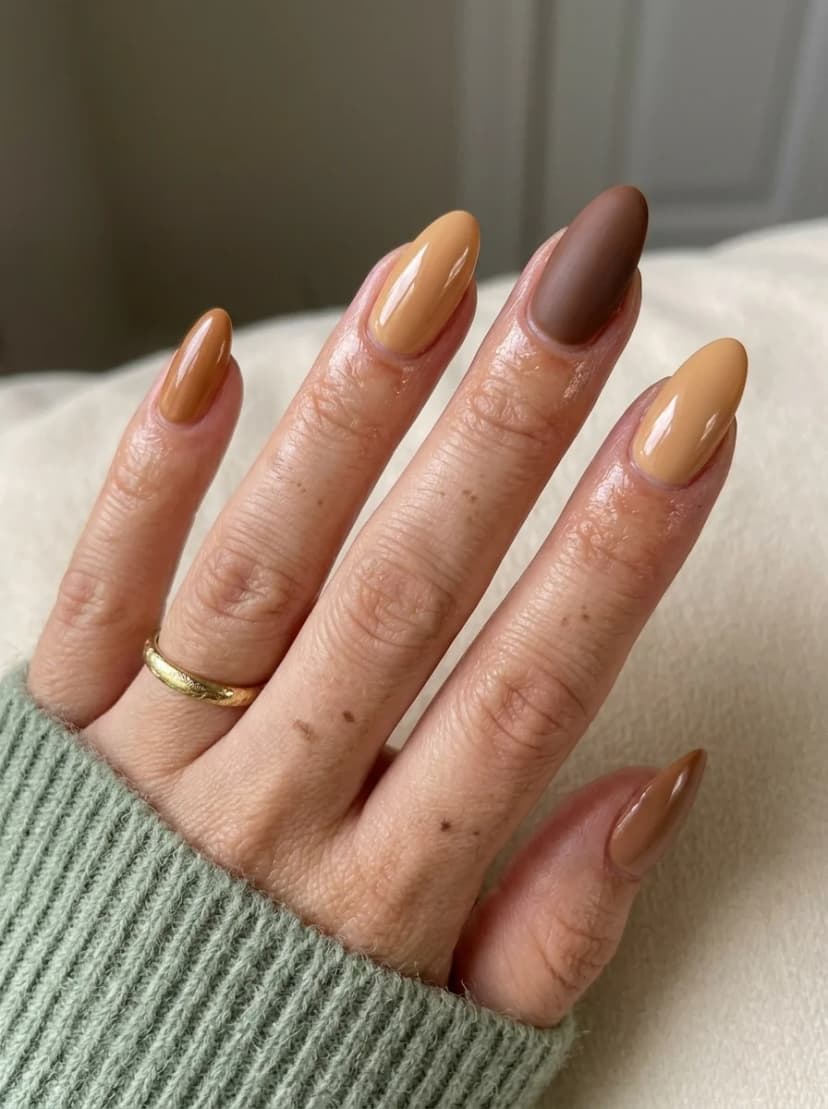
OVERVIEW:
Each nail pair is a different solid shade of brown, ranging from light caramel to deep chocolate. This is not an ombre gradient; each nail is a single, fully opaque color. The effect is like a paint swatch card for fall neutrals. Simple, clean, and surprisingly effective.
The palette works because all the shades share warm undertones. Nothing pulls cool or ashy, which keeps the set cohesive even though every nail is a different color. The middle finger, which is the darkest chocolate, acts as an anchor for the lighter shades surrounding it.
This is the easiest design on this list. No patterns, no art, no special tools beyond standard polish application. It is a good option for anyone who wants a fall manicure without the time commitment of hand-painted designs. The hardest part is choosing which three different shades to use from your collection.
DESIGN BREAKDOWN:
Three shades of brown, one on each nail. The gradient reads as intentional rather than random.
- Nail Color Used: Three different shades of warm brown, from light caramel to deep chocolate.
- Suitable Nail Shape: Almond or any shape. This design works on everything.
- Design Element: Each nail pair is painted a different solid shade of warm brown.
- Finish: Glossy top coat for a polished, unified look.
- Tools Used: None beyond standard polish application.
GET THE LOOK AT HOME:
Arrange your chosen shades from lightest to darkest before you start painting.
- Prep: Push back cuticles and shape nails.
- Lightest shade: Paint the index and ring finger with the lightest brown. Two thin coats.
- Second Dark/Light Shade: Next, paint the thumb and pinky finger, with the next light/dark (middle) shade of brown. Again two thin coats are enough.
- Darkest accent: The middle finger gets the deepest chocolate. This will be the last nail to paint.
- Seal: Apply a glossy top coat to all nails. The shine unifies the different shades.
Pro Tip: If you do not own three different brown polishes, you can create variation by adding a drop of white to one shade and a drop of black to another. That gives you three distinct tones from a single bottle.


16. Nude with Rose Floral Art
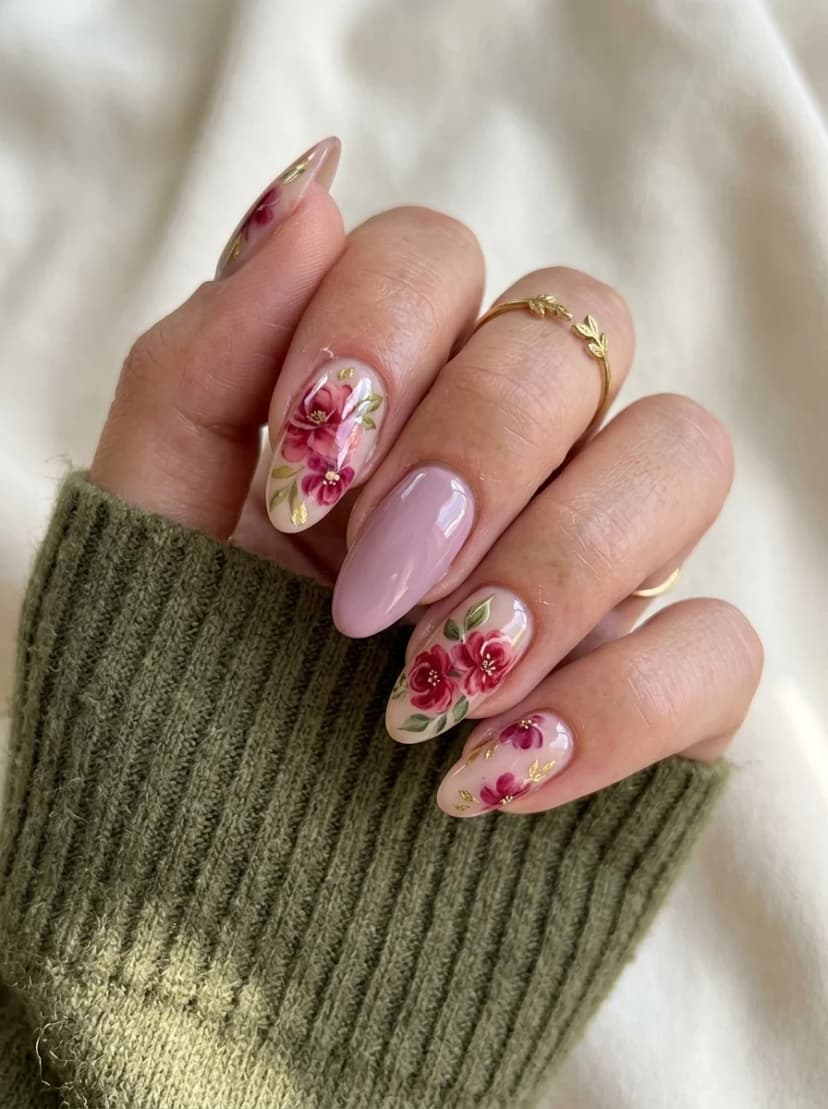
OVERVIEW:
Hand-painted roses on a sheer nude base create a design that feels romantic without being seasonal in a specific way. The deep pink and berry-toned flowers with green leaves have a vintage, almost wallpaper-like quality. The solid mauve accent nail on the ring finger adds a color-blocked element that grounds the floral pattern.
The roses are painted in a loose, painterly style. The petals are not perfectly defined, and the edges blend into each other. That looseness is what makes them look organic rather than stiff. Trying to paint precise, photorealistic roses on a nail surface usually results in something that looks overworked.
The sheer nude base is doing important work here. It lets the natural nail show through slightly, which keeps the design feeling light and airy. An opaque white base would make the roses look more like stickers. The transparency of the nude makes them feel painted.
DESIGN BREAKDOWN:
Delicate florals on a translucent base. The mauve accent ties the palette together.
- Nail Color Used: Sheer nude base, deep pink and berry tones for roses, green for leaves, solid mauve for accent nail.
- Suitable Nail Shape: Almond. The soft taper suits the romantic style.
- Design Element: Hand-painted roses on sheer nude, solid mauve accent on ring finger.
- Finish: Glossy top coat for a fresh, dewy appearance.
- Tools Used: Small detail brush, top coat for diluting polish.
GET THE LOOK AT HOME:
Dilute your pink polish slightly with a drop of top coat to create a watercolor consistency.
- Base: Apply two coats of sheer nude to all nails. Let dry.
- Roses: Using diluted pink polish, paint loose petal shapes in a circular arrangement. Two to three roses per nail, depending on space.
- Depth: Add darker berry tones to the center of each rose. Blend outward.
- Leaves: Paint small green leaves around the roses with a detail brush.
- Accent nail: Paint the ring finger with two coats of solid mauve.
- Seal: Apply a glossy top coat to all nails.
Pro Tip: If your roses look flat, add a tiny dot of white to the outer edge of a few petals. It creates a highlight that gives the flower dimension without requiring advanced shading skills.
17. Autumn Plaid Tartan Nails
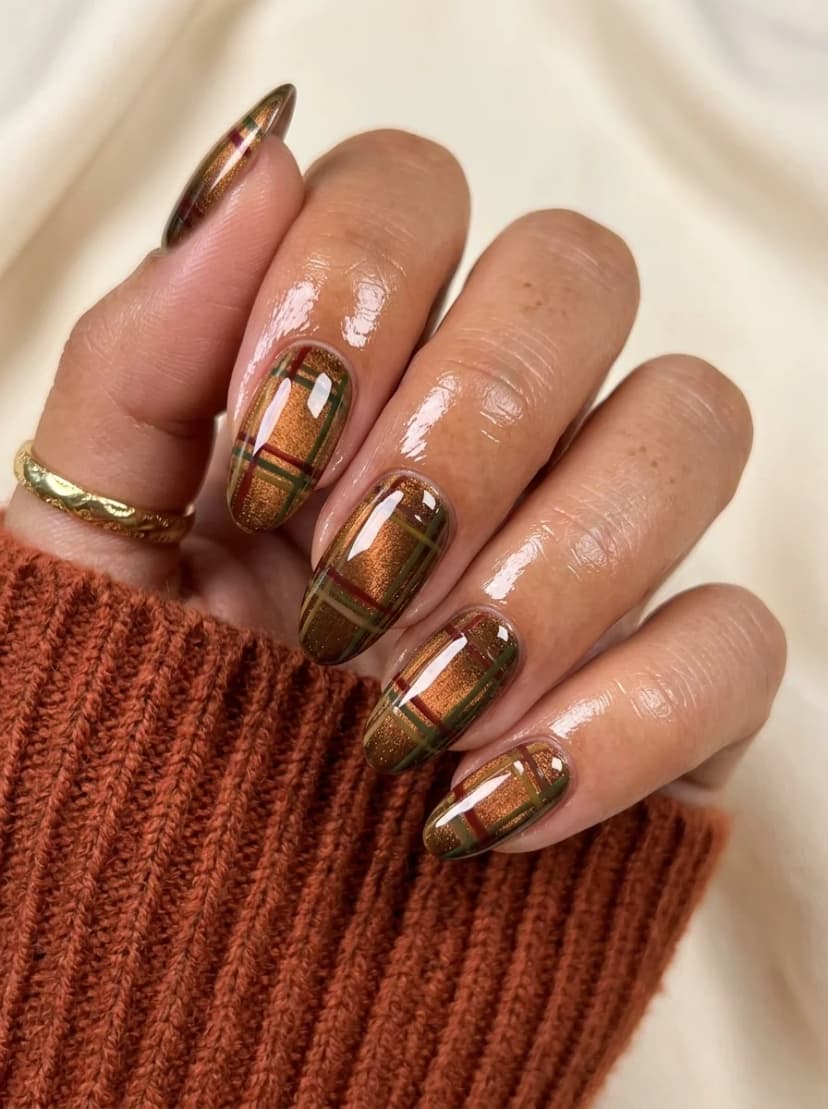
OVERVIEW:
This tartan uses a gold shimmer base with overlapping lines of olive green, brown, and deep red. The result looks like a wool blanket translated onto nails. The gold shimmer running through the base catches light between the plaid lines, which gives the design a depth that flat cream polishes would not achieve.
Unlike the brown plaid in Design 1, this version uses a wider color palette and a more complex line arrangement. The green and red lines cross the brown and gold ones, creating a traditional tartan pattern that feels distinctly autumnal. Every nail has the same pattern, which gives the set a uniform, textile-like quality.
This design takes patience. Each color of line needs to dry before you add the crossing lines, or the colors bleed. Budget at least an hour for the full set, and consider doing one hand at a time.
DESIGN BREAKDOWN:
Multi-color tartan on a shimmer base. Layering is key.
- Nail Color Used: Gold shimmer base, olive green, brown, and deep red for the plaid lines.
- Suitable Nail Shape: Almond or coffin. The elongated shape gives the tartan room to develop.
- Design Element: Full tartan plaid pattern on all nails.
- Finish: High-gloss top coat to seal the layered lines.
- Tools Used: Thin striping brush, striping tape optional.
GET THE LOOK AT HOME:
Work color by color. Let each set of lines dry completely before adding the crossing lines.
- Base: Apply two coats of gold shimmer to all nails. Let dry.
- Brown lines: Paint thin horizontal and vertical lines in brown. Let dry.
- Green lines: Add crossing lines in olive green, offset from the brown lines. Let dry.
- Red accents: Paint thin red lines in the gaps between the brown and green lines.
- Seal: Apply a thick top coat to smooth out the texture from the layered lines.
Pro Tip: Use striping tape to mask off sections if you want perfectly straight lines. Apply the tape, paint over it, then remove while the polish is still wet.


18. Bronze Ombre Tip Nails
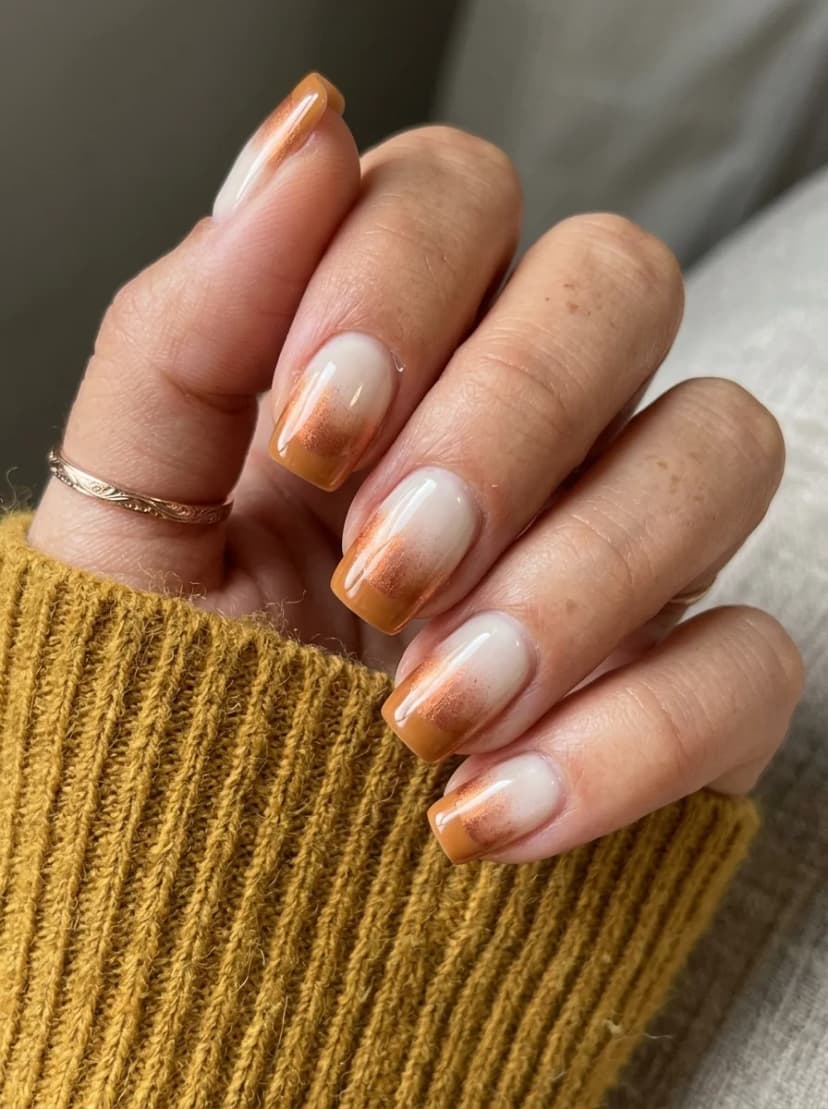
OVERVIEW:
Rather than a sharp French tip line, this design uses a soft bronze gradient that fades from opaque at the tip to translucent near the center of the nail. The milky white base keeps everything clean, and the bronze has a shimmer quality that catches light without being overtly metallic.
The short, rounded shape works well here because the ombre is subtle and compact. A longer nail would give the gradient more room to develop, but the effect on short nails is surprisingly elegant. The bronze reads as a warm, sun-kissed accent rather than a dramatic color statement.
This is a good transitional design for anyone who is not ready to commit to full fall colors. The bronze tips feel autumnal, but the milky base keeps the overall look light enough for early September.
DESIGN BREAKDOWN:
Soft gradient tip on a milky base. The shimmer adds warmth without weight.
- Nail Color Used: Milky white or sheer pink base, bronze shimmer polish for the tips.
- Suitable Nail Shape: Short almond or rounded. The compact shape suits the subtle gradient.
- Design Element: Milky base with bronze shimmer ombre at the tips.
- Finish: Glossy top coat for a smooth, dewy finish.
- Tools Used: Makeup sponge for gradient, cleanup brush.
GET THE LOOK AT HOME:
The sponge technique creates a softer gradient than brushing the color on directly.
- Base: Apply two coats of milky white. Let dry.
- Sponge: Paint a stripe of bronze shimmer on a makeup sponge. Dab it onto the tip of each nail, concentrating the color at the very tip and fading toward the center.
- Build: Repeat two to three times per nail, allowing a few seconds between passes for the color to build.
- Clean: Use a cleanup brush to remove polish from the skin.
- Seal: Apply a glossy top coat to smooth out the sponge texture.
Pro Tip: Keep the bronze concentrated at the very tip and use a lighter hand as you move toward the center of the nail. The gradient should be barely there by the time it reaches the middle.
19. Mauve Chrome Nails
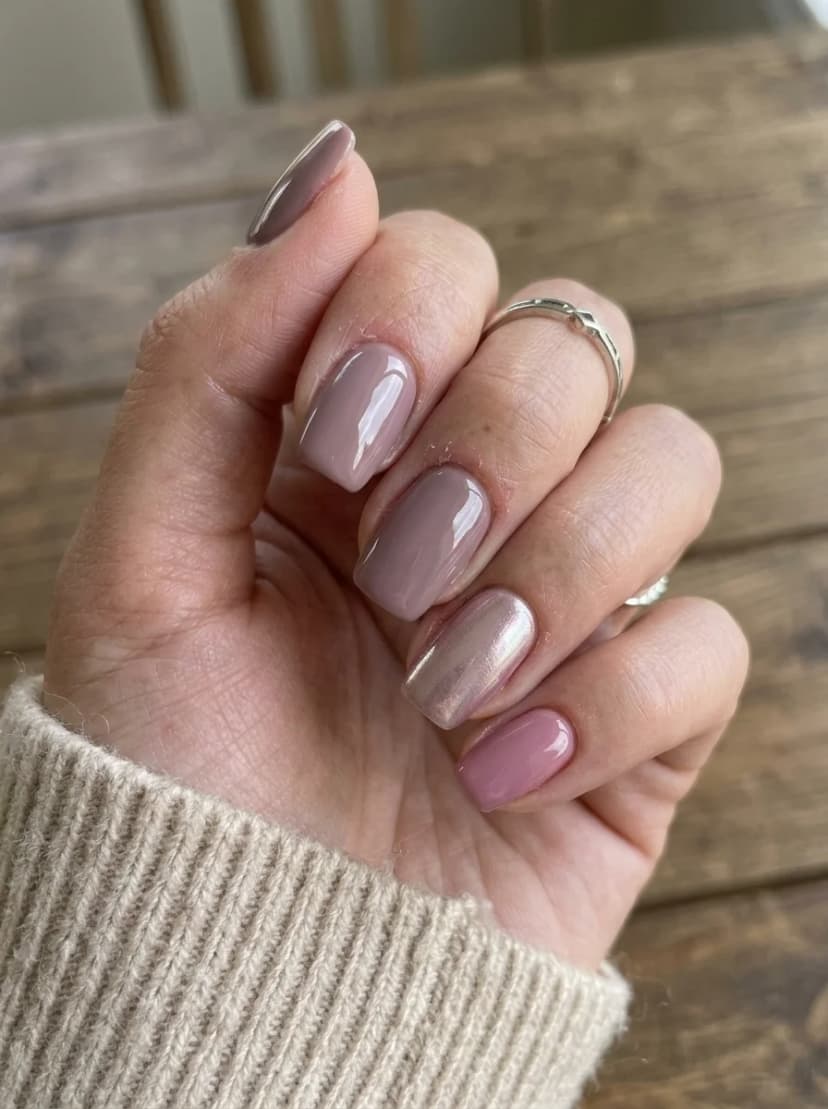
OVERVIEW:
Mauve chrome is the quiet luxury of fall nail colors. It sits between pink, purple, and taupe, and the chrome finish adds a subtle metallic sheen that catches light without being flashy. One accent nail uses a slightly lighter mauve metallic, which creates a tonal variation that keeps the set from reading as a single flat color.
The squoval shape is a practical match for this color. The muted mauve reads as professional and polished, and the shorter length keeps the chrome from looking costume-like. This is a design that works in an office setting as easily as it works at a weekend brunch.
Mauve is one of those colors that flatters a wide range of skin tones because it contains both warm and cool undertones. If you have struggled to find a neutral that does not wash you out, mauve chrome is worth trying.
DESIGN BREAKDOWN:
Muted metallic with tonal variation. Understated but refined.
- Nail Color Used: Mauve chrome or metallic polish, lighter mauve metallic for accent nail.
- Suitable Nail Shape: Short squoval or coffin. The practical shape matches the understated color.
- Design Element: Mauve chrome on four nails, lighter mauve metallic on ring finger.
- Finish: Chrome or metallic finish with a glossy top coat.
- Tools Used: None beyond standard polish application.
GET THE LOOK AT HOME:
Chrome polish shows brush strokes. Apply in thin, confident strokes and do not go back over areas.
- Prep: Push back cuticles and buff the nail surface smooth.
- Two thin coats: Apply two thin coats of mauve chrome to four nails. Let each dry for three minutes.
- Accent nail: Paint the ring finger with two coats of the lighter mauve metallic.
- Seal: Apply a glossy top coat to all nails. Cap the free edge.
Pro Tip: If you see brush strokes after the first coat, do not try to fix them. Let it dry and apply the second coat in smooth, single strokes. The self-leveling properties will minimize visible strokes.


20. Amber Cat-Eye with Polka Dots
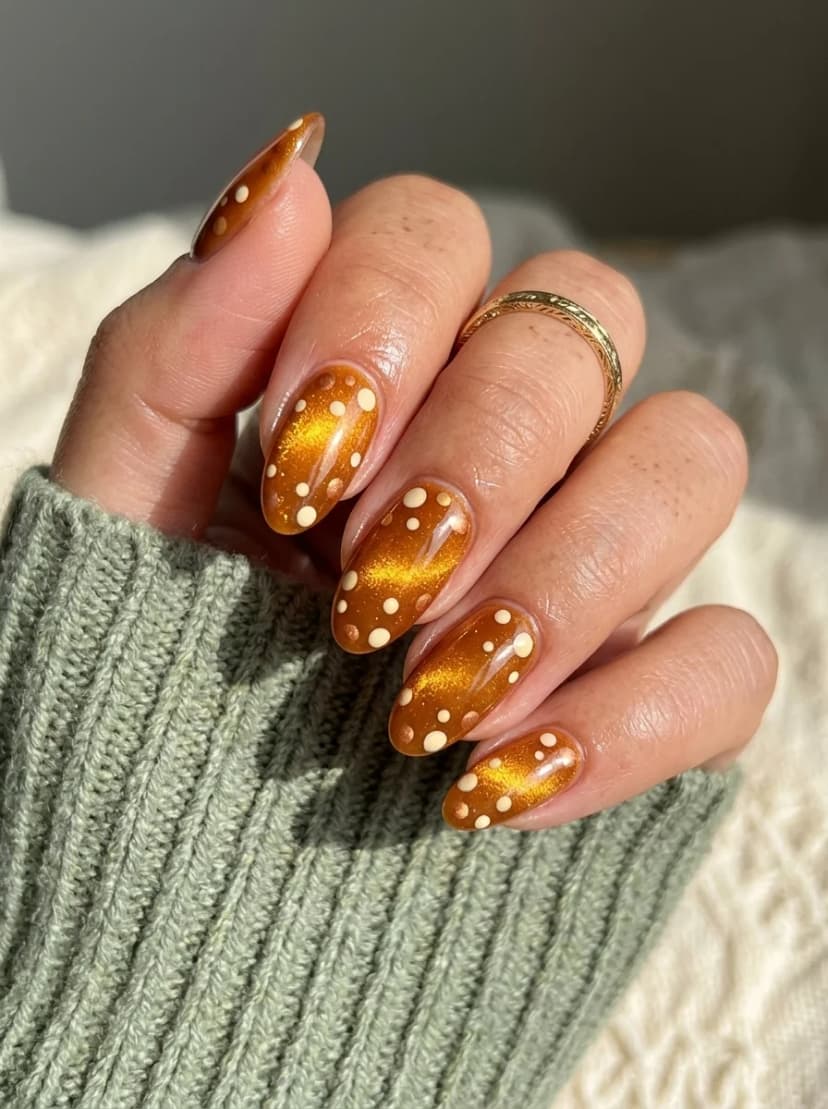
OVERVIEW:
Combining a magnetic cat-eye base with hand-painted polka dots creates a design with two layers of visual interest. The amber-gold cat-eye produces a shifting band of light, while the cream-colored dots scattered across each nail add a playful, almost retro quality. The two elements should not work together, but the warm color palette ties them into something cohesive.
The dots are deliberately irregular in size and placement. Some are larger, some smaller, and they are scattered randomly rather than in a grid. That randomness is important. Uniform polka dots would clash with the organic, flowing quality of the cat-eye effect.
This design requires gel products for the cat-eye base, followed by regular polish or gel paint for the dots. The two-step process takes longer than a single-technique design, but the result justifies the time investment.
DESIGN BREAKDOWN:
Magnetic base with decorative overlay. The dots add character without competing with the cat-eye.
- Nail Color Used: Amber-gold cat-eye gel polish, cream or off-white for the dots.
- Suitable Nail Shape: Almond. The curved surface showcases both the cat-eye effect and the dot pattern.
- Design Element: Amber cat-eye base with scattered cream polka dots.
- Finish: High-gloss gel top coat.
- Tools Used: Cat-eye magnet, dotting tool, UV or LED lamp.
GET THE LOOK AT HOME:
Complete the cat-eye base first, then add the dots as the final step.
- Base: Apply a thin coat of black gel polish. Cure.
- Cat-eye coat: Apply one coat of amber cat-eye gel. Hold the magnet above the wet polish for 10 to 15 seconds. Cure immediately.
- Top coat: Apply a glossy gel top coat and cure.
- Dots: Once the top coat is cured and cooled, use a dotting tool dipped in cream polish to place random dots across each nail. Vary the sizes.
- Seal: Apply one final layer of top coat to seal the dots.
Pro Tip: Dip your dotting tool in polish and press it onto a paper towel once before touching the nail. This removes excess polish and prevents the dots from spreading into blobs.
21. Nude with Daisy Art
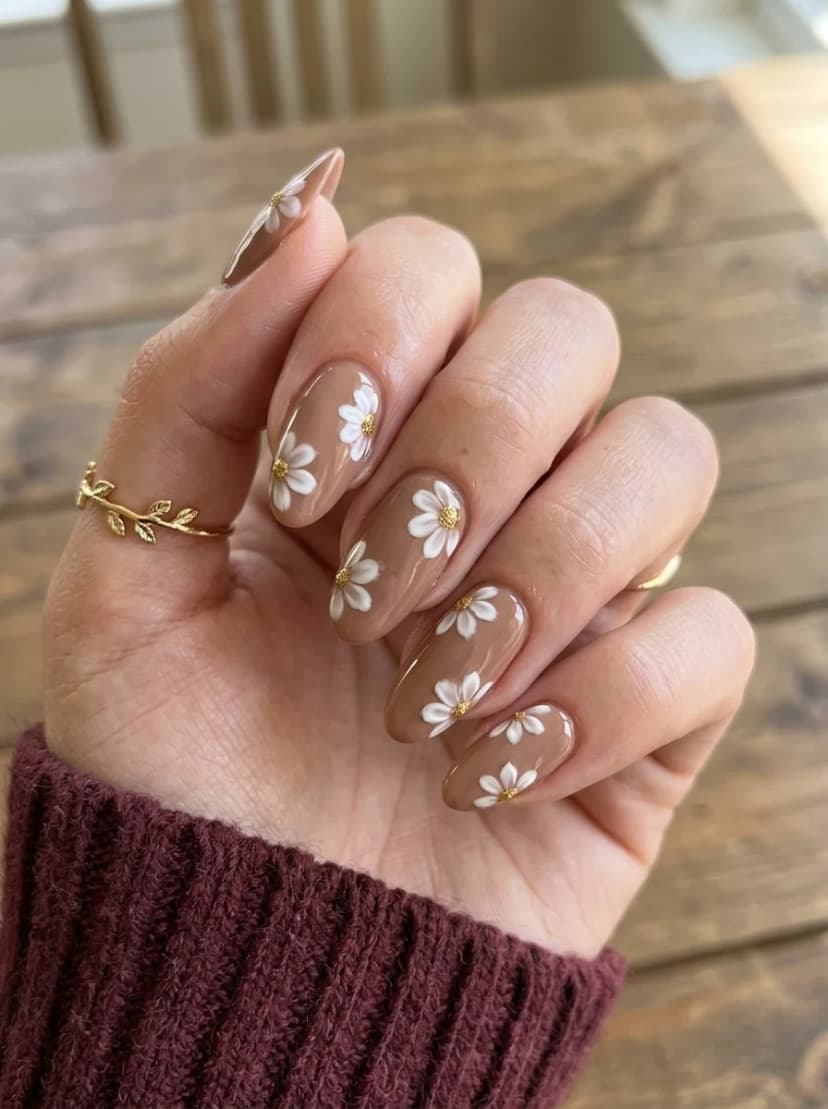
OVERVIEW:
White daisies on a warm nude base feel like the last wildflowers of the season. The petals are painted in a loose, slightly dimensional style, and the gold centers add a small metallic accent that catches light. The nude background keeps everything grounded and lets the flowers be the focal point.
The composition on each nail is different. Some nails have two or three small daisies, others have one larger bloom. That variation keeps the set from looking like a repeating stamp pattern. Each nail feels like its own small painting.
Daisies are one of the more forgiving flowers to paint. The petals are simple oval shapes radiating from a center point, and the slight imperfections that come with freehand painting actually make them look more natural. This is a good design for anyone who wants to try floral nail art without needing advanced skills.
DESIGN BREAKDOWN:
Simple flowers on a warm neutral. The gold centers add a subtle metallic touch.
- Nail Color Used: Warm nude or tan base, white for petals, gold for centers.
- Suitable Nail Shape: Almond. The natural curve suits the organic floral theme.
- Design Element: Hand-painted white daisies with gold centers scattered across all nails.
- Finish: Glossy top coat for a fresh, dewy look.
- Tools Used: Dotting tool for centers, detail brush for petals.
GET THE LOOK AT HOME:
Paint the centers first, then add petals around them. This keeps the flowers centered and proportional.
- Base: Apply two coats of warm nude. Let dry.
- Centers: Use a dotting tool to place gold dots where you want each flower center.
- Petals: Using a detail brush and white polish, paint five to six oval petals radiating from each gold center.
- Variation: Vary the number and size of daisies on each nail for a natural, scattered look.
- Seal: Apply a glossy top coat to finish.
Pro Tip: Keep the petals small. Tiny, delicate blossoms look more refined than large ones on a nail surface. If a petal looks too thick, flatten it with a single stroke of the brush.


22. Nude with Gold Bow Art
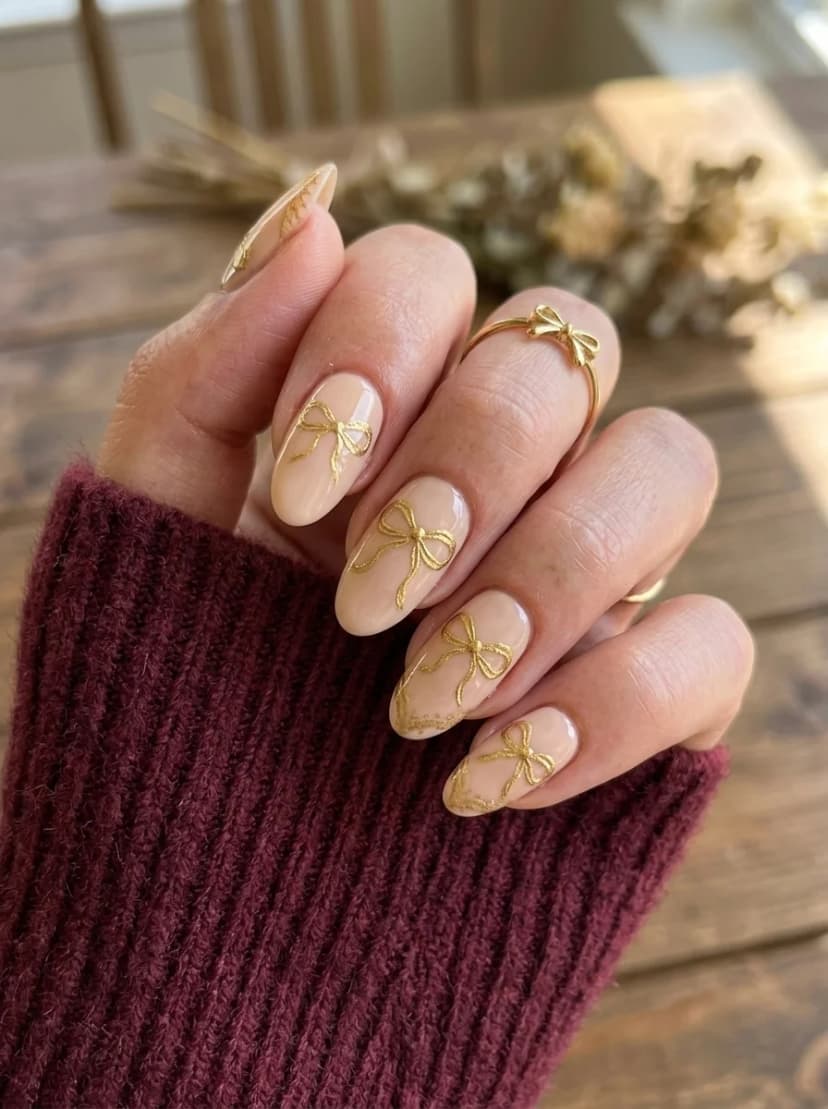
OVERVIEW:
Hand-painted gold bows on a nude base create a design that feels feminine and polished without being overwrought. The bows are painted with a slightly textured gold polish that catches light differently than flat metallic, giving them a dimensional quality that looks almost like wire or thread.
Each nail has one bow, centered on the nail surface. The placement is consistent, which gives the set a uniform, intentional quality. The nude base is warm and slightly opaque, enough to cover any natural nail discoloration while still looking like a natural nail color.
The bows are the hardest part. Each one requires two loops and two tails, all painted at a very small scale. If freehand bows feel intimidating, start with the two loops as simple dots side by side, then drag them downward to meet at a point. The tails are just two short strokes extending from the bottom.
DESIGN BREAKDOWN:
Minimal base with decorative metallic art. The bows are small but detailed.
- Nail Color Used: Warm nude base, gold metallic polish for bows.
- Suitable Nail Shape: Short almond or oval. The compact shape keeps the bows proportional.
- Design Element: Hand-painted gold bow on each nail over nude base.
- Finish: Glossy top coat to seal the art and add shine.
- Tools Used: Fine detail brush for bows.
GET THE LOOK AT HOME:
Paint one bow at a time. The gold polish needs to be wet for you to shape the loops properly.
- Base: Apply two coats of warm nude. Let dry.
- Bow loops: Using a detail brush and gold polish, paint two small loops side by side in the center of the nail.
- Bow tails: While the loops are still wet, drag two short strokes downward from the center to create the tails.
- Refine: Use the tip of the brush to clean up the shape and sharpen the tail ends.
- Seal: Apply a glossy top coat once the bows are fully dry.
Pro Tip: Practice the bow shape on a piece of paper first. Once you can consistently make two even loops and two matching tails, move to the nails. The paper practice saves polish and frustration.
23. Burnt Orange Leaf Nails
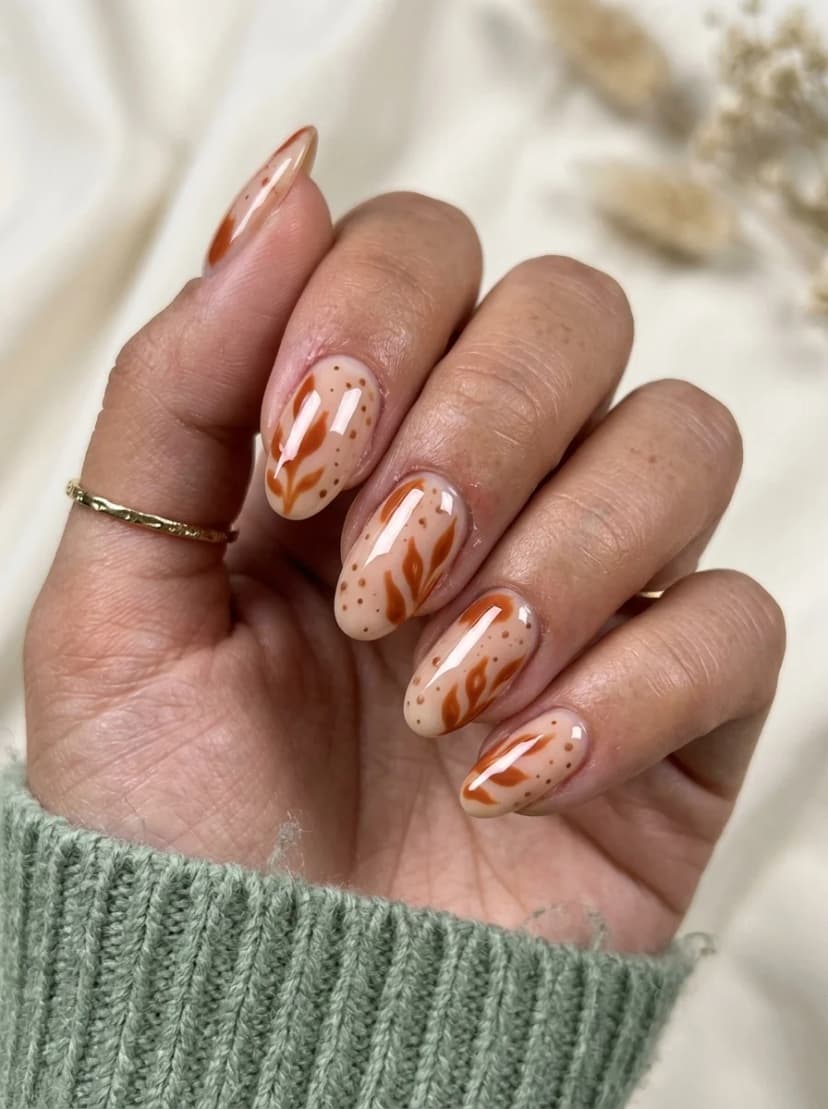
OVERVIEW:
Burnt orange leaf art on a sheer nude base captures the essence of fall without being literal about it. The leaf shapes are stylized and loose, more like abstract petal forms than botanical illustrations. Small brown dots scattered around the leaves add texture and fill the negative space without cluttering the design.
The burnt orange is warm and saturated, the color of dried leaves or pumpkin spice. Against the sheer nude background, it pops without being loud. The design has a quiet confidence to it. It does not need to shout to get noticed.
The almond shape gives the leaf forms room to curve and flow. On shorter nails, you would need to simplify the leaf shapes and reduce the number of elements per nail. The medium-length almond here is the sweet spot.
DESIGN BREAKDOWN:
Earthy botanical art on a clean canvas. The dots add depth without distraction.
- Nail Color Used: Sheer nude base, burnt orange for leaves, brown for dots.
- Suitable Nail Shape: Almond. The tapered shape suits the flowing leaf forms.
- Design Element: Hand-painted burnt orange leaves with brown dot accents on sheer nude.
- Finish: Glossy top coat for a polished look.
- Tools Used: Detail brush for leaves, dotting tool for dots.
GET THE LOOK AT HOME:
Paint the leaves first, then fill in with dots. The dots are the easiest part and go on last.
- Base: Apply two coats of sheer nude. Let dry.
- Leaves: Using a detail brush and burnt orange polish, paint loose, curved leaf shapes on each nail. Two to four per nail.
- Dots: Use a dotting tool dipped in brown to place small dots in the spaces between the leaves.
- Seal: Apply a glossy top coat to finish.
Pro Tip: Keep the leaves loose and flowing. If you try to paint precise, detailed leaf shapes, they will look stiff. The beauty of this design is in the gestural, organic brush strokes.


24. Sage Green with Gold Botanical Art
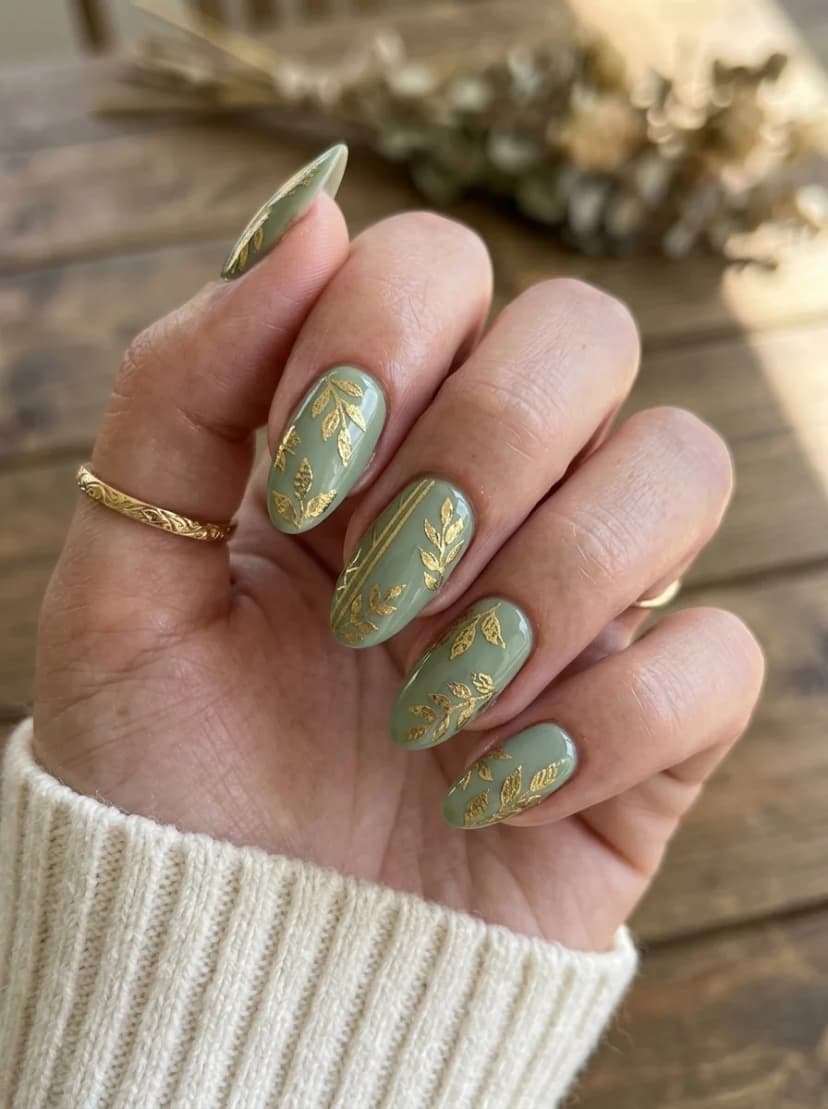
OVERVIEW:
Sage green is a muted, earthy tone that feels like a natural fit for fall. This design uses it as the base for gold botanical line art, which includes leaves, stems, and small floral motifs painted in metallic gold across all nails. The gold against the sage creates a warm-on-cool contrast that catches light and adds visual depth.
Unlike designs where the art is confined to accent nails, this one covers every nail with gold botanical work. The result feels immersive, like looking through a garden gate. The consistency of the gold line weight across all nails keeps the design cohesive rather than chaotic.
The botanical line art requires a very thin brush and patience. Each leaf and stem is painted individually, which means the full set takes longer than designs with fewer detail elements. If you are working with limited time, consider doing the art on just two or three accent nails and keeping the rest solid sage.
DESIGN BREAKDOWN:
Muted base with metallic botanical overlay. The gold line work is the star.
- Nail Color Used: Sage green base, gold metallic polish for botanical art.
- Suitable Nail Shape: Almond. The tapered shape suits the organic botanical theme.
- Design Element: Gold metallic leaf and stem line art covering all nails over sage green base.
- Finish: High-gloss top coat to enhance the gold shimmer and seal the art.
- Tools Used: Very fine detail brush for gold line work.
GET THE LOOK AT HOME:
Paint the solid sage base first, then work through the botanical details one nail at a time.
- Base: Apply two coats of sage green to all nails. Let dry.
- Stems: Using a fine detail brush and gold polish, paint thin, flowing stem lines across each nail.
- Leaves: Add small oval leaf shapes along the stems. Vary the sizes and angles.
- Details: Add small floral motifs or buds at the ends of some stems.
- Seal: Apply a glossy top coat to all nails. Be gentle over the gold art.
Pro Tip: Load your brush with enough gold polish to create smooth, continuous lines. A dry brush produces scratchy, broken lines. A fully loaded brush produces flowing, elegant curves.
25. Classic Tortoiseshell Nails
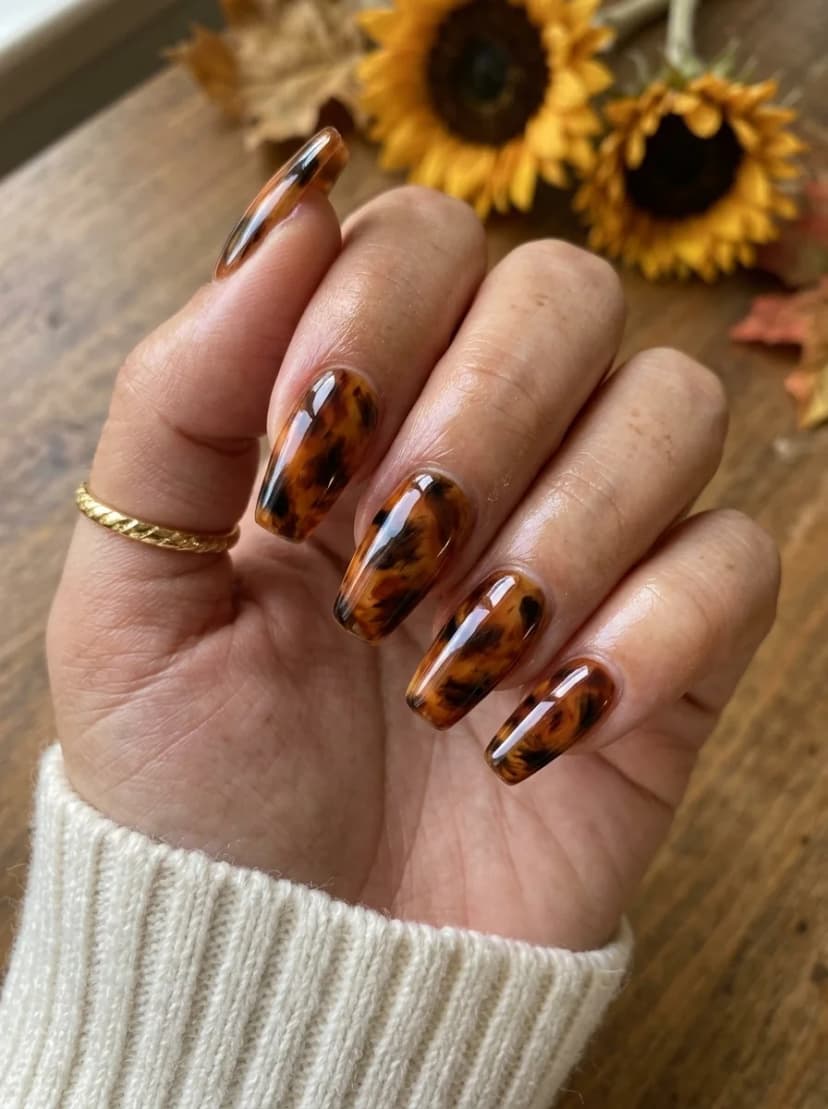
OVERVIEW:
Full tortoiseshell on every nail is one of the most sophisticated fall manicures you can wear. The pattern uses layers of translucent amber, dark brown, and black to create a depth that looks like polished resin or vintage eyeglass frames. The high-gloss finish is essential. Without it, the pattern looks flat and painted. With it, the layers appear to float over each other.
Every nail will look different, and that is the point. Tortoiseshell is an organic pattern. Some nails will have more amber, others more dark brown. The variation across the set is what makes it look authentic rather than stamped. If you try to make every nail match, you will overwork the pattern and lose the depth.
This design works best on medium to long nails. The pattern needs surface area to develop its layers. On short nails, the amber and brown spots get compressed and the design loses the geological, stone-like quality that makes tortoiseshell look expensive.
DESIGN BREAKDOWN:
Layered wet-on-wet technique. Depth comes from building translucent layers.
- Nail Color Used: Translucent amber, dark brown, and black. A sheer orange or cognac as the base layer.
- Suitable Nail Shape: Almond or coffin. The elongated shape gives the pattern room to breathe.
- Design Element: Full tortoiseshell pattern on all nails.
- Finish: High-gloss top coat to create depth and the polished resin effect.
- Tools Used: Detail brush, toothpick for dragging, foil palette.
GET THE LOOK AT HOME:
Work one nail at a time. The wet-on-wet technique requires speed and confidence.
- Base layer: Apply a sheer amber or cognac coat. Do not let it dry.
- Dark spots: While the base is wet, drop small spots of dark brown and black onto the nail.
- Drag: Use a toothpick to drag through the spots in flowing lines. Two or three drags per nail maximum.
- Layer: Once the first layer is dry, apply another sheer amber coat over the top. This creates depth by making the first layer appear submerged.
- Seal: Apply a thick, glossy top coat to encapsulate the layers and create the polished stone effect.
Pro Tip: The layering step is what separates mediocre tortoiseshell from convincing tortoiseshell. That second sheer amber coat over the dried pattern creates the illusion of depth. Skip it and the design looks flat.


Tips to Make Your Fall Manicure Last Longer
Cooler weather and drier air can affect how long your polish lasts. Here are practical steps to extend the life of your fall manicure:
- Always use a base coat. It creates a bonding layer between your natural nail and the polish, which prevents premature chipping.
- Cap the free edge. Run your brush along the tip of each nail after applying color and top coat. This seals the edge and prevents tip wear.
- Reapply top coat every two to three days. A fresh layer refreshes the shine and adds an extra protective barrier against chipping.
- Wear gloves when cleaning. Household cleaners and dish soap are harsh on polish. Rubber gloves protect your manicure.
- Moisturize your cuticles daily. Fall air is drier than summer air. Hydrated cuticles prevent the skin around your nails from cracking and pulling at the polish edge.
- Avoid using your nails as tools. Opening packages, peeling stickers, and scratching surfaces are the fastest ways to chip your polish. Use the pad of your finger or grab a proper tool instead.
Conclusion
Fall is a season that rewards warmth and texture in your nail choices. The 25 designs here range from simple solid-color applications like the multi-tone browns and burgundy chrome to detailed hand-painted work like the tortoiseshell and botanical gold art. There is something for every skill level and time commitment.
The brown and green tones that dominate this list are not accidental. They are the colors of the season, and wearing them on your nails is one of the easiest ways to align your personal style with the world around you. Whether you choose a straightforward solid or a layered marble, the warmth of these shades will feel right from September through November.
Whatever you choose, take your time with the application. A well-applied simple design will always look better than a rushed complex one. Prep your nails, apply thin coats, and seal everything with a good top coat. The result will be worth the effort.
Loving This Guide? Get More Like This! 💌
Want to impress with clothes? Want to look good? Subscribe to Whatsmyshape Newsletter and get weekly fashion guides, exclusive outfit ideas, and beauty tips delivered directly to your inbox. No spam, just pure style inspiration! ✨